XUJI leather steering wheel cover install. Goodbye plastic steering wheel. OEM?

Kelbad

New member
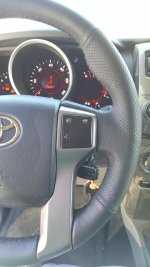
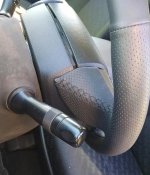
I bought a used 2010 and was surprised it did not have a leather steering wheel. The plastic wheel is too slippery for my taste but I cannot justify buying a new steering wheel for $500. For less than $60 and three hours of time this works better for my budget. I had used a wheelskin cover on my previous Tacoma and was going to get one for the 4runner but then I found this one by XUji. This cover looks like the OEM wheel- the leather is solid on the top and bottom and perforated on the sides.

I posted some of this in a previous thread on wheel covers HERE and was asked to provide a bit more detail.

I grabbed the Xuji from amazon HERE. It was $59.99 and had free Prime shipping. It does not say it fits the 5th gen but you can see from the photos the wheels appear almost identical. It can be had cheaper if you get it from Aliexpress HERE, but there shipping is slower and I was in a hurry. If I see it show up on aliexpress again for $30ish again I will pick up a spare. Some places on aliexpress let you pick thread color (black, red, blue or white) and with holes or without holes. The one from amazon comes with holes and black thread just like OEM.

If the links are broken on aliexpress, Search for “Black Genuine Leather Steering Wheel Cover for Toyota Land Cruiser Prado 2010 2012 2014 Tundra Tacoma”.

The install is easy in theory, but it is still time consuming if you are anal and thus it took me over 3 hours to do.
I found a lot of info Tundratalk.net forums HERE.

I did not take off my steering wheel nor remove my airbag and trim to do the install but if I did it again I probably would. Instead, I used the flat tool they provide in the kit to press the leather into the gaps. Tucking in the leather to the gaps takes time and being flexible helps! 

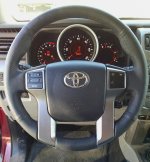
I love this cover. It feels GREAT and the leather quality is awesome. Here are a few photos of mine after the install. Excuse the red dirt covering everything but I was in Moab a couple of weeks ago.
 

Attachments

  • IMG_20150429_110024.jpg
    IMG_20150429_110024.jpg
    134 KB · Views: 13,034
  • IMG_20150429_104544172.jpg
    IMG_20150429_104544172.jpg
    137.2 KB · Views: 8,221
  • IMG_20150429_110235.jpg
    IMG_20150429_110235.jpg
    135.7 KB · Views: 8,378
Register to hide this ad
This cover gets tight just like the OEM wheel.

Watch these two videos for help on the install.
Video 1. HERE
This one shows you how to apply the tape and shows you how he positions and re-positions the cover on the wheel. It shows you how to push/tuck the ends behind the trim using the tool (he uses a dull screwdriver!)


Video 2. HERE This video shows the Cross-Stitch pattern.
Important. Notice how he starts. You push the needle through the leather starting from the inside. This lets you really pull the ends together hard if necessary. The cross stitch pattern is very easy. ! Notice how he comes in from the outside and crosses over the thread every time.

If you want to remove your wheel, airbag and trim, here are the steps shown for a tundra. HERE Doing this will make it easier to start and finish sewing each section. I did not do this, fyi.


Helpful Hints:
- The leather stretches easier when it is warm.
- I placed the cover on my steering wheel and let it sit all day while I was at work and the 4runner was parked in the sun. I think this helped stretch it out a bit and helped me get very tight tolerances during the install.
- Leave the tape about a ¼” from the end that will be tucked in next to the verts. If you take it to the end like I did, you will find it sticks beautifully to the verts and makes it a pain in the butt to tuck in!!. Don’t do it!
- Watch the videos. Watch the cross stitch one twice! Notice how he comes in from the outside and crosses over the thread every time.
- Cut and attach the tape in strips as shown in Video 1. You don’t want it bunching up during the install because you will feel it after you are done.
- After you place the tape on the inside of the cover, use something hard (like the round end of the tool) to rub the tape into the leather. Why? The tape is very strong and will really stick to the leather. When you are repositioning the cover to stretch it for the difficult areas, the cover will want to stick to the wheel and not the leather.

My Order:
1. I sewed the 6” bottom section first. Then I used the tool to tuck in the ends behind the verts.
2. I sewed the two sections below the horizontal spokes next. I used the tool to tuck in the ends behind the verts.
3. I sewed the upper half last. It will be the easiest to sew, but will take a long time due to the length.


Place the cover on the wheel and get it lined up.
This process will take some time, don’t rush!!! Take your time and get it perfect.

The little “wings” will face you.

I started at the bottom. It was easy to center this 6” section between the vertical trim pieces. When I was happy, I used my knee/leg to hold it in place from below and then my hands were free to push the rest of the cover on.

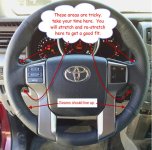
Center the seam on the centerline of the wheel.
1. Use the thumb holders to verify position. Those little bumps are a great point of reference.
2. The seams where the leather is sewn should line up and touch at the centerline of the wheel.
 

Attachments

  • Wheel 1 hints.jpg
    Wheel 1 hints.jpg
    76 KB · Views: 17,481
[MENTION=114267]Kelbad[/MENTION],

You did an amazing job on that cover! Before your post, I had no idea covers better then wheelskins existed.

Thanks for taking the time to post all of those details and links!
 
Thanks y'all. I must admit I was pleasantly surprised by how well it looked when I was finished.

I can't stress enough to watch the two videos to learn the stitch. And take take your time so you don't have to redo anything.
 
Every one of these I've seen looks like ass...

Except for this one.

NO SHlT ?!?


%26lt%3B%26lt%3B%26lt%3B%26lt%3B-albums-trail-picture45562-xuji-steering-wheel-leather.jpg


I think you owe apology to FlyingHawaian and several other people here who did fine job on their wheels. Or at least post your "honest" opinion in their treads. Otherwise the only "ass" here is you. Don't take it personal, though. God bless
 
Last edited:
NO SHlT ?!?


%26lt%3B%26lt%3B%26lt%3B%26lt%3B-albums-trail-picture45562-xuji-steering-wheel-leather.jpg


I think you owe apology to FlyingHawaian and several other people here who did fine job on their wheels. Or at least post your "honest" opinion in their treads. Otherwise the only "ass" here is you. Don't take it personal, though. God bless

Calling someone out on a post from over 2 1/2 years ago? :confused:
 
NO SHlT ?!?


%26lt%3B%26lt%3B%26lt%3B%26lt%3B-albums-trail-picture45562-xuji-steering-wheel-leather.jpg


I think you owe apology to FlyingHawaian and several other people here who did fine job on their wheels. Or at least post your "honest" opinion in their treads. Otherwise the only "ass" here is you. Don't take it personal, though. God bless

I haven't seen their work. I was referring to the aftermarket leather/pleather jobs they do at the local dealers with their dealer installed "upgrade" packages.
 
That looks great! I have a 16 LE so mine is already leather but I might do that just to fatten it up a bit. My 4Runner wheel feels scrawny after driving the BMW.
 
That looks great! I have a 16 LE so mine is already leather but I might do that just to fatten it up a bit. My 4Runner wheel feels scrawny after driving the BMW.

Really? I think my Runner has a pretty fat wheel, my wife's BMW has an M-sport wheel and she said my wheel felt thicker.
 

Members online

Forum statistics

Threads
278,317
Messages
3,554,129
Members
248,016
Latest member
Advally Service

Trending content

Back
Top