
You are using an out of date browser. It may not display this or other websites correctly.
You should upgrade or use an alternative browser.
You should upgrade or use an alternative browser.
What Did You Do To Your 3rd Gen Today?
- Thread starter pin8246
- Start date
- Status
- Not open for further replies.

cl4Rk
Member
Replaced the skid plate hardware with stainless steel.
- M8-1.25 x 25 flange bolts (qty 9)
- Some anti-seize on the threads, especially the front-most bolts
- Torque spec: not too tight
You could probably go a little shorter on the bolts, but I wouldn’t go much longer. 25mm looks like it’s a perfect fit.
My front center bolt broke off long ago before I got the truck. Still need to extract it. For now I just have 8 bolts holding everything on. Feels solid, no rattling, seems fine.
EDIT: I added fender washers on the two rearmost bolts; the bolt holes there on my skid were a little on the large side.


- M8-1.25 x 25 flange bolts (qty 9)
- Some anti-seize on the threads, especially the front-most bolts
- Torque spec: not too tight
You could probably go a little shorter on the bolts, but I wouldn’t go much longer. 25mm looks like it’s a perfect fit.
My front center bolt broke off long ago before I got the truck. Still need to extract it. For now I just have 8 bolts holding everything on. Feels solid, no rattling, seems fine.
EDIT: I added fender washers on the two rearmost bolts; the bolt holes there on my skid were a little on the large side.
Last edited:

fatherdoug
New member
Super minor update. Feel as if this has become a diary of sorts. But it is useful in that regard. Today the SPW's were all returned to correct coils and positions. No CEL, idle remains at 1250. Talked Napa into giving me a new battery to replace the one purchased 3/19 with a 3 year warranty (win, I think). Bought new relays for light bar and additional backup lights as one was corroded to shit. Truck runs great, that high idle sucks for the engine braking, glad I got not plans for any wheeling in the near future. I tried to find a vacuum leak with propane all over engine bay, no luck. Perhaps I have a "special" ECM that learns very slowly. It now has 100+ miles over 3 days of the approximate same commute with no change. I also noted the heater does not seem able to roast a turkey any longer. Wondering whether maybe it is a temp sensor, or something time related? Coolant is lowering, but no obvious leaks on ground, no steam cleaned spark plugs, no steam in exhaust or sweet smell.
The plot revvins?
In regards to the coolant leak, do you still have an oil cooler on the side of the engine behind the oil filter? There is a coolant line that runs from the water pump to the inlet of the oil cooler, then back out to the heater core?, I think. I was losing coolant out of the inlet hose, but it was evaporating from all the hot parts of the engine before it hit the ground. New hoses and clamps solved the problem. It's a treat to get to unless you're replacing other items like the water pump.
CrudRunner
New member
Interesting question. I'll be under it tomorrow. If all goes well I have new steering rack bushings, sway bar end links and all associated bushings to install. Likely get coolant dye to UV light and look for leaks all over. Still no change on the idle front. Is it possible there is too much air in the throttle body, or in general that is not allowing engine temp sensor to get accurate read? I definitely hear sloshing when turning on the heater. I've very firmly tried to manually close throttle, as well as pushed in and out on the blade to see if shifts laterally. No shifting. When I did the initial cleaning it was surprising clean, so I don't think it had developed a grime ring that helped seal off the throttle plate like some have experienced. But I did not look at it straight on in the light. If I'm productive, and efficient, and the MTB doesn't call too much I may yank TB and look at it.
Additionally, any good mechanic recommendations in the Bend, Oregon region?
Additionally, any good mechanic recommendations in the Bend, Oregon region?
I definitely hear sloshing when turning on the heater.
That’s typically a sign of air in the engine cooling system. Have you done anything with the cooling system or anything else that might affect it?
CrudRunner
New member
Full flush of coolant, Toyota pink, thermostat, rad cap 09/17/2019. It does not leave any puddles of coolant, no obvious leaks that are visible. It has had the slosh since I purchased. Only "coolant" things I have done would have been removal for cleaning of overflow bottle, and the TB hoses being removed along with TB. I did find my UV light and goggles, so that is one step closer.That’s typically a sign of air in the engine cooling system. Have you done anything with the cooling system or anything else that might affect it?

fatherohenry
Member
Replaced the skid plate hardware with stainless steel.
- M8-1.25 x 25 flange bolts (qty 9)
- Some anti-seize on the threads, especially the front-most bolts
- Torque spec: not too tight
Thanks for the facepalm! I recently replaced my bolts with M8-1.25x20 from HD. The washers on the old bolts wouldn't come off so I replaced those too, best I could. It hadn't occurred to me to look 3 drawers down and to the right where they keep the M8 flange bolts! Plus the flange bolts I bought today have a 10mm head instead of 13mm - much more appropriate for the (un)necessary torque. I also didn't realize there were 9 bolts holding things together. Mine only had 7 when I bought it ten years ago. The more you know, right?
Full flush of coolant, Toyota pink, thermostat, rad cap 09/17/2019. It does not leave any puddles of coolant, no obvious leaks that are visible. It has had the slosh since I purchased. Only "coolant" things I have done would have been removal for cleaning of overflow bottle, and the TB hoses being removed along with TB. I did find my UV light and goggles, so that is one step closer.
I'd be willing to bet you have air in the cooling system then. The best way that I've found to bleed mine is with a spill free funnel and parking on a steep incline. Have to make sure both heaters are on as well.
The spill free funnel raises the fill point higher and the steep incline helps as well.
I'd also check that your coolant overflow hose isn't clogged and that your radiator cap is holding pressure in the cooling system.
Got a box of shiny parts from Northwest Fabworks. An Eco-Crawler reduction box doubler kit.
It uses a common and easy to find third gen transfer case as a donor instead of an increasingly hard to find earlier gear driven case. It's a chunky case for the planetary reduction gear set to sit in, and a nice input shaft that makes it all fit together like stock (no press on couplers).
And the case bolts together with lots of options for clocking in roughly 5 degree increments.
It won't get installed until spring, though, can't have my 4Runner down during the winter months. One of its jobs is to take on the road salt and lousy roads we have here in the salt belt. I already procured a J-shift box from a junkyard a couple of weeks ago. I might get another one (since they're cheap) so I can completely assemble it on the bench over the winter and have a quicker install in the spring.
It uses a common and easy to find third gen transfer case as a donor instead of an increasingly hard to find earlier gear driven case. It's a chunky case for the planetary reduction gear set to sit in, and a nice input shaft that makes it all fit together like stock (no press on couplers).
And the case bolts together with lots of options for clocking in roughly 5 degree increments.
It won't get installed until spring, though, can't have my 4Runner down during the winter months. One of its jobs is to take on the road salt and lousy roads we have here in the salt belt. I already procured a J-shift box from a junkyard a couple of weeks ago. I might get another one (since they're cheap) so I can completely assemble it on the bench over the winter and have a quicker install in the spring.
I look forward to seeing some install posts and reviews! Do they have a triple shifter like they do for tacobox or are you going to lose a cupholder?Got a box of shiny parts from Northwest Fabworks. An Eco-Crawler reduction box doubler kit.
It uses a common and easy to find third gen transfer case as a donor instead of an increasingly hard to find earlier gear driven case. It's a chunky case for the planetary reduction gear set to sit in, and a nice input shaft that makes it all fit together like stock (no press on couplers).
And the case bolts together with lots of options for clocking in roughly 5 degree increments.
It won't get installed until spring, though, can't have my 4Runner down during the winter months. One of its jobs is to take on the road salt and lousy roads we have here in the salt belt. I already procured a J-shift box from a junkyard a couple of weeks ago. I might get another one (since they're cheap) so I can completely assemble it on the bench over the winter and have a quicker install in the spring.
I look forward to seeing some install posts and reviews! Do they have a triple shifter like they do for tacobox or are you going to lose a cupholder?
I'm getting a triple stick kit from them as well, it hasn't arrived yet. So keeping the cupholder.

Endlessblockades
Senior Member
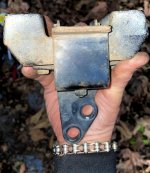
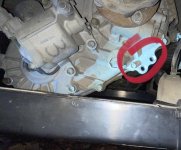
Rather boring, but I removed the vibration dampner from the T-Case since the skid it has been rubbing on was off anyway. Didn't notice anything at the J stick or feel or hear anything in 4WD or at any other time so I'll leave it off for now. The rubber between the U-shaped weight (which weighs at least 5 lbs, feels like) is torn anyway. I reinstalled the mounting bolts in the 2 holes shown because they are a bit special - very fine thread, marked 9, and have a captive washer. Just in case I feel the need to put one back on....
Attachments
Last edited:
fatherdoug
New member
Rather boring, but I removed the vibration dampner from the T-Case since the skid it has been rubbing on was off anyway. Didn't notice anything at the J stick or feel or hear anything in 4WD or at any other time so I'll leave it off for now. The rubber between the U-shaped weight (which weighs at least 5 lbs, feels like) is torn anyway. I reinstalled the mounting bolts in the 2 holes shown because they are a bit special - very fine thread, marked 9, and have a captive washer. Just in case I feel the need to put one back on....
I did this on my son's '98 limited several years ago. He developed vibration in the driveline. We crawled under the car to discover part of the rubber was missing on the dampener. It took us a couple months to find a decent replacement in a salvage yard that still had one. After all that work of replacing the dampener, the vibration was still there. The problem turned out to be the driveshaft itself. :shrug:
cl4Rk
Member
Practicing what I preach: OEM Lower Ball Joints and bolts.
The truck is 21 years old with 208k miles, and there’s no evidence that the LBJs have ever been replaced.


My old LBJs didn’t look too bad. Just surface rust and a compressed boot. I didn’t feel any play or see any leaking, but I did see that the base of one of the boots was just beginning to dry out and wrinkle in a way that would become a tear pretty soon.


An issue I ran into was that I did have to reuse one bolt.
The threading on one of the bolt holes in the the knuckle seems to have corroded in such a way that made it impossible to thread on a new bolt. I didn’t want to force the issue and risk cross threading, so I cleaned and inspected the old bolt which actually looked like it was in decent shape, applied blue thread locker, and reused it.
You can see the reused bolt in this photo (it’s the front right bolt, which is in the foreground and to the left in the photo):

I was able to replace all the other bolts with new OEM ones.
One other issue I ran into was that I had to over torque the LBJ castle nuts in order to line up the cotter pins. It should be 105 ft lbs, but I ended up with just under 123 ft lbs on the left and 139 ft lbs on the right.
Honestly, I’m a little uncomfortable about reusing that one bolt and about the higher torque on the castle nuts. Maybe someone with more experience can chime in and put my mind at ease?
The job took me about 3.5 hours working by myself, taking my time, and cleaning up / painting some other things while the wheels were off.
Big thanks to [MENTION=120071]mtbtim[/MENTION] for his videos. I watched that LBJ video probably 10 times over the last couple months, taking thorough notes. And thanks to [MENTION=319302]Bad Luck[/MENTION] who encouraged me to just go for it myself (he probably doesn’t remember that— it was just an off hand comment on a thread a while ago).
This 4Runner is the first vehicle I’ve ever really wrenched on and this forum has been essential. Thanks everyone!!
The truck is 21 years old with 208k miles, and there’s no evidence that the LBJs have ever been replaced.
My old LBJs didn’t look too bad. Just surface rust and a compressed boot. I didn’t feel any play or see any leaking, but I did see that the base of one of the boots was just beginning to dry out and wrinkle in a way that would become a tear pretty soon.
An issue I ran into was that I did have to reuse one bolt.
The threading on one of the bolt holes in the the knuckle seems to have corroded in such a way that made it impossible to thread on a new bolt. I didn’t want to force the issue and risk cross threading, so I cleaned and inspected the old bolt which actually looked like it was in decent shape, applied blue thread locker, and reused it.
You can see the reused bolt in this photo (it’s the front right bolt, which is in the foreground and to the left in the photo):
I was able to replace all the other bolts with new OEM ones.
One other issue I ran into was that I had to over torque the LBJ castle nuts in order to line up the cotter pins. It should be 105 ft lbs, but I ended up with just under 123 ft lbs on the left and 139 ft lbs on the right.
Honestly, I’m a little uncomfortable about reusing that one bolt and about the higher torque on the castle nuts. Maybe someone with more experience can chime in and put my mind at ease?
The job took me about 3.5 hours working by myself, taking my time, and cleaning up / painting some other things while the wheels were off.
Big thanks to [MENTION=120071]mtbtim[/MENTION] for his videos. I watched that LBJ video probably 10 times over the last couple months, taking thorough notes. And thanks to [MENTION=319302]Bad Luck[/MENTION] who encouraged me to just go for it myself (he probably doesn’t remember that— it was just an off hand comment on a thread a while ago).
This 4Runner is the first vehicle I’ve ever really wrenched on and this forum has been essential. Thanks everyone!!
Last edited:
ViaPhoenix
New member
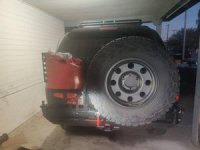
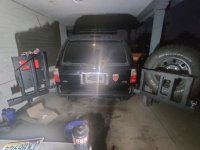
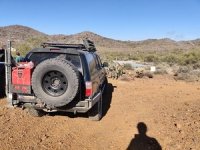
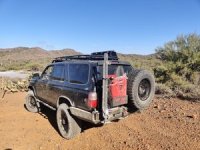
In the last couple weeks, I have done the washer fluid bottle relocate mode, replaced the spray nozzles with the Honda Odyssey sprayers from a couple pages back, and got my CBI re bumper mounted on finally (it arrived while i was on vacation in September).
Full Res photos, and videos from the morning.
Question: OME-60028-P with OME-890 coils in the rear. Even before i got my rear bumper on the rear was a little lower than the front, but i left it alone until i knew exactly what and when i was going to do to the T4R. Now that my rear bumper/trailgear is on it is sagging another 2 inches. I went out wheeling today, hit some obstacles, but nothing too crazy, and i never rubbed, so maybe it is just aesthetics to get it leveled out, but thoughts on what i should do?Just springs? go to the 891's or 861's? (the 5-6 inch lift with the 861s scares me a little that it will put me too high)
Full Res photos, and videos from the morning.
Question: OME-60028-P with OME-890 coils in the rear. Even before i got my rear bumper on the rear was a little lower than the front, but i left it alone until i knew exactly what and when i was going to do to the T4R. Now that my rear bumper/trailgear is on it is sagging another 2 inches. I went out wheeling today, hit some obstacles, but nothing too crazy, and i never rubbed, so maybe it is just aesthetics to get it leveled out, but thoughts on what i should do?Just springs? go to the 891's or 861's? (the 5-6 inch lift with the 861s scares me a little that it will put me too high)
Attachments

Brian.
Member
One other issue I ran into was that I had to over torque the LBJ castle nuts in order to line up the cotter pins. It should be 105 ft lbs, but I ended up with just under 123 ft lbs on the left and 139 ft lbs on the right.
Honestly, I’m a little uncomfortable about reusing that one bolt and about the higher torque on the castle nuts. Maybe someone with more experience can chime in and put my mind at ease?
Don't owrry, at ALL, about the castle nuts. They're designed that way... I never even bother with a "final torque", I just hit the spec and look to see if it's closer to loosen or to tighten and go whichever is closer.
As for the 4th bolt, yours looks like a super clean rig so I'm guessing you don't beat it into the rocks. If you're mostly an on-road vehicle, you're almost certainly fine. FWIW, the fix for that situation is a "rethread" tool (a slightly less aggressive tap, designed to clean up threads, not cut new... but a tap works in a pinch). Nothing stopping you from getting one of those, pulling the bolt, chasing the threads and installing the new bolt.
For me, today I swapped in my 3rd ECU. It's not what it seems... first was a test for fixing the "no master key" issue and wanting more than 1 key. 2nd was the original after I tested (I ended up burning the traces off the PCB of my test unit), and today was 3rd because I also damaged the traces on my original ECU, patched with some wire to jump the bad trace, and I wanted something I felt was more reliable.
Lesson here? Right tool for the job kids. A 30w pencil soldering iron may be just fine if all you're doing is soldering some automotive wires together, or putting a little solder in a crimp connector to keep the oxidization at bay. It's *not* the right tool for removing and replacing surface mount chips.
Still, even with buying 4 keys, 2 ECUs, a chip reader/programmer and a solder and hot air rework station, I've spent roughly 1/4 what my local auto locksmith wanted and closer to 1/8th what Toyota wanted.

Today for my 02 runner I purchased a new air, oil, and fuel filter and picked up some MAF cleaner to get things ready for a road trip. Also snagged some royal purple gear oil to swap out all my diffs and transfer case fluids, grabbed some regular JB weld to fix my hatch key cylinder that’s fallen in as well as some high heat JB to patch a small hole on the muffler. Allso grabbed a mechanics stethoscope to try and find out where a low rumble noise is coming from after I change out the fluids, if it’s still there. There’s a chance the rumbling could be coming from my driver side Cv, because after I installed the ECGS clamshell bushing my dumbass forgot to buy grease and all that I had around was some crap Teflon lube that I had to use on the splines so I at least had some sort of lube on it.
Last edited:
FYI — the FSM specifies not to loosen a castle nut to line up the cotter pin, only to tighten it. I would not worry about having to tighten more.
I know it's in the FSM, but I can never find it when I go looking for it as a reference when this comes up. Any idea where it is?
An issue I ran into was that I did have to reuse one bolt.
The threading on one of the bolt holes in the the knuckle seems to have corroded in such a way that made it impossible to thread on a new bolt. I didn’t want to force the issue and risk cross threading.
Honestly, I’m a little uncomfortable about reusing that one bolt
I also wouldn't feel comfortable re-using 20+ year old hardware. For corroded threads, I like to run a tap of the same exact bolt size paired with cutting fluid so the threads get cleaned up smooth. I did this procedure to my other car a couple weeks ago and trust me, inserting brand new bolts was very satisfying with "refurbished" threads from the tap.
When chasing the threads, just be VERY careful not to run it quick and on an angle. Breaking the tap/ruining the threads makes huge stress to the owner.
- Status
- Not open for further replies.
Similar threads
- Replies
- 9
- Views
- 26K


- Replies
- 0
- Views
- 2K
- Replies
- 5
- Views
- 1K

- Replies
- 13
- Views
- 3K


- Replies
- 11
- Views
- 20K


