

LimeLED
New member
Toyota OEM LED Fog Lamp Installation (Non-Limited)
After taking way more time than it should have, I have mine installed. I thought I'd share what I learned and the steps it takes.
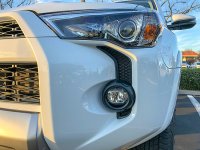
I really like them. Great cutoff and noticeably brighter than the stock incandescent fog lamps. Plus, being OEM parts, they are SAE compliant.
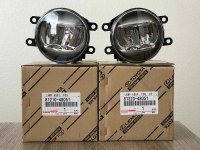
It appears you can buy a kit (made in China) in chrome or black, or individual replacement parts (made in Japan). It looks like the Japanese ones are original equipment on 2016-2018 Land Cruiser, 2015-2018 Prius C, and 2018 Tundra. While they cost significantly more, I installed the individual, made in Japan ones. I paid $284 total from an online Toyota parts dealer for both lamps.
Also worth noting: the kit ones are not the same design as the individual Japanese ones. They are not simply a cheaper version that are produced in China. The design is noticeably different. Nonetheless, you have a few options for OEM LED fog lamps.
Application:
2014+ (SR5, Trail, Off-Road, and Pro with these instructions)
2014+ Limited (Install will be different than these instructions)
Toyota's documents state these kits are for 2019+, but I had no problem on my 2018 ORP. I imagine this is the same for 2014+.
I'm not sure if these would work on 2010-2013 or not.
Parts:
81220-48051 (Left) - Made in Japan
81210-48051 (Right) - Made in Japan
Or
PT413-42190 - Chrome kit - Made in China
Or
PT413-42191 - Black kit - Made in China
Tools required:
Installation:
Prep
This is hardest part of the entire install.
This side does NOT require partially removing the fender liner or fog lamp bezel; there is no fog lamp splash shield.
After taking way more time than it should have, I have mine installed. I thought I'd share what I learned and the steps it takes.
I really like them. Great cutoff and noticeably brighter than the stock incandescent fog lamps. Plus, being OEM parts, they are SAE compliant.
It appears you can buy a kit (made in China) in chrome or black, or individual replacement parts (made in Japan). It looks like the Japanese ones are original equipment on 2016-2018 Land Cruiser, 2015-2018 Prius C, and 2018 Tundra. While they cost significantly more, I installed the individual, made in Japan ones. I paid $284 total from an online Toyota parts dealer for both lamps.
Also worth noting: the kit ones are not the same design as the individual Japanese ones. They are not simply a cheaper version that are produced in China. The design is noticeably different. Nonetheless, you have a few options for OEM LED fog lamps.
Application:
2014+ (SR5, Trail, Off-Road, and Pro with these instructions)
2014+ Limited (Install will be different than these instructions)
Toyota's documents state these kits are for 2019+, but I had no problem on my 2018 ORP. I imagine this is the same for 2014+.
I'm not sure if these would work on 2010-2013 or not.
Parts:
81220-48051 (Left) - Made in Japan
81210-48051 (Right) - Made in Japan
Or
PT413-42190 - Chrome kit - Made in China
Or
PT413-42191 - Black kit - Made in China
Tools required:
- #2 Phillips stubby screwdriver
- 10mm socket
- 25’ tape measure or laser measure
- Masking tape or similar to “mark” a wall
Installation:
Prep
- Turn the front wheels all the way to the right.
- Disconnect the negative battery cable.
This is hardest part of the entire install.
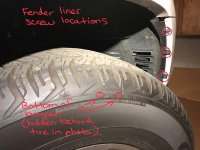
- Partially remove the right front fender liner. Do this by removing two bottom front screws (bottom of bumper) and the three front fender liner screws. Then bend the fender liner back to gain additional access to the fog lamp. Keep track of which screws go where!
- Partially remove the right fog lamp bezel.
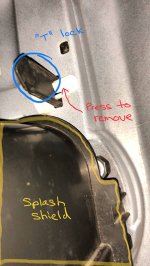
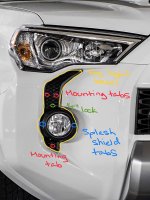
- Reach up behind the bumper and remove the white “T” lock from the large mounting tab above the fog lamp splash shield. It removes by pressing on the release button and sliding it to the left (toward driver side).
- Next, release the two upper mounting tabs (above the “T” lock) and one lower mounting tab by squeezing the release tabs. The fifth, very top mounting tab is inaccessible, but that’s okay.
- From the front of the bumper, carefully bend the fog lamp bezel back and up, exposing the fog lamp splash shield mounting tabs. It will remain attached at the very top.
- With the fog lamp bezel now allowing access, there are two mounting tab release buttons directly to the right and left of the fog lamp. Press in on the mounting tabs to release and remove the fog lamp splash shield. The splash shield must pivot upward to separate the upper tab from the bumper.
- Behind the bumper, now release the fog lamp electrical connector by pressing the release button and pulling down.
- Remove the fog lamp by removing the two screws on the right side of the fog lamp.
- Slide the two left side fog lamp mounting tabs into the slots in the bumper.
- Reinstall the two mounting screws on the right side.
- Reconnect the fog lamp connector.
- Reinstall the fog lamp splash shield by first sliding the upper tab into the bumper and then engage the side tabs. During my install, I could not get the upper tab to engage without trimming 2-3mm off the top of the tab. It seems the LED fog lamps provide for less clearance on reinstallation.
- Reinstall the fog lamp bezel by firming pressing it into the bumper and then reinstall the “T” lock.
- Bend the fender liner back into position.
- Reinstall all five fender liner screws. Be careful not to over tighten.
This side does NOT require partially removing the fender liner or fog lamp bezel; there is no fog lamp splash shield.
- Reach up behind the bumper and release the fog lamp connector by pressing the release button and pulling down.
- Remove the fog lamp by removing the two screws on the left side of the fog lamp.
- Hold the new LED fog lamp in place and reinstall the two mounting screws on the right side.
- Reconnect the fog lamp connector.
- Reconnect the negative battery cable.
- Make sure the vehicle has a full tank of fuel as well as whatever cargo you normally carry.
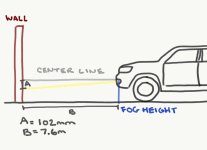
- Position the vehicle on a flat surface in front of a flat wall. Be sure the distance from the fog lamp to the wall is exactly 7.6m (25 feet).
- Measure the distance from the center of the fog lamp to the ground. Make note of this measurement. This is the fog lamp centerline. Mine measured 722mm, but yours will probably be different.
- Turn on the fog lamps and adjust them so the top of the beam cutoff is 102 mm (4 in.) below the the fog lamp centerline height. In my example, I took 722mm minus 102mm. Therefor, the top of my beam cutoff needs to be at 620mm from the ground.
- Mark this height on the wall with a piece of masking tape or something similar.
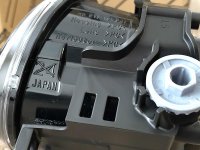
- Reach up behind the bumper and turn the adjustment screw on the fog lamp with a #2 Phillips screwdriver. I was able to reach up and adjust them with everything in place, even the right side fender liner.
Note: always finish the adjustment using a clockwise turn. If you go too far, turn counterclockwise and then finish by turning clockwise. Why? I don’t know, but this is what Toyota says to do.
Attachments
-
 LimeLED LED fog lamps.jpg105.7 KB · Views: 9,355
 -
 LimeLED fog lamp adjuster.jpg112.8 KB · Views: 7,610
 -
 LimeLED fender screws.jpg75 KB · Views: 7,584
 -
 LimeLED fog light diagram.jpg86.8 KB · Views: 7,706
 -
 LimeLED fog light diagram front.jpg96.9 KB · Views: 9,151
 -
 LimeLED fog light aiming.jpg98 KB · Views: 8,520
 -
 LimeLED fog after front close.jpg129.6 KB · Views: 7,925
 -
 LimeLED fog after front light.jpg110.1 KB · Views: 7,566
Last edited:


