12v Constant Power... need some clarifications.

classic72

New member
I have a fridge on it's way and want to make my rear 12v outlet on all the time. I do have the inverter on my truck as well, but plan to use the 12v. I don't need it switched, just want to make it +12v constant.

Looking for the simplest method possible.... hoping I can just achieve this at the fuse box under the hood like some other's I read on older Toyota's. Don't want to take interior plastic apart if I don't have to.

I have read a couple of posts, but still not making total sense.

I don't mind if all the sockets end up at +12v constant, but definitely need the rear.

Thanks in advance... and I apologize for the confusion with this.
 
Register to hide this ad
"I have a fridge on it's way and want to make my rear 12v outlet on all the time. I do have the inverter on my truck as well, but plan to use the 12v..."

Hi classic,

Hope you weren't planning to plug it into an existing 12v receptacle w/no mod; they won't be capable of handling high current demand utilities. First you need to find out how many amps (or watts) the new frig will consume "Full load" because you'll need to pull an appropriately sized, 'fused' line from the battery to the frig location. Once you determine the units electrical requirements, then you'll know what size wiring kit and fuse/holder to purchase.

The new unit will carry a service "nomenclature tag" with all of the information that you'll need on it, so you can likely find it on-line before the device arrives! If this is your first equipment installation, there should be at least a few tutorial threads here on this site for help. If not, there's plenty of 'self-help' info on "you tube" to use as a guide to help you get started! Let us know how you made out. Best to you!
 
Not sure of the 5th gen "constant 12v" to the rear stock receptacle has been conquered yet. I know the 4th gens have.

In my case (until I go the dual battery route) I ran a fused 10-guage wire from the battery to a location near the stock rear 12v plug for my fridge which is a 37qt. ARB. I ran this cable through the rubber grommet in the engine bay, down the passenger kick panel and along the lower door jam to the back cargo area. The entire operation took an hour and that included drilling a 1 inch hole in the rear plastic near the stock plug.

If you want pictures and step by step, I can write it up for you along with a parts list. It did not take much effort and the parts list was very small.

Now I know I have a set up that can handle the constant-on load of a fridge with very little parasitic loss of voltage/amps.
 
Wiring for constant 12V in cargo area.

Ok, here are some quick and dirty photos.

In order:

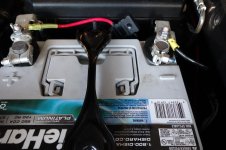
Positive (Red) to positive terminal on battery. In-line blade fuse holder with 15A fuse. Black to ground terminal. None of this was connected until the wire was run, obviously :)

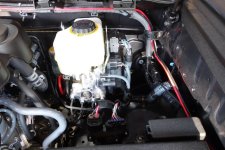
Route neatly around perimeter of engine compartment/firewall zip-tying along the way.

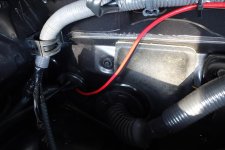
Make a neat hole through the rubber grommet in firewall. Start fishing wire through into cab.

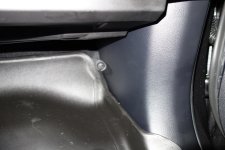
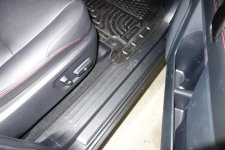
Remove kick panel on passenger side. (Plastic screw enables the panel to pull back and out)

Pull door jam protector up. It is snapped in, but pull up evenly along the length. Comes out pretty easy. Do this at both passenger side doors. Fish the cable along through the wire runs.

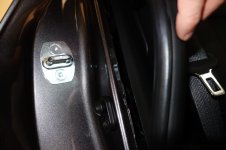
With the rear passenger door open you can peel the weatherstrip back between the side of the seat and the cab itself. That enables you to fish the wire through without removing any interior body panels or the seats. I used a coat hanger to help fish it through. Make sure there is nothing that will pinch the wire. There is plenty of room in there and not much in the way of sharp edges, but just be sure.

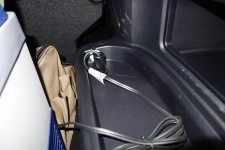
In the cargo area I popped out the little tray on top of the wheel well. It took some struggling as it is in there with these little tabs that may flex and break, but that may have been my fault for getting a tad too aggressive with it. It still snapped back no problem. You will see the inverter bolted to the wheel well. Stay clear of it with the wiring. I drilled a hole in the tray itself making sure the cable and cigarette plug had enough space when the tray was put back.

Crimp and heat-shrinked all hot connections. Done.
 

Attachments

  • battery.jpg
    battery.jpg
    130.7 KB · Views: 2,692
  • routing.jpg
    routing.jpg
    112.9 KB · Views: 2,709
  • thruFW.jpg
    thruFW.jpg
    131.2 KB · Views: 2,622
  • kick.jpg
    kick.jpg
    133.9 KB · Views: 2,574
  • jam.jpg
    jam.jpg
    136.6 KB · Views: 2,511
  • totherear.jpg
    totherear.jpg
    134.6 KB · Views: 2,535
  • plug.jpg
    plug.jpg
    134.4 KB · Views: 2,795
Last edited:
Parts list from Mcmaster-Carr:

1. Easy-id Low-voltage Cable 10 Gauge, 25 Ft. Length ( I personally would not use anything smaller (higher number) than 10 gauge wire for this application )

2. 1 pack Standard Ring Terminal, Vinyl Insulated, 12-10 Awg, 3/8" Screw/stud Size

3. 1 pack Flame-retardant Quick-disconnect Terminal, Straight, 12-10 Awg, .25"w X .032" Thk Tab, Yellow

4. Blue Sea 12v socket: http://www.amazon.com/gp/product/B001U4ZZPK/ref=oh_aui_detailpage_o04_s00?ie=UTF8&psc=1

5. Fuse holder, blade-type.

It was about $60 total, but I needed more terminals for another project and ordered packs of them, so a little more than you may need. The cable was very high quality and $35 for 25 feet. All of this can probably be purchased cheaper elsewhere, but I like Mcmaster-Carr and they are local to me.
 
Last edited:
Your new fridge should pull something like 4-5 amps max.

If you plan on running anything heavier run a thicker wire guage.

I actually ran a #6 from the battery to a Blue Sea ATC fuse panel located behind the jack door panel. I have numerous USB and 12 plugs throughout the rear.
 
I think most fridges pull 4-5 amps on compressor start-up, but are more like .7 to 1.5 + or - (per hour) when running. Most modern 12V fridges like ARB and the like are pretty thrifty with power draw.

Your new fridge should pull something like 4-5 amps max.

If you plan on running anything heavier run a thicker wire guage.

I actually ran a #6 from the battery to a Blue Sea ATC fuse panel located behind the jack door panel. I have numerous USB and 12 plugs throughout the rear.
 
Ok, here are some quick and dirty photos.

In order:

Positive (Red) to positive terminal on battery. In-line blade fuse holder with 15A fuse. Black to ground terminal. None of this was connected until the wire was run, obviously :)

Route neatly around perimeter of engine compartment/firewall zip-tying along the way.

Make a neat hole through the rubber grommet in firewall. Start fishing wire through into cab.

Remove kick panel on passenger side. (Plastic screw enables the panel to pull back and out)

Pull door jam protector up. It is snapped in, but pull up evenly along the length. Comes out pretty easy. Do this at both passenger side doors. Fish the cable along through the wire runs.

With the rear passenger door open you can peel the weatherstrip back between the side of the seat and the cab itself. That enables you to fish the wire through without removing any interior body panels or the seats. I used a coat hanger to help fish it through. Make sure there is nothing that will pinch the wire. There is plenty of room in there and not much in the way of sharp edges, but just be sure.

In the cargo area I popped out the little tray on top of the wheel well. It took some struggling as it is in there with these little tabs that may flex and break, but that may have been my fault for getting a tad too aggressive with it. It still snapped back no problem. You will see the inverter bolted to the wheel well. Stay clear of it with the wiring. I drilled a hole in the tray itself making sure the cable and cigarette plug had enough space when the tray was put back.

Crimp and heat-shrinked all hot connections. Done.


Running a ground wire directly to the battery isn't necessary for a 12V outlet, nor is it the best idea. The ground wire should be as short as possible and come directly from the new outlet and connect to a solid metal surface. There are plenty of factory grounds already located in the cargo area that can be utilized.

The power wire and fuse should go directly to the battery like you've shown (although it needs to be protected from chafing with some split-loom).
 

Members online

No members online now.

Forum statistics

Threads
278,310
Messages
3,554,080
Members
248,016
Latest member
Advally Service

Trending content

Back
Top