2000 limited SleepyDad build

about 10K since I replaced it.

I have a 97 with 230K on it and the shaft on that trucks is still fine. The reason I replaced my OEM shaft was because when I lifted the back end 4" I would get a clunk into gear really bad. after replacing the shaft that went away. I think the slip yoke wears and when you lift the back end it makes it a bit worse. if your not going to lift your truck and the OEM shaft is solid, no reason to replace it.

[MENTION=158195]thezentree[/MENTION] also went with Toms shafts... he had a different story but I think he ended up liking it?

Ive lifted 2" up front and 2.5" in the back. Mild, will pick up TW when I need to replace it

Thanks again

I bought mine trying to eliminate a driveline vibration that started after I lifted it (2.5" up front, 3" out back).

The first try, I ordered it with the wrong bolt pattern on the axle end flange. TW fixed it for free even though it was my error, I just had to pay to ship it back ($70).

The second try, the vibrations seemed worse, so I had the driveshaft checked at a local driveline shop. They said it had about .060" runout, so I sent it back to TW and they replaced it.

The third try, I still had vibrations, so I had the driveline shop check it again, and they said it had .060" runout again. I paid them to "straighten" it ($115 and a two week lead time) and the vibrations seemed worse than before it was "straightened." It turns out that the local driveline shop is the only place within several hours driving distance that can even check DS balance, so I'm stuck with a driveshaft that has so far cost me close to $800 that I don't trust to be straight. Honestly, I'm sort of leaning towards the local place having a DS balancer/straightener that is out of calibration and me paying them $115 to bend my previously straight driveshaft.

I'm now running the OEM driveshaft with a new rear U-joint, with the same vibrations as always, just ever so slightly less bad than the "straightened" TW driveshaft. It's been starting to clunk lately though, so I might swap the TW DS back in this coming weekend if the weather holds up.

Long story short, my experience with TW has overall been good since I don't know definitively that their driveshafts were bent. Objectively, their prices are reasonable, build time and shipping is ridiculously fast for a custom part coming from two time zones away, and they stood behind their product when I said it was defective.
 
Last edited:
catching cans

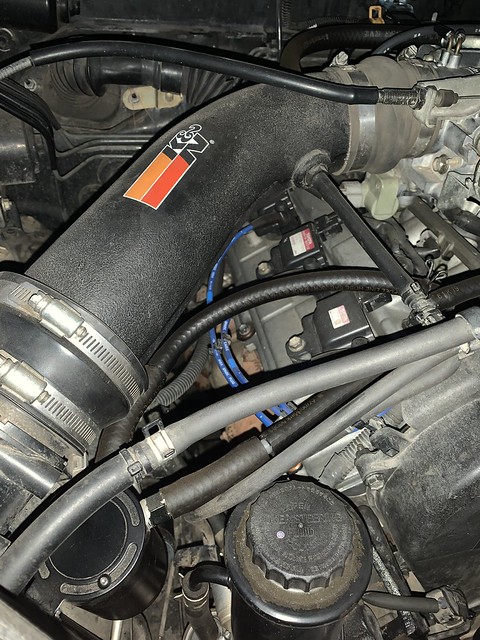
I picked up this catch can a while back and finally got around to finding a spot for it. not much room left in my engine bay so I had to get creative with my bracket skills.

<a href="https://imgur.com/fSKKjb8"><img src="https://i.imgur.com/fSKKjb8l.jpg" title="source: imgur.com" /></a>

<a href="https://imgur.com/xfjajyU"><img src="https://i.imgur.com/xfjajyUl.jpg" title="source: imgur.com" /></a>

<a href="https://imgur.com/ggVIMTl"><img src="https://i.imgur.com/ggVIMTll.jpg" title="source: imgur.com" /></a>

<a href="https://imgur.com/ppZoAuI"><img src="https://i.imgur.com/ppZoAuIl.jpg" title="source: imgur.com" /></a>
 
Do yourself a favor and get some stainless worm drive clamps for each end of the lines. They will leak with time, speaking from experience.
 
I wonder how many people run catch cans on these. Here's how I mounted mine.

so your running 2 cans one from each head. It was my understanding that one side is considered the breather (in) side and one is the outlet (PCV)

so I guess my question is would the can on the breather side be upstream of vapors?

I have been meaning to hook up my vac gauge to verify pressures from either side just because I was curious about it.

I have never really messed with the vac/pcv system as long as it was all working so I don't really know but it seems like 1 can is enough?

edit: I would have mounted it up like you did but I still have the stock intake with the resonators. maybe air raid in the future.
 
Last edited:
I wonder how many people run catch cans on these.

so your running 2 cans one from each head. It was my understanding that one side is considered the breather (in) side and one is the outlet (PCV)

so I guess my question is would the can on the breather side be upstream of vapors?

I have been meaning to hook up my vac gauge to verify pressures from either side just because I was curious about it.

I have never really messed with the vac/pcv system as long as it was all working so I don't really know but it seems like 1 can is enough?

edit: I would have mounted it up like you did but I still have the stock intake with the resonators. maybe air raid in the future.

Nice work with the bracket.

I hadn't see anyone else with a catch can till yours. Mine is almost in the same location. I just attached it to the side of the airbox.

The single can does work pretty well. It certainly collects a lot of vapors - mostly water with a little bit of nasty goo mixed in.

I've had to empty mine about every 2,000 miles to keep it from overflowing.

49938355096_b90a1e81d1_z.jpg
 
Seal front fender apron

This was a while ago so yes I'm way behind schedule. meh.

it was Denos days for this truck back in April. The starter was acting up not engaging sometimes so it was time.

<a href="https://imgur.com/7F6yIcg"><img src="https://i.imgur.com/7F6yIcgl.jpg" title="source: imgur.com" /></a>

The easiest way to pull this off is to remove the splash shield so you can access the starter thru this area. Some of my clips are probably 20+ years old now so they broke. I seem to break these clips a lot?

<a href="https://imgur.com/elHELKk"><img src="https://i.imgur.com/elHELKkl.jpg" title="source: imgur.com" /></a>

Now that the story is long I decided to try my hand at a clip design

<a href="https://imgur.com/7uaM5Gh"><img src="https://i.imgur.com/7uaM5Ghl.png" title="source: imgur.com" /></a>

I don't know a lot about 3D printing but I'm learning and this is just a PLA batch. I would guess they should be ok for a while but I will need to look into maybe ABS.

<a href="https://imgur.com/pZ3Xkt2"><img src="https://i.imgur.com/pZ3Xkt2l.jpg" title="source: imgur.com" /></a>

They work perfect on the sheet metal portion but not so great on the frame connections. so I need to maybe work on my design.

<a href="https://imgur.com/SPd1Xm9"><img src="https://i.imgur.com/SPd1Xm9l.jpg" title="source: imgur.com" /></a>

they bust off when you try to push them into the frame holes
<a href="https://imgur.com/xxVBDE3"><img src="https://i.imgur.com/xxVBDE3l.jpg" title="source: imgur.com" /></a>

the OEM ones are deceptively complicated from a CAD design perspective. I will keep @ it and see if I can perfect my design.

Cheers.

here is the STL for this design.

splash guard clip v3.stl - Google Drive
 
making some changes to this truck

I got a big box from E

winter project - non body lift rear bumper

<a href="https://imgur.com/my5feCC"><img src="https://i.imgur.com/my5feCCl.jpg" title="source: imgur.com" /></a>
<a href="https://imgur.com/dEatJwe"><img src="https://i.imgur.com/dEatJwel.jpg" title="source: imgur.com" /></a>

I also picked up an addicted offroad front tube bumper for this truck and sprayed a couple of coats of DTM onto it... for now. I have some changes I want to make this winter. it's a nice minimal bumper.
<a href="https://imgur.com/hqBn2Po"><img src="https://i.imgur.com/hqBn2Pol.jpg" title="source: imgur.com" /></a>
 
and so it begins

<a href="https://imgur.com/5aXBfhD"><img src="https://i.imgur.com/5aXBfhDl.jpg" title="source: imgur.com" /></a>
 
by god it's been a long road

those who have not past the 50 years mark get ready, it's coming for ya
<a href="https://imgur.com/OfcFFkx"><img src="https://i.imgur.com/OfcFFkxl.jpg" title="source: imgur.com" /></a>

but now that is out of the way and I'm finally done with my master bathroom remodel I can have my own fun again.

fist step in the eimkeith non body lift bumper seems to be the nut strips and end thingies. so I got those 2 things done tonight.

<a href="https://imgur.com/d7W6D2I"><img src="https://i.imgur.com/d7W6D2Il.jpg" title="source: imgur.com" /></a>

kick ass welds, no they are not but functional yes they r. so we will go with it... next up... I have no idea maybe new rear frame x-member tomorrow evening.

<a href="https://imgur.com/Ft4iyJ9"><img src="https://i.imgur.com/Ft4iyJ9l.jpg" title="source: imgur.com" /></a>
 
I picked up this catch can a while back and finally got around to finding a spot for it. not much room left in my engine bay so I had to get creative with my bracket skills.

<a href="https://imgur.com/fSKKjb8"><img src="https://i.imgur.com/fSKKjb8l.jpg" title="source: imgur.com" /></a>

<a href="https://imgur.com/xfjajyU"><img src="https://i.imgur.com/xfjajyUl.jpg" title="source: imgur.com" /></a>

am I too late to the catch can party?

nice bracketry btw, - recently installed my Moroso Air/oil separator/Catch can and mounted it to the fender with easy access to the drain valve.


.
 

Attachments

  • IMG_8606.jpg
    IMG_8606.jpg
    134.7 KB · Views: 320
  • IMG_8607.jpg
    IMG_8607.jpg
    138 KB · Views: 305
  • IMG_8605.jpg
    IMG_8605.jpg
    136.5 KB · Views: 305
I got a big box from E

winter project - non body lift rear bumper

<a href="https://imgur.com/my5feCC"><img src="https://i.imgur.com/my5feCCl.jpg" title="source: imgur.com" /></a>

ugh. the FedEx guys have got to be dropping those boxes off the back of the truck onto their corners - look at that thing. :facepalm:
 
ugh. the FedEx guys have got to be dropping those boxes off the back of the truck onto their corners - look at that thing. :facepalm:

what damage?

I'm almost done with the setup on this little guy... just waiting on the Razorweld Razorcut 45 Amp part now. it should make doing things a lot easier around my place. totally overkill for what I need but I figured having more robots in like is a solid way to run things.

<a href="https://imgur.com/gYZbu5E"><img src="https://i.imgur.com/gYZbu5El.jpg" title="source: imgur.com" /></a>
 
Last edited:
rear bumper sneaking up on it, sssshhh don't scare the bumper

after some messing around I was able to get the passenger side perfect. The driver side is a different story... I took it apart and noticed I had a huge epoxy glob on the bottom interferring with the frame rail position, also need to take some more body off... so I think it's just a matter of me noticing the obvious stuff I need to take care of before it's going to fit.

<a href="https://imgur.com/2vWQnzn"><img src="https://i.imgur.com/2vWQnznl.jpg" title="source: imgur.com" /></a>

I also think the body might be a bit off-center and the bend was messed up a bit during shipping so... stuff to figure out before more holes can be drilled.
<a href="https://imgur.com/zZCR5eO"><img src="https://i.imgur.com/zZCR5eOl.jpg" title="source: imgur.com" /></a>
 
do you have access to a 3d printer (or is your Langmuir table up and running)? I can send a file with the profile of the large radius bend to use as template for repositioning it if that's helpful.

Passenger side looks great, btw.
 
do you have access to a 3d printer (or is your Langmuir table up and running)? I can send a file with the profile of the large radius bend to use as template for repositioning it if that's helpful.

Passenger side looks great, btw.

still waiting on the razor weld torch, they have been on order since March :(

I think I have things about as good as they are going to get. thinking I'm ready to take everything apart and sand blast it and then start tacking it. I should maybe look @ the receiver and recovery points as well I suppose before doing a full on burn on the entire thing.

passenger fit looks great
<a href="https://imgur.com/Pjgbvi0"><img src="https://i.imgur.com/Pjgbvi0l.jpg" title="source: imgur.com" /></a>

driver fit you can see the mismatch but I think I can fix that with clamps and tac's
<a href="https://imgur.com/uLzc7LJ"><img src="https://i.imgur.com/uLzc7LJl.jpg" title="source: imgur.com" /></a>

the wings were not any trouble at all really. once I knew what went where.
<a href="https://imgur.com/OA7yz7K"><img src="https://i.imgur.com/OA7yz7Kl.jpg" title="source: imgur.com" /></a>
<a href="https://imgur.com/RwWQ03o"><img src="https://i.imgur.com/RwWQ03ol.jpg" title="source: imgur.com" /></a>

I do have one favor to ask? I would promise to keep it private of course. would save me some time.

I'm not as concerned with 1.5" of extra ground clearance with the fuel tank. I would rather drop it down and then fabricate a skid plate. it will work well from what I can see so far. I could also skip chopping up the floor brace.
<a href="https://imgur.com/HDPEVbF"><img src="https://i.imgur.com/HDPEVbFl.jpg" title="source: imgur.com" /></a>

but here in lies the favor
the front tank strap mounts are a bit of a problem, I would like to move them down an 1" or 1.5" also need to test to make sure they don't get hit by the track bar?
<a href="https://imgur.com/H3l0HIa"><img src="https://i.imgur.com/H3l0HIal.jpg" title="source: imgur.com" /></a>

I only have these mounts tack'ed into placed right now and I could just modify them, but if you would be ok sharing those models? I use autodesk fusion so I'm guessing I can import just about any type of file. I would keep that transaction private of course. Langmuir is telling me I should have the torch by the end of the month. and of course I would share that design if it works out back with you.

oh and one other thing, I decided to use some 60mm m12 to connect the bumper on the frame. yes the bolts stick down and I might whack them but it seems fine for my parking lot wheeling.
<a href="https://imgur.com/BKUu3qt"><img src="https://i.imgur.com/BKUu3qtl.jpg" title="source: imgur.com" /></a>

I'm a weird metric nut and bold hoarder I have bags of stuff on hand. I have it in my last will and testament that I will be buried with my metric nuts and bolts. you can never be sure when you will need them.
<a href="https://imgur.com/dFqkHkS"><img src="https://i.imgur.com/dFqkHkSl.jpg" title="source: imgur.com" /></a>
 
Last edited:
<iframe width="800" height="600" src="https://www.youtube.com/embed/xNBelKOSouc" title="YouTube video player" frameborder="0" allow="accelerometer; autoplay; clipboard-write; encrypted-media; gyroscope; picture-in-picture" allowfullscreen></iframe>
 

Members online

Forum statistics

Threads
278,315
Messages
3,554,102
Members
248,016
Latest member
Advally Service

Trending content

Back
Top