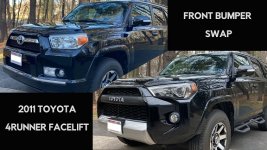
2014+ front end conversion -lets get this done!

Thank you for the offer but I wouldn't want the hassle of repainting, and I don't like the SR5 front end. Black trail or bust, in exchange for a 2016 black trail front end.

Hmmm I might be interested but I'm just not sure how the fenders would line up
 
Last edited:
Hmmm I might be interested but I'm just not sure how the fenders would line up
From my understanding, the fenders would match up just fine. It is the bumper support, bumper cover, various fasteners/hardware and other small support items, and then the headlights that would change. Whereabouts are you located?
 
IMHO with the cost of doing this conversion and hassle going with an aftermarket bumper is a better choice. Highly recommend the Peflreybilt front!


Sent from my iPhone using Tapatalk
 

appreciate it, but pretty vague re: DRL for the swap

Basically what he did, but I just wanted more information regarding this:

the DRL from my old bumper goes up next to the headlight and becomes my DRL and signal lights. The new headlights are not plug play as far as the harness goes because the actual headlight housing comes with a little little harness that attaches to the h11 bulb but the other end of it which attaches to the vehicle isn't h11. Im not sure what it is but the easiest way around this is to either splice it or get a HID kit which most people are already doing.

Doing a 2014+ swap and retrofit and 4x4labs front bumper so the DRL and turn has to be relocated to the main assembly. Maybe [MENTION=109477]Rorck[/MENTION] can help since he's basically running this setup already plus LEDs under the assembly.
 
appreciate it, but pretty vague re: DRL for the swap

Doing a 2014+ swap and retrofit and 4x4labs front bumper so the DRL and turn has to be relocated to the main assembly. Maybe [MENTION=109477]Rorck[/MENTION] can help since he's basically running this setup already plus LEDs under the assembly.

check out link [2] I sent earlier, I did the swap a few months ago, and the info below helped me get it done:

Also, you can use these adapters to splice the headlamps to make life easier: https://www.amazon.com/gp/product/B01HNAT6CW/ref=oh_aui_detailpage_o07_s00?ie=UTF8&psc=1

"

Part numbers:
8117035571 Headlamp assembly, driver's side
8113035541 Headlamp assembly, passenger side
5310135080C0 Grille, SR5 version. TRD version doesn't have the Toyota logo in it. Also, this is a color coded part! The part number I listed is painted black.
8113524160 (2 needed) Dust cap for low beams
9007560028 (2 needed) New turn signal socket (modification necessary, see below)
7444NA bulb (2 needed) New turn signal/ DRL bulb

Everything else is pretty much a straight swap. High beams are still 9005, Low beams are still H11, front sidemarkers are still 168. I did swap the sidemarker to this LED bulb and I highly recommend you do the same. Not only is the LED much brighter than stock, the socket is in a place where you have to remove the whole headlight assembly to swap the bulb, so putting an LED in there should mean you'll never have to change it.

NOTES:
1) To modify the new turn signal socket, you simply have to cut off one of the "legs" that is preventing it from going into the assembly, and then trim about half a millimeter off the largest leg to get it in. It's very easy to see what I mean when you have it in your hands. It fits very snugly and I'm not worried about it coming out, even with it missing a leg. (The reason for this is the socket I used is not for a 4Runner. The 2014+ 4Runners use a 3-prong socket, and the previous models use a 2-prong socket. Rather than try to mess with re-wiring a perfectly good harness, I chose to just get a 2-prong socket and slightly modify it to fit. I'm very happy I chose this option, it took about 60 seconds per side to modify the socket. Alternatively, you can cut another slot in the headlight assembly itself to let the leg fit in. However I chose to cut a $5 socket vs. a $300 assembly)

2) The new headlight assembly has an "extension cord" built into it to connect the low beams. It's hard to explain, but basically one end plugs into your low beam bulb behind the dust cap, and snakes through the assembly to connect to the headlight wiring harness. This just makes it possible to connect the low beams without cutting through the dust cap. However, the problem with this is that the early model years have a different harness that doesn't work with this extension unless you want to cut and splice wires. I chose to drill a hole straight through the dust cap, and my Morimoto HID kit already had a rubber grommet to seal up the mess I had just made, and it looks as good as factory. You can do something very similar with the factory wiring and bulb also. Basically, just ignore that little cord completely and cut a small hole for your existing wires.

3) There's not enough slack in the wiring harness to have both the DRLs and the fog lights connected (this is because the DRLs get moved up into the new assembly and the fog lights stay down in the bumper). This wasn't a concern for me because I'm using an LED fog light bulb that had a ballast and longer wiring, so it fit just fine. This could be a concern for you, although it's very easy to splice and extend the wiring to fit. It probably doesn't matter for those of you intending to add an aftermarket bumper.

4) I tried to do this cheaper and bought these Depo headlights on Amazon. Please do NOT buy these, stick with OEM! The light output on those was straight dangerous, I couldn't even tell if my headlights were on until I turned off my fog lights.

5) I was able to do all this without removing the front bumper. I got in a small accident recently and it was already messed up, plus I plan on swapping to a steel bumper soon so I didn't care if I broke it a bit. It ended up no worse off though. There's enough flex in it so you just have to hold it out of the way to reach the lowermost bolt that secures the headlight assembly. Remove all the screws holding the fender liner to the bumper in the wheel wells, then just grab the bumper and tug sideways and forwards, it pops right off. You can see the silver bolt that holds the headlight assembly pretty easily. (Do this at your own risk, it worked for me but it's really not a good idea). I was able to swap the entire headlight assembly in about 20 minutes using this method. If you're replacing the entire bumper anyways, just take that off first and save yourself the trouble.

6) There's two flimsy plastic pieces on the inside of the bumper that I assume are to help with air flow. They were in the way of the new headlights and grille, so I just ripped them out. You can probably cut them to fit, but I didn't feel like wasting my time with that, and I was parked right next to the dumpster. "

 
Last edited:
If there is anyone with a 2010-2013 Trail Edition that is doing this conversion and you are located within a reasonable distance of Austin, Texas... I would like to buy your old parts to retro convert my 2016 Trail!
 
If there is anyone with a 2010-2013 Trail Edition that is doing this conversion and you are located within a reasonable distance of Austin, Texas... I would like to buy your old parts to retro convert my 2016 Trail!

are you still interested in doing this?
i have a 2013 trail that i plan on updating to a 2014+ front end.
 
Reviving this... anyone in Richmond, VA area wanting to swap a 2010-2013 front end for 2014+? Wanted to throw my hat in the ring for any takers
 
last minute help

I am converting my 13 limited to a 14+ pro front end.

The write up referenced makes the turn signals the new DRLs. As I am in Canada, DRLs are mandatory. They currently switch from my turn signal/marker to low beam using the auto sensor function. I would like to change this function if possible so my DRLs can be like the 14+ where the high beams are the DRL's.

I think I finally understand what needs to be done to have my DRLs to my high beams. I need this item to extend the wire from the lower portion (next to the fog light) to the assembly where the high beam is?

I still plan on buying this item but am unsure if it is necessary if I am trying to maintain the 14+ stock look and function.

I don't know if it's possible to have it fully converted to the stock look/function of the 14+ as there is not much information regarding this portion of the headlight that I can find. Any help would be greatly appreciated as I am planning to do this conversion next week.
 
Just want to give a shout out to the guys on here that replied [MENTION=119582]Jeffy[/MENTION] and the OP coconut4runner now known as _seek.adventure_ on IG.

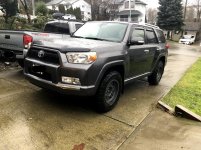
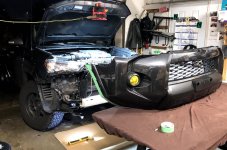
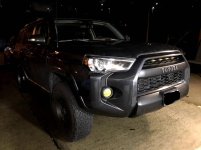
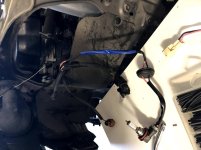
I got some before and after shots of my truck and I also took pictures of the wiring for those wondering about the conversion.

It is super simple if you have any basic electric wiring skills. Haha I say this when my dad is the one who wired it for me. But we basically cut the new blue housing cable and cut off my old socket. Then we stripped and soldered the wires together. That way, we can save the dust cap and rubber grommet.

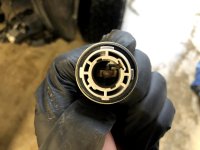
One of the last photos shows the adapter with 4 legs you need to insert and twist. All you need to do is trim the 4th leg of part 90075-60028. This is the your DRL you relocate up top and becomes your DRL and turn signal.

Anyways, thanks again for all the help!
 

Attachments

  • IMG_6530 copy.jpg
    IMG_6530 copy.jpg
    140.2 KB · Views: 442
  • IMG_6554.jpg
    IMG_6554.jpg
    137.3 KB · Views: 445
  • IMG_6562 copy.jpg
    IMG_6562 copy.jpg
    126.4 KB · Views: 452
  • IMG_6538.jpg
    IMG_6538.jpg
    120.6 KB · Views: 443
  • IMG_6535.jpg
    IMG_6535.jpg
    123.3 KB · Views: 445
This weekend I finished the swap on my 2011 SR5. I hit a deer and it was minimal damage, but this insurance check was plenty to pay for everything needed for the project.

I made a fairly thorough video of the process. Here's the link. The parts list and cost are posted there too.

Thanks to all of the information in this post and others to help get it done.

https://www.youtube.com/watch?v=gfzF1YsqgLM&feature=youtu.be
 

Attachments

  • double picture resize2.jpg
    double picture resize2.jpg
    119.3 KB · Views: 296
I am converting my 13 limited to a 14+ pro front end.

The write up referenced makes the turn signals the new DRLs. As I am in Canada, DRLs are mandatory. They currently switch from my turn signal/marker to low beam using the auto sensor function. I would like to change this function if possible so my DRLs can be like the 14+ where the high beams are the DRL's.

I think I finally understand what needs to be done to have my DRLs to my high beams. I need this item to extend the wire from the lower portion (next to the fog light) to the assembly where the high beam is?

I still plan on buying this item but am unsure if it is necessary if I am trying to maintain the 14+ stock look and function.

I don't know if it's possible to have it fully converted to the stock look/function of the 14+ as there is not much information regarding this portion of the headlight that I can find. Any help would be greatly appreciated as I am planning to do this conversion next week.
Did you ever figure this out? I was thinking, of disabling stock drl, installing aftermarket drl module to power highbeam
 
Late to again ! So is in everyone's opinion is going from 14' back is 10-13 easier ? As in no splicing for headlights just buying that yrs ? Anything else ? Of hassle note ? Any knowledge appreciated
 

Members online

Forum statistics

Threads
278,309
Messages
3,554,066
Members
248,016
Latest member
Advally Service

Trending content

Back
Top