2015 Dual Battery Installation

Thanks Keith PDX ,
I took your advise and used the Blue Sea ML-ACR along with a number of other devices from blue sea. Not the cheapest way to go. But The best for the purpose. I will post some pictures later when I figure out how to do that.

Rack
 
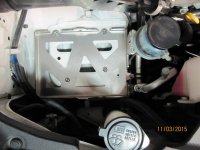
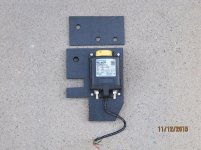
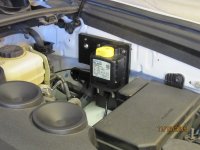
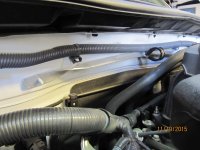
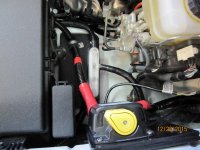
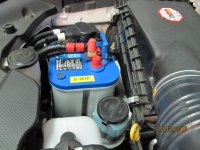
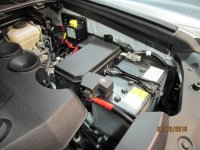
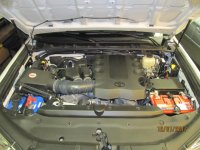
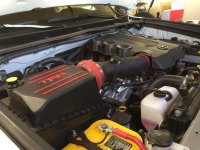
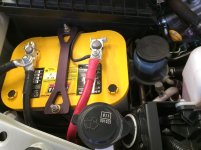
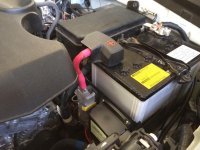
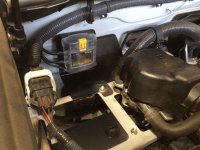
Here are some pics of My dual battery install.
The marine Battery was used because it has the extra terminal on top which will be used for the bussman fuse and relay panel. I used #1awg marine cable due to its flexibility and amp capacity. The added support bar on the fire wall is to keep from attaching to the OEM loom. Both batteries have a negative to ground at there location. I also ran #1 awg cable from both batteries to a negative bus bar which is also grounded to the frame. The bus bar also provides grounding for the ACR. I did not drill any holes to do this install, there are plenty of existing threaded holes in the body for mounting. I installed a terminal strip next to the ACR for testing the three position switch. I have not found a good location on the dash board for this switch yet. That is the next project when I install the light bar.
This was not the cheapest way to go but when I shut the hood I feel confident that the truck won't self destruct. Thanks to everyone who posted there dual battery mods. All the information was most helpful.
 

Attachments

  • 3rd battery pics002.JPG
    3rd battery pics002.JPG
    99.9 KB · Views: 3,732
  • 3rd battery pics002-001.jpg
    3rd battery pics002-001.jpg
    85 KB · Views: 3,767
  • 3rd battery pics002-002.JPG
    3rd battery pics002-002.JPG
    104.4 KB · Views: 3,685
  • 3rd battery pics002-003.JPG
    3rd battery pics002-003.JPG
    107.6 KB · Views: 3,693
  • 3rd battery pics002-004.JPG
    3rd battery pics002-004.JPG
    123.3 KB · Views: 4,462
  • 3rd battery pics002-005.JPG
    3rd battery pics002-005.JPG
    122.3 KB · Views: 5,603
  • 3rd battery pics002-006.JPG
    3rd battery pics002-006.JPG
    126.8 KB · Views: 5,536
  • New battery.jpg
    New battery.jpg
    131.7 KB · Views: 1,082
Last edited:
Here are some pics of My dual battery install.
The marine Battery was used because it has the extra terminal on top which will be used for the bussman fuse and relay panel. I used #1awg marine cable due to its flexibility and amp capacity. The added support bar on the fire wall is to keep from attaching to the OEM loom. Both batteries have a negative to ground at there location. I also ran #1 awg cable from both batteries to a negative bus bar which is also grounded to the frame. The bus bar also provides grounding for the ACR. I did not drill any holes to do this install, there are plenty of existing threaded holes in the body for mounting. I installed a terminal strip next to the ACR for testing the three position switch. I have not found a good location on the dash board for this switch yet. That is the next project when I install the light bar.
This was not the cheapest way to go but when I shut the hood I feel confident that the truck won't self destruct. Thanks to everyone who posted there dual battery mods. All the information was most helpful.

Great job! Looks very clean.
 
Shrockworks tray

I assume you used the Shrockworks tray too? Looks nice.

Yes sir, thanks. Shrockworks tray was used. It was a very easy to install for my 2012.

Shrockworks provided very detailed install instructions; highly recommended.
 
Niceo

Looks nice and clean can you describe the wiring for the on-auto-on switch? I f you have a photo of the switch schematic that would be great.

I'm wiring a painless solenoid isolator kit but rather than use their switch I'm trying to figure out how to use a Ottratw contour dpdt rocker in the panel (almost OEM looking).

Dirty parts has a kit option with a similar switch like the Contura but I have not found any wiring schematic posted out there.

Thanks

Mojav

Here a photo difference between the two

And showing the isolator. The bottom. Switch is the painless


65061038b086f66c37e1fddf2bf66a35.jpg
 
Thanks to this thread and Kieth for starting it, I got my dual battery setup going.

Running the fridge, rear aux 12v and winch off the optima.
 

Attachments

  • IMG_1103.jpg
    IMG_1103.jpg
    131.2 KB · Views: 2,266
  • IMG_1104.jpg
    IMG_1104.jpg
    127.2 KB · Views: 2,331
  • IMG_1105.jpg
    IMG_1105.jpg
    132.6 KB · Views: 2,420
  • IMG_1106.jpg
    IMG_1106.jpg
    131.1 KB · Views: 2,299
  • IMG_1041.jpg
    IMG_1041.jpg
    131.3 KB · Views: 2,239
Thanks to this thread and Kieth for starting it, I got my dual battery setup going.

Running the fridge, rear aux 12v and winch off the optima.

A couple questions,

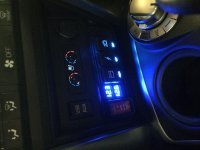
*can you take a clearer photo (likely with lights off) of the voltage monitor mounting
*Can you take another photo of the voltage meters with lights on but more from a drivers head looking down (i.e. how you see it when driving).

I bought that same voltage meter (assuming yours is the same as Keiths) but when I had it test fitted in the upper console I light it up by a 9v and did not like how bright it was. The OEM said that it was not dimmable, wonder how that location lower in the dash works
 
I added a piece of 20% window tint to mine... Much better. If I had it to do over I'd use something dimmable.

Great work guys! Glad the thread helped.
 
Suggestion to everyone running dual batteries...

Go back and put a coating of dielectric grease on all your terminal connections. Not just the batteries- the ring terminals at the fuses, relays, isolators, the grounds at the frame, all of it.

This will keep you running smoothly with no corrosion, so, when you really NEED your system to work it'll be there for you.

PS- The installs in this thread look nice- well thought out and executed!
 
A couple questions,

*can you take a clearer photo (likely with lights off) of the voltage monitor mounting
*Can you take another photo of the voltage meters with lights on but more from a drivers head looking down (i.e. how you see it when driving).

I bought that same voltage meter (assuming yours is the same as Keiths) but when I had it test fitted in the upper console I light it up by a 9v and did not like how bright it was. The OEM said that it was not dimmable, wonder how that location lower in the dash works


They are bright. I probably will put some tint on mine as well when I go back in there.

this work?:
 

Attachments

  • IMG_1108.jpg
    IMG_1108.jpg
    135.2 KB · Views: 2,123
So are you running your stock battery, and the die hard battery?
I know there is some info out there about the two batteries, but I want to know how your system is holding up, because this is the route I will be taking. Thank you.
 
So are you running your stock battery, and the die hard battery?
I know there is some info out there about the two batteries, but I want to know how your system is holding up, because this is the route I will be taking. Thank you.

I'll bump this and ask a follow-up. Did your odyssey mount into the shrockworks battery cage ok? The dimensions I read online led me to believe the pc1500 was too long.
 
So are you running your stock battery, and the die hard battery?
I know there is some info out there about the two batteries, but I want to know how your system is holding up, because this is the route I will be taking. Thank you.

System is still rocking! The different batteries concern is only present if they're drastically different ages or different chemistries that have a voltage difference.
 
Took delivery of this kit today, quality looks to be superb. Thanks again for posting details it'll come in handy for my install.
 

Members online

Forum statistics

Threads
278,309
Messages
3,554,075
Members
248,016
Latest member
Advally Service

Trending content

Back
Top