3.4 Valve Cover Gasket Replacement (part#s n pics)

Hey Guys,

Here's a comprehensive video regarding doing the Valve Cover Gasket Job. It was a collaboration of [MENTION=102606]infamousRNR[/MENTION] and myself. We're hoping it helps out a lot of people wanting to tackle this job themselves and avoid the steep labor rates at a local shop or the dealership.

If you have any questions, please ask. If you have comments on how you like it or how we can do a better job, please let us know. Enjoy!

<iframe width="560" height="315" src="https://www.youtube.com/embed/N5fAXAuGozI" frameborder="0" allowfullscreen></iframe>
 
Thank you so much

Hi guys, this post is what made me join this forum. Thank you so much for starting this thread and the great write up Jon and mbtim for the fantastic (and timely) video and everyone else for the added advice. I'm pretty much a novice at this stuff and you guys saved me $400. I also had the Haynes manual for kicks and it helped too. I just called Toyota and they quoted me $780 including tax and 4.5 hours shop time. I bought everything OEM except felpro for the plenum gaskets (convenience). $$ are Canadian so take 70% or so for US dollars, say $450 USD?

I was changing spark plugs and noticed I had both valve cover gaskets leaking and also 4 of the plug tube seals. I will probably have to do one of the coils too because it's rubber is soft. After looking this stuff up I found this post and you guys gave me the confidence to do it myself. It took me about 8-10 hours worth of work just tinkering away 1/2 hour here and there in the evening when the kids were in bed. I was methodical, if there's a next time, 4-5 hours I think, by myself.

I did:
Denso spark plugs ($3 each) valve cover gaskets ($50 each), camshaft plugs ($35 each I think) valve cover bolt washer seals x16 ($2 each), tube seals ($6 each), PCV valve ($20!) and grommet ($20!), plenum gaskets ($20 each) plug Toyota FIPG ($20 tube) all about $400 including 15% tax. I reused my aluminum half-moon plugs. Had to buy a new in-lb torque wrench, throttle body cleaner, Mass Air Flow cleaner, dielectric grease. I imagine it would have been cheaper with non-OEM and order online, but I felt better with mostly OEM.

I read 4RUN0326’s comment about whether the halfmoons and camshalft plugs really need to come out. My two cents is that no, probably not, but when you take out the valve cover gasket the little bit of FIPG that is on the joints of the half moons and plugs might come loose, when you put some more FIPG in there it might not get in the little cracks so your better off doing it once and doing them than finding out later you should have. I still reused my aluminum half-moons though.

Saw a question on why you need the washer seals. I believe it’s because otherwise you’ll be cranking down aluminum to aluminum to steel bolts and doing it in a pattern for flatness. You need these little guys to protect this stuff from cracking and to get a nice even seal.
Some things I ran into.

I don't like that wiring harness (you knew I was going to say that), but that duct tape (the real foil stuff for actual ducts) wrapped all around it really came in handy when it did break on me on the drivers side. The little tabs that have the bolt holes broke just by turning the bolts! :( One thing, there's a single wire, mid engine at the back of the harness, you can barely see it. You can reach in and pull it straight up to detach (it doesn't have a clip). This will help you lift the harness up quite high so you can get both valve covers off. Also carefully detach two electrical clips passenger side front, under the timing belt cover thingy.

I did disconnect my negative battery cable so my ECM would reset, seems to run nicely now so I don’t know if that helped. I’d do it anyway so I wouldn’t zap something, or myself.

I did not put any anti-seize on the spark plugs. Denso says don't put it on because then the threads will slide more easily if you have it on, and will go in further than they were meant to with the same torque. This makes lots of sense. Says the plugs already have some kind of metal, (nickel or something) on the threads that help with this. It said if you do use anti seize lower the torque to 2/3rds. My plugs were older than earth (don't ask I'll feel bad) and I still got them out. My plugs had maybe a 2-3 mm (0.08-0.1 in) gap!! They need 0.043. I couldn't find a gap tool with 0.043 but there were lots with 0.044. Don't worry about this, it's just number rounding, Toyota wants 1.1 mm. 0.043 inch is 1.0922 mm and 0.044 inch is 1.1176 mm. I just made sure my 0.044 didn't go through the pre-gapped plug. Funny thing about the plugs, I expected I'd run into 3 Densos and 3 NGKs, but I had all Densos. I asked the Toyota parts guy and he told me there are Denso's in some and NGKs in others because they were made in different factories so each factory put in what they had. The Haynes just lists Denso and Type 1 and NGK as Type 2. I don't know the truth, so when I asked the Toyota parts guy if I should have 3 of each and he couldn't sell me NGKs, I just trusted him. He seemed to know his stuff otherwise.

Before you do the valve cover gaskets, check those valve cover bolts, torque them to the 52 in-lbs because I can tell you right now they are loose. I read lots of people giving me this advice so I checked my own with my hands and they felt tight. I figured mine weren't loose and carried on, but when I got my wrench on them they came off wayyy too easily, so close to finger tight. I still needed to do the job because of the leaking plug tube seals, but if it was only the cover gaskets that would have been a little easier, except for the drivers side.

Those plug tube seals, I used a 1-1/4 socket to push them on instead of a 32 mm (It's just what I had and 1-1/4 in is 31.75 mm). I found that if you put the socket on them you could just lean on them and they would slide in real slow. Once the were seated a bit I used my hammer for the last few taps. A bit of motor oil on the inside with my finger really helped get them over the plug tubes.

I worried about being fast enough to put the camshaft plugs and 2 half moons in because the FIPG says it is ready in 15 minutes in the future I might like something that takes a bit longer, but it does make me feel nice to have used the Toyota stuff.

I labeled everything religiously, this did come in handy because the truck started up first time. Having a piece of cardboard labeled with some holes was a great idea and worked well.

I did not drain the coolant. The coolant lines into the throttle body have the metal clips and I just plugged them lightly and lifted them up a little, I could hear the coolant run back down the hose and they never leaked on me. A little 'coolant hose removal' tool (looks like an ice pick hook thingy) is super handy for those two little hoses under the throttle body.
Didn't think I would get new plenum gaskets, but there was some RTV or something on them and it looked like a flat surface wasn't going to be made so I got some new ones and cleaned up the old surface.

I took the throttle body and upper plenum off in one piece. I would think about taking the throttle body off by itself next time because it will be easier to get to the hoses underneath it, but I've heard the throttle body bolts can wreck when removing them and there's the potential cost of the new gasket. *shrug* My throttle body was really dirty so I cleaned it and the MAF. Used throttle body cleaner on the caked on stuff inside the plenum, seamed to work well. Had plenty of carbon or something on the intake manifold tubes but I didn't know if I should clean that at all since next stop is the air intake valves and cylinder. I left them alone for fear of getting some gunk in there and wrecking something.

The little PCV grommet is tough to get out. I took mine off when I had the valve cover off, so it was a little easier.

I really need to change my oil more frequently, seemed like there was a lot of 'gunk' in there and my work is only 5 kms away so short trips for my DD, cold-ish -15 C (5 F) winters, hot-ish summers 35-40 C (95-104 F) degrees and I occasionally pull a small camping trailer. I think I'll do the oil 5 times a year instead of 4 now that I've seen the camshafts! :)

I'm eyeing up that Tundra brake upgrade now....

Thanks a lot for your help everyone, really gave me the confidence to pull this off and sorry for the long book, but I'm just sooo happy I was able to do this :)

 
Hi guys, this post is what made me join this forum. Thank you so much for starting this thread and the great write up Jon and mbtim for the fantastic (and timely) video and everyone else for the added advice. I'm pretty much a novice at this stuff and you guys saved me $400. I also had the Haynes manual for kicks and it helped too. I just called Toyota and they quoted me $780 including tax and 4.5 hours shop time. I bought everything OEM except felpro for the plenum gaskets (convenience). $$ are Canadian so take 70% or so for US dollars, say $450 USD?

I was changing spark plugs and noticed I had both valve cover gaskets leaking and also 4 of the plug tube seals. I will probably have to do one of the coils too because it's rubber is soft. After looking this stuff up I found this post and you guys gave me the confidence to do it myself. It took me about 8-10 hours worth of work just tinkering away 1/2 hour here and there in the evening when the kids were in bed. I was methodical, if there's a next time, 4-5 hours I think, by myself.

I did:
Denso spark plugs ($3 each) valve cover gaskets ($50 each), camshaft plugs ($35 each I think) valve cover bolt washer seals x16 ($2 each), tube seals ($6 each), PCV valve ($20!) and grommet ($20!), plenum gaskets ($20 each) plug Toyota FIPG ($20 tube) all about $400 including 15% tax. I reused my aluminum half-moon plugs. Had to buy a new in-lb torque wrench, throttle body cleaner, Mass Air Flow cleaner, dielectric grease. I imagine it would have been cheaper with non-OEM and order online, but I felt better with mostly OEM.

I read 4RUN0326’s comment about whether the halfmoons and camshalft plugs really need to come out. My two cents is that no, probably not, but when you take out the valve cover gasket the little bit of FIPG that is on the joints of the half moons and plugs might come loose, when you put some more FIPG in there it might not get in the little cracks so your better off doing it once and doing them than finding out later you should have. I still reused my aluminum half-moons though.

Saw a question on why you need the washer seals. I believe it’s because otherwise you’ll be cranking down aluminum to aluminum to steel bolts and doing it in a pattern for flatness. You need these little guys to protect this stuff from cracking and to get a nice even seal.
Some things I ran into.

I don't like that wiring harness (you knew I was going to say that), but that duct tape (the real foil stuff for actual ducts) wrapped all around it really came in handy when it did break on me on the drivers side. The little tabs that have the bolt holes broke just by turning the bolts! :( One thing, there's a single wire, mid engine at the back of the harness, you can barely see it. You can reach in and pull it straight up to detach (it doesn't have a clip). This will help you lift the harness up quite high so you can get both valve covers off. Also carefully detach two electrical clips passenger side front, under the timing belt cover thingy.

I did disconnect my negative battery cable so my ECM would reset, seems to run nicely now so I don’t know if that helped. I’d do it anyway so I wouldn’t zap something, or myself.

I did not put any anti-seize on the spark plugs. Denso says don't put it on because then the threads will slide more easily if you have it on, and will go in further than they were meant to with the same torque. This makes lots of sense. Says the plugs already have some kind of metal, (nickel or something) on the threads that help with this. It said if you do use anti seize lower the torque to 2/3rds. My plugs were older than earth (don't ask I'll feel bad) and I still got them out. My plugs had maybe a 2-3 mm (0.08-0.1 in) gap!! They need 0.043. I couldn't find a gap tool with 0.043 but there were lots with 0.044. Don't worry about this, it's just number rounding, Toyota wants 1.1 mm. 0.043 inch is 1.0922 mm and 0.044 inch is 1.1176 mm. I just made sure my 0.044 didn't go through the pre-gapped plug. Funny thing about the plugs, I expected I'd run into 3 Densos and 3 NGKs, but I had all Densos. I asked the Toyota parts guy and he told me there are Denso's in some and NGKs in others because they were made in different factories so each factory put in what they had. The Haynes just lists Denso and Type 1 and NGK as Type 2. I don't know the truth, so when I asked the Toyota parts guy if I should have 3 of each and he couldn't sell me NGKs, I just trusted him. He seemed to know his stuff otherwise.

Before you do the valve cover gaskets, check those valve cover bolts, torque them to the 52 in-lbs because I can tell you right now they are loose. I read lots of people giving me this advice so I checked my own with my hands and they felt tight. I figured mine weren't loose and carried on, but when I got my wrench on them they came off wayyy too easily, so close to finger tight. I still needed to do the job because of the leaking plug tube seals, but if it was only the cover gaskets that would have been a little easier, except for the drivers side.

Those plug tube seals, I used a 1-1/4 socket to push them on instead of a 32 mm (It's just what I had and 1-1/4 in is 31.75 mm). I found that if you put the socket on them you could just lean on them and they would slide in real slow. Once the were seated a bit I used my hammer for the last few taps. A bit of motor oil on the inside with my finger really helped get them over the plug tubes.

I worried about being fast enough to put the camshaft plugs and 2 half moons in because the FIPG says it is ready in 15 minutes in the future I might like something that takes a bit longer, but it does make me feel nice to have used the Toyota stuff.

I labeled everything religiously, this did come in handy because the truck started up first time. Having a piece of cardboard labeled with some holes was a great idea and worked well.

I did not drain the coolant. The coolant lines into the throttle body have the metal clips and I just plugged them lightly and lifted them up a little, I could hear the coolant run back down the hose and they never leaked on me. A little 'coolant hose removal' tool (looks like an ice pick hook thingy) is super handy for those two little hoses under the throttle body.
Didn't think I would get new plenum gaskets, but there was some RTV or something on them and it looked like a flat surface wasn't going to be made so I got some new ones and cleaned up the old surface.

I took the throttle body and upper plenum off in one piece. I would think about taking the throttle body off by itself next time because it will be easier to get to the hoses underneath it, but I've heard the throttle body bolts can wreck when removing them and there's the potential cost of the new gasket. *shrug* My throttle body was really dirty so I cleaned it and the MAF. Used throttle body cleaner on the caked on stuff inside the plenum, seamed to work well. Had plenty of carbon or something on the intake manifold tubes but I didn't know if I should clean that at all since next stop is the air intake valves and cylinder. I left them alone for fear of getting some gunk in there and wrecking something.

The little PCV grommet is tough to get out. I took mine off when I had the valve cover off, so it was a little easier.

I really need to change my oil more frequently, seemed like there was a lot of 'gunk' in there and my work is only 5 kms away so short trips for my DD, cold-ish -15 C (5 F) winters, hot-ish summers 35-40 C (95-104 F) degrees and I occasionally pull a small camping trailer. I think I'll do the oil 5 times a year instead of 4 now that I've seen the camshafts! :)

I'm eyeing up that Tundra brake upgrade now....

Thanks a lot for your help everyone, really gave me the confidence to pull this off and sorry for the long book, but I'm just sooo happy I was able to do this :)

Glad you had success with this. We should have shown in our video the two electrical connections on the passenger side under the timing cover but we forgot to document that. We figured people would figure it out. I don't think we mention disconnecting the injector connections either but we also thought people would figure out they had to disconnect them to get the wiring harnesses out of the way. That's interesting that there is a connection you can disconnect on the driver side to get more movement out of the harness. I'll have to remember that if I ever have to do it again.

As for the half moons and cam plugs, I think I would always recommend a person reseal the half moons and replace the cam plugs. It's exactly like the question of whether or not to replace the water pump while you're replacing the timing belt. It's a lot of labor to get in there, so why not take care of it, because even though it's not leaking now, you would be kicking yourself down the road if it started to leak and you have to go back in all over again.

The plenum gaskets really should not be reused. You might be able to get away with it, but why risk a leak when the gaskets are inexpensive?

Same with the valve cover bolt washers. They have a rubber bottom and smash down as you torque the bolts down. The old washers will have hardened and brittle rubber so why reuse them when new ones aren't that expensive.

Buying new half moons is definitely not needed unless they get damaged during removal.

I did the same as you and didn't remove my throttle body from the upper plenum but it does make the cleaning of it much easier.

That's interesting about Denso not recommending using anti-seize on the threads. I've changed plugs on many engines and I used anti-seize for the first time on my 4runner because I read it was a recommended practice. But, I didn't bother with torque specs when changing my plugs. The plugs have a crush washer and you can feel when you make contact with the washer on the top of the head and then feel when it crushes down and the plug snugs up. Plugs are one of those things like oil pan drain bolts or the fill and drain bolts on a differential. I've loosened and tightened them on so many occasions that I just know how to properly tighten them without over-tightening.

As for the prices you quoted, that sounds VERY expensive. Did you buy the parts online or visit a local dealership? I think you could have saved yourself a bundle of money. Maybe as much as a $200 or 50%. Is it a Canada thing why it was so expensive?

As for the buildup of gunk in your plenum, [MENTION=101985]ShooterMcGavin[/MENTION] started a thread regarding this. He cleaned it up with purple power and actually removed his intake manifold to get in deeper to clean things up. Here's his thread:
http://www.toyota-4runner.org/3rd-g...d-up-intake-under-intake-manifold-advice.html

Anyway, I'm stoked you had success with this and that [MENTION=102606]infamousRNR[/MENTION] and my video was helpful to you. Your success with this repair was exactly why we put the time into video documenting the process.
 
Hi there,

I went to the local dealership to get the parts. I just felt it would be much easier for me to get exactly what I needed if I was talking to Toyota. I bet the increased cost is both a result of the dealership $$ and the 'Canada" thing. I don't doubt cost for this in the states could be 50% when you also add in the exchange rate. When I'm feeling more adventurous I'll order online and save a few bucks.

Here the link to the Denso page where they say don't put anti-seize on. No big deal just figured it's good info. I haven't changed too many plugs but I bet it's hard to screw up. About half-way down there are two yellow signs with exclamation marks and it talks a bit about lubricant on the threads. DENSO SPARK PLUGS

For the gunk in my engine, I'm going to do several short oil changes. It just looked like maybe an older engine should.

Thanks again!
 
Last edited:
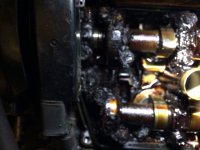
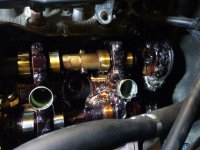
Did my valve gaskets today. Here's what my engine looked like when I took the covers off. Looks like the previous owner hadn't done an oil change in a few years. Air filter looked just as bad.
 

Attachments

  • IMG_5520.JPG
    IMG_5520.JPG
    97.7 KB · Views: 2,189
  • IMG_5521.JPG
    IMG_5521.JPG
    121.4 KB · Views: 2,224
Did my valve gaskets today. Here's what my engine looked like when I took the covers off. Looks like the previous owner hadn't done an oil change in a few years. Air filter looked just as bad.

That's a bummer. When I took my covers off, I was afraid I was going to see a ton of sludge but the previous owners must have done regular oil changes on my truck because there was no sludge to be seen. Changing the oil on a regular basis is the single best way to give your engine a longer life. I don't understand how people can abuse their vehicles like this.
 
That's a bummer. When I took my covers off, I was afraid I was going to see a ton of sludge but the previous owners must have done regular oil changes on my truck because there was no sludge to be seen. Changing the oil on a regular basis is the single best way to give your engine a longer life. I don't understand how people can abuse their vehicles like this.

I'm just glad I didn't take the 4R to the dealership to do the work. They would have either charged me a ridiculous amount or not done anything inside the engine and just left it. It sucks that it's that bad, but at least it's getting fixed and should be good to go soon.

I plan on driving on it for a few weeks with some Royal Purple in it and then I'll change it again. Hopefully that clears up anything they weren't able to get.

This'll be a brand new 4Runner by the time I'm done with it.
 
Great write ups and instructions for this. Done about 4 of valve cover gaskets on various 3rd gens. Only thing I would suggest is to wash your engine day before to help eliminate dirt and oil from getting into things... If you do wash it... Make sure the engine is dry before working on it because getting water inside an engine isn't good either.

Rafal
 
how much did the dealer charge for the job?

Dude, do not go to the dealer for this. It will cost you a ton of money. At the very least, do a Yelp search and find an independent shop near you with good reviews. But, if you're at all mechanically inclined, and you have some basic tools, you can do this job yourself. If you take your time, label hose and electrical connections, and use the video tutorial [MENTION=102606]infamousRNR[/MENTION] and I have provided, you can knock this job out yourself, learn something about working on your own rig, walk away with a sense of accomplishment and save yourself a bundle of money. This job is not technically hard, it's just time consuming.
 
Thanks for the video! I'll probably do my valve cover gaskets next year and I figure I'll also check my valve clearances + adjust the shims (if necessary) while I'm in there. From the video, it doesn't look like there's much room, especially with the plastic fuel injection rail harness in the way.

Can you comment on how much room there is to perform a valve adjustment or if additional components might need to be removed for access?
 
I wouldn't be the person to answer this question for you. I don't have any experience doing a valve adjustment on our engines or any engine for that matter. Hopefully somebody can chime in with some technical knowledge on the subject.

Sent from my XT1060 using Tapatalk
 
So this sunday I'm planning on replacing my valve cover gasket since when I bought the car a couple months ago I was told there is a minor leak. I bought all the parts for the job I'm just going through all my dads tools and checking what I have and what I need. However I am 18 and this is my first time actually working on my car so I'm a bit terrified, any beginners advice?
 
So this sunday I'm planning on replacing my valve cover gasket since when I bought the car a couple months ago I was told there is a minor leak. I bought all the parts for the job I'm just going through all my dads tools and checking what I have and what I need. However I am 18 and this is my first time actually working on my car so I'm a bit terrified, any beginners advice?

Here's some advice:
1) Take some before pictures of different sides of the engine just in case you need a reference of how things go back on the engine.
2) Label hose connections and electrical connections with corresponding letters or numbers so you know where they connect back to.
3) Draw a diagram of how the spark plug wires run from the coil packs on the passenger side and route over to the driver side so you don't put them back wrong.
3) Make sure you have all the parts you need to do this job right. Along with the valve cover gaskets, you should replace the cam plugs on the backs of the heads. You should replace the valve cover bolt washers. You should replace the spark plug tube seals. You'll need a tube of Toyota FIPG or similar sealant.
4) This would be a great time to replace the spark plug wires and spark plugs so consider doing it.
5)Write notes of the order you took things apart and cross them off as you put them back onto the engine.
6) Make a diagram of the plenum bolt and nut patterns and place the bolts onto the pattern as you take them off so you don't forget which bolt or nut goes where.
7) With other bolts and nuts you take off, put them onto a post it or piece of paper labeling what it's for and/or where it came off the engine so you're not trying to figure out where it needs to go.
8) Take your time and go slow. This is not a race. Do it right the first time.
9) Lastly, use this video [MENTION=102606]infamousRNR[/MENTION] and I made for this job. It shows you everything you need to be successful. Watch it in advance to see if you have all the parts and tools you need before starting. Good luck!

<iframe width="560" height="315" src="https://www.youtube.com/embed/N5fAXAuGozI" frameborder="0" allowfullscreen></iframe>
 
looks great for 344k! i hope mine looks that good at 243k, my gaskets are starting to seep too. thanks for the writeup!
6.gif

4.gif
31.gif
 
Here's some advice:
1) Take some before pictures of different sides of the engine just in case you need a reference of how things go back on the engine.
2) Label hose connections and electrical connections with corresponding letters or numbers so you know where they connect back to.
3) Draw a diagram of how the spark plug wires run from the coil packs on the passenger side and route over to the driver side so you don't put them back wrong.
3) Make sure you have all the parts you need to do this job right. Along with the valve cover gaskets, you should replace the cam plugs on the backs of the heads. You should replace the valve cover bolt washers. You should replace the spark plug tube seals. You'll need a tube of Toyota FIPG or similar sealant.
4) This would be a great time to replace the spark plug wires and spark plugs so consider doing it.
5)Write notes of the order you took things apart and cross them off as you put them back onto the engine.
6) Make a diagram of the plenum bolt and nut patterns and place the bolts onto the pattern as you take them off so you don't forget which bolt or nut goes where.
7) With other bolts and nuts you take off, put them onto a post it or piece of paper labeling what it's for and/or where it came off the engine so you're not trying to figure out where it needs to go.
8) Take your time and go slow. This is not a race. Do it right the first time.
9) Lastly, use this video [MENTION=102606]infamousRNR[/MENTION] and I made for this job. It shows you everything you need to be successful. Watch it in advance to see if you have all the parts and tools you need before starting. Good luck!

<iframe width="560" height="315" src="https://www.youtube.com/embed/N5fAXAuGozI" frameborder="0" allowfullscreen></iframe>

Thank you so much for the detailed response, your video has been the most insightful information I've found on the replacement and I've watched through it a couple times now. Luckily my dad finally agreed to come lend a hand so it will be easier. Thanks for the help!
 
Thank you so much for the detailed response, your video has been the most insightful information I've found on the replacement and I've watched through it a couple times now. Luckily my dad finally agreed to come lend a hand so it will be easier. Thanks for the help!

Well, isn't that part of the job description of being a dad? Helping your son work on his ride. Glad you got some help and hope everything goes smooth for you guys.
 
I'll need to do this soon... Has anyone disconnected the coolant lines to the TB and just looped them back to each other as a bypass or to eliminate them altogether? I have done this on my 300ZX because it is of very little benefit here in NC to have those lines running through the TB. Just curious if anyone has thought to do this.
 

Members online

No members online now.

Forum statistics

Threads
278,316
Messages
3,554,124
Members
248,016
Latest member
Advally Service

Trending content

Back
Top