
You are using an out of date browser. It may not display this or other websites correctly.
You should upgrade or use an alternative browser.
You should upgrade or use an alternative browser.
4ever4running's 2002 4Runner Build
- Thread starter 4ever4running
- Start date

4ever4running
New member
About 2.5 weeks is what he told me, and it ended up being 3 weeks. Not bad at all compared to some manufacturers I've heard of.
James.
2.5 - 3 weeks isn't bad at all! Especially considering that the wait for my Shrockworks will probably end up being closer to 4 months.
since you've got the brakes for 15 inch wheels, how are they? You've got a ton of weight in steel wheels, tires, and all that weight in the rear so it makes me curious.
They do their job but they definitely aren't as responsive as they used to be, or as responsive as I would like...As soon as my tires wear down, I am planning on stepping up to 16" or 17" wheels with 35's and doing the Tundra brake upgrade which should help to compensate for the wheels, tires, and everything else.
4ever4running
New member
December 21st - December 29th Update
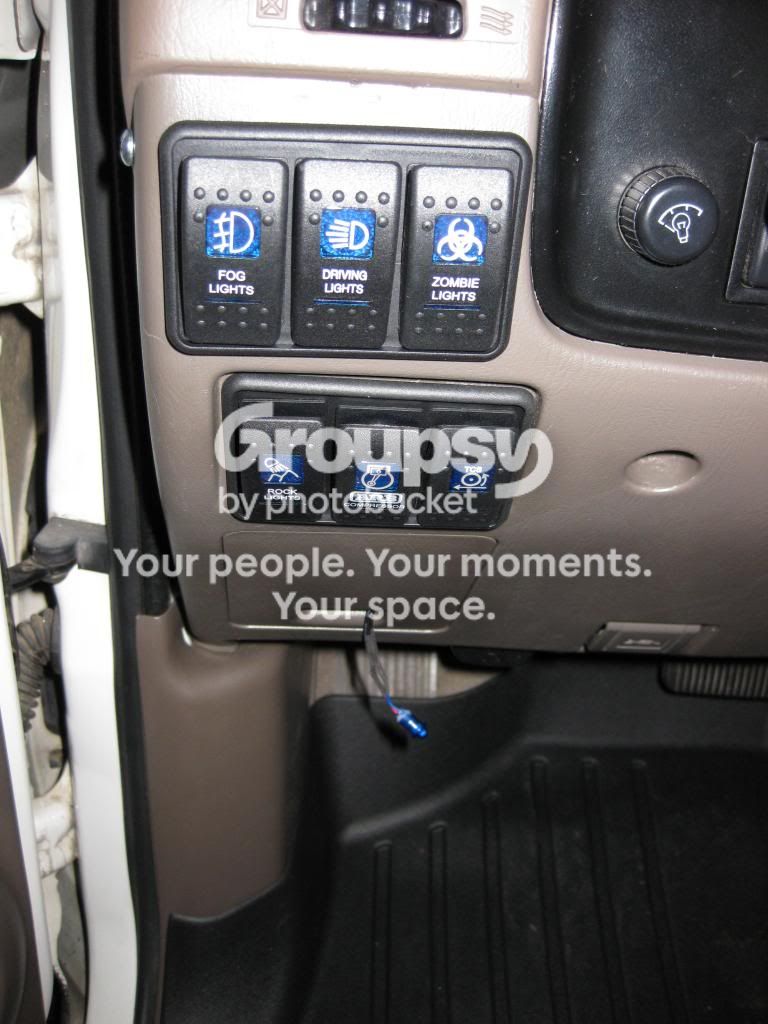
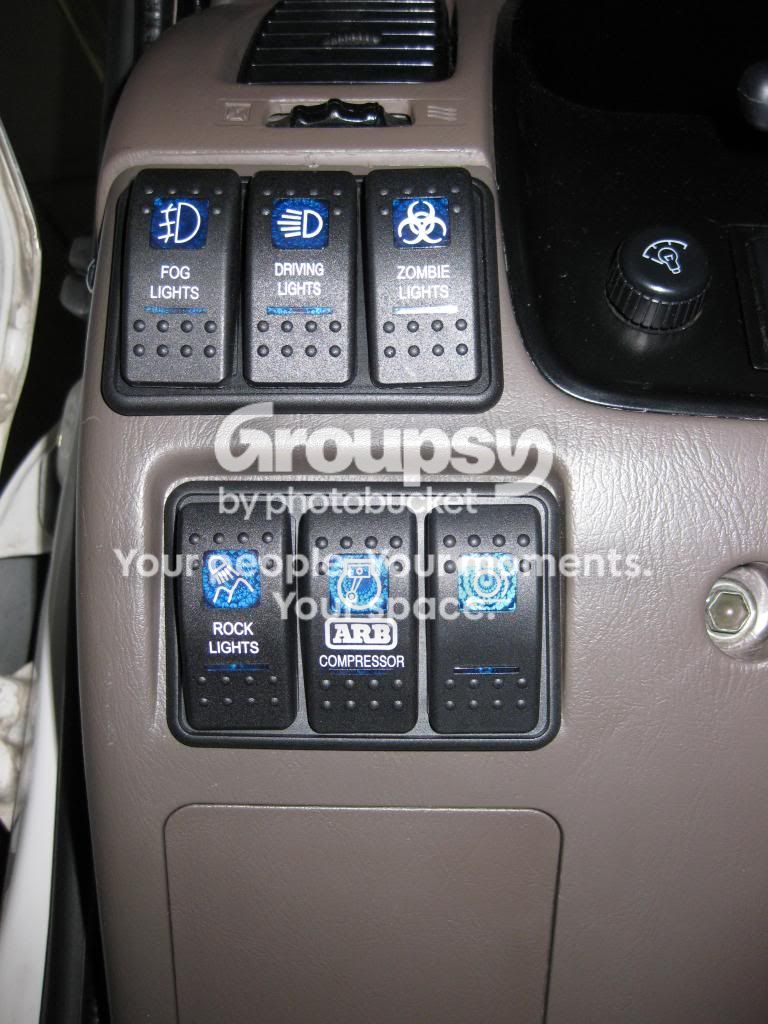
I bumped of my contura rocker switches with my knee and broke the actual rocker. So, I went on OTRATTW.com with the intention of just replacing the rocker, but that didn't last long...I ended up ordering another rocker switch and another 3-switch holder. I figure that with my ShrockWorks coming I will eventually have enough accessories to fill the switches. But, for now the "Zombie Lights" switch is the only one that is functional on the top row and it controls my roof lights. I am hoping to order some PIAA 510 Ion Crystal fog lights to fill the bottom light holes of the ShrockWorks and I will eventually get some lights to sit on top of the bumper.
I used my Dremel to cut the hole to fit the switch holder and the switches. It was a pretty easy process but it took a little while because I was being really careful to not cut more than I needed to.
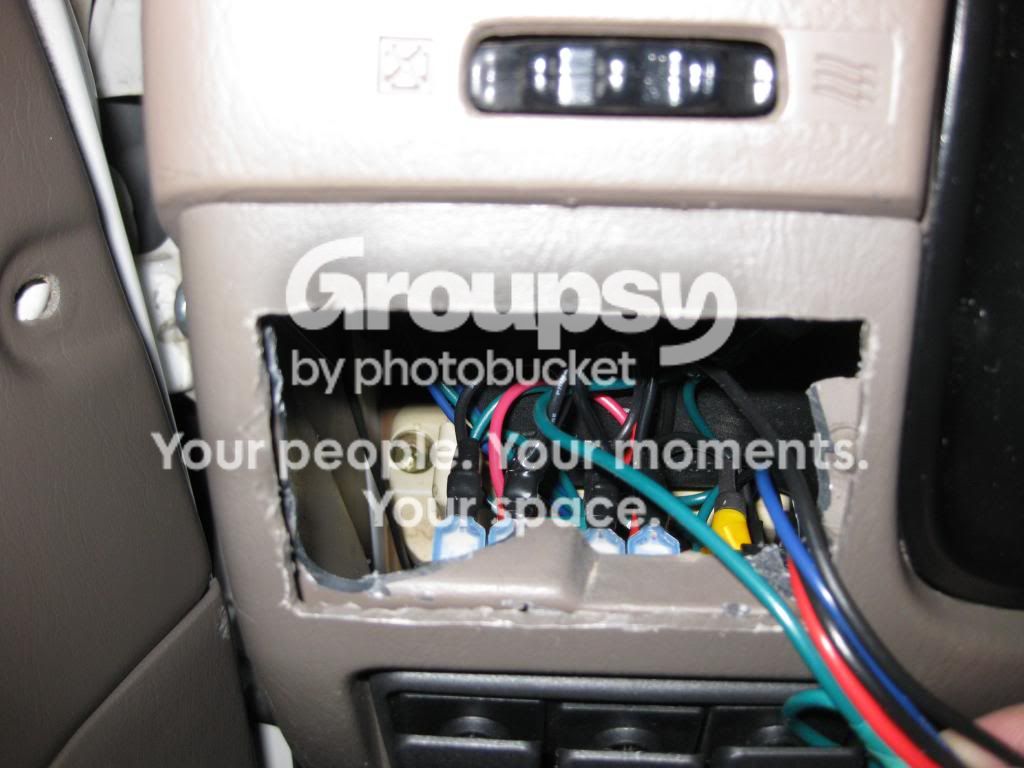
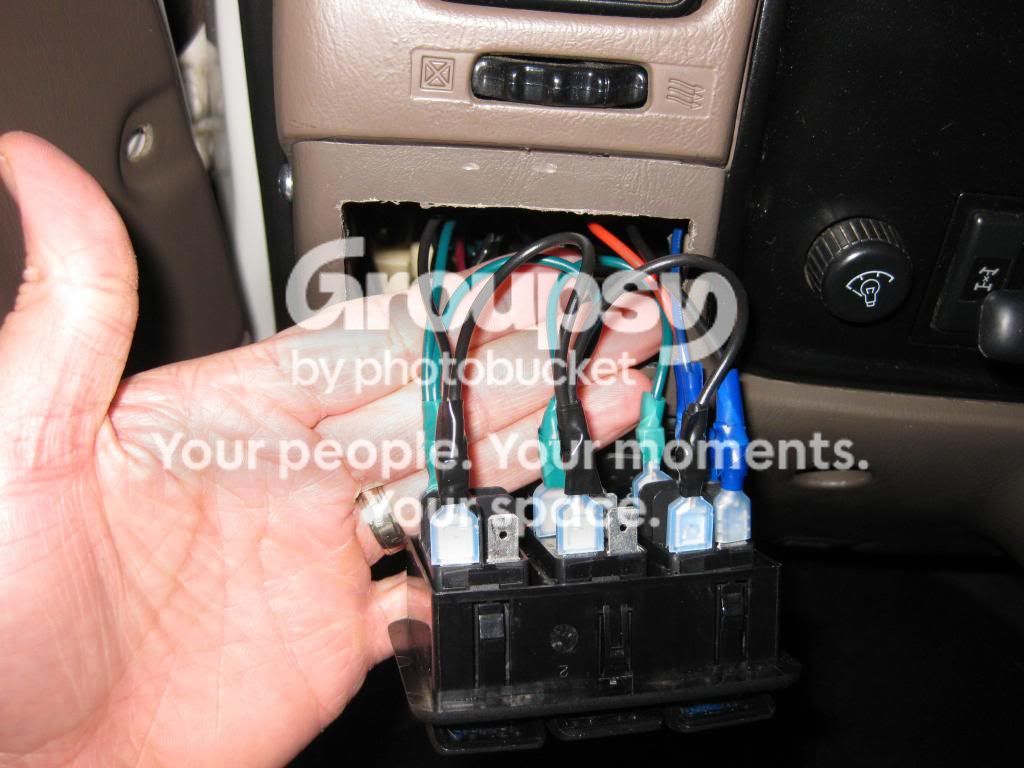
Also, with 6 switches the wiring was getting out of control. So I cleaned it up by looping all the 12V lights (green wires) and the grounds (black wires) together. It was a PITA but definitely worth it because the wiring is a lot cleaner.
Final Product:

Finally, my big Christmas present from my wife was some Weather Tech Digial Fit floor mats. They have already gotten some use because of some recent rain and snow and so far I love them!



I bumped of my contura rocker switches with my knee and broke the actual rocker. So, I went on OTRATTW.com with the intention of just replacing the rocker, but that didn't last long...I ended up ordering another rocker switch and another 3-switch holder. I figure that with my ShrockWorks coming I will eventually have enough accessories to fill the switches. But, for now the "Zombie Lights" switch is the only one that is functional on the top row and it controls my roof lights. I am hoping to order some PIAA 510 Ion Crystal fog lights to fill the bottom light holes of the ShrockWorks and I will eventually get some lights to sit on top of the bumper.
I used my Dremel to cut the hole to fit the switch holder and the switches. It was a pretty easy process but it took a little while because I was being really careful to not cut more than I needed to.
Also, with 6 switches the wiring was getting out of control. So I cleaned it up by looping all the 12V lights (green wires) and the grounds (black wires) together. It was a PITA but definitely worth it because the wiring is a lot cleaner.
Final Product:
Finally, my big Christmas present from my wife was some Weather Tech Digial Fit floor mats. They have already gotten some use because of some recent rain and snow and so far I love them!
Last edited:
4ever4running
New member
I talked with Joel from Engo and he let me know that my winch just shipped today so I should have it mid-next week!

4ever4running
New member
Wow, I just noticed our interiors are pretty close to matching! Good work on the switch panels, love the Zombie Lights switch lol.
Great minds think alike. Thanks man! Haha yeah I actually wanted to get a "Roof Lights" switch but OTRATTW was out of stock when I placed my order so I scrolled though the other options and found the Zombie Lights switch and just couldn't pass it up.
4ever4running
New member
January 9th Update
I got home from work and had my winch waiting for me :thumb3:.
My initial reaction is that this thing is beefy! and it looks great! I am really impressed at how well the winch was packaged. Everything was in great shape and completely undamaged.
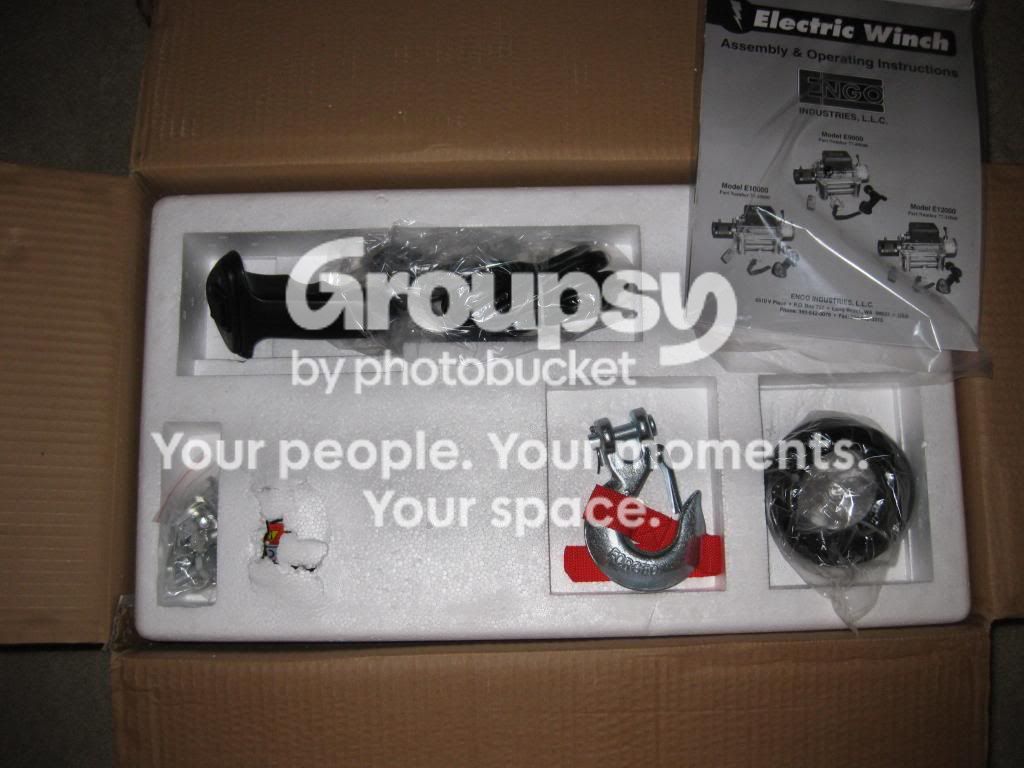
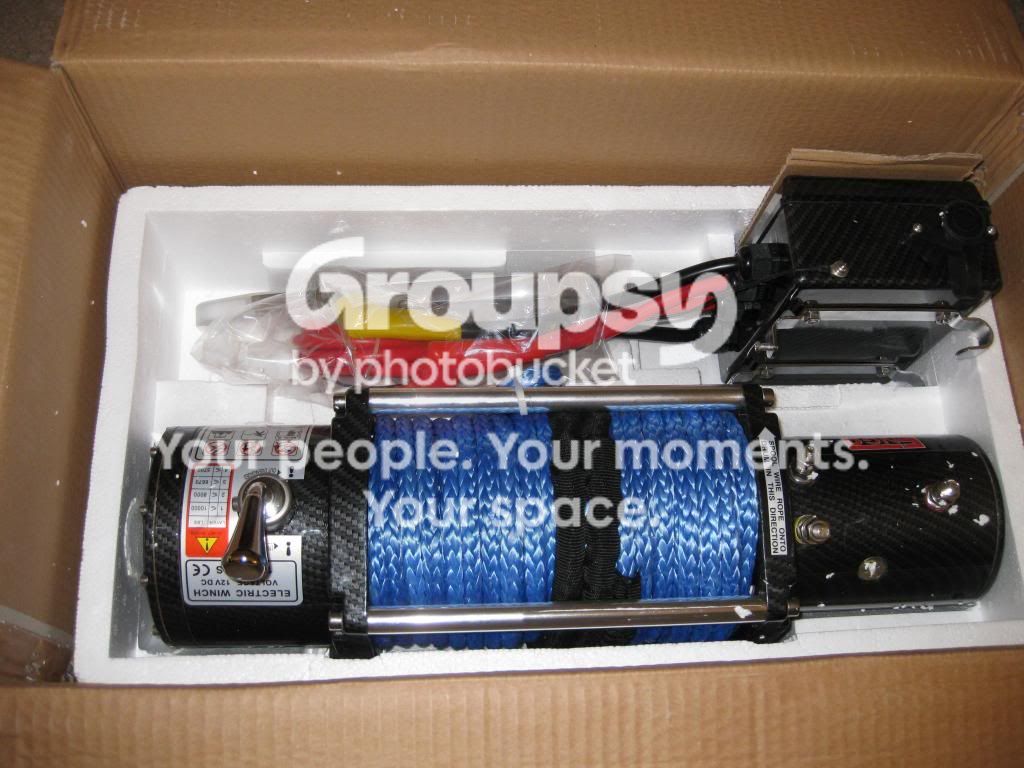
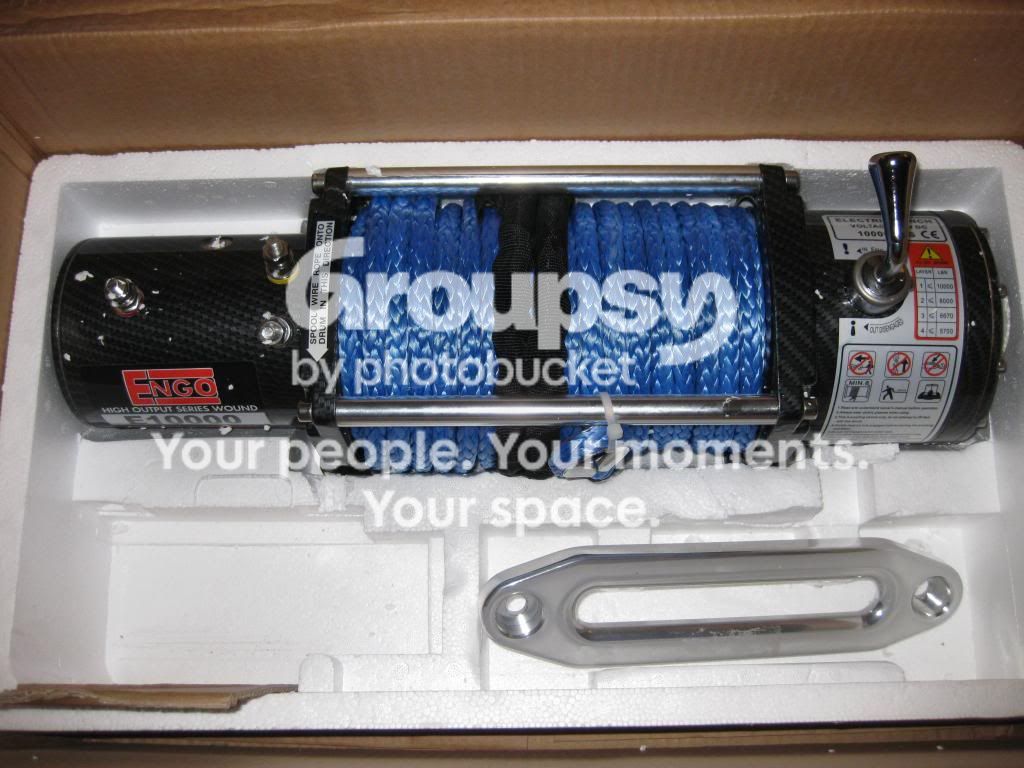
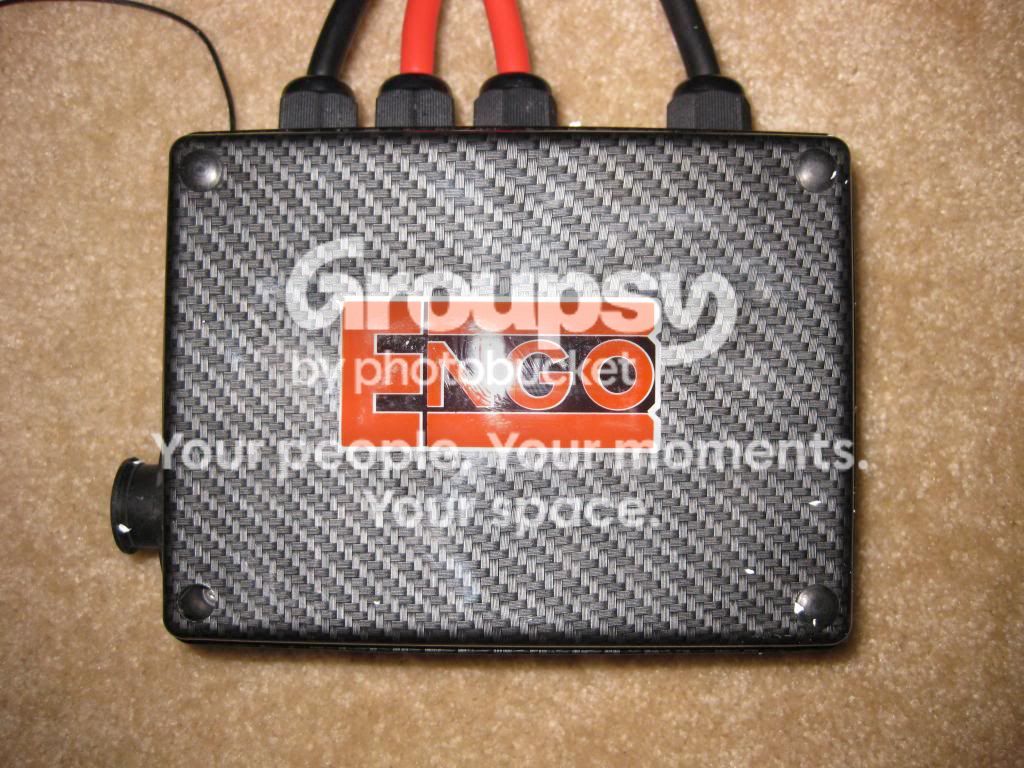
Control Box
I didn't waste any time and got right to work getting it clocked so the clutch lever can be easily accessed through the cutouts in the Shrockworks. To clock the winch I started by removing the allen screws that secure the crossbars.
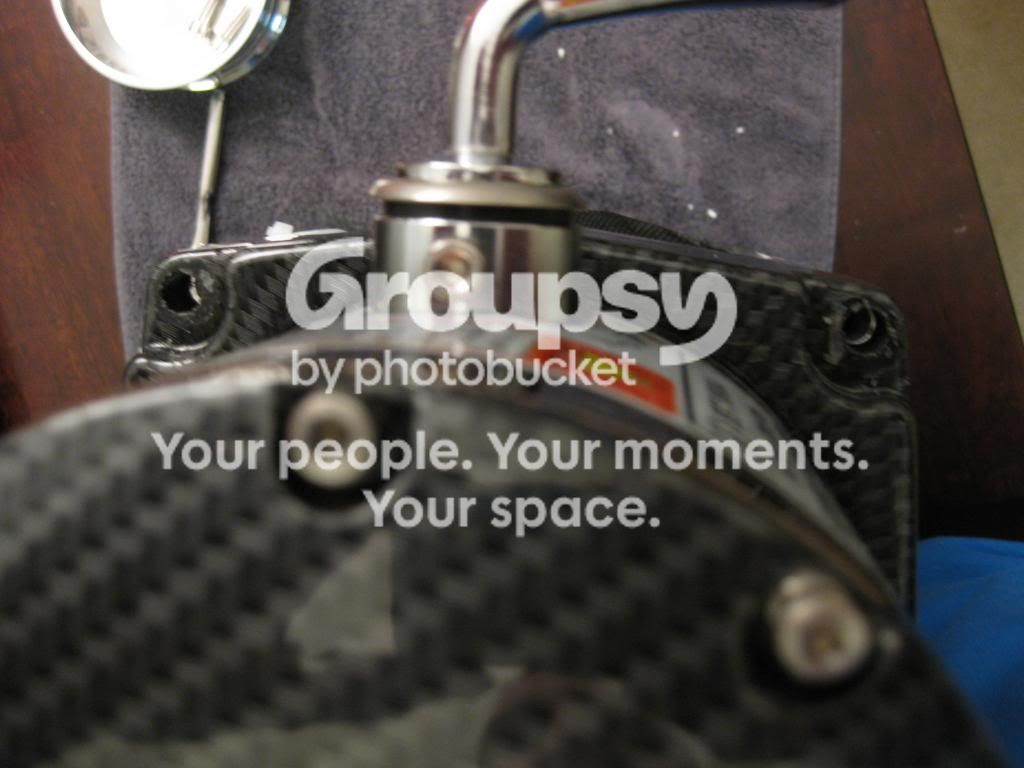
Once the crossbars are removed, the gearbox comes right off.
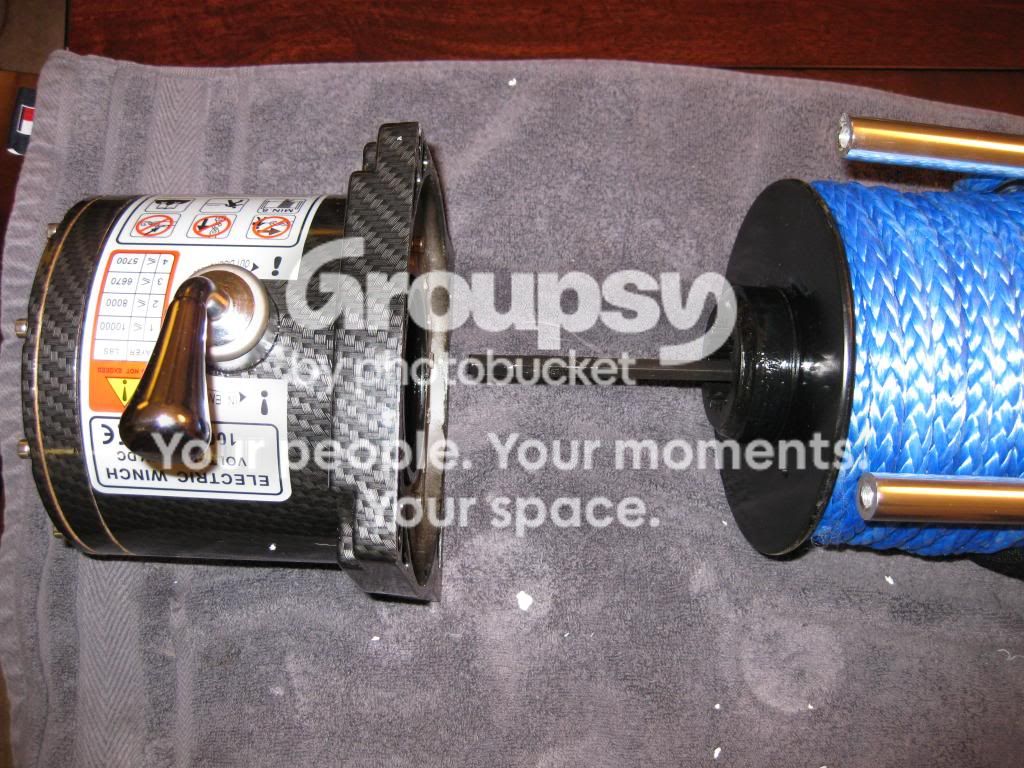
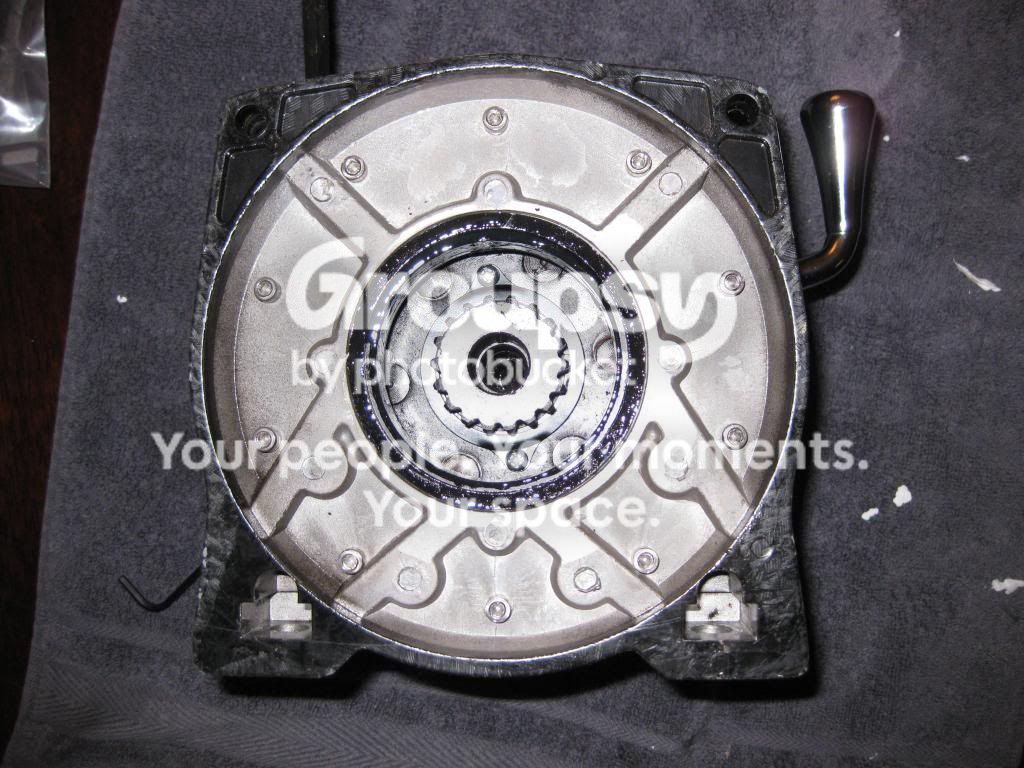
Then the 10 allen screws on the inside of the gearbox need to be removed.
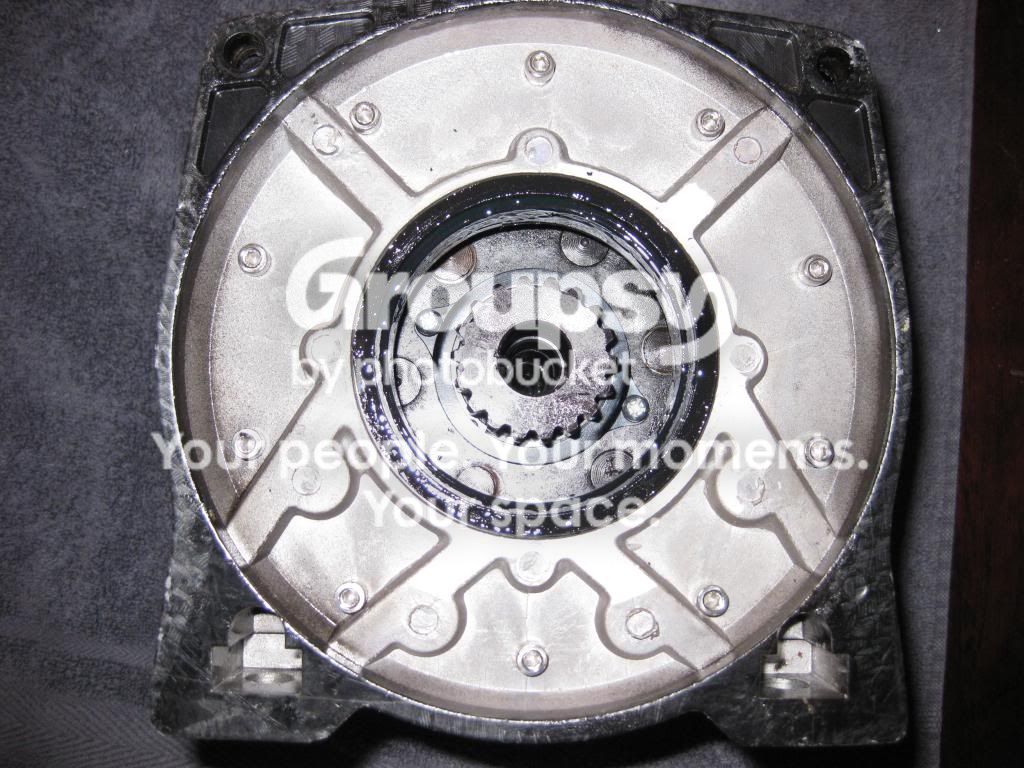
At this point, the "feet support piece" can be removed from the gearbox.
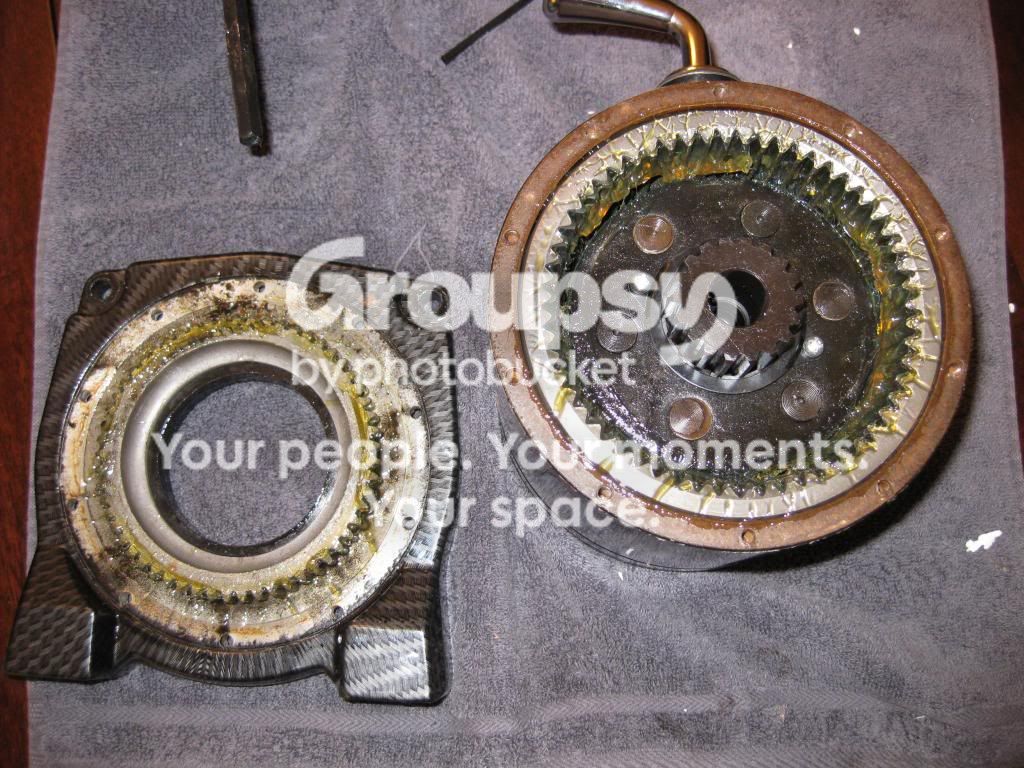
Now there are two options for properly clocking the winch:
Option 1: You can remove the "feet support piece" from the gearbox, rotate it to the desired position, then simply place it back onto the gearbox. OR
Option 2: Rather than removing the "feet support piece" you can simply rotate it while keeping the actual gearbox stationary. This is the easiest way IMO.
Either way, once the "feet support piece" aligned with the gearbox (making sure that the gasket is also properly aligned) the 10 allen screws can be put back in place
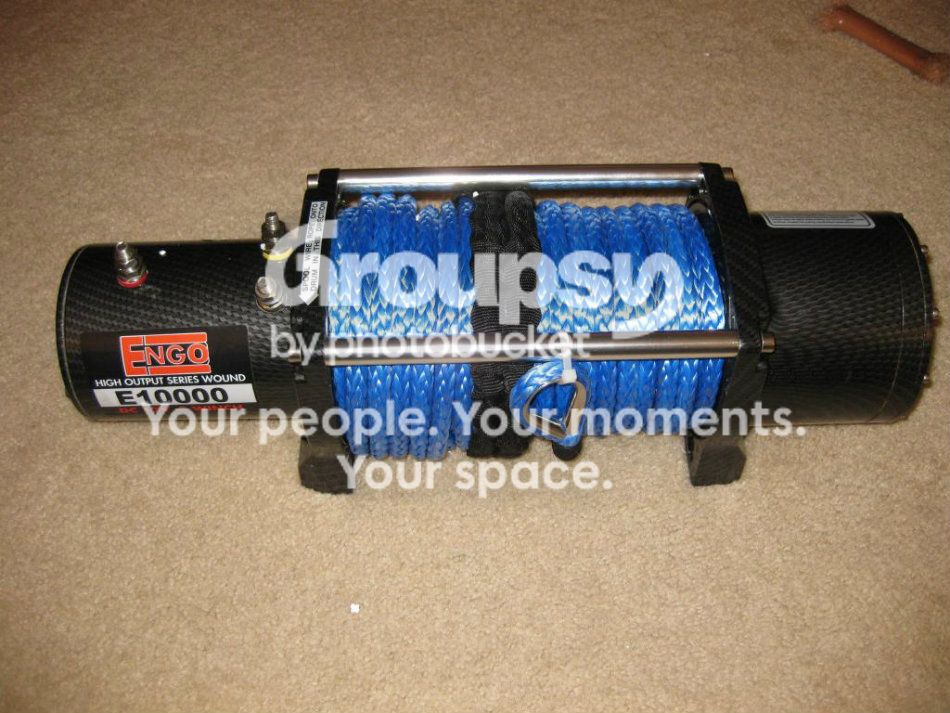
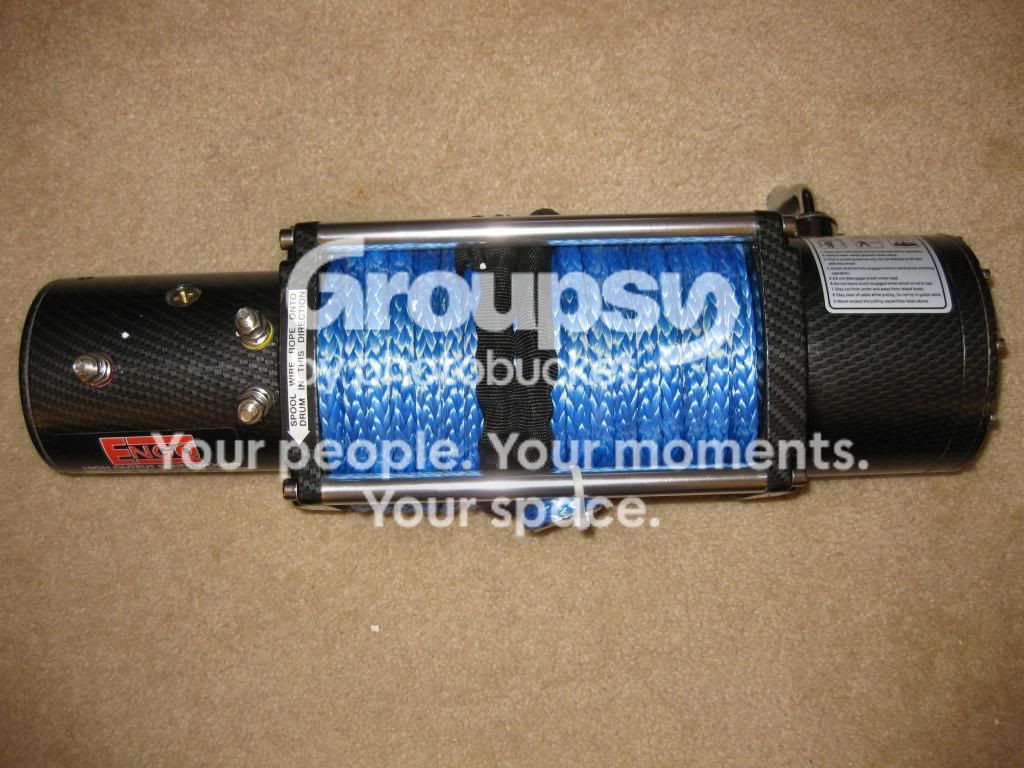
Lastly, the crossbars are reattached with the two large allen screws. Done! Here is the final product:
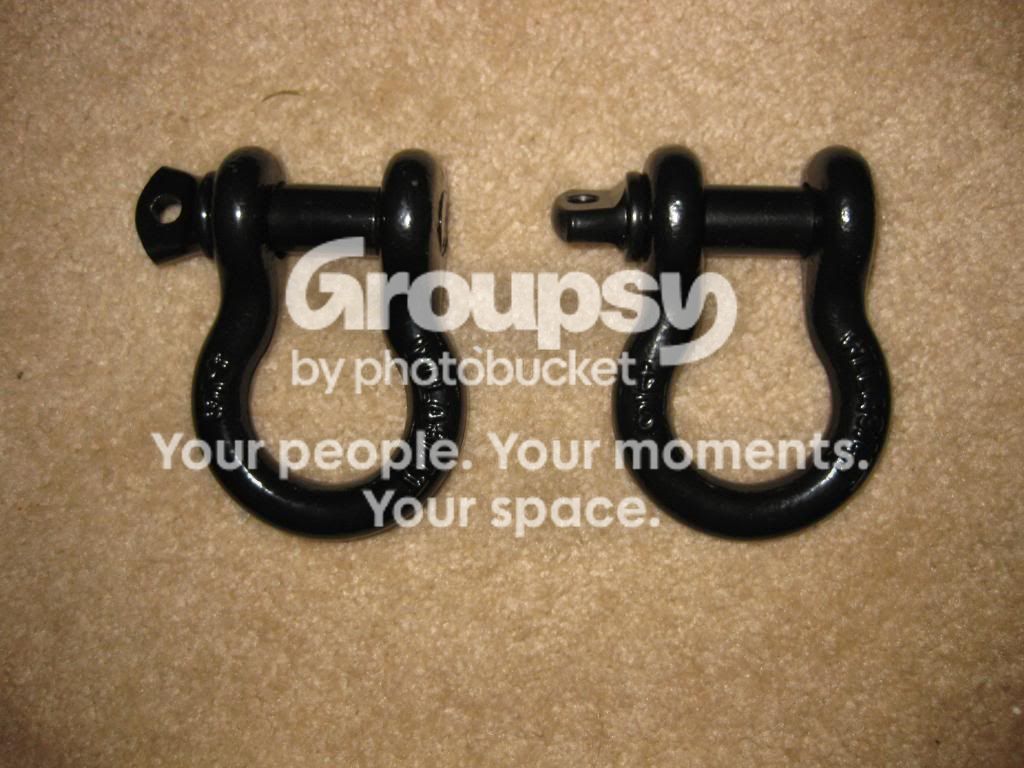
Finally, I ordered some 3/4" Smittybilt clevis shackles, Daystar D-ring isolators, and D-ring washers from Quadratec. The clevis shackles showed up today, but the isolators and washers are backordered...
I got home from work and had my winch waiting for me :thumb3:.
My initial reaction is that this thing is beefy! and it looks great! I am really impressed at how well the winch was packaged. Everything was in great shape and completely undamaged.
Control Box
I didn't waste any time and got right to work getting it clocked so the clutch lever can be easily accessed through the cutouts in the Shrockworks. To clock the winch I started by removing the allen screws that secure the crossbars.
Once the crossbars are removed, the gearbox comes right off.
Then the 10 allen screws on the inside of the gearbox need to be removed.
At this point, the "feet support piece" can be removed from the gearbox.
Now there are two options for properly clocking the winch:
Option 1: You can remove the "feet support piece" from the gearbox, rotate it to the desired position, then simply place it back onto the gearbox. OR
Option 2: Rather than removing the "feet support piece" you can simply rotate it while keeping the actual gearbox stationary. This is the easiest way IMO.
Either way, once the "feet support piece" aligned with the gearbox (making sure that the gasket is also properly aligned) the 10 allen screws can be put back in place
Lastly, the crossbars are reattached with the two large allen screws. Done! Here is the final product:
Finally, I ordered some 3/4" Smittybilt clevis shackles, Daystar D-ring isolators, and D-ring washers from Quadratec. The clevis shackles showed up today, but the isolators and washers are backordered...
Last edited:

4ever4running
New member
Updates - saweeet! Winch looks cool with that carbon fiber look. You'll have to let us know how you like it when you get it bolted up to that Shrockworks. Whats the ETA on that BTW? Looking forward to it.
Cheers
Thanks man! I will definitely keep everyone posted on how it performs. When I ordered the Shrockworks in early October they said that it would be done sometime in late January - early February so hopefully I can get it in the next couple weeks.
4ever4running
New member
January 9th – January 13th Update
January 9th
With all my accessories piling up and more on the horizon, I am quickly running out of space on the battery. So, I decided to install a Blue Sea fuse block to help organize all my wires and make sure that all of my accessories are properly fused. I ordered a Blue Sea 12 position positive and negative fuse block from OTRATTW. I didn’t order anything else because I wanted to figure exactly what I needed and where to mount it.
January 11th
I got the Blue Sea fuse block in the mail. I am always impressed how quickly OTRATTW ships their stuff!
Background
I found a guy on a different forum who used a sheet of Lexan to mount his fuse block. I really liked the idea so I decided to do something similar. For those of you who don’t know Lexan is a strong, heat resistant, and impact resistant polycarbonate plastic. I was able to find some at my local Home Depot. I bought an 8” X 10” sheet for about $4 and some hardware to mount everything. When I was thinking about how to mount the fuse block to the Lexan and how to mount the Laxan to the factory fuse box cover, one of the main issues that I was concerned about what having access to the factory fuse box. Read more below to see what I ended up doing.
January 12th - January 13th
I got to work mounting the fuse block. First I test fit and cut the Lexan sheet down to size. An added benefit of the Lexan is that even though it’s pretty strong, it is still really easy to cut. I marked off the area that I wanted to cut and used a level and a razor blade to repeatedly score the Lexan. After the Lexan is scored sufficiently the pieces break off with a little force.
Test fitting the trimmed Lexan over the factory fuse box.
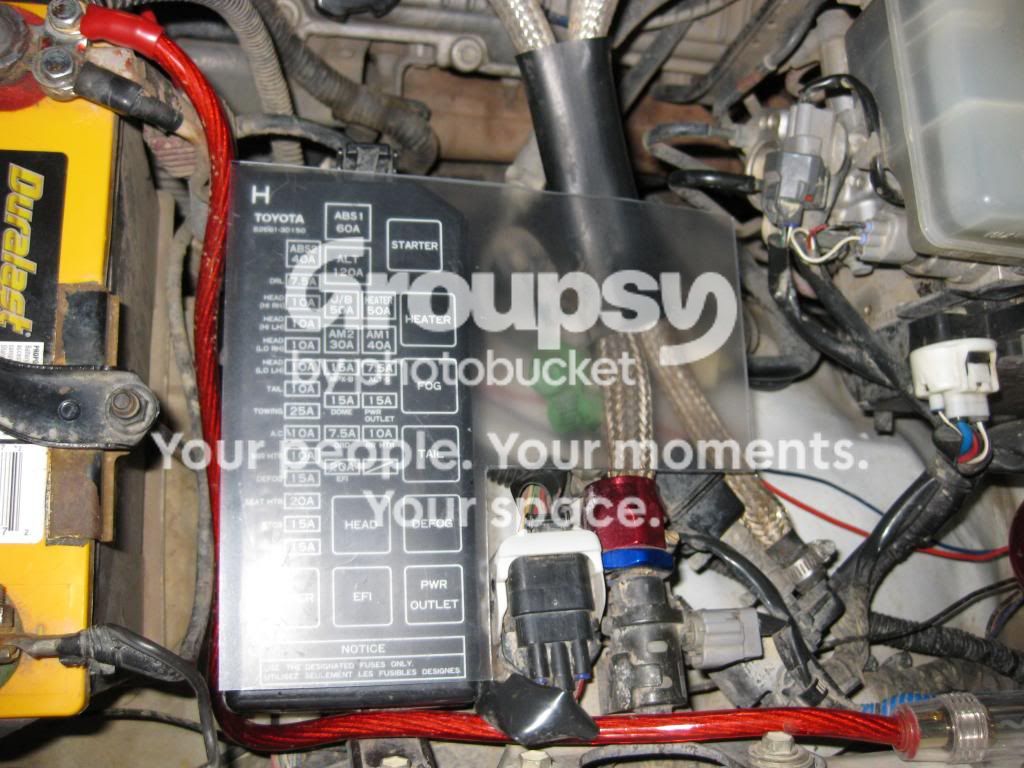
I determined where I wanted the fuse block and drilled the mounting holes in the Lexan
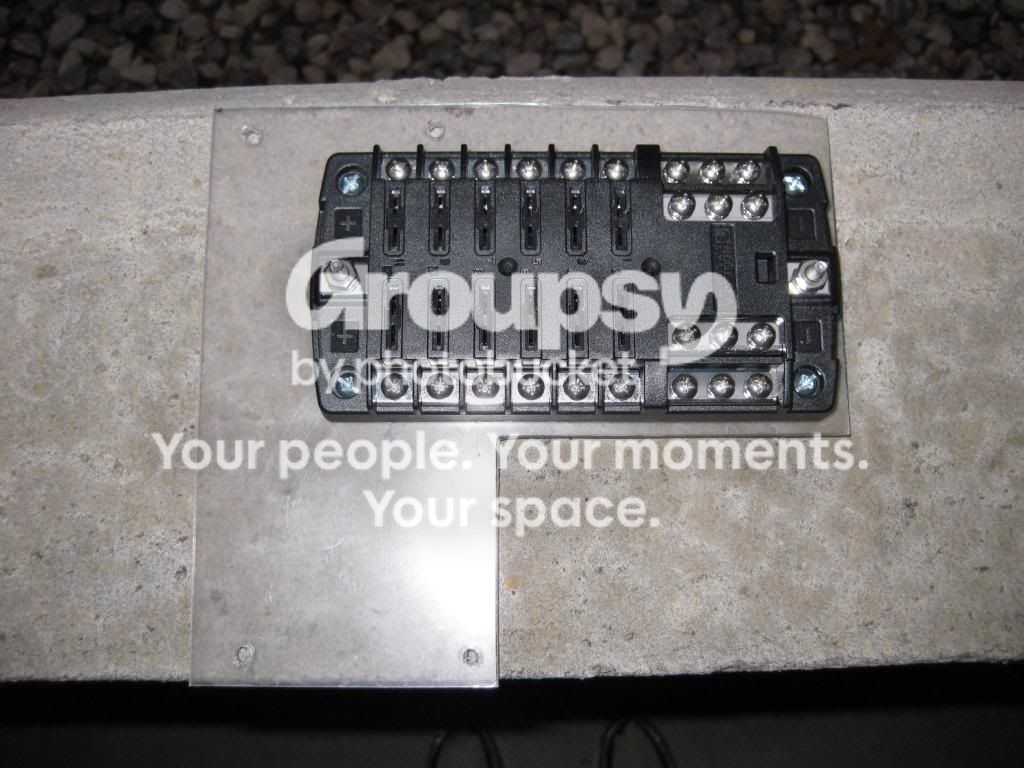
I lined up the factory fuse cover and the Lexan and drilled the mounting holes in the factory fuse cover. The two large holes in the middle are where bolts for mounting the Blue Sea to the Lexan will sit.
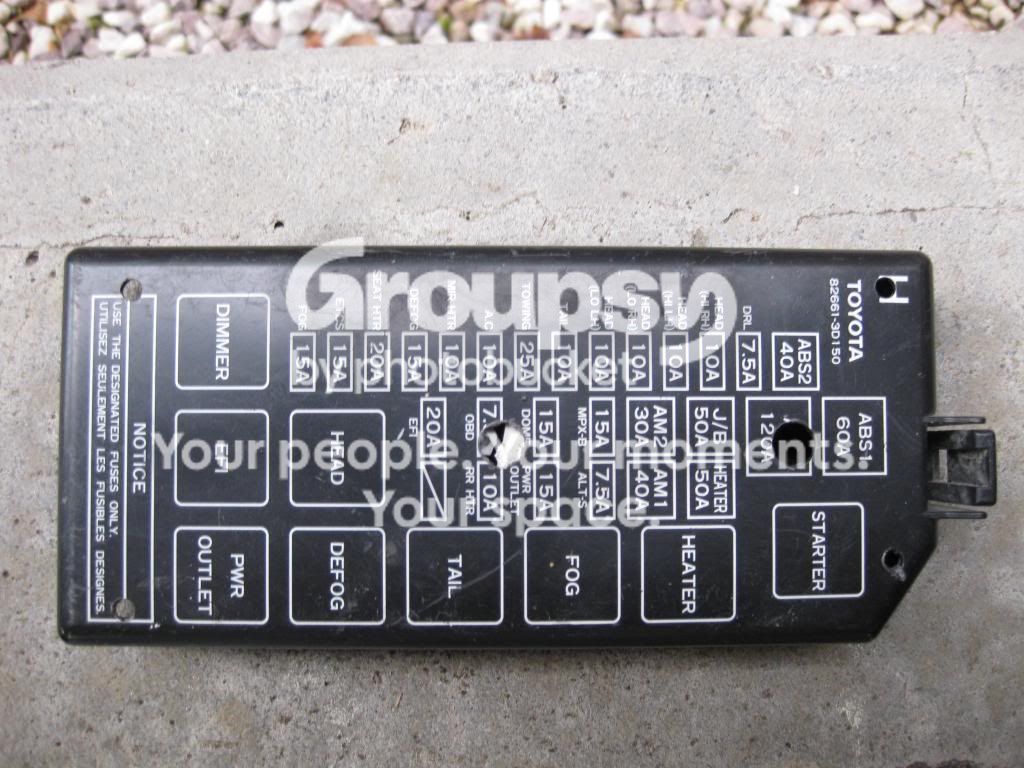
I used #8 hardware to secure everything. I used nylon lock nuts to secure the Blue Sea to the Lexan. To ensure that I have access to the factory fuse box when I need to, I used wing nuts to secure the Lexan sheet to the factory fuse box cover. That way I can simply remove the four wing nuts and pull the entire Lexan sheet off and move it out of the way.
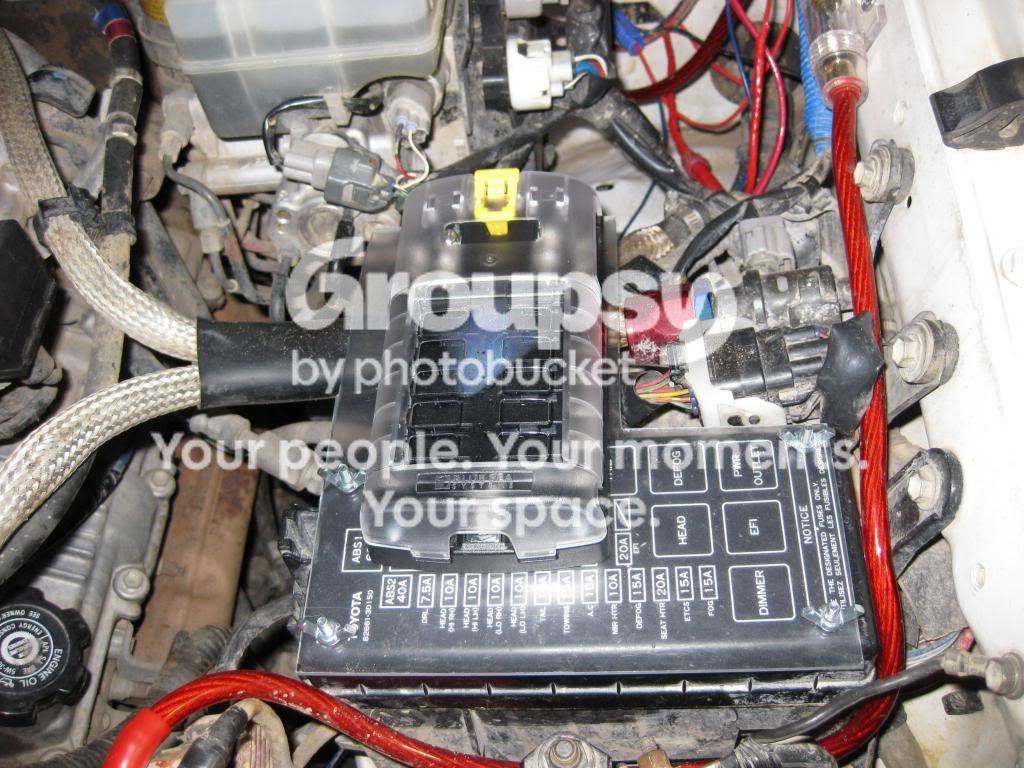
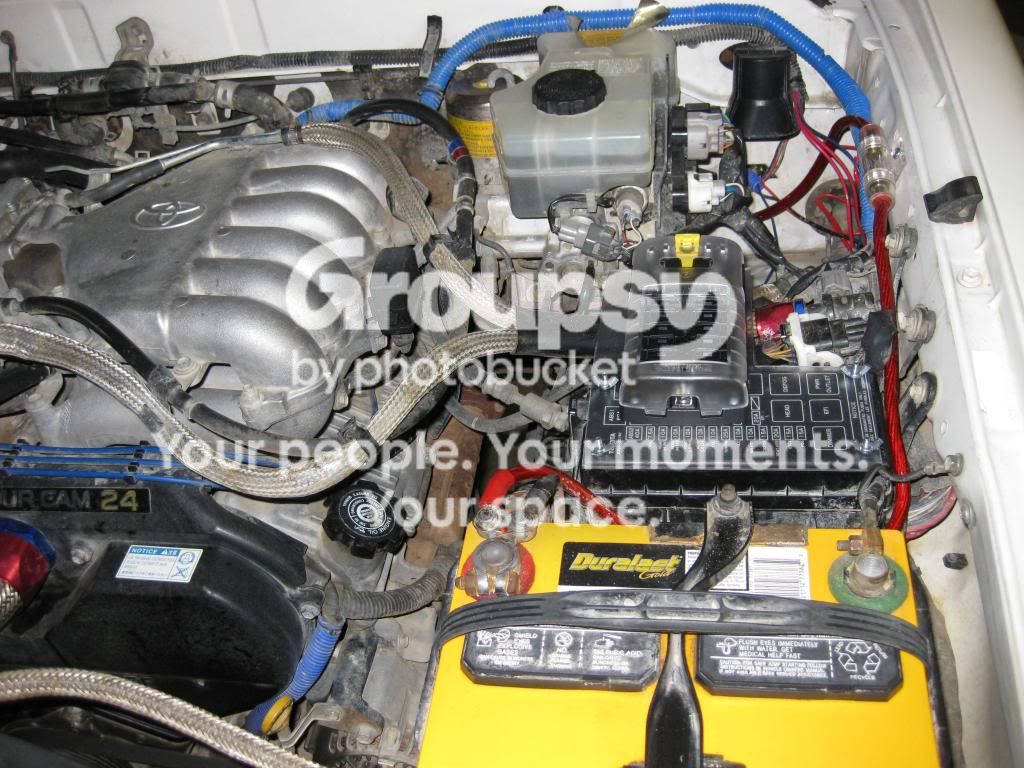
Then I started wiring up my accessories.
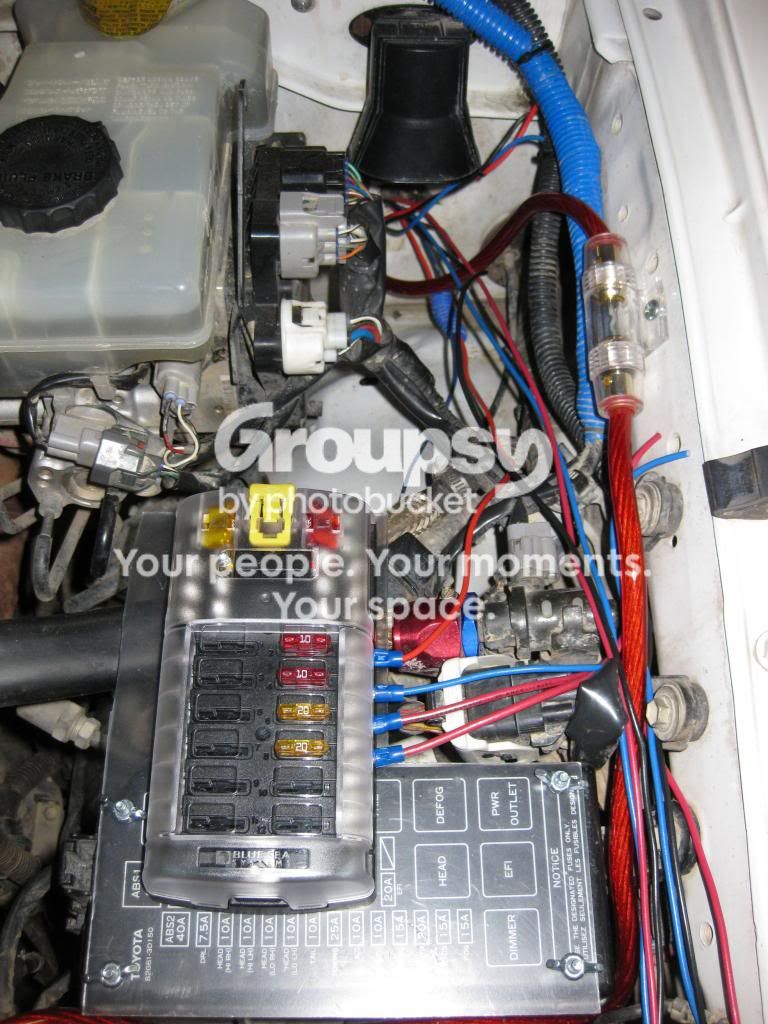
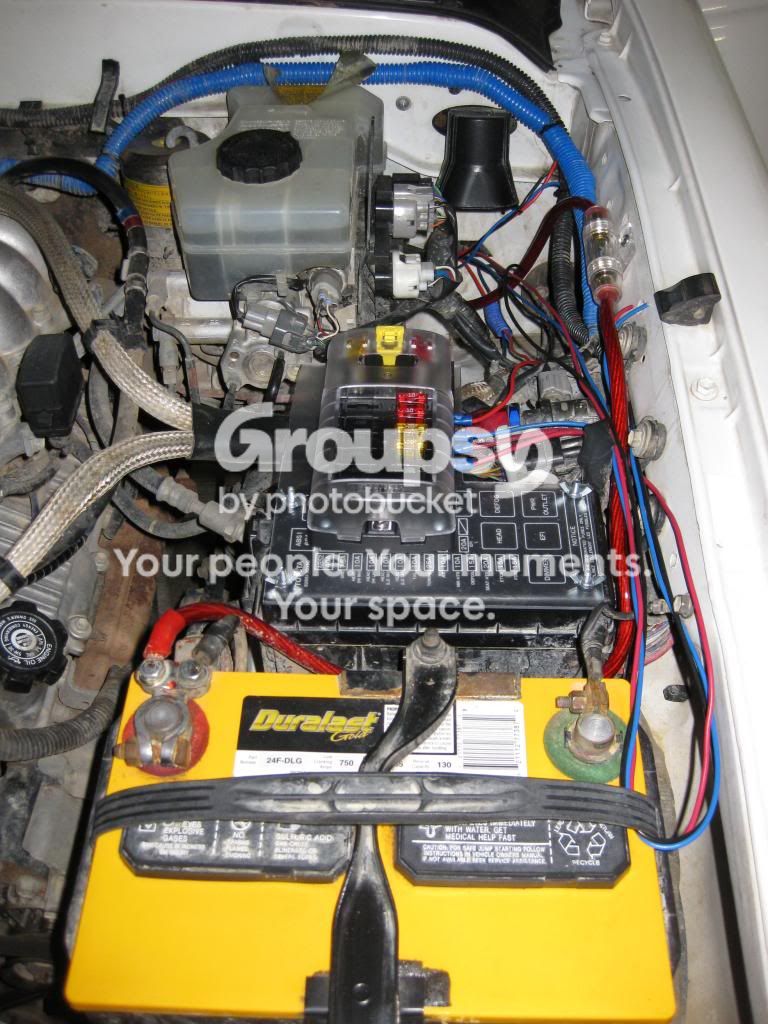
Those of you with a keen eye will notice the random wires looped around the battery…I ran those in anticipation of my next accessory…
Lastly, I used my Microsoft Excel skills to create a label so I can tell which wires go to which accessory.
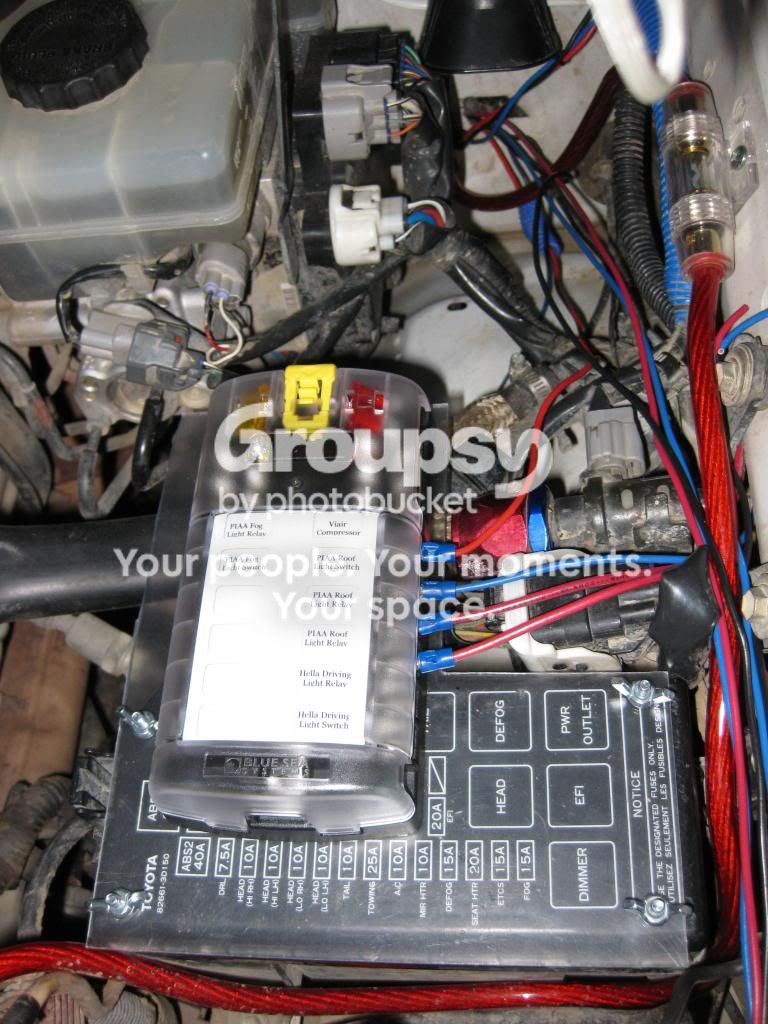
Can you sport the new accessory?
January 9th
With all my accessories piling up and more on the horizon, I am quickly running out of space on the battery. So, I decided to install a Blue Sea fuse block to help organize all my wires and make sure that all of my accessories are properly fused. I ordered a Blue Sea 12 position positive and negative fuse block from OTRATTW. I didn’t order anything else because I wanted to figure exactly what I needed and where to mount it.
January 11th
I got the Blue Sea fuse block in the mail. I am always impressed how quickly OTRATTW ships their stuff!
Background
I found a guy on a different forum who used a sheet of Lexan to mount his fuse block. I really liked the idea so I decided to do something similar. For those of you who don’t know Lexan is a strong, heat resistant, and impact resistant polycarbonate plastic. I was able to find some at my local Home Depot. I bought an 8” X 10” sheet for about $4 and some hardware to mount everything. When I was thinking about how to mount the fuse block to the Lexan and how to mount the Laxan to the factory fuse box cover, one of the main issues that I was concerned about what having access to the factory fuse box. Read more below to see what I ended up doing.
January 12th - January 13th
I got to work mounting the fuse block. First I test fit and cut the Lexan sheet down to size. An added benefit of the Lexan is that even though it’s pretty strong, it is still really easy to cut. I marked off the area that I wanted to cut and used a level and a razor blade to repeatedly score the Lexan. After the Lexan is scored sufficiently the pieces break off with a little force.
Test fitting the trimmed Lexan over the factory fuse box.
I determined where I wanted the fuse block and drilled the mounting holes in the Lexan
I lined up the factory fuse cover and the Lexan and drilled the mounting holes in the factory fuse cover. The two large holes in the middle are where bolts for mounting the Blue Sea to the Lexan will sit.
I used #8 hardware to secure everything. I used nylon lock nuts to secure the Blue Sea to the Lexan. To ensure that I have access to the factory fuse box when I need to, I used wing nuts to secure the Lexan sheet to the factory fuse box cover. That way I can simply remove the four wing nuts and pull the entire Lexan sheet off and move it out of the way.
Then I started wiring up my accessories.
Those of you with a keen eye will notice the random wires looped around the battery…I ran those in anticipation of my next accessory…
Lastly, I used my Microsoft Excel skills to create a label so I can tell which wires go to which accessory.
Can you sport the new accessory?
Last edited:

murdarunna19
New member
Hey where did you get the gauge pod on the pillar? Just wondering because im looking to put two gauges in

Thurlo76
New member
Hey where did you get the gauge pod on the pillar? Just wondering because im looking to put two gauges in
I was just about to ask this haha so yes... do tell
4ever4running
New member
Hey where did you get the gauge pod on the pillar? Just wondering because im looking to put two gauges in
I was just about to ask this haha so yes... do tell
It is a Lotek Gauge Pod and they can be purchased here: www.gaugepods.com // Lotek Inc.
murdarunna19
New member
Great, thank you!
4ever4running
New member
January 12th - January 13th Update Continued
While I was under the hood, I started looking for a place to mount the control box for the Engo. There are a couple different possibilities for mounting locations but I wanted to mount it in the engine bay where it will be safe from water, debris, and damage. I think I found the perfect spot.
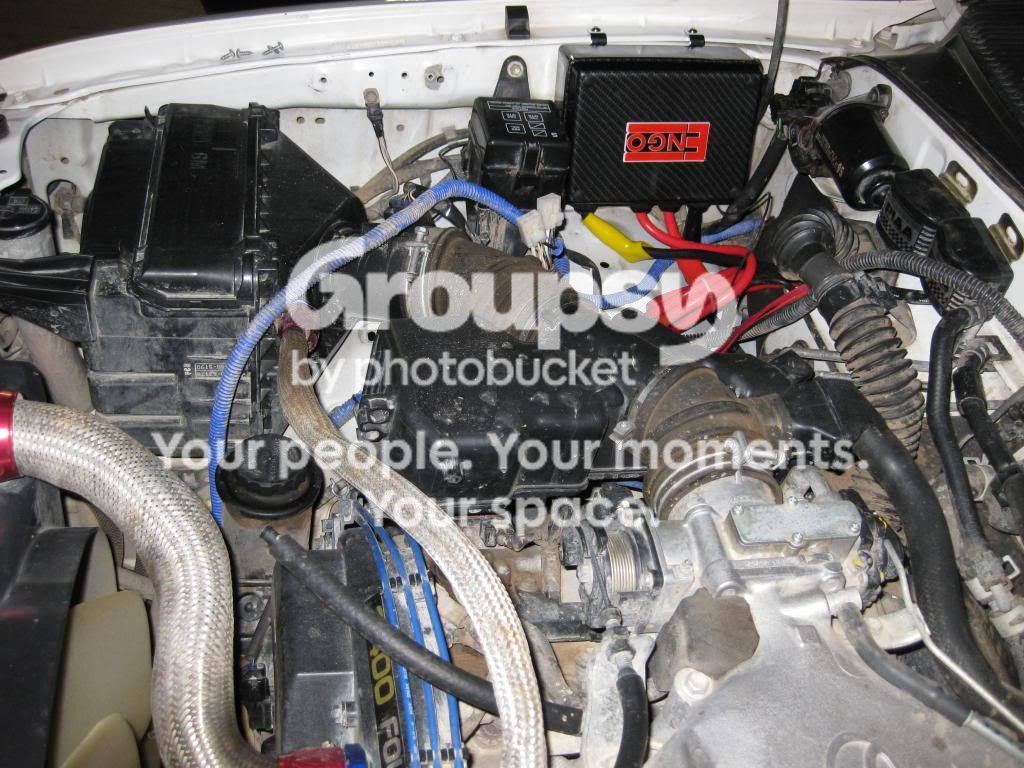
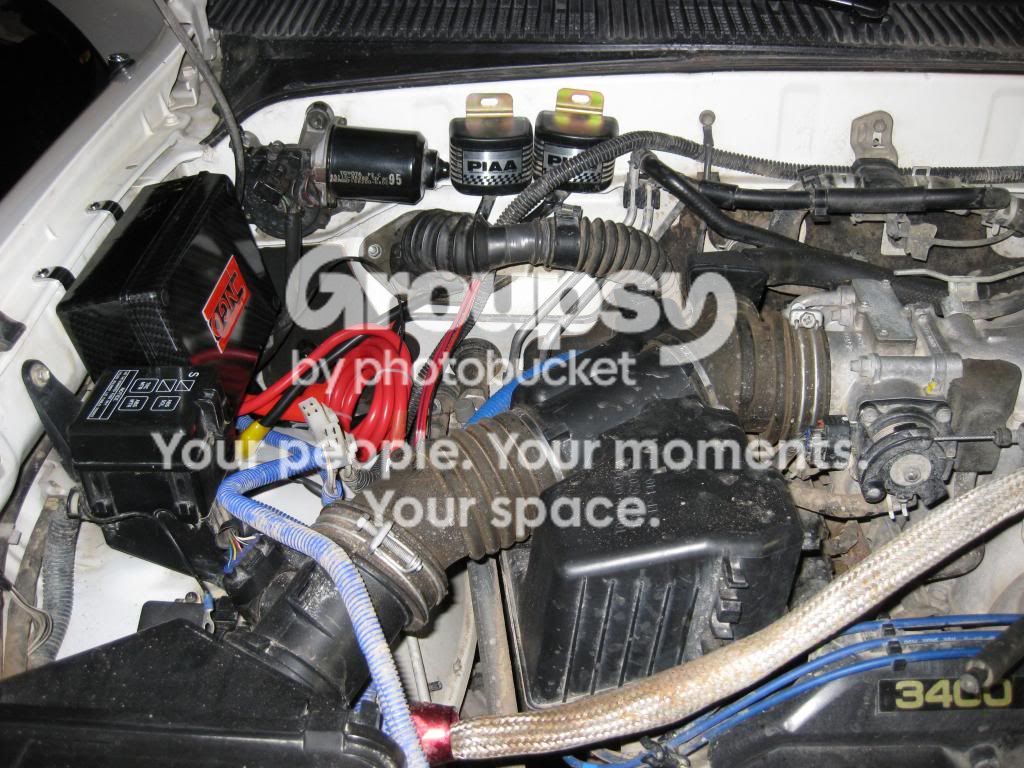
As an added bonus, I was able to reuse the factory mounting brackets and yes I am still able to close the hood without hitting the control box.
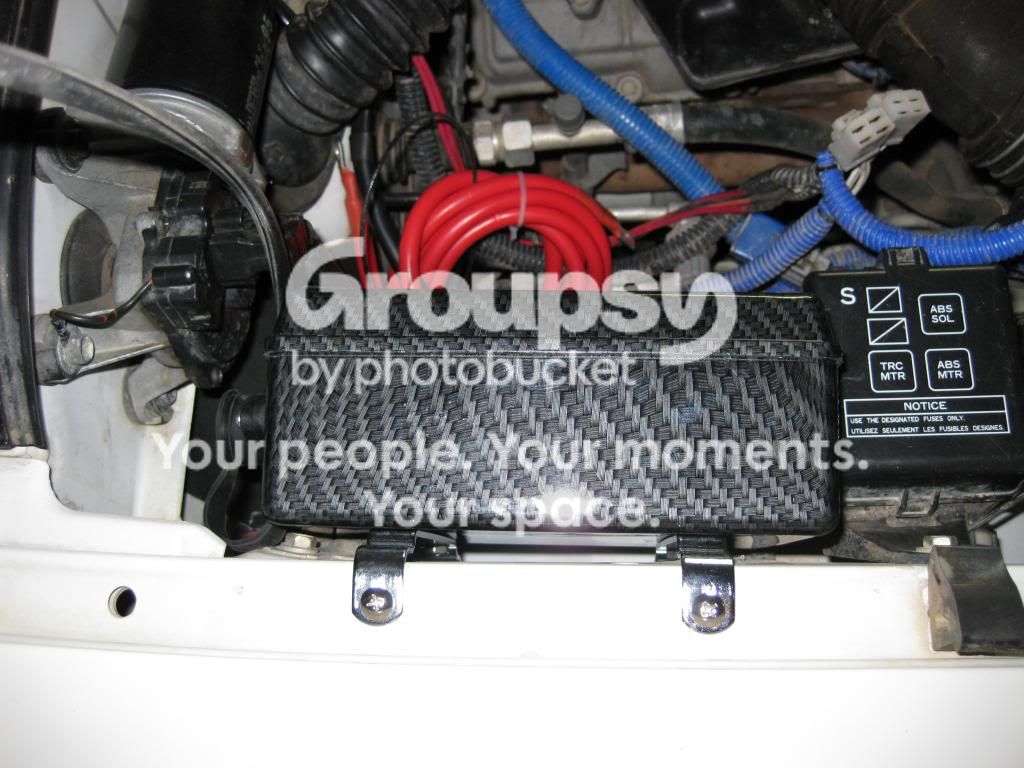
There are a few downsides about mounting the control box in this location but I think I can work around them.
1) Since the control box is designed to be mounted on top of the winch, the connection wires are waaay too short to reach the winch. This is a pretty easy fix since I can either extend the existing wires or just rewire the control box.
2) With the control box mounted in this location, I won't really have access to the winch remote plug and even if I do, I will have to open the hood and/or run the cord across the hood when winching. To fix this I am considering 2 options. The first option is to order a universal wireless winch remote and just control the winch wirelessly. The second option involves extending the winch remote plug to mount on the Shrockworks. I contacted Joel at Engo and asked him if they make a winch remote extension cord and currently they don't but he did say they are in the process of producing them and they should be available soon. I think for now I am going to go with the first option and just control the winch wirelessly. I figure that I can always add the extension cable later if I want to.
3) I had to move the 2 PIAA relays for the roof lights. No big deal because I was able to find enough room to mount the relays on the firewall in the same general area.
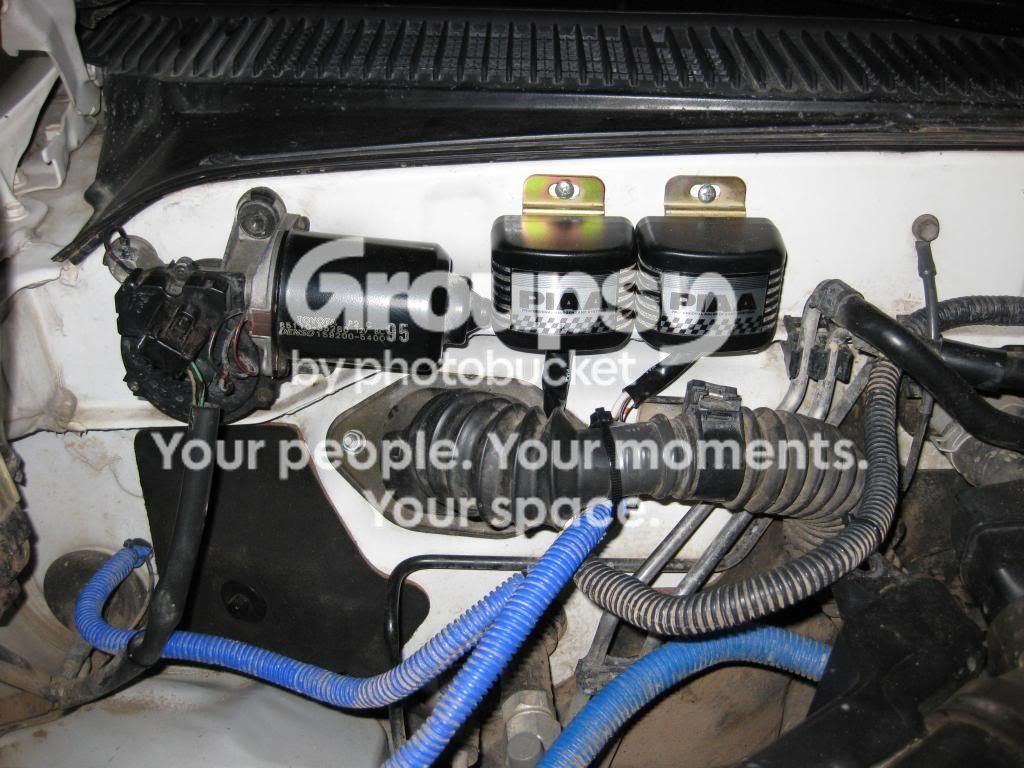
While I was under the hood, I started looking for a place to mount the control box for the Engo. There are a couple different possibilities for mounting locations but I wanted to mount it in the engine bay where it will be safe from water, debris, and damage. I think I found the perfect spot.
As an added bonus, I was able to reuse the factory mounting brackets and yes I am still able to close the hood without hitting the control box.
There are a few downsides about mounting the control box in this location but I think I can work around them.
1) Since the control box is designed to be mounted on top of the winch, the connection wires are waaay too short to reach the winch. This is a pretty easy fix since I can either extend the existing wires or just rewire the control box.
2) With the control box mounted in this location, I won't really have access to the winch remote plug and even if I do, I will have to open the hood and/or run the cord across the hood when winching. To fix this I am considering 2 options. The first option is to order a universal wireless winch remote and just control the winch wirelessly. The second option involves extending the winch remote plug to mount on the Shrockworks. I contacted Joel at Engo and asked him if they make a winch remote extension cord and currently they don't but he did say they are in the process of producing them and they should be available soon. I think for now I am going to go with the first option and just control the winch wirelessly. I figure that I can always add the extension cable later if I want to.
3) I had to move the 2 PIAA relays for the roof lights. No big deal because I was able to find enough room to mount the relays on the firewall in the same general area.
Last edited:

Stockwell45
New member
That switch panel is awesome, I had no idea they made anything like that. Gotta get me one now!
Your wiring under the hood looks good too, way neater than mine.
Your wiring under the hood looks good too, way neater than mine.
Stockwell45
New member
Also, do you plan on keeping that Revtek lift after you get your bumper? Your front end might hate you after you throw on all that weight lol.
4ever4running
New member
That switch panel is awesome, I had no idea they made anything like that. Gotta get me one now!
Your wiring under the hood looks good too, way neater than mine.
I agree, the Blue Sea fuse block is a necessity for anyone with a bunch of accessories that are connected to the battery.
Thanks man, I'm doing my best to keep it as neat and organized as possible.
Also, do you plan on keeping that Revtek lift after you get your bumper? Your front end might hate you after you throw on all that weight lol.
Haha yeah I would imagine that with the Revtek lift, front end would be :flipoff:
As soon as I get word that the Shrockworks is on the way, the Revtek lift and shocks are will be getting replaced with these.
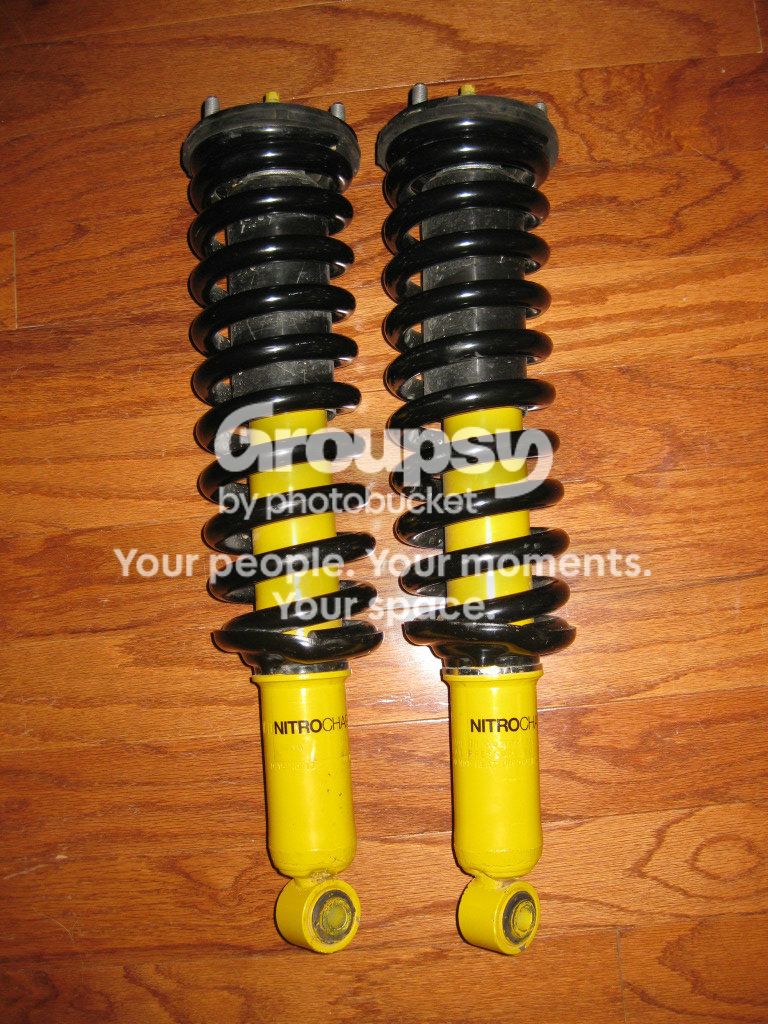
Heavy Duty OME 882's and Nitrocharger 90004 shocks that I picked up from another member a while back.
4ever4running
New member
January 20th Update
I was able to finish installing my Blue Sea fuse block and I am really happy with how it came out and everything works perfectly! Here is the final product:
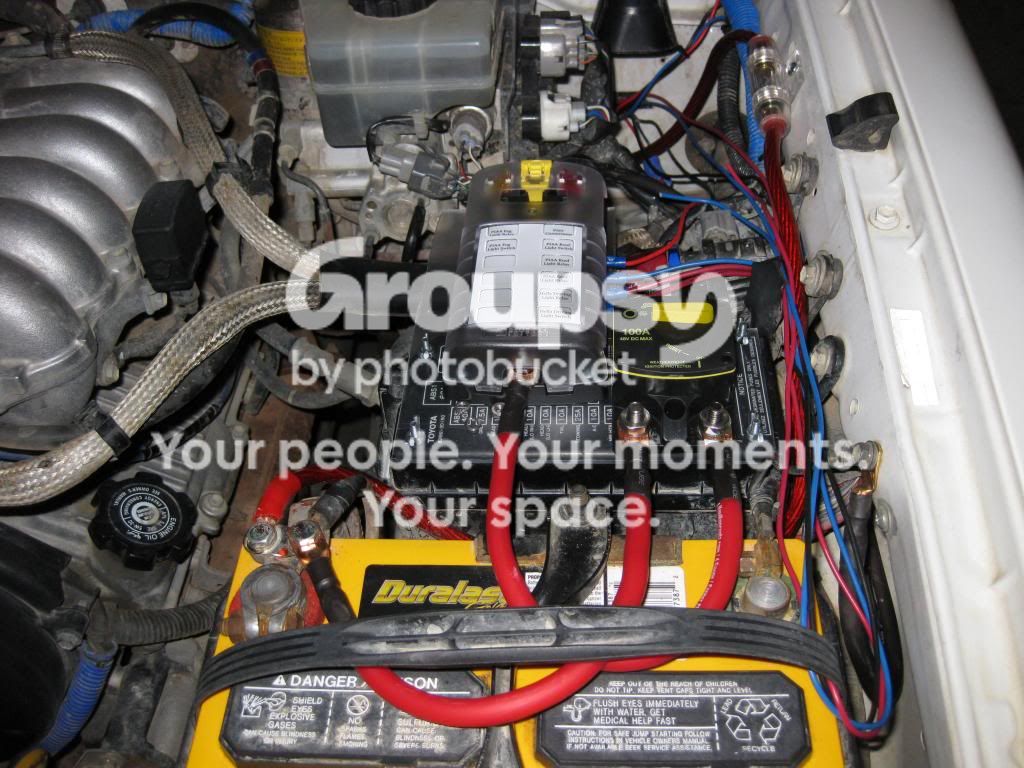
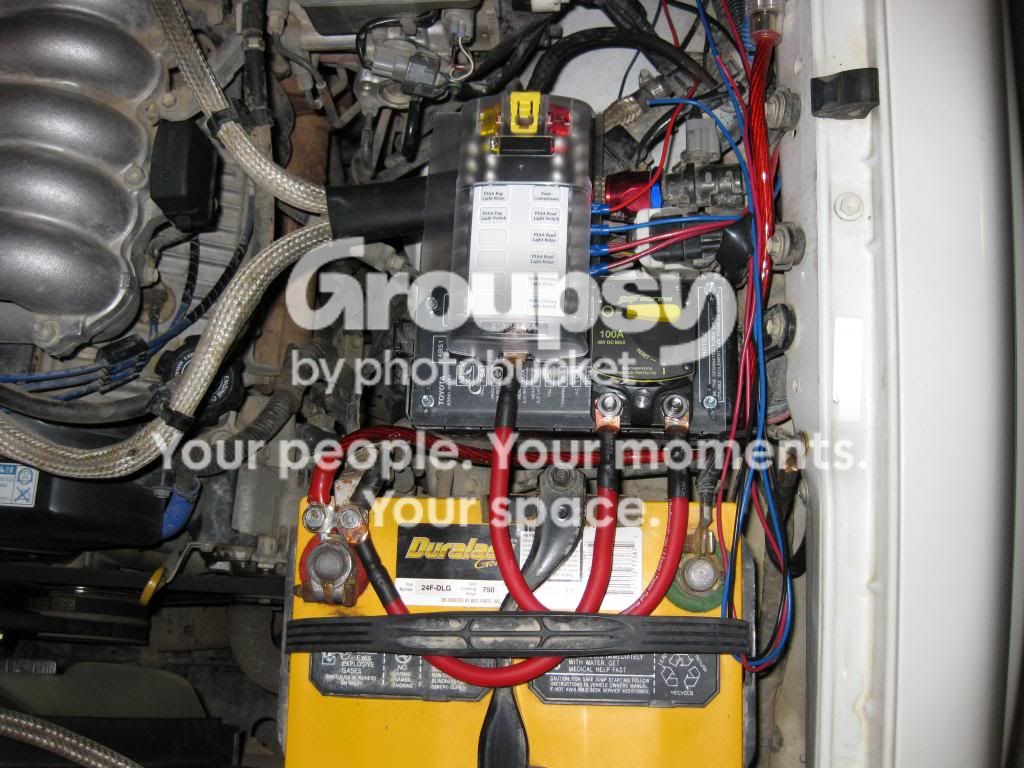
The hardest part of the project was making the 4 gauge power wires and ground wire that connect the battery to the fuse block. For anyone doing this in the future, here is the method that I used.
1) Measure and cut the wire to the proper length.
2) Strip the power wire so there is enough room for the wire to fit into the terminal and still have about 1/8" of wire visible.
3) Use a small blow torch to heat the terminal.
4) Once the terminal gets hot enough feed solder into the terminal.
5) Continue to feed solder until it starts coming out the top of the terminal.
6) Let the wire and terminal cool for a couple minutes.
7) Finish the wire and terminal connection with some heat shrink tubing to cover the exposed wire.
Here is a list of the main parts I used and where you can find them:
1 - 12 Circuit Blue Sea fuse block (OTRATTW)
1 - Stinger 100 AMP circuit breaker (Amazon.com: STINGER SCBM100 100 Amp Marine Circuit Breaker: Electronics)
2 ft KnuKonceptz 4 gauge wire - red (power wire) (Amazon.com: KnuKonceptz KCA Kable 4 Gauge Power Wire Red: Car Electronics)
3 ft KnuKonceptz 4 gauge wire - black (ground wire) (Amazon.com: KnuKonceptz KCA Kable 4 Gauge Power Wire Black: Car Electronics)
6 - Pico 4 gauge eye terminals (Pico 4238C 4 AWG Battery Cable 5/16" Tubular Lug Ring / Eye Terminals 15 Per Package : Amazon.com : Automotive)
I was able to finish installing my Blue Sea fuse block and I am really happy with how it came out and everything works perfectly! Here is the final product:
The hardest part of the project was making the 4 gauge power wires and ground wire that connect the battery to the fuse block. For anyone doing this in the future, here is the method that I used.
1) Measure and cut the wire to the proper length.
2) Strip the power wire so there is enough room for the wire to fit into the terminal and still have about 1/8" of wire visible.
3) Use a small blow torch to heat the terminal.
4) Once the terminal gets hot enough feed solder into the terminal.
5) Continue to feed solder until it starts coming out the top of the terminal.
6) Let the wire and terminal cool for a couple minutes.
7) Finish the wire and terminal connection with some heat shrink tubing to cover the exposed wire.
Here is a list of the main parts I used and where you can find them:
1 - 12 Circuit Blue Sea fuse block (OTRATTW)
1 - Stinger 100 AMP circuit breaker (Amazon.com: STINGER SCBM100 100 Amp Marine Circuit Breaker: Electronics)
2 ft KnuKonceptz 4 gauge wire - red (power wire) (Amazon.com: KnuKonceptz KCA Kable 4 Gauge Power Wire Red: Car Electronics)
3 ft KnuKonceptz 4 gauge wire - black (ground wire) (Amazon.com: KnuKonceptz KCA Kable 4 Gauge Power Wire Black: Car Electronics)
6 - Pico 4 gauge eye terminals (Pico 4238C 4 AWG Battery Cable 5/16" Tubular Lug Ring / Eye Terminals 15 Per Package : Amazon.com : Automotive)
4ever4running
New member
Just got these bad boys in last night, Hella Rallye 4000s.
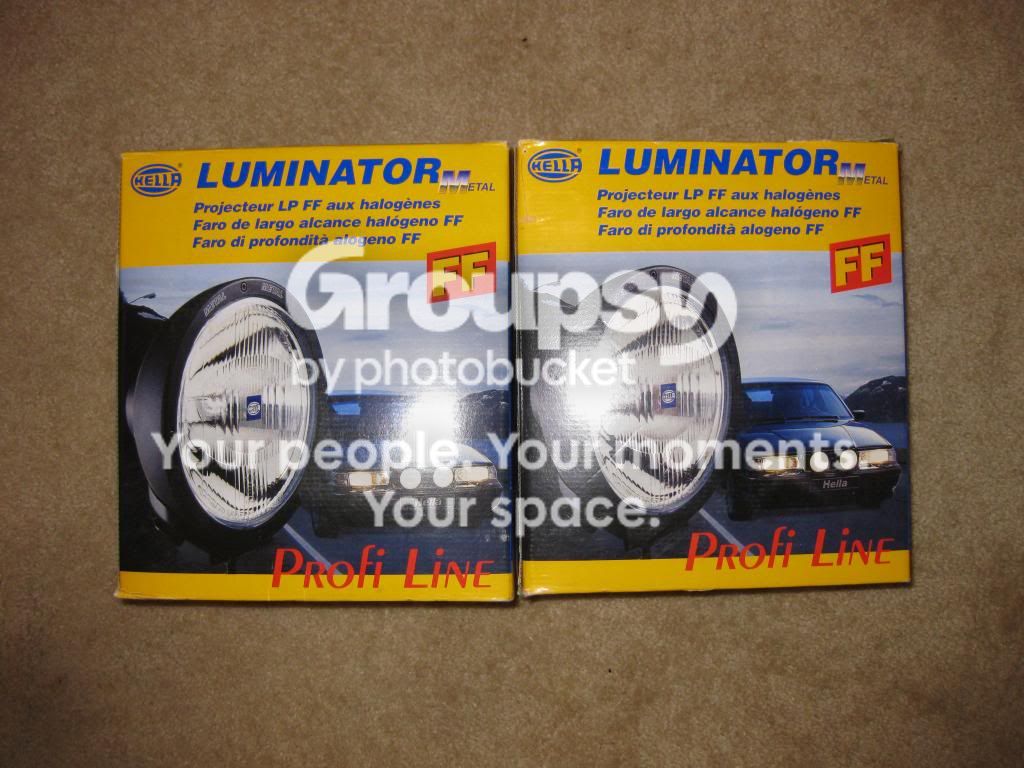
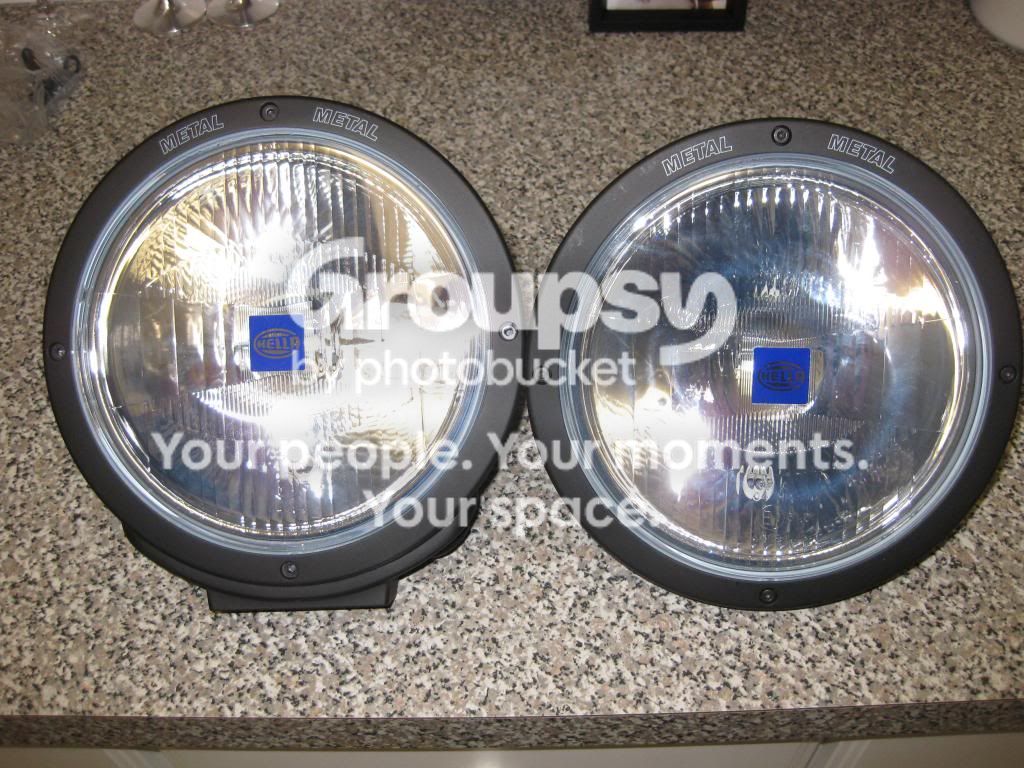
All the accessories for the bumper are coming together, now I just need the actual bumper...
All the accessories for the bumper are coming together, now I just need the actual bumper...
Similar threads

- Replies
- 3
- Views
- 3K

- Replies
- 0
- Views
- 2K
- Replies
- 2
- Views
- 10K
- Replies
- 4
- Views
- 720
- Replies
- 2
- Views
- 1K

