4ever4running's 2002 4Runner Build

Powder coating is a bake in process. Not really an easy way to fix it but you can always touch up the scratches with some matching paint.
 
Shrockworks is finally installed!!

I finally was able to get the Shrockworks installed this weekend. It definitely wasn't as easy as I thought it was going to be and it took me and my friend about 7 hours to get everything installed and tightened down. All said and done, I couldn't be happier with how it came out!


Gotta represent!
 
I forgot my camera, but my buddy Ian took a couple pictures of during the install.

Bumper, brackets, bolts, winch. Should be easy enough, right?


Wrong! We quickly realized that the frame cap welds were a little too high, forcing the brackets inward and not allowing us to fit the bumper between the brackets. The Dremel followed by some black paint fixed that issue.


We also found out that the powder coat added just enough width to make it really tough to jam into place, so we hit the high spots with the Dremel.


And after some not so gentle persuasion with a BFH, we got it in place.


BUT that wasn't the end of it....We had to get it in place to mark the location of two 3/8" holes that need to be drilled in the brackets (that are designed to prevent the bumper from shifting forward during heavy winching). So we marked the holes, pulled the bumper off, drilled out the holes, installed the winch, and re-installed the bumper using the floor jack and some more persuasion from a BFH.


Those of you with a keen eye will notice that the winch fairlead is not installed...We couldn't install it because the bolts supplied by Engo were too short to fit through the fairlead and the bumper. A quick trip to the hardware store the next day easily solved that problem.

And when we were finished, it was dark enough to test the lights.
Parking lights:

Parking lights + fogs:

[URL=http://s981.photobucket.com/user/nurrej/media/temporary_zps4b47cbd9.jpg.html]
 
I've always been an ARB guy, but honestly I think I'm starting to like the Shrockworks bumpers better. Especially after seeing setups like yours. I think having the black hood really makes things blend together, I like it!
 
Looks fantastic! Well deserved after the long wait! Really brings your whole front end together nicely with the black hood too. Like.
 
I've always been an ARB guy, but honestly I think I'm starting to like the Shrockworks bumpers better. Especially after seeing setups like yours. I think having the black hood really makes things blend together, I like it!

Looks fantastic! Well deserved after the long wait! Really brings your whole front end together nicely with the black hood too. Like.

Thanks guys, I definitely appreciate the complements and positive feedback! It has been a long wait but I'm super happy with the result so well worth it IMO.

Now that the chrome bumper is gone, I'm toying with the idea of plasti dipping my wheels and rear bumper to complete the black/white look (at least until I get a new rear bumper and wheels, which will probably be a while).
 
Holy crap its beautiful! I agree that if you go full "panda" it will look really good. Looks really good now though too. What did you use to isolate the screw pins on your shackles?
 
Last edited:
Looks awesome man. Definitely a great addition, even down to the red accenting. At paint the back bumper, leave the wheels the same.
 
Dang she looks good. Congrats on the bumper! On a somewhat separate note how do you like those hellas? If I ever get a rack I want to swap my 700s to the rack and run rallyes on the bumper (if theyre good that is haha).
 
Holy crap its beautiful! I agree that if you go full "panda" it will look really good. Looks really good now though too. What did you use to isolate the screw pins on your shackles?

Thanks Nate! Hahaha I like the "panda" nickname.

I used these Daystar D-ring isolators: Daystar KU70056BK - Daystar D-ring Isolators for 3/4" D-Ring Shackle - Quadratec
And these Daystar D-ring washers: Daystar KU71074RE - Daystar D-Ring Washers - Quadratec

Looks awesome man. Definitely a great addition, even down to the red accenting. At paint the back bumper, leave the wheels the same.

Thanks man! I'm thinking I'll start with the bumper and maybe 1 wheel and see how I like it and go from there. The beauty of Plasti Dip is that it can always just be peeled off.

Dang she looks good. Congrats on the bumper! On a somewhat separate note how do you like those hellas? If I ever get a rack I want to swap my 700s to the rack and run rallyes on the bumper (if theyre good that is haha).

Thanks dude! On the drive home I got a chance to test out the Hellas and I am very impressed! They are super bright and shine super far. I can honestly say I don't think you will find a better value at just over $100 per light ($200 per pair). Here is a good video review that I found when I was researching lights for the top of my bumper: ORW Hella 4000 Lights - YouTube
 
I think you should leave your wheels the same. I agree with [MENTION=58830]ARKRWLR[/MENTION], paint the rear bumper black and leave wheels as-is. Everyone rocks black stuff nowadays (for good reason, most of the time) but I think if you can pull off silver wheels - do it! I like how the chrome reflectors on all your lights (Hella's, headlights, and clear corners) kind of match the wheels. Maybe I'm just crazy....
 
I think you should leave your wheels the same. I agree with [MENTION=58830]ARKRWLR[/MENTION], paint the rear bumper black and leave wheels as-is. Everyone rocks black stuff nowadays (for good reason, most of the time) but I think if you can pull off silver wheels - do it! I like how the chrome reflectors on all your lights (Hella's, headlights, and clear corners) kind of match the wheels. Maybe I'm just crazy....

Yeah I guess a little chrome in a black and white world isn't a terrible thing :). I'll probably start with the bumper and see how I like it. Thanks for the advice.
 
I took some time to get my fog lights and driving lights properly aimed last night so I'm not blinding oncoming traffic.

Stock headlights


Fog lights


Fog lights + running lights


Stock headlights + fog lights


You can see that the fog lights are almost even with the stock headlights, which is little too high, but they are aimed as far down as the bumper will allow them to go. So, I'll pick up some washers next time I'm at the hardware store and add a few between the light mount and the bumper so the lights sit a little higher, and can be aimed lower.

Driving lights


Everything on

The Hella's are so bright that you can barely tell the other lights are even on.:trophy:
 
I haven't looked through the whole thread yet but how did your paint your rocker panels and above the wheel wells and make it look so clean? Did you have a shop do it?


I also dig the black scooped hood, looks really good IMO
 
I haven't looked through the whole thread yet but how did your paint your rocker panels and above the wheel wells and make it look so clean? Did you have a shop do it?


I also dig the black scooped hood, looks really good IMO

I actually did it all myself. The key to making it look clean was in the prep work...Before doing anything, I taped everything off using 3M 3/8" plastic fine line tape because it's flexible and I could make the lines and curves nice and straight, then I went up the body panels with standard 3M blue painters tape to protect from over-application.

Thanks, I appreciate the positive feedback! I'm definitely happy with how everything came out. Which reminds me, I may actually have to hit the hood with another coat sometime soon, it's starting to fade a bit.
 
Since installing the Shrockworks I haven't done anything really big with the T4R, but I have done a couple small projects over the past couple weeks...

1) Plati-dipped my emblems, license plate surround, and rear bumper. I'm really happy with how everything came out and I was considering doing my wheels too, but I like how they actually stand out more, so I'm going to leave them alone for now.
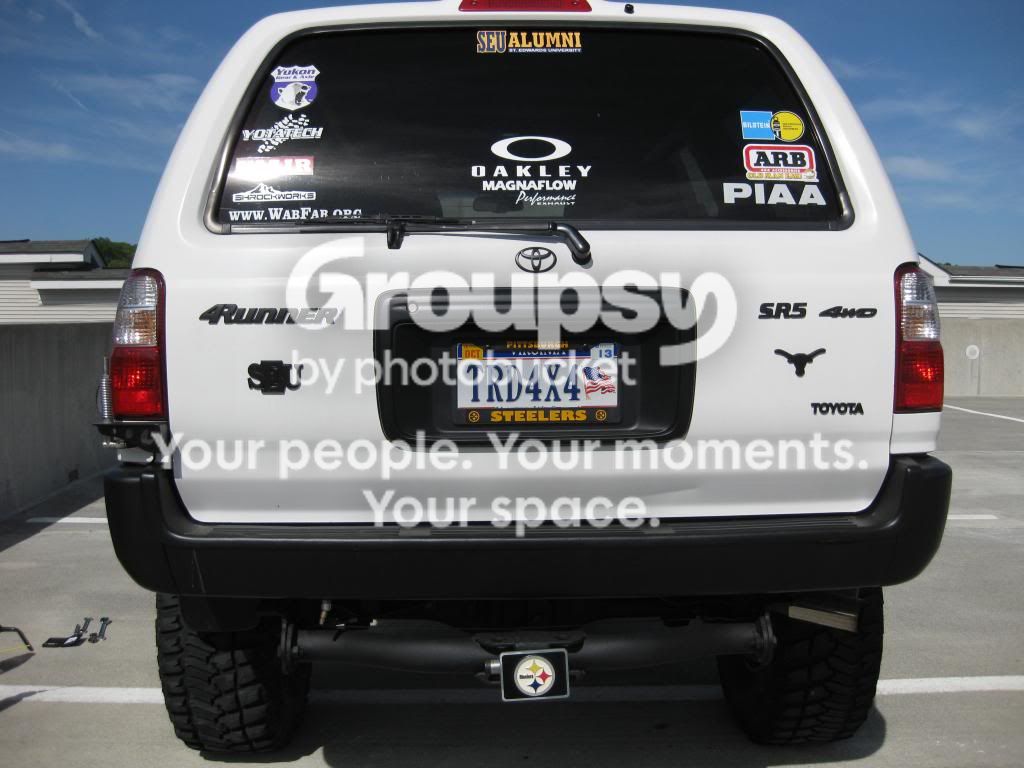
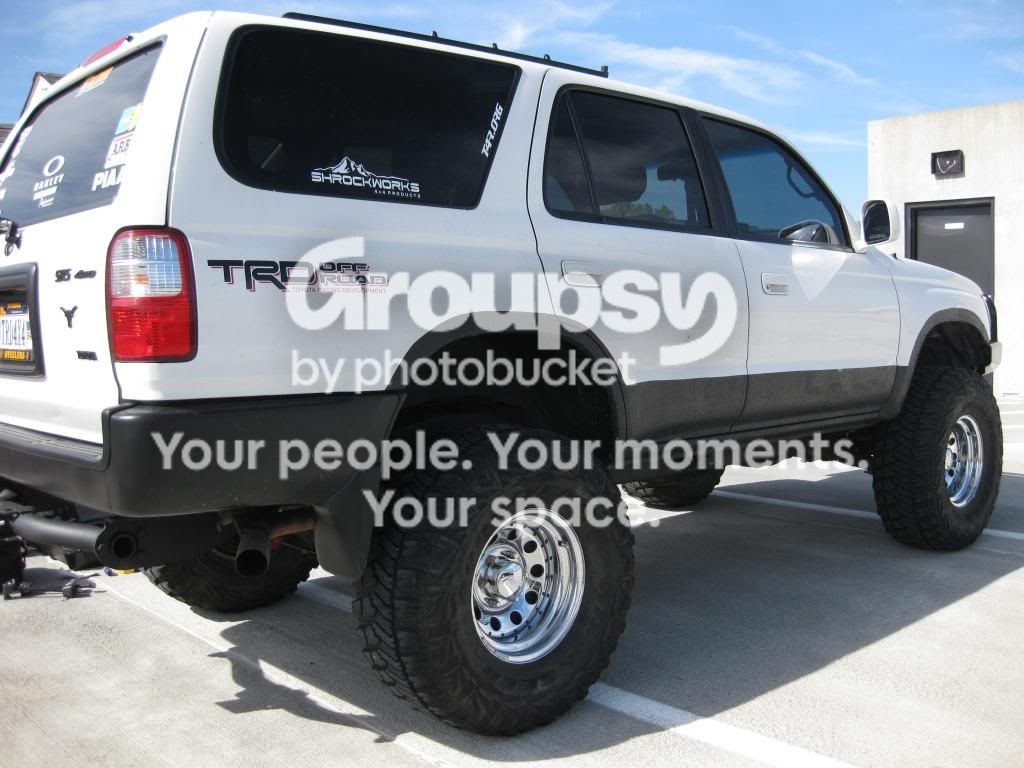

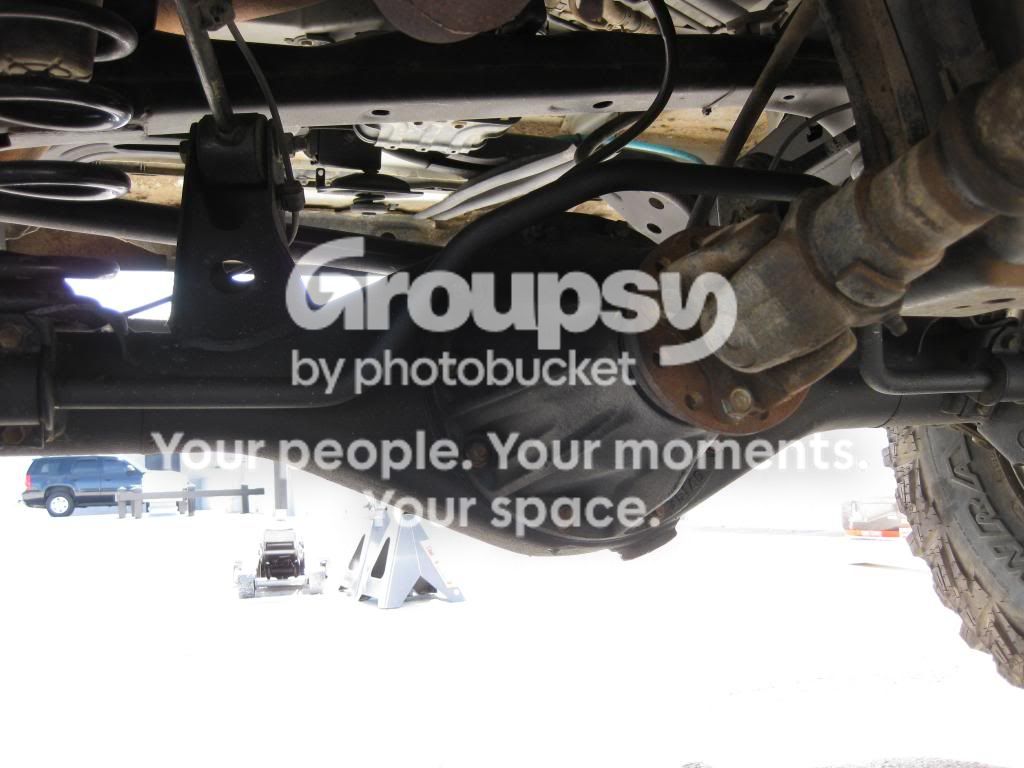
2) Rust prevention: I picked up a couple more cans of 3M Rubberized Undercoating and pretty much finished coating the rear end. It looks much better and so far everything I have done has held up really well.

3) Got an alignment - As many of you may or may not know, I swapped out my spacer lift for OME 882 coils a while ago, but never had it aligned because I wanted to get the bumper and winch on first and have it sitting at ride height. So, I took it to Goodyear and unfortunately they don't offer lifetime alignments, but I did get a 3 years for around $160, not too bad IMO.

Up next...
4) Even after getting an alignment, I am still leaning to the driver side a bit (both front and rear). So, I ordered a 1/4" top plate spacer for the front (Front Top Plate Spacer (One - 1/4") - Toytec Lifts: Toyota Lift Kits: FJ Cruiser Lift Kits, Tacoma Lift Kits, Tundra Lift Kits, 4 Runner Lift Kits, Sequoia Lift Kits, Toyota Truck Lift Kits) and a 10mm coil spacer for the rear (Rear Coil spring spacers 10MM - Toytec Lifts: Toyota Lift Kits: FJ Cruiser Lift Kits, Tacoma Lift Kits, Tundra Lift Kits, 4 Runner Lift Kits, Sequoia Lift Kits, Toyota Truck Lift Kits). The plan is to install the rear coil spacer first and drive it around a bit to see if it helps to level out the front. If not, then I'll install the top plate spacer on the front.

5) Timing belt: I finally pulled the trigger and ordered a timing belt kit. I went with this kit from aircabinman on eBay based on a couple timing belt-related threads: Toyota Timing Belt Water Pump Kit Genuine Parts 4 Runner Truck 3 4L V6 | eBay. It's more expensive than most other kits I've seen, but it comes with ALL OEM replacement parts which is well worth the extra cost IMO.

6) License plate mount: Here in VA we are required to have both a front and rear license plate, super annoying!. But, since I am running a synthetic line and hawse fairlead for my winch, I don't have anywhere to mount my license plate so I just have it taped to the inside of my windshield...I talked to Mark at Shrockworks and they actually just came out with a solution a couple weeks ago: A flip up license plate mount (Flip Up License Plate Mount). "Our new flip up license plate mount bolts on with the top two winch mounting bolts and hangs down covering the winch opening. When you need to use your winch, simply flip up the your license plate and go." So I ordered one in bare steel and I'm planning on painting it with the Duplicolor red Metalcast that I used on the fairlead and Hella light rings.

 
Last edited:
The rig is looking great! The front bumper really sets it off, and once you get rid of the chrome on the rear bumper it will look even better. Are your Hella's HID? I always wanted a set but they are $$$!

I'm with Ripcord, I bet white wheels would look great on your 4Runner! But, I think they would have to be the right style. Something like the SCS F-5 in white would look awesome!

I love the "Panda" nickname, but all I can think of is "Sexual Harassment Panda" on South Park, lol! :D
 
Last edited:

Members online

Forum statistics

Threads
278,312
Messages
3,554,089
Members
248,016
Latest member
Advally Service

Trending content

Back
Top