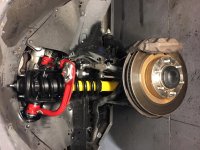
4th & 5th Gen Upper Control Arm UCA Install - Write Up

Thank you very much for this write-up. It's been years since I did my lift & I've forgotten a lot of it; your write-up will be very helpful.

I'm confused about one part:
"Also, make sure the Lower Control Arm is supported by a jack. The weight of the vehicle needs to be on the UCA for the bushings to seat properly. If you tighten the UCA through bolt without weight on the suspension, the bushings will be destroyed quickly. You can torque the through bolt with the wheel on the ground, and the weight on the tire."

Does this mean that you only partially tighten the through bolt until you've got the wheel(s) back on & jack stands removed? I didn't see that as part of the last step.

If you support the LCA's with a jack are you raising them up or just keeping them at the level they were before the old UCA's were removed?

Thanks again for taking the extra time to post the pics & write-up.
 
Thank you very much for this write-up. It's been years since I did my lift & I've forgotten a lot of it; your write-up will be very helpful.

I'm confused about one part:
"Also, make sure the Lower Control Arm is supported by a jack. The weight of the vehicle needs to be on the UCA for the bushings to seat properly. If you tighten the UCA through bolt without weight on the suspension, the bushings will be destroyed quickly. You can torque the through bolt with the wheel on the ground, and the weight on the tire."

Does this mean that you only partially tighten the through bolt until you've got the wheel(s) back on & jack stands removed? I didn't see that as part of the last step.

If you support the LCA's with a jack are you raising them up or just keeping them at the level they were before the old UCA's were removed?

Thanks again for taking the extra time to post the pics & write-up.

You’re so welcome! I get such a kick out of helping you guys. I have had so many write ups help me, I just wanted to give back to our special forum. We are lucky.

Yes, you just don’t want to do what some did, torquing everything at full droop, unsupported.

It’s been a while, but a couple of the instructions and write ups I went through emphasized this. Without support or weight, the bushings must get pinched and shredded when weight is put on the suspension.

Some say it’s no big deal but I didn’t want to chance it (there were pics of the shredded bushings somewhere).
 
I have the same JBA UCAs and they work great! Used this write up to help my install so thanks big time!

Only issue I had was that after my alignment the driver side UCA creaks pretty bad... Anyone else have this issue? Saw in another thread to uninstall and reinstall UCA but was curious if I've missed lubing something correctly. Ugh idk.
 
Is anyone running TRD pro wheels and 285/70r17 tires with these UCA’s? Just want to be sure I’d have enough clearance.
 
Missing a washer?

Great write up. I just finished installing mine. The JBA instructions differ slightly from yours in step 16. When the pin goes through there should be a thick outer washer, then the UCA, thin inner washer, then tube, thin inner washer, UCA, thick out washer. It seemed impossible to get it all together with one person (I borrowed my neighbor for that part). It takes someone pushing on the bolt while the other wiggles all the pieces into alignment.

Other than though, not a bad job.
 
Great write up. I just finished installing mine. The JBA instructions differ slightly from yours in step 16. When the pin goes through there should be a thick outer washer, then the UCA, thin inner washer, then tube, thin inner washer, UCA, thick out washer. It seemed impossible to get it all together with one person (I borrowed my neighbor for that part). It takes someone pushing on the bolt while the other wiggles all the pieces into alignment.

Other than though, not a bad job.

Interesting does it look like they updated/changed it?
 
Man, I had never seen that Total Chaos video. Super good. And now I know that I should only be willing to pay for 14 minutes of labor for each side of a lift install! :)
 
Interesting does it look like they updated/changed it?

IMG_1038.jpg

Here's a pic. The instructions are not clear which washer goes in which place, but it's really tight, so this is the way I put it together. It took two people to get the UCA in place, one holding one of it, the other putting the inner washer at about 45 degree angle and using it to ramp the other end in place so that both inner washers are there.

Prior to getting help, I was considering using a bottle jack to stretch the UCA slightly...probably not a good idea.
 

Attachments

  • IMG_1038.jpg
    IMG_1038.jpg
    133.6 KB · Views: 1,672
Caster

Your caster still on negative after the alignment, why is that? Its supposed to fixed it right?


One last thing, here is my alignment printout:

[/QUOTE]
 
spectacular writeup. changing it up from camburg to JBA.

question: i'm doing a full suspension replace at 165k, still undecided between 5100's and 6112's. i'm looking for ride quality mostly dont care much about lift, but anticipate getting probably 2" anyway between new struts and springs. you guys recommend going with stock or the STD high caster? any reason not to get STD high caster? am i forced into at least 2" of lift in that case?
 
14. Have a celebratory beer. You are halfway there! (hopefully something really tasty!)

15. Place new UCA in place, and thread in through bolt.


16. Replace through bolt washer and nut.


******VERY IMPORTANT******
The orientation should be: Long Bolt, Large Washer, A-Arm Bushing, UCA Tube mounted to chassis, other side, A-Arm Bushing, Large Washer, Nut

Also, make sure the Lower Control Arm is supported by a jack. The weight of the vehicle needs to be on the UCA for the bushings to seat properly. If you tighten the UCA through bolt without weight on the suspension, the bushings will be destroyed quickly.


You can torque the through bolt with the wheel on the ground, and the weight on the tire.

Torque nut with torque wrench to 85 ft-lbs


17. Place ABS wire bracket back on new UCA. I had to bend the shape of the ABS wire bracket on both sides to get it to fit just right on the new UCA, and then had to cut and reposition the rubber sheath around the wire (CAREFUL!!!), then bend the tabs on the bracket and gently crimp them around the ABS wire. If you cut or crush this wire, you'll be pretty bummed out. You have to place the wire in a spot where the articulation of the UCA won't pull or crush the ABS wire. There is room, but just barely.


18. Place the supplied washer ABOVE THE KNUCKLE AND BELOW THE BALL JOINT and place the ball joint stud into knuckle. (Some have questioned why the washer is there. It seems to be to keep the grease inside the boot. So yes, the washer goes ABOVE the boot!!)


19. Place the nylon lock nut onto the ball joint stud finger tight. The nut size may be 21mm. I didn't have a wrench that big, so I very carefully tightened the nut with a crescent wrench. Use a 10mm wrench to hold the ball joint stud from rotating. Torque to 45 ft-lbs.


20. Admire your work! Almost done!


21. Replace fender aprons and clips, tire and lug nuts, carefully remove jackstands and wheel chocks, repeat for the other side, get an alignment, and go rip it up!

And time for a celebratory beer (or a bunch!!).


One last thing, here is my alignment printout:


Awesome write up! I will be installing my SPC UCA and King extended travel next weekend. Thanks for the details as this will be my first time doing an UCA replacement.
 
spectacular writeup. changing it up from camburg to JBA.

question: i'm doing a full suspension replace at 165k, still undecided between 5100's and 6112's. i'm looking for ride quality mostly dont care much about lift, but anticipate getting probably 2" anyway between new struts and springs. you guys recommend going with stock or the STD high caster? any reason not to get STD high caster? am i forced into at least 2" of lift in that case?
Why are you switching from camburgs? What are you doing with your camburgs?

Sent from my XT1710-02 using Tapatalk
 
I'm doing these on a 2016 4Runner. Mine came with four washers two thick and two thin and in the write up it says I should have a washer on the outside of the bushing and on the inside of the bushing but there is not enough space to get the control arm in place, has anyone had this issue or do I not need the interior washers... Please help running out of beers and patiences
 
I'm doing these on a 2016 4Runner. Mine came with four washers two thick and two thin and in the write up it says I should have a washer on the outside of the bushing and on the inside of the bushing but there is not enough space to get the control arm in place, has anyone had this issue or do I not need the interior washers... Please help running out of beers and patiences


What UCA Are you installing? I installed Icons on my buddies Tacoma and had to use a pry bar to gently get the arms in place with the washers on the inside. It was a little tricky but it didn’t take much time to get them in. There was two of us though, my buddy pried while I aligned the through bolt.


Sent from my iPhone using Tapatalk
 
I'm doing these on a 2016 4Runner. Mine came with four washers two thick and two thin and in the write up it says I should have a washer on the outside of the bushing and on the inside of the bushing but there is not enough space to get the control arm in place, has anyone had this issue or do I not need the interior washers... Please help running out of beers and patiences

Big washers go on the outside, by the nut and the bolt, the little washers go on the inside, by the tower/strut area. This video (it starts on the important part with the washers) shows big washers, but the theory is the same.

Big - Little - Little - Big


I just spoke to Al on the phone, and he said definitely use all 4 washers. And he mentioned that a helper would be helpful at this step.

Call 855 533 7437, press 1, and he will probably pick up during business hours (east coast).

PM me if you need more of an explanation. Good Luck!!


<iframe width="560" height="315" src="https://www.youtube.com/embed/Jt5a0fUMR00?start=77" frameborder="0" allow="accelerometer; autoplay; encrypted-media; gyroscope; picture-in-picture" allowfullscreen></iframe>
 
Last edited:
I just installed the JBA control arms on my 2008 over the weekend. I found the washers to not be too bad, but a little bit of a wrestle. The technique I ended up using, was a pry bar once it got to the rearward bushing to slide the washer in. The bushings flex enough with the right leverage, and then you can slide that around. There seemed to be just enough width to get the front washers both in place, without any leverage. All in all took a little while but not too bad, and I was doing it by myself.

Very impressed with the instructions, and the fit/finish, looking forward to seeing how it drives on and off road soon! Only got a chance to test drive around the block this afternoon, but so far so good.
 
I found the washers to not be too bad, but a little bit of a wrestle. The technique I ended up using, was a pry bar once it got to the rearward bushing to slide the washer in. The bushings flex enough with the right leverage, and then you can slide that around.

Thank you for this post. I spent over an hour wrestling with those washer and finally came inside and found this post.
Drivers side took 3 hours, passenger side <90 minutes including clean up!
 

Members online

No members online now.

Forum statistics

Threads
278,310
Messages
3,554,079
Members
248,016
Latest member
Advally Service

Trending content

Back
Top