AC Dead

My advice is take out the entire dash as one unit vs disassembling it....SOOOO much easier. I didnt take a ton of photos along the way, but tried to describe and document on thread I started.

I read this before and keep running it through my head. HOW

like what are you leaving in and how are you that good, that you can just disconnect and unclip everything. I can't even begin to think about to go about doing that. There are so so many things that would hold it in place before you could even access the fasteners.

Please link whatever the thread was!!!!!!!!!!!
 
I read this before and keep running it through my head. HOW

like what are you leaving in and how are you that good, that you can just disconnect and unclip everything. I can't even begin to think about to go about doing that. There are so so many things that would hold it in place before you could even access the fasteners.

Please link whatever the thread was!!!!!!!!!!!
Here's a link to the topic he is referring too.

Replacing Evaporator...what else should I do while in there?
 
Spent way too long working on the airbox this morning. It was way more complex than expected and I broke a few clips and had to bodge some repairs including on a blend door. Absolute white knuckle terror the entire way. Then, while I was wrapping up I just happened to notice that I'd dislodged the defrost actuator. NOT an actuator you can live without. I did; new blower, new Denso evap, new TXV, new heater core, and new filter.

Got it back into the car, put the support bar back in place, hooked up the heater core, filled the rad, and got the bare minimum connected to test the heater and airflow; gauge cluster, ECU, HVAC control unit, etc.

Fired right up, no CEL, and the hvac controls all work perfectly. Not gonna lie, I was surprised.

Moving on to replacing condensor and compressor, then to charge the system and test it. If that all works out I can move on to re-assembling the interior. Finger's crossed. EDIT: Nope. Did you know the 07-09 cars use a different mounting pattern for the compressor and some retailers don't have this distinction in their system?
 
I just want to dedicate a quick post and call out PartsGeek.com for being complete scumbags. So here is a quick redux on the situation:

> I order a number of parts from them for this project
> One of the items is a compressor/condensor/TXV kit
> As you can tell from this thread I have the TXV installed, it is now buried within a airbox, buried within my dash
> They mistakenly shipped me the incorrect compressor part for my model year
> I try to call them, four times. Two are unfruitful and two the system "accidentally" hangs up on me
> I open an RMA online. That appears to work but I don't get a shipping label and there is clear text saying if I don't return the entire kit I get nothing back
> I go onto online chat and explain the situation: "you shipped me a kit, most parts are right but the compressor is incorrect for my car, I need to return the compressor"

"Sorry you must return the entire kit, surely you must understand"

"Actually I don't understand at all. If you work on cars you know that one bad part might be discovered several hours of labor later"

"Welp that is our policy"

Obviously in my case it's better to take a ~200$ loss then redo all that work and risk further damage to the airbox, a sensitive part that is barely available and retails for two grand.

So I'm now eating a couple hundred on a new compressor, eating the loss from PartsGeek.com, and eating multiple extra days on this project to get the correct part.

A hearty GFY to PartsGeek.com!
 
UPDATE

New compressor ordered, and I discovered PartsGeek also shipped me the wrong suction and discharge hoses, so now I get to go track down those. I suspect it's the same issue as the compressor where the incorrect model year was sent.

Project is delayed till at least Saturday at this point.

The chargeback against PartsGeek was interesting. Their excuse for not refunding the wrong compressor was that it was "part of a kit" and only the entire kit can be refunded (oh yeah lemme just spend four hours tearing apart my car again due to your mistake, oh yeah no problem). Of course the "kit" is just a parent SKU of the constituent parts, all of which I could have purchased separate from the same catalog, and they're even listed on the "kit". So if you ever make the mistake of ordering from PartsGeek definitely just order the kit line items separately, there is no benefit to ordering the "kit", only downside.

As they claimed that their policies state that kits can only be returned in full I felt the chargeback was an uphill battle however when I actually reviewed their TOS and return policies the word "kit" doesn't even appear, so I'm expecting the chargeback to sail through. So that's at least a positive aspect as I sit here dead in the water waiting for parts I thought I had a week ago.

EDIT: PartsGeek declined to RMA the hoses. To the chargeback it goes!

EDIT2: Lol this is just getting absurd at this point. I happened to toss in a set of radiator hoses into the original order, and THOSE WERE INCORRECT TOO! So out of a $700 order something like $500 of it was incorrect. Naturally I gave PartsGeek a chance to provide a shipping label and they refused again. How is this a real company.
 
Minor update

So it turns out basically every single car part supplier has the wrong part in their system for a 2005 v6 4runner for the suction hose. As in, the part that is physically in inventory does not match what the actual part is. After getting the wrong part again from another source I called Oreilly and asked the dude to physically walk down and grab the part and compare it to his computer screen. NOT A MATCH. Saved a drive!

So unless someone knows how to find a suction hose like right this instant I'm gonna probably have to reuse my existing hose and just clean it up real good.

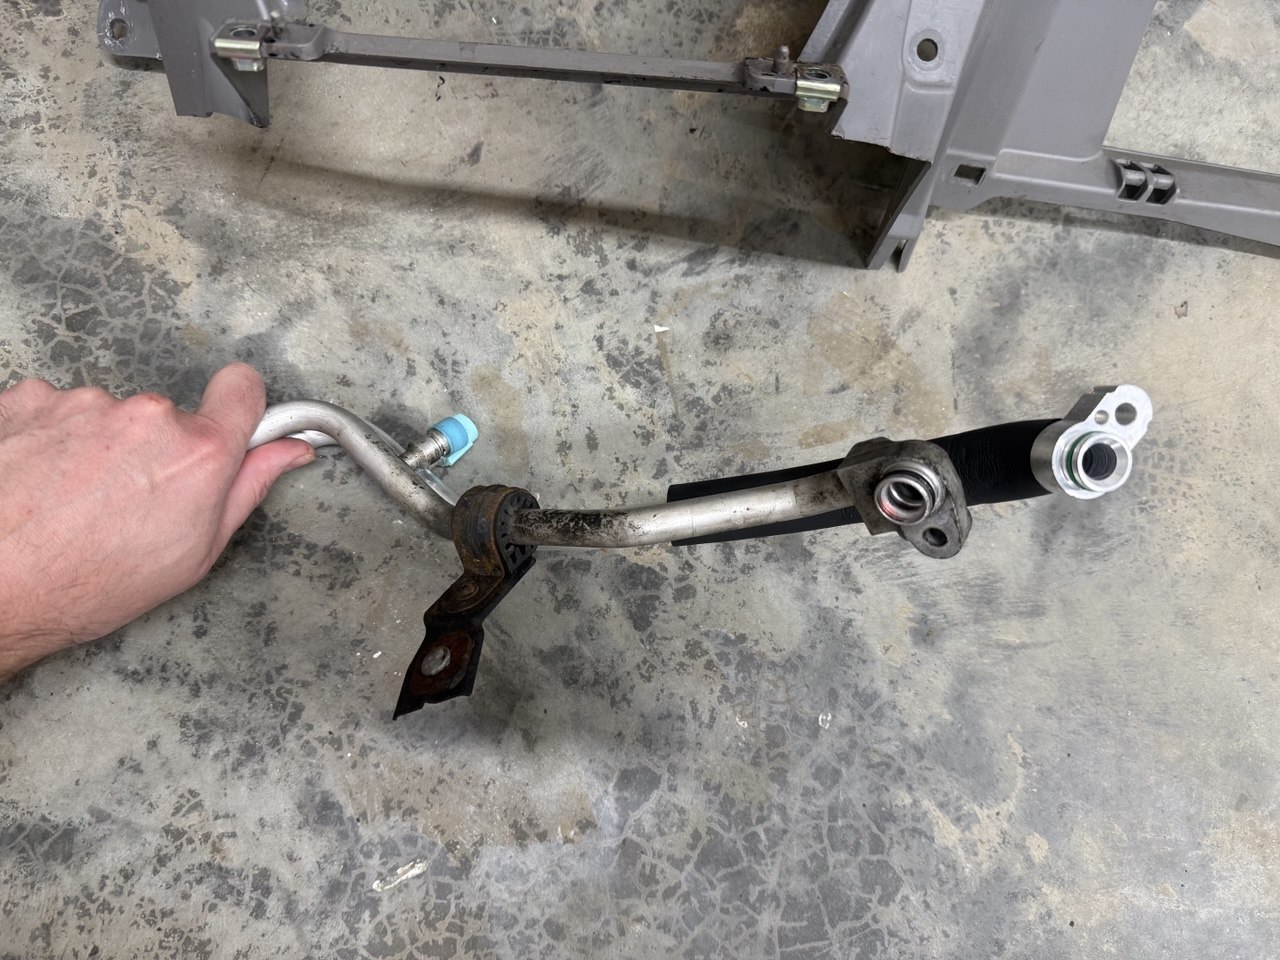
Here's the problem:

lc168v.jpg


You can see the line is a few inches too long and the flange is orientated the wrong way.

If it was slightly off I think I'd try bending it but I think I lack the skill to get the rotation correct on the flange.
 
I ended up refurbing the existing line. Flushed it, cleaned it, replaced the o-rings, schrader valve, and cap.

Put my new, correct compressor on, ran a vacuum, tested decay, put in initial charge, it took about 70psi at 70F and then cranked the engine. Instant burnt rubber smell and zero compression ratio.

Bad compressor. Now I get to tear the whole ****in thing apart again. FML.
 
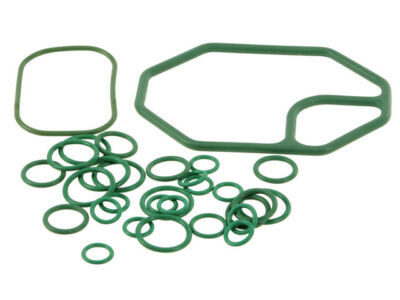
btw, can someone please explain this to me:

BVUf5Tx.jpg


This is a bog standard o-ring kit for the 4th gen.

What the HECK are those two big gaskets up top???????

I've had my system completely torn apart, I've replaced every single o-ring, seal, whatever, I've touched every single joint. My system holds vacuum and pressure. At no point have I seen either of those two gaskets. What on earth are they for?
 
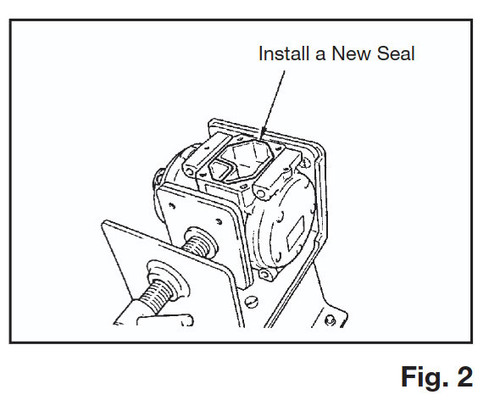
Ahh, found one of them.

BXeI6UN.md.jpg


Looks like it goes inside the compressor (outer?) housing where the lines connect. Doesn't look like a part you would replace very often without good reason.
 
UPDATE

Car is blowing cold air. I went and picked up a OEM compressor and installed it and put the engine bay back together. I ended up having the exact same issue as the prior compressor which made me want to cry. I consulted chatGPT (lol I know) and it told me to check my gauge fittings, lo and behold one was loose causing the service valves to not push in all the way.

What an absolute roller coaster this has been. Putting my interior back together tomorrow.
 
BTW couple notes on getting the OEM Denso compressor:

- Clutch kicks in much softer and quieter than Aisin, or even the 22 year old original Denso for that matter
- It came slightly underfilled by about an ounce. Significant but probably not even enough to matter
- It uses a pag46 oil that is actually significantly different from actual pag46 from the auto parts store. They're compatible but not the same. its annoying that the fancy fluid doesn't come in a little bottle inside the box. I think they do this because leaving the oil inside the compressor helps with long term shelf life. actually the instructions on the Denso said to rotate normal direction minimum ten times to release oil from the head.
 
BTW couple notes on getting the OEM Denso compressor:

- Clutch kicks in much softer and quieter than Aisin, or even the 22 year old original Denso for that matter
- It came slightly underfilled by about an ounce. Significant but probably not even enough to matter
- It uses a pag46 oil that is actually significantly different from actual pag46 from the auto parts store. They're compatible but not the same. its annoying that the fancy fluid doesn't come in a little bottle inside the box. I think they do this because leaving the oil inside the compressor helps with long term shelf life. actually the instructions on the Denso said to rotate normal direction minimum ten times to release oil from the head.

When you says...."...Denso said to rotate normal direction minimum ten times to release oil from the head..." what exactly are you rotating, I'm assuming the pulley, if so is that clockwise or counterclockwise while facing the pulley?

Also how much has all the parts costed you...not counting any wrong parts, etc.?
 
[MENTION=149207]AuSeeker[/MENTION] i think it rotates clockwise, same as alternator.

[MENTION=117138]Cezar[/MENTION] , now you got all that room to put that remote start in, all that room to get to the wires and you can basically solder the connections at this point. i did run 2 fused wires directly from the battery to each 12v red and red/white wires. it just an old habit of mines from older installs.
 
When you says...."...Denso said to rotate normal direction minimum ten times to release oil from the head..." what exactly are you rotating, I'm assuming the pulley, if so is that clockwise or counterclockwise while facing the pulley?

COUNTER-CLOCKWISE while facing the pulley.

I figured it out by spinning the hub (not the pulley) left and right and seeing which hole puffed and which hole sucked with my thumb. As the liquid (small line) is the discharge, that is the one that should puff when spinning the correct direction.

Also how much has all the parts costed you...not counting any wrong parts, etc.?

About $1100 and I'd say 30 hours at the end of it. I also replaced my radiator, thermostat, and hoses while I was in there. Tried to do the belt but Autozone sold me one that was an inch too short and boy was that an exercise in frustration till I figured it out. I put the original belt back on because it's only seven years old and still in fine shape.

Anyway, car is almost fully back together. All tasks under the hood are done except I need to seal the heater core ingress (was thinking about using duct seal), and I need to do a final charge on the AC system. I cut it a little short because I was choking on exhaust in my garage yesterday. I'll do the final top off out in the driveway.

Interior-wise, dash is in, steering wheel, airbags, cluster, vents and trim. If I temporarily plug in the hvac controls I can run the car and 100% of hvac functions work and the air blows ice cold.

I'll spend the rest of the day on the last of the trim pieces and then remote start / stereo reinstall which I'm dreading but should not go past tonight, so the car should be back on the road tomorrow!
 
Thanks for the info!

I'm not sure on a V6 but on my V8 the serpentine belt tensioner pulley the size was changed midway through the 2004 production year, the pulley is either around 3 1/2" (90mm) or 4" (105mm) depending on when it was made for the 2004 production year, I found this out when I replaced my bad tensioner pulley, I measured my old one in the parking lot before going into Napa to get a new one just to be sure it was correct, the first one they pulled out was incorrect so they found the correct size, I didn't even think about the belt being a different size but found out at home when I tried to install it, had to go back and get the correct size belt.
 
I'll make a mental note to bring my belt with me when its due for replacement.

Just finished up the car. Took it for a test drive. 100% functionality on all systems. Glad it's over with.

My advise for anyone doing this job is keep a log of every single thing you do. My log ended up being 2.5 pages of a legal pad. When doing the second half I was able to use it as a checklist. It was tremendously valuable.

Also I kinda snaked my support bar through a few harnesses and I don't think that was worthwhile. It's probably better to just undo everything so the support bar will just lift out of the car.

2 big snags I ran into was one harness I forgot to snake the bar through and luckily I was able to undo it at the end and re-run it. Not all harnesses are that easy to do that with. The other was I missed the antenna cable that goes up the A pillar on re-assembly and only noticed once the dash was all back together and I was installing the stereo. I used a bendy magnetic tool to snake a new path just above the cabin filter slot and it all worked out.

Re-work on this job is absolutely brutal so do everything you can to do things _once_.

What else. Um the hard line and most of the hose hold-downs were rotted out so I fabbed up my own as needed using cable clamps with rubber isolators. Worked great, and a couple spots actually look better than OEM.
 
Just wrapped up my final charge. Hit 40/200 @ 75F. Barely almost sorta high head pressure but nothing out of range. I find it hard to nail the exact specs on these things when it takes forty minutes to charge a system while it just sits there and heat soaks and roasts itself. I hate how long it takes to do the 2nd half of a charge. I usually end up flipping between a bunch of cans to speed things up.
 
On your serpentine belt, if you can read the brand and belt number on your old belt that should be all you need to get a replacement belt, the auto parts store should be able to cross reference it to whatever brand you replace it with.
 

Members online

No members online now.

Forum statistics

Threads
278,306
Messages
3,554,045
Members
248,016
Latest member
Advally Service

Trending content

Back
Top