Another Full-Length Roof Rack Option -PrinSu

Any developments on the non drill modification, or did i miss something?

I started working on something and had to scrap it and drill so I could have the rack secured for an offroading trip. I had planned to trim a piece of ABS plastic to match the bracket on the side rail, drill a few holes and secure it to the bracket with carriage bolts, then use thick double sided tape to secure the ABS foot to the roof of the 4Runner. There is some lateral movement on the rack so I think using the double sided tape to secure it to the roof is the best approach next to drilling.
 
I started working on something and had to scrap it and drill so I could have the rack secured for an offroading trip. I had planned to trim a piece of ABS plastic to match the bracket on the side rail, drill a few holes and secure it to the bracket with carriage bolts, then use thick double sided tape to secure the ABS foot to the roof of the 4Runner. There is some lateral movement on the rack so I think using the double sided tape to secure it to the roof is the best approach next to drilling.


Thanks for the reply! I plan to purchase this rack and try it out. I was planning use my CAD software at work to 3D print some custom blocks to attach to the front side rail brackets. Then, use some 3M VHB double sided tape or something stronger to stick to the roof side. Anybody see anything im missing where this might not work with this particular rack? I know there are some full length racks attached in this fashion in the front part like the gobi, but the Prinsu one is not one solid rack, its multiple pieces assembled together. Thanks in advance!
 
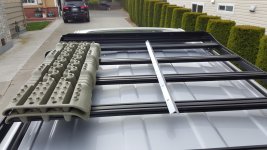
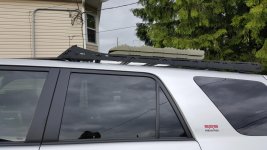
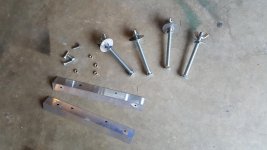
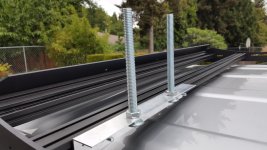
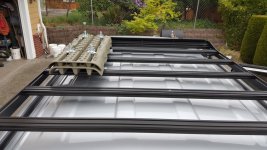
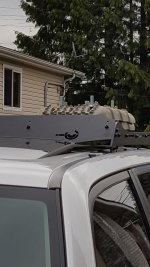
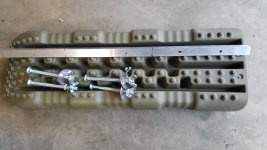
Mocking up a mounting system for my TREDs. Will have time to finish on Saturday.
 

Attachments

  • 20160427_181756.jpg
    20160427_181756.jpg
    135.4 KB · Views: 2,137
  • 20160427_181255.jpg
    20160427_181255.jpg
    137.5 KB · Views: 3,457
  • 20160427_181240.jpg
    20160427_181240.jpg
    136.4 KB · Views: 4,374
  • 20160427_181148.jpg
    20160427_181148.jpg
    116.7 KB · Views: 2,039
Thanks for the reply! I plan to purchase this rack and try it out. I was planning use my CAD software at work to 3D print some custom blocks to attach to the front side rail brackets. Then, use some 3M VHB double sided tape or something stronger to stick to the roof side. Anybody see anything im missing where this might not work with this particular rack? I know there are some full length racks attached in this fashion in the front part like the gobi, but the Prinsu one is not one solid rack, its multiple pieces assembled together. Thanks in advance!

I think that should work well. The main concern I had with a no-drill solution was minimizing the lateral movement that is possible if the front feet are secured and this approach should address that concern.
 
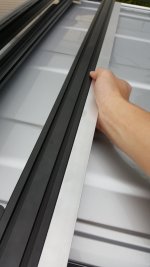
Finished building my TRED mounts. Now the brackets are drying after a few coats of black Rustoleom.

Next up...my ARB awning mount!
 

Attachments

  • 20160428_171718.jpg
    20160428_171718.jpg
    137 KB · Views: 2,034
  • 20160428_174751.jpg
    20160428_174751.jpg
    135.6 KB · Views: 2,498
  • 20160428_183314.jpg
    20160428_183314.jpg
    141.1 KB · Views: 3,575
  • 20160428_183402.jpg
    20160428_183402.jpg
    131.7 KB · Views: 2,331
Can anyone who has the full sized rack post a pic of where the front drills into. Would love to see how it mounts and if I'd really want to drill into my truck. Thanks!
 
5/17 edited with more details:

For those that like this rack but are concerned about drilling into their new vehicle I thought I would post on how easy it is to install the plus nuts.

I added my plus nuts for the front mounts today. First you install the rack sides and at least 3 cross bars to get it squared up.

Once you have it where it looks right use a punch to mark your holes for the plus nuts.

Remove the rack then drill your holes. A long step bit to 3/8" is perfect (hint Harbor Freight step bits).

plusnut_01.jpg


There is plenty of room so there is no worry of drilling into something bad. The metal is about 3x the normal thickness so the longer step bit will drill through all the layers in the same size.

Next I used a couple of washers and an old socket to set the plus nut. The ones equipped from Prinsu are not the right size to fit into the drip rail since they were not meant to fit there. Next I tapped the plus nut in with a hammer to set it in place then used a large set of pliers to hold the socket to keep the whole thing from spinning. You can see in the pic it made some marks on the socket so use an old one. (This pic is on the second side before pounding it in place. The marks on the socket are from the first one I installed).

plusnut_02.jpg


I used a cordless power drill and a 11mm socket to make it go faster.

This only took a couple minutes per side and the plus nuts are locked in tight and are the same as the factory installed ones. Do this before you install the rack. It would be a PITA to cinch down the plus nuts with the rack in position.

plusnut_03.jpg


Another thing I would mention is to remove the rubber drip rail molding beforehand. It just pulls out. After mounting the plus nut run some painters tape across the center of the nut so you have a reference of where you will need to punch a 3/4" hole in the rubber molding. Place the molding in place the use another piece of tape on top of the molding so you know where to center punch it. Do not try and drill this out. Many at the Tacoma forums have tried this and ruined their molding. You can purchase a kit from Amazon for around $15. place the molding on a 2x4 and hammer hard until you get thru it. It has metal embedded inside and this kit will go right thru it.
 
Last edited:
I added my plus nuts for the front mounts today. First you install the rack sides and at least 3 cross mounts to get it squared up.

Once you have it where it looks right use a punch to mark your holes for the plus nuts.

Remove the rack then drill your holes. A step bit to 3/8" is perfect.

plusnut_01.jpg


There is plenty of room so there is no worry of drilling into something bad.

Next I used a couple of washers and an old socket to set the plus nut. The ones equipped are not the right size. I tapped the plus nut in with a hammer to set it in place then used a large set of pliers to hold the socket to keep the whole thing from spinning.

plusnut_02.jpg


I used a power drill and a 11mm socket to make it go faster.

This only took a couple minutes per side and the plus nuts are locked in tight and are the same as the factory installed ones.

plusnut_03.jpg

Looks good! The more i see this being done, the less likely i think about coming up with a non drill solution. It doesn't look too bad at all. Any pics of the rack fully installed? So were the supplied washers too wide?
 
Last edited:
4th Gen Runner with Gobi Ladder and Full Prinsu rack

Hey guys!

2004 Limited (spoiler without bump)

I purchased this rack a few months ago and love it. As far as clearance with the Gobi ladder and the Prinsu- there is no problem. The spoiler comes within 1/4" of the front-back side rails of the Prisnu- but cannot touch even if you push the tailgate up to its' highest potential.

The spoiler does not hit there rear-most bar while it is in the last horizontal mounting space- however there is one more mounting location further back, which is tilted so the bar is vertical. I'm guessing this is for a rear light bar- however the rail cannot be put there and used with the spoiler. If you have no spoiler, the rear-most rail can most likely be used.

I will do a full write-up with pictures and everything, once I stop milking posts to hit that 15. ha.
 
Last edited:
Has anyone ever considered using a neo magnet mount instead of drilling?
4runner+4eva-albums-4runner+4eva-picture40070-neomag.jpg


K&J Magnetics: MMR-A-ZC

While most full racks continue to use the 4 original OEM mounts and 2 additional fronts, I see on some racks, it's just double sided tape and others, like the Prinsu, require drilling.
To me, doesn't seem like there's that much "pull" to compensate for if some manufacturers are using double sided tape to hold down their front feet and why these neo mag mounts wouldn't work as a substitute. The 3.75" magnet has a pull of 151 lbs each. I can't imagine double sided tape having that much strength.
Again, I'm not a mechanical engineer nor do I play one on TV but seems like a potentially viable no drill option if "securing" the front feet is all that is required. How much securing????
 
Last edited:
Looks good! The more i see this being done, the less likely i think about coming up with a non drill solution. It doesn't look too bad at all. Any pics of the rack fully installed? So were the supplied washers too wide?

The supplied washer are for over the rack mounting position and were not meant to fit into the drip rail. I have used the plus nuts before and it's much better to cinch them down while it's easy to access than when you have the rack in position.

Here are a few. I don't like my light bar in that position so I will move it to the center in front of the air deflector.

prinsu_002.jpg


prinsu_004.jpg


prinsu_005.jpg


I switched out the allens with Torx security screws.

prinsu_007.jpg
 

Members online

Forum statistics

Threads
278,316
Messages
3,554,120
Members
248,016
Latest member
Advally Service

Trending content

Back
Top