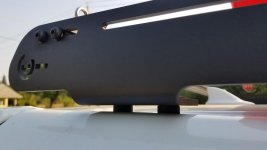
Another Full-Length Roof Rack Option -PrinSu

Drilling worry and RTT Solutions

So I have a follow ups to two things many have questions with:
1) The worry of drilling in to the top.
2) RTT mounting

I will answer them in order, with pictures included. If you would like to see my RTT solution scroll past the drilling part.

Full Length Prinsu Moisture Check:

Look, I'm an average Joe just like many of you. I'm currently in the Navy and work on Submarines on shore duty at Point Loma. I've had my Prinsu Rack for almost a year now and I fretted drilling in to the top of my roof as many of you have.

A couple months ago I noticed this on top of my headliner on my passenger side:

kageken-albums-prinsu+headliner++rtt-picture50837-img-7245.jpg


I wasn't sure if it was dirt or from the hole I had drilled so I immediately thought aw crap I f'ed it up and now I'm going to have to pay for the consequences of not having it done professionally. I decided to take a look for myself and looked up ways to partially take off the headliner so I could take a gander to see how bad the damage is. Theres plenty of questions about doing this task and some pictures with it already removed but not much detail. If you'd like, follow along and I will show you how I partially removed the headliner, or just skip past all those steps to see the end result of how it looks underneath your roof and if there was any rust.

I started all this like aforementioned, searching the forums, and couldn't find anything productive. I started prying at the liner with a flat tip to see where it's mounted. Since this is on the passenger side I will show you the steps for THAT side. I assume the driver side is similar. Here is everything simplified:

1) Remove (2)Oh Shit Handles:
kageken-albums-prinsu+headliner++rtt-picture50822-img-7242.jpg

Use a flat head and gently lift the (2) covers off, (2) Size 11 Metric bolts I believe, take them out. Handle can be pulled off right after.

kageken-albums-prinsu+headliner++rtt-picture50823-img-7237.jpg

Pull the handle down, take a flat head and gently lift the bottom of the (2) tabs to pry if away from the mount. After it comes off a little you should be able to pull the tabs off by hand. The tabs will come out and take a slight turn out. Picture below shows what they look like and how you will have to turn them out:

kageken-albums-prinsu+headliner++rtt-picture50824-img-7230.jpg

Once you have these out, you can pull the handle from the metal clips. You can also pinch the metal clips together and pull the metal clips out. It will make it significantly easier to put the handle back in by pulling the clips out as well.

2) Remove (A)? Pillar
This should literally come right off once the handle is removed.
kageken-albums-prinsu+headliner++rtt-picture50828-img-7234.jpg


3) Remove Sun Visor
kageken-albums-prinsu+headliner++rtt-picture50831-img-7240.jpg

Flat head again or something similar to wedge this gently apart and pull it off with the visor mount sliding down the middle. This will expose 2 Phillips screws, take them out, and remove the visor.

kageken-albums-prinsu+headliner++rtt-picture50827-img-7233.jpg


kageken-albums-prinsu+headliner++rtt-picture50836-img-7239.jpg


At this point you should have enough room to slightly pull down your headliner and take a look up with a flash light.

Here are the results:

kageken-albums-prinsu+headliner++rtt-picture50838-img-7210.jpg


It's that gold thing back there.

kageken-albums-prinsu+headliner++rtt-picture50826-img-7228.jpg


kageken-albums-prinsu+headliner++rtt-picture50825-img-7219.jpg


It's perfectly fine! Stop being a pansy and thinking so hard about it and get the full length option and drill in to your car!

Do everything in reverse and put everything back!

Don't forget to put the weather stripping back properly!
kageken-albums-prinsu+headliner++rtt-picture50829-img-7235.jpg


Roof Top Tent Mount:

I coughed up the $120 or so and got the Prinsu mounting foot for topracs. I got this idea from someone on instagram. I believe he has a white 5th runner and lives in Vegas. I don't remember your name buddy but I stole this from you. Credit goes to you.

kageken-albums-prinsu+headliner++rtt-picture50832-img-7247.jpg

kageken-albums-prinsu+headliner++rtt-picture50833-img-7248.jpg


I have a goFSR M55. I bought the standard toprac feet at 1.5", which, with the addition of the channel for the bolt of the tent. puts me about 2.5" of clearance above the rack. Enough for me to get my hands in and bolt everything down comfortably without moving crossbars(which I tried and hated).

The only issue I have is that the bolts for MY TENT to mount to the rack are bigger than the holes on the toprac feet. Obviously if you have a different tent you may or may not have this problem.

kageken-albums-prinsu+headliner++rtt-picture50835-img-7250.jpg


This can be remedied by drilling a larger diameter hole in to the toprac feet or getting a smaller bolt that will still slide in to the channel of the rack tightly. You can also modify the channel that your bolt slides in to on your roof tent to be smaller.

kageken-albums-prinsu+headliner++rtt-picture50834-img-7249.jpg


Going on a trip and will be bringing the tent, I'll let you all know how it goes.

 
Last edited:
Has anyone used sikaflex instead of RTV silicone on their installs? Will install mine in a couple of weeks and I'm just trying to get my ducks in a row.
 
Last edited:
How tight should the included eyebolt tie downs be? Hand tight seems too loose and I feel with any decent load, it will come loose if used to anchor your straps to. I was able to hand tighten them and then gave it another half turn using an Allen key as leverage, but when I loosened them up, I can see some imprint from the washer on the powder coating
 
I have been running the full length for about two years and regularly haul 2x4, 2x6 and 4x4 on the rack. Hand-tight the eye bolts with ratchet straps - been rock solid and never come loose :thumb3:

pjo
 
Can you use any Eye Bolts? I'd hate to pay $40+ for a set of eye bolts that I see for some of these racks.

Get some short shank m6 ss eye bolts (various on amazon) and some m6 10 series ss roll in t-nuts($3 ea shipped on 10 or so). You will still end up spending ~$40 but you will have like 10 eyebolts.

Lots of prinsu stuff on the tacoma forum if you need ideas.
 
Last edited:
Get some short shank m6 ss eye bolts (various on amazon) and some m6 10 series ss roll in t-nuts($3 ea shipped on 10 or so). You will still end up spending ~$40 but you will have like 10 eyebolts.

Lots of prinsu stuff on the tacoma forum if you need ideas.


Ordered these bits. Thanks for the suggestion
 
I opened my full prinsu rack and went to install it, when I noticed 2 things.

1-there were no instructions

2- after looking online how to install it, I found that some people say that there are longer spacers that go in the middle 4 bolt holes. Well, all 10 of my spacers are exactly the same length. Is this normal, or should I have different length spacers?

I emailed CBI/Prinsu, but I doubt I'll get a response until Monday.
 
I opened my full prinsu rack and went to install it, when I noticed 2 things.

1-there were no instructions

2- after looking online how to install it, I found that some people say that there are longer spacers that go in the middle 4 bolt holes. Well, all 10 of my spacers are exactly the same length. Is this normal, or should I have different length spacers?

I emailed CBI/Prinsu, but I doubt I'll get a response until Monday.

All of my spacers were the same size. I came across the post you found too.

Also, I didn't like the look of the aluminum spacers so I used heat shrink (for large diameter wires) to give them a strong black finish. Paint may work too but I didn't want to deal with it flaking off.
 

Attachments

  • 20180811_082246.jpg
    20180811_082246.jpg
    131.4 KB · Views: 1,016
All of my spacers were the same size. I came across the post you found too.

Also, I didn't like the look of the aluminum spacers so I used heat shrink (for large diameter wires) to give them a strong black finish. Paint may work too but I didn't want to deal with it flaking off.

Cool, thanks!

I painted mine.
 
Just got my full rack a few days ago. Installing it now using the no drill Camaro hood parts. Will see how it goes. Also, black spacers came with my rack, so I am pretty happy about that.
f8a72919922ceb32aa9375fa39e80ec6.jpg


Sent from my Pixel XL using Tapatalk
 
Just got my full rack a few days ago. Installing it now using the no drill Camaro hood parts. Will see how it goes. Also, black spacers came with my rack, so I am pretty happy about that.
f8a72919922ceb32aa9375fa39e80ec6.jpg


Sent from my Pixel XL using Tapatalk


Debating between this and the SSO. Let us know how the no drill option works for you.
 
Debating between this and the SSO. Let us know how the no drill option works for you.

The no drill option worked just fine so far. The part I used was recommended earlier in this thread. It is:

https://www.camarocentral.com/1970_1981_Camaro_Cowl_Panel_Rear_Hood_Adjust_p/she-104.htm

You can see in the picture above about how thick the rubber pad is. I would say that a pad that is about half an inch thicker would work better. I'm sure there are lots of options out there, since you add your own nut and washers it can be any size. I had to add some washers between the pad and the rack, because it was low enough it was allowing a part of the rack bracket to barely touch my roof.

I had to buy a torx bit for install, which I didnt realize I needed, and also I ordered the extra 1x1 because people said it didnt come with one, but mine did so I have an extra 1x1.

Dont have a pic right now, but it looks great.
 
This rack looks great and I'm considering it vs the Gobi Stealth. Anyone know how much each of them weighs?

Sent from my Pixel 2 using Tapatalk
 
Ordered my rack on Saturday morning!
I ordered those Camaro hood stops and I’ll give em a go but I’m propbably going to drill the front end in for piece of mind. Who has got a hi-lift jack on their prinsu and what are you using to mount it and lock it? Thanks!
 

Members online

No members online now.

Forum statistics

Threads
278,316
Messages
3,554,121
Members
248,016
Latest member
Advally Service

Trending content

Back
Top