ANTMAN'S Thread

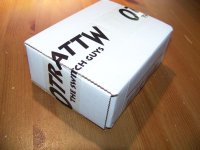
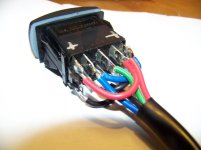
Something came in the mail today!


100_4284.jpg

100_4286.jpg

100_4288.jpg


OTRATTW is an AWESOME company to deal with! I called them about a week ago to order a switch for my dual battery setup. The switches they offered weren't exactly what I wanted, but I was tired of searching for that "perfect" switch, so I placed an order with them.

Just when I was about to hang up I asked how much a custom switch would cost. I explained what I wanted and he said: "No problem, since you basically just want some wording changed and are already using artwork we have in the computer, you're looking at 5 bucks more." Really!? That, my friends, is pretty friggin' awesome in my book!

***More about the switch.

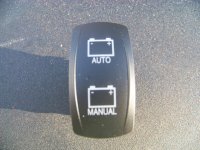
V-Series Contura Switch # VJD2UHTB : DPDT ON/OFF/ON, GREEN/DAYLIGHT BRIGHT RED BOTH INDEPENDENT LED'S.

I had to go with a DPDT switch because I'm using the switch as 1 output and 2 separate input power sources (Ignition only +, and Aux battery +).

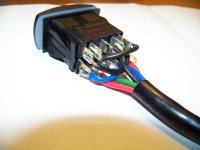
In order for the LED's to work the way I want it takes some "creative wiring" at the switch. I'll provide a wiring diagram and a writeup once installed.

Psyched!


100_4294.jpg

100_4295.jpg
 

Attachments

  • 100_4284.jpg
    100_4284.jpg
    126.2 KB · Views: 2,398
  • 100_4286.jpg
    100_4286.jpg
    138.2 KB · Views: 2,501
  • 100_4288.jpg
    100_4288.jpg
    137.5 KB · Views: 2,404
  • 100_4294.jpg
    100_4294.jpg
    109.2 KB · Views: 2,548
  • 100_4295.jpg
    100_4295.jpg
    112 KB · Views: 2,430
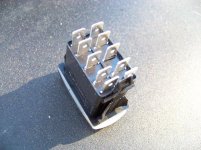
Look at all them terminals on a single switch :wow2:

So much for the K.I.S.S. method, lol

KISS is still in effect, LOL.

The 2 terminals on each end are power and ground for the LED's.

The other 6 are for the switch. Basically this switch is like 2 SPDT switches in one. Two independent sets of 3 terminals, activated by the same switch.

You can do all kinds of things with a switch like this!
 
Look at all them terminals on a single switch :wow2:

So much for the K.I.S.S. method, lol


LOL I thought exactly the same thing! I didn't even think that was possible.

Cool switch ;) haha now you have to mash it into you dash somehow with that big ole bundle behind it :D Nice solder BTW
 
so whats this going to do?

Switched to AUTO, both batteries will be connected and charged while the truck is running and separated whenever the truck is off.

Switched to MANUAL, both batteries will be connected always, allowing for self jumpstart if the main battery dies.

Switched to off (center position) batteries will be separated always. This could be useful if I was listening to the stereo (say at the beach) with the ignition on but the truck not running.

The blue LED illuminates whenever the battery solenoid is closed (batteries connected).
 
Last edited:
Diagram

Man, you can't post stuff like this without a parts list and wiring diagram. Very clean setup.

I'm going to be looking at this over and over again.
 
Man, you can't post stuff like this without a parts list and wiring diagram. Very clean setup.

I'm going to be looking at this over and over again.

Hold tight! Once I finish I'll provide all the details you guys want. Usually I wait until I'm completely done, but I have been planning this so long I couldn't wait. Sorry!
 
Very crafty as usual Jeff! Can I ask you...I noticed that in the first picture the the top battery is lit green and the bottom battery is just off (when switched in the up position); but then in the second picture the top battery appears to be reddish? and the bottom battery is lit amber (when switched in the down position)? Was that because in the second picture you had the parking lights on? (so basically if the switch was on the "off" position the batteries would be lit up kind of reddish when the parking lights are on?)

And because I'm nosy, what's that little black box at the end of the harness :)
 
Very crafty as usual Jeff! Can I ask you...I noticed that in the first picture the the top battery is lit green and the bottom battery is just off (when switched in the up position); but then in the second picture the top battery appears to be reddish? and the bottom battery is lit amber (when switched in the down position)? Was that because in the second picture you had the parking lights on? (so basically if the switch was on the "off" position the batteries would be lit up kind of reddish when the parking lights are on?)

And because I'm nosy, what's that little black box at the end of the harness :)

The switch looks like that due to my poor camera skills...

The bottom LED is actually very bright red. The color bleeds through the switch a little and lights the top icon slightly. In person it's not that noticeable.

What's the box? Eddie, I'm disappointed in you! How do you think I was lighting up everything? Lol!
 
LOL! I was too busy paying attention to the switch lights I didn't even noticed the panel was not mounted in the dash when you took those pictures :frusty:

Aaaaactually, I think it's because your pictures sucked so much I can't even tell if the panel was mounted in the dash or sitting on your kitchen counter, yeah that's it :)
 
Awesome work as usual! Just out of curiosity, why solder directly to the switch instead of using some crimp push connectors?

Thanks!

1. Soldering is always a better, more permanent connection.

2. Spade connectors have a way of coming loose sometimes and then you have to figure out which one went where, lol.

3. Spades would have made the install depth even deeper.

4. I like to solder.


Nothing wrong with the crimp-on spades, they work. Whenever I use them I always squeeze the connector together with needle-nosed pliers first so they fit tighter.

PS- I just knew you couldn't stay away from a new switch post...
 

Members online

No members online now.

Forum statistics

Threads
278,306
Messages
3,554,045
Members
248,016
Latest member
Advally Service

Trending content

Back
Top