Best Dual Battery Setup for a 5th Gen 4Runner

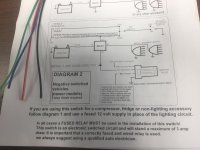
Update: Looks like I will need to go the relay route. Found this diagram showing how to do it. Doesn't pay to try and skip steps. Now to get a relay and figure our where to put it. In the meantime I at least got the switchpro wired and operational and wiped down the engine bay a bit!

http://www.solidkit.com.au/wp-content/uploads/2015/09/RELAY-Dual-Volt-Meter-Wiring-Diagram.png


ok, making progress but just hit a snag. My solidkit dual volt meter arrived in the mail today as did my AOB Battery voltage on off switch. the goal was to wire the switch on the negative lines. I can get it to function as an on off but the volt meter only displays 3.3 volts or 6.6v. When the volt meter is hooked directly it reads the full 12.8. here is a diagram I swiped.

AOB Switch.jpg

any thoughts on how to wire this switch in and get the volts to read properly? I wasn't planning on a relay, the wire from each battery is fused at 2amps so that should protect the AOB switch and it's 3amp rating. I have been able to figure everything else out so far, this is frustrating. Might just need a simple on/off toggle but I thought the AOB would look cool......

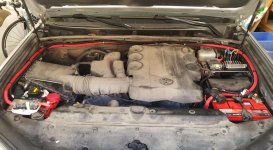
Oh, here is where i'm at so far. Pardon the filthy engine bay.

dual battery.jpg


TIA, Chris
 

Attachments

  • AOB Switch.jpg
    AOB Switch.jpg
    74.1 KB · Views: 2,377
  • dual battery.jpg
    dual battery.jpg
    143.6 KB · Views: 2,582
Last edited:
Well I got it to work. Picked up a relay and was able to use the wires that were already run. Now it's time to wire up the accessories. Doing fridge and a couple of power drops in the rear plus the compressor.

This project has been a lot of fun but sure took some time and money. As I often do, any saving from doing this myself was more than offset by upgrades. Shrockworks trays for each battery, Power Tray for Switch pro, SDHQ panel for switchpro, and solid kit volt meter. I had most of the tools and only a bit of knowledge. I have wired and rewired most of my house and am comfortable doing it but this level of 12v was new to me.

Thanks to all that have gone before me and provided lots of info. [MENTION=112177]4RnR Grl[/MENTION] for the excellent write up and parts list and [MENTION=144483]Bumbo[/MENTION] for explaining the importance of proper grounding.


Sorry about the turned pictures. Tried a couple of different things and couldn't get them to work.

20180610_160053.jpg

20180610_170121.jpg
 

Attachments

  • 20180610_160053.jpg
    20180610_160053.jpg
    137.5 KB · Views: 1,956
  • 20180610_170121.jpg
    20180610_170121.jpg
    136.6 KB · Views: 2,044
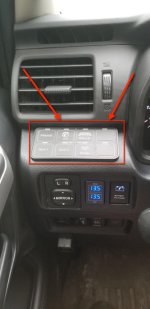
[MENTION=56284]Chrisinvermont[/MENTION] - What brand is this? Is it a SwitchPro?
 

Attachments

  • 20180610_170121.jpg
    20180610_170121.jpg
    76.3 KB · Views: 1,870
[MENTION=56284]Chrisinvermont[/MENTION] - What brand is this? Is it a SwitchPro?

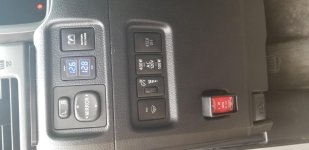
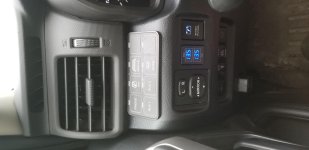
Yes, Switch Pro 9100. I like it, easy to install and set up. The app on Android leaves a bit to be desired but hopefully as they sell more of these they can update the app. One thing I didn't consider was how the mounting location would reflect in the window when I look at the side view mirror. It's better now that I have the labels on and I'm fine tuning the LED backlights to match the volt meter. I like the location for ease of access both while driving and while outside the vehicle.
 
The Odyssey 25-PC1400 battery fits the Shrockworks tray with plenty of room to spare. I wish I had maybe ordered the next size up to see if I could fit it but at least it's easy to get in and plenty of space for air and routing wiring. It weighs less than advertised, which is cool, 47.6 vs. 52 lbs.

Actual Battery Dimensions:
9 3/8" L x 6.75" W X 8.75" H

Advertized Battery Dimensions:
9 7/16" L x 6.75" W X 8.75" H

Actual Weight: 47.6 lbs

Here are some pics of the fitment from different angles to give a sense of scale relative to components in the engine bay.

If you're wondering where the ARB air compressor bracket went, it's in for powder coating since I made some holes larger, along with a bunch of other brackets I made over the weekend for the sPOD, Isolator, and ARB rear diff breather.
Just purchased the shrockworks tray also; any issues with the Odyssey battery with it's ability to carry the load of your accessories? Not wanting to go with Optima and I was already considering modifying the Shrockworks tray due to the size difference.
 
The Odyssey 25-PC1400 has been a fantastic battery to support the accessories. No issues, no drainage or power leakage. I’m quite pleased and will continue replacing it with the same.

Also still running the OEM starter battery with no issues but will likely replace it with the largest Odyssey battery that will fit soon or when it finally dies.
 
National Luna Dual Battery Isolator Mounting Bracket

Hey guys, since I had made a number of home made brackets for T4R members for the National Luna Isolator, I went and started a tiny company - Fugitive Offroad - featuring a line of brackets, including one for the National Luna isolator and some other products for the 5th Gens. The brackets are ultra light weight 6061 aluminum, anodized black to look factory in the engine bay and come with stainless steel hardware. You can pick up the Luna bracket at Fugitive Offroad
 

Members online

Forum statistics

Threads
278,314
Messages
3,554,097
Members
248,016
Latest member
Advally Service

Trending content

Back
Top