
Changing rear differential gasket

Anyone know how to change the rear diff housing? I've got a leak where the housing connects. Is this basically the same as the 3rd where it's just a sealant or is there a special gasket I need?

A gasket exists, but I have never used one.

Make sure you clean the sealing surface of both the axle and the diff before putting the new stuff on. I don't stop cleaning until there is NOTHING left on the surface (huge pain in the ass).

I typically put the FIPG on the axle side making a bead all the way around the surface. Some folks just go on the inside edge of the studs, but I like to circle the studs. Make your bead, place the diff back in the axle, hand tighten the nuts in a cross pattern, then torque to spec in a cross pattern. I'll wait an hour or so before adding fluid, but I think you can after 10 minutes or so. I've never had a differential leak.

https://www.amazon.com/Genuine-Toyota-00295-01281-Formed-Transmission/dp/B000EDBR8C
 
Anyone know how to change the rear diff housing? I've got a leak where the housing connects. Is this basically the same as the 3rd where it's just a sealant or is there a special gasket I need?

Edit - Alex above beat me too it while I was putting the below response together. At least we're on the same page.

There is a gasket between the 3rd member and axle housing but many just use some type of RTV or Toyota FIPG (Form in Place Gasket) to seal up the 3rd member. So, you can either buy a replacement paper gasket or use some type of FIPG. From my research, there's 3 good choices you can use for a FIPG for this application. Here they are:

Toyota Orange FiPG, part #00295-01281
https://www.amazon.com/Genuine-Toyo...0305&sr=8-3-fkmr0&keywords=Toyota+Orange+FIPG

Honda Bond
https://www.amazon.com/Hondabond-Hi...UTF8&qid=1491060956&sr=1-1&keywords=hondabond

Permatex Ultra Grey
https://www.amazon.com/Permatex-821...491061139&sr=8-1&keywords=permatex+ultra+grey

[MENTION=102606]infamousRNR[/MENTION] and I recently helped [MENTION=148218]JZiggy[/MENTION] with a 3rd Member Swap and Rear Axle Seal Job. Here's our video showing how you can pull your 3rd member so you can either replace the paper gasket or use one of the FIPG choices I gave you above. Jordan [MENTION=148218]JZiggy[/MENTION]) used Honda Bond because he used it before and has had good success with it.

<iframe width="560" height="315" src="https://www.youtube.com/embed/ZMTbgY1xQKk" frameborder="0" allowfullscreen></iframe>
 
Last edited:

For what it's worth, Three Bond makes the Toyota FIPG, Hondabond, Yamabond, etc. etc. I've read in the past that Honda/Yamabond don't use solvents, if that matters to you. I drive a Toyota, so I use the Toyota stuff =p

I have no basis for reasoning, but I truly believe these products to be better than Permatex.
 
For what it's worth, Three Bond makes the Toyota FIPG, Hondabond, Yamabond, etc. etc. I've read in the past that Honda/Yamabond don't use solvents, if that matters to you. I drive a Toyota, so I use the Toyota stuff =p

I have no basis for reasoning, but I truly believe these products to be better than Permatex.

That's good info. The Toyota FIPG would be my first choice as well.
 
That's good info. The Toyota FIPG would be my first choice as well.

Hey Tim another great video! I have a question regarding the requirement to place matchmarks on the propeller shaft and differential flange. How necessary is this step? I'm asking because I already removed the diff without placing match marks :(

Trying to understand the potential issue and what I need to do before bolting the rear properller shaft back on, thanks!

Dave
 
I've forgot to put marks on mine several times and it's never been an issue.

Your results may vary...

Thanks for the feedback. Based on the connection it doesn't seem like it should be an issue. I wish there was an explanation as to why the FSM has that step.
 
Thanks for the feedback. Based on the connection it doesn't seem like it should be an issue. I wish there was an explanation as to why the FSM has that step.

You have a 50/50 chance of getting it right anyway :). If you want to be really diligent, you can try to match the rust/scratch pattern on the differential flange to the propeller shaft flange, to nail down the original orientation.
 
It has something to do with the driveshaft being balanced with that exact orientation, if you adjust it, it may not be balanced anymore.

Never has been an issue with mine although I do try to remember now. Maybe I've been lucky and put it back the correct way every time?
 
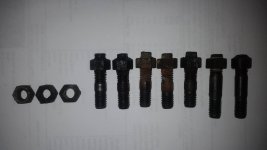
So another thing I just noticed after watching the video again is that 7 out of the 10 bolts actually came off. So now I only have 3 bolts in the axel housing. Also out of the 7 bolts that came off, 2 bolts are longer then the remaining 5.

Time for some new hardware plus I need to figure out how to thread the bolts back in.

Any input for anyone would be appreciated.
 

Attachments

  • RearDiff Carrier Bolts.jpg
    RearDiff Carrier Bolts.jpg
    103.1 KB · Views: 650
You have a 50/50 chance of getting it right anyway :). If you want to be really diligent, you can try to match the rust/scratch pattern on the differential flange to the propeller shaft flange, to nail down the original orientation.

Good point :) but based on how things are going I dont like my chances lol Hopefully I can see a pattern to match, thanks.
 
It has something to do with the driveshaft being balanced with that exact orientation, if you adjust it, it may not be balanced anymore.

Never has been an issue with mine although I do try to remember now. Maybe I've been lucky and put it back the correct way every time?

I guess if I notice an imbalance it doesn't take much to fix it. Sounds like you need to play the lottery more often :)
 
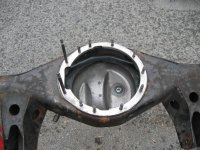
I had the same leak from the gasket so I decided to go the hard way & swap in an e-locker housing. I found a pic from my axle housing swap that shows where longer studs go. (not bolts). You wont have the 2 super long ones unless you have an e-locker. Good luck!
 

Attachments

  • IMG_2533.jpg
    IMG_2533.jpg
    137.5 KB · Views: 845
Last edited:
Nice! thanks for the pic scramble. I called up conicelli Toyota (thats were I grab all my Toyota parts) and he found 3 types of bolts. He was going through the measurements and we both concluded the super long ones weren't for me and thanks to your pic i now know what application they're used for, a diff with elocker. Unless Im missing were its located in the FSM, there's no mention of different size bolts on SA-91 and onwards.
 
It has something to do with the driveshaft being balanced with that exact orientation, if you adjust it, it may not be balanced anymore.

Never has been an issue with mine although I do try to remember now. Maybe I've been lucky and put it back the correct way every time?

Externally balanced driveshafts are neutral balanced, off the car, the mark the FSM refers to is just bolt orientation, like Leon mentioned
 
Nice! thanks for the pic scramble. I called up conicelli Toyota (thats were I grab all my Toyota parts) and he found 3 types of bolts. He was going through the measurements and we both concluded the super long ones weren't for me and thanks to your pic i now know what application they're used for, a diff with elocker. Unless Im missing were its located in the FSM, there's no mention of different size bolts on SA-91 and onwards.

All the studs protruding from my 2WD rear end appeared to be the same length from what I can recall being under it and negotiating the 3rd member...
 
All the studs protruding from my 2WD rear end appeared to be the same length from what I can recall being under it and negotiating the 3rd member...

When we figured out the bolts required the quantity for the short bolts according to the system was 8 and 2 for the medium sized bolts which matched what I pulled off. From what I've gathered so far the following specs determine the bolts required:

- with or without diff lock
- original wheel size 15 or 16
- 2wd or 4x4

For my config (wo diff lock, 16, 4x4) I require 8 short and 2 medium.

Now if someone can tell me which transfer case model I have I'll be golden! lol
 
When we figured out the bolts required the quantity for the short bolts according to the system was 8 and 2 for the medium sized bolts which matched what I pulled off. From what I've gathered so far the following specs determine the bolts required:

- with or without diff lock
- original wheel size 15 or 16
- 2wd or 4x4

For my config (wo diff lock, 16, 4x4) I require 8 short and 2 medium.

Now if someone can tell me which transfer case model I have I'll be golden! lol

The FSM only seems to distinguish rear ends between diff-locked and not, from what I can tell, but you are probably correct regarding different length studs - I just didn't notice it from underneath. I assume the third member has a slightly thicker flange in one area. All nuts however, are the same on mine and leave the same amount of thread showing when tightened.

Good luck with your TC search, a dealer "should" be able to tell you looking up your VIN
 
The FSM only seems to distinguish rear ends between diff-locked and not, from what I can tell, but you are probably correct regarding different length studs - I just didn't notice it from underneath. I assume the third member has a slightly thicker flange in one area. All nuts however, are the same on mine and leave the same amount of thread showing when tightened.

Good luck with your TC search, a dealer "should" be able to tell you looking up your VIN

When Im back in the garage I'll take a closer look at the housing to see if I can notice a thicker area because at this point I don't know exactly were the longer bolts need to go. The nuts are all the same on mine as well.

You would think the dealer would know but all they can tell me is what tcase parts apply to my truck they couldn't tell me the model number of the tcase (VF2A or VF3AM). Unless the guy I was talking to couldn't use his system properly.
 

Members online

Forum statistics

Threads
278,312
Messages
3,554,089
Members
248,016
Latest member
Advally Service

Trending content

Back
Top