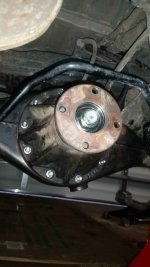
Changing rear differential gasket

Good point :) but based on how things are going I dont like my chances lol Hopefully I can see a pattern to match, thanks.

I also don't think that there is any reason to try to match the orientation of the differential flange to the propeller shaft flange - I am sure that they were not balanced as an assembly at the factory.

The only thing that may be important is to match the original orientation of the slip yoke to the propeller shaft, since those may have been balanced as an assembly. But unless you removed the slip yoke from the propeller shaft, that's not an issue.
 
I also don't think that there is any reason to try to match the orientation of the differential flange to the propeller shaft flange - I am sure that they were not balanced as an assembly at the factory.

The only thing that may be important is to match the original orientation of the slip yoke to the propeller shaft, since those may have been balanced as an assembly. But unless you removed the slip yoke from the propeller shaft, that's not an issue.

Thats reassuring, I left the slip yoke intact since there was no reason to remove it from the propeller shaft, thanks!
 
I also don't think that there is any reason to try to match the orientation of the differential flange to the propeller shaft flange - I am sure that they were not balanced as an assembly at the factory.

The only thing that may be important is to match the original orientation of the slip yoke to the propeller shaft, since those may have been balanced as an assembly. But unless you removed the slip yoke from the propeller shaft, that's not an issue.

This is correct. It is not imperative to match which orientation the driveshaft mated to the carrier flange.
 
I’m surprised that no mentioned how heavy the 3rd member is !! OP if your by yourself. Please get help from another person. The 3rd member is HEAVY for single person. Especially if the truck is on jack stands and your under it. Also, it could be a big pain in the ass to remove it. If the OEM paper gasket is stuck to the third member. I had to use a air hammer to prie it apart from the housing. But hopefully yours will just pop out.

I recommend new 3rd member bolts. You’ll need a special tool to remove them and to install them( my mechanic friend let me borrow his Mac , not sure the proper terminology). Also, if you have a elocker. You need to remove that.

You’ll need to disconnect your brake lines. They will drip none stop unless you cap them. Then you’ll need to bleed the brakes.

Op make sure your breather isn’t clogged up.
 
Last edited:
I’m surprised that no mentioned how heavy the 3rd member is !! OP if your by yourself. Please get help from another person. The 3rd member is HEAVY for single person. Especially if the truck is on jack stands and your under it. Also, it could be a big pain in the ass to remove it. If the OEM paper gasket is stuck to the third member. I had to use a air hammer to prie it apart from the housing. But hopefully yours will just pop out.


I recommend new 3rd member bolts. You’ll need a special tool to remove them and to install them( my mechanic friend let me borrow his Mac , not sure the proper terminology). Also, if you have a elocker. You need to remove that.

You’ll need to disconnect your brake lines. They will drip none stop unless you cap them. Then you’ll need to bleed the brakes.

Op make sure your breather isn’t clogged up.

I concur. I installed ARB locker several months ago and reinstalling 3rd member without screwing up the FIPG was a pain since it is so heavy. Removal was easy as I used jack to support it. If I have to do it all over again, I will just drop the entire rear axle.
 
I concur. I installed ARB locker several months ago and reinstalling 3rd member without screwing up the FIPG was a pain since it is so heavy. Removal was easy as I used jack to support it. If I have to do it all over again, I will just drop the entire rear axle.

hell yea! put it on jack stands, tighten the nuts by hand until the FIPG oozes out, let it sit for 1hr, then tighten to spec.
 

Attachments

  • IMG_2536.jpg
    IMG_2536.jpg
    138 KB · Views: 1,379
Can you elaborate? The flanges can only line up one of two ways, 180 deg apart. How can one configuration cause the u-joint to bind up?

What if the slip yoke pulls out. And you don’t pay attention and put it back the wrong way. You could bind up the u-joints. Couldn’t you ?
 
I concur. I installed ARB locker several months ago and reinstalling 3rd member without screwing up the FIPG was a pain since it is so heavy. Removal was easy as I used jack to support it. If I have to do it all over again, I will just drop the entire rear axle.

Yeah, don’t ask how I know. Lol
 
What if the slip yoke pulls out. And you don’t pay attention and put it back the wrong way. You could bind up the u-joints. Couldn’t you ?

Got it - you're talking about incorrectly installing the slip yoke into the driveshaft, which indeed could cause balance or binding issues. I thought you were talking about u-joint binding if the flanges are aligned incorrectly, which I don't believe can happen. Thanks for clarifying!
 
I used permatex right stuff and it worked great. The only catch is it dries pretty quick so you have to move quickly.

And yes, the 3rd member is a pig! I'm 6'3 270lbs and struggled to get it back in place myself. I laid on my back and bench pressed that pig back in while trying not to disturb the sealant. No leaks....
 
Got it - you're talking about incorrectly installing the slip yoke into the driveshaft, which indeed could cause balance or binding issues. I thought you were talking about u-joint binding if the flanges are aligned incorrectly, which I don't believe can happen. Thanks for clarifying!

Yes sir. One day, I had to remove my driveshaft. And I was fighting it. And the slip yoke slipped out. So it’s nice to have a flat bench to make sure it’s aligned properly.
 
Mike , you got it all back together and wired up??


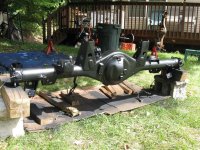
It's back together, drove it around the block & put it in the garage. LOL It's not wired nor does it have any rear brakes. It just got too damn cold outside! I have all of the parts for the drums. Just waiting for a warm day to do them.

2 coats of Eastwood & 2 coats of VHT Chassis paint.
 

Attachments

  • IMG_2557.jpg
    IMG_2557.jpg
    142.2 KB · Views: 888
Last edited:
Just finished

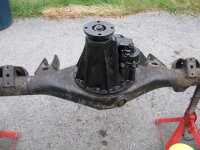
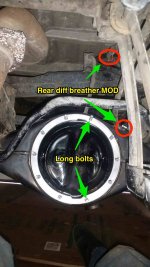
Hey folks so I just finished installing the rear diff back into its proper home. While I was at it I also did the rear diff breather MOD. Here's my feedback on the job with a few pics.

To answer [MENTION=99565]kolelt[/MENTION] yes the rear diff is heavy and more so when putting it back in but I managed. In retrospect the key is to align the bolts with the appropriate holes and just try and seat the rear diff don't try and jam it in all at once like I did because it has the potential to go in cockeyed. It took me a bit of jostling to get it loose before setting it properly.

Here's a few observations:

While uninstalling, 7 of my 10 carrier bolts came out and I also noticed 2 of them were longer than the rest when I pulled out the 3 remaining in the carrier. Since I had the bolts out I decided to get new hardware, here are the part numbers and quantity.

Toyota Part No.: 90116-A0018 x 8 (short studs)
Toyota Part No.: 90116-A0015 x 2 (Long studs)
Toyota Part No.: 90170-08204 x 10 (nuts)
Toyota Part No.: 94512-00800 x 10 (spring washers)

I wasn't sure where the longer studs needed to be placed but after examining the rear diff I noticed that 2 of the 10 bolt holes were flush and the remaining 8 were recessed slightly so that answered that question.

I guess there's a special tool to get these bolts back in but I just used two nuts and a 12mm socket wrench (tip provided by a mechanic friend). Just make sure the two nuts are pressed against each other tightly and when you wrench on the outer nut to tighten the stud back into the carrier the inner nut will prevent nut rotation on the stud.

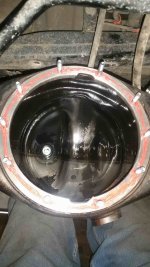
I used FIPG to create the gasket Toyota Part No: 00295-01281. It was my first time using FIPG and I probably used too much not sure if that's bad but only time will tell.

When installing the nuts I tried following [MENTION=120071]mtbtim[/MENTION] rear diff swap video but I failed miserably lol. I got the hand tightening part down but when it came to torquing the nuts in a pattern of every 3rd bolt I realized my torque wrench was too long so I used my regular 3/8's ratchet. I also didn't use any loctite but I'm thinking I will go back today and redo each nut one at a time with a proper torque wrench and some loctite since I've read that lock\spring washers don't work. You can read below.

https://engineerdog.com/2015/01/11/10-tricks-engineers-need-to-know-about-fasteners/

That's it for now folks, thank you all for your contributions.

Dave

 

Attachments

  • Housing.jpg
    Housing.jpg
    116 KB · Views: 1,421
  • FIPG.jpg
    FIPG.jpg
    122.6 KB · Views: 1,066
  • Installed.jpg
    Installed.jpg
    102.5 KB · Views: 1,064
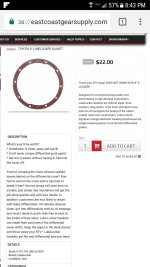
Has anyone tried using gasket sold by ECGS vs Toyota FIPG? I used FPIG when I installed ARB locker and now I am seeing a little bit of wetness around 3 bottom bolts. It is not leaking but if I have to do it all over again I will use a gasket instead. Really difficult not to mess up FPIG when putting back the third member.
 

Attachments

  • Screenshot_20180120-204331.jpg
    Screenshot_20180120-204331.jpg
    136.6 KB · Views: 818
Old gasket

I can't post yet, so I'm trying here to get some help. I've spent the 5 1/2 hours to clean off the old gasket on my 97. I've been mainly using plastic razors and have went through most of a can of permatex gasket remover, and that's only the third member side. I've switched to a metal razor to peel off as much of the top layer as I can. Is there any better way because I have at least double the gasket residue on the axle housing still to get off, not including what remains on the third.
 
I can't post yet, so I'm trying here to get some help. I've spent the 5 1/2 hours to clean off the old gasket on my 97. I've been mainly using plastic razors and have went through most of a can of permatex gasket remover, and that's only the third member side. I've switched to a metal razor to peel off as much of the top layer as I can. Is there any better way because I have at least double the gasket residue on the axle housing still to get off, not including what remains on the third.

Try using some steel wool or sandpaper medium grit. I used sandpaper on mine and it was shining afterwards. In the process of doing my clutch and I started using steel wool to clean things up and now that would be my preference. Either one should work though.
 

Members online

No members online now.

Forum statistics

Threads
278,312
Messages
3,554,083
Members
248,016
Latest member
Advally Service

Trending content

Back
Top