
Dirtco's Adventure Thread

Besides for a few small details the front tube work is pretty much done!

<a data-flickr-embed="true" href="https://www.flickr.com/photos/156493849@N03/48005023068/in/dateposted-public/" title="fullsizeoutput_50c"><img src="https://live.staticflickr.com/65535/48005023068_d61c429eeb_b.jpg" width="768" height="1024" alt="fullsizeoutput_50c"></a><script async src="//embedr.flickr.com/assets/client-code.js" charset=“utf-8"></script>

The small hole is for the front corner marker light.

<a data-flickr-embed="true" href="https://www.flickr.com/photos/156493849@N03/48005138027/in/dateposted-public/" title="fullsizeoutput_50e"><img src="https://live.staticflickr.com/65535/48005138027_26a50cbc6f_b.jpg" width="1024" height="768" alt="fullsizeoutput_50e"></a><script async src="//embedr.flickr.com/assets/client-code.js" charset=“utf-8"></script>

Rigid Hyperspot A-Pillar lights, along with some Rigid diffused ditch lights.

<a data-flickr-embed="true" href="https://www.flickr.com/photos/156493849@N03/48005051576/in/dateposted-public/" title="fullsizeoutput_503"><img src="https://live.staticflickr.com/65535/48005051576_bc89b650ba_b.jpg" width="768" height="1024" alt="fullsizeoutput_503"></a><script async src="//embedr.flickr.com/assets/client-code.js" charset=“utf-8"></script>

<a data-flickr-embed="true" href="https://www.flickr.com/photos/156493849@N03/48005136422/in/dateposted-public/" title="fullsizeoutput_507"><img src="https://live.staticflickr.com/65535/48005136422_66b6e05a58_b.jpg" width="768" height="1024" alt="fullsizeoutput_507"></a><script async src="//embedr.flickr.com/assets/client-code.js" charset=“utf-8"></script>

<a data-flickr-embed="true" href="https://www.flickr.com/photos/156493849@N03/48005134687/in/dateposted-public/" title="fullsizeoutput_502"><img src="https://live.staticflickr.com/65535/48005134687_2036e0cf79_b.jpg" width="732" height="1024" alt="fullsizeoutput_502"></a><script async src="//embedr.flickr.com/assets/client-code.js" charset="utf-8"></script>
 
Per the usual, it's looking so good. :jaw:


Do you have plans for fabbing some kind of fender/flare that will be tied to the tube?
 
Here's a few more pictures, besides for the passenger side lower X brace bar the internal cage work is done! I also need to build the passenger side door bar but I wheel alone 95% of the time, and when I do have the family with me we are going down easy dirt roads at a slow pace. Eventually I'll get around to it, but for now I need to switch gears and get the rear suspension and tube work figured out so its at least drivable.

<a data-flickr-embed="true" href="https://www.flickr.com/photos/156493849@N03/48026098313/in/dateposted-public/" title="fullsizeoutput_510"><img src="https://live.staticflickr.com/65535/48026098313_f7e9914a20_b.jpg" width="768" height="1024" alt="fullsizeoutput_510"></a><script async src="//embedr.flickr.com/assets/client-code.js" charset="utf-8"></script>

The cage is welded into the body everywhere, the entire inside and outside are fully welded the entire length of the passenger area. The gussets are for added strength and mounting tabs for a roof panel.

<a data-flickr-embed="true" href="https://www.flickr.com/photos/156493849@N03/48026103388/in/dateposted-public/" title="fullsizeoutput_508"><img src="https://live.staticflickr.com/65535/48026103388_5b6e9fb1c9_b.jpg" width="759" height="1024" alt="fullsizeoutput_508"></a><script async src="//embedr.flickr.com/assets/client-code.js" charset="utf-8"></script>

<a data-flickr-embed="true" href="https://www.flickr.com/photos/156493849@N03/48026178617/in/dateposted-public/" title="fullsizeoutput_509"><img src="https://live.staticflickr.com/65535/48026178617_b2e569202e_b.jpg" width="768" height="1024" alt="fullsizeoutput_509"></a><script async src="//embedr.flickr.com/assets/client-code.js" charset="utf-8"></script>

 
One door down, seven more to go!!

The silver doors that are on the 4Runner will be my "nice" doors, they will be on the truck most of the time and have windows, door panels, speakers, etc. Down the road I plan on building a set of "rock doors" that I will use for running hard trails where I know body damage will be likely. Those will be 1/2 doors for the front, and full rear doors without windows for the rear (no broken glass).

Even though these are my "nice" doors they will still see some abuse, so I added some reinforcement. I welded a section of 1.25" wide 1/8" thick steel strap to the inside of the door, and a section of 1" by 1/8" to the outside. I drilled holes through the outside steel strap so I could rosette weld it through the door skin into the inner steel strap. Having the wider material in the inside of the door allowed me to weld around the outside and not burn through the door due to the extra 1/8" of material behind the skin. So now the lower panel of the door has a 1/4" rub rail built into it. :D

<a data-flickr-embed="true" href="https://www.flickr.com/photos/156493849@N03/48026280551/in/dateposted-public/" title="fullsizeoutput_511"><img src="https://live.staticflickr.com/65535/48026280551_171518bc5b_b.jpg" width="769" height="1024" alt="fullsizeoutput_511"></a><script async src="//embedr.flickr.com/assets/client-code.js" charset="utf-8"></script>

<a data-flickr-embed="true" href="https://www.flickr.com/photos/156493849@N03/48026278586/in/dateposted-public/" title="fullsizeoutput_512"><img src="https://live.staticflickr.com/65535/48026278586_10ccbebfef_b.jpg" width="768" height="1024" alt="fullsizeoutput_512"></a><script async src="//embedr.flickr.com/assets/client-code.js" charset="utf-8"></script>

<a data-flickr-embed="true" href="https://www.flickr.com/photos/156493849@N03/48026282736/in/dateposted-public/" title="fullsizeoutput_514"><img src="https://live.staticflickr.com/65535/48026282736_7084183fce_b.jpg" width="1024" height="767" alt="fullsizeoutput_514"></a><script async src="//embedr.flickr.com/assets/client-code.js" charset="utf-8"></script>
 
giphy.gif
 
One door down, seven more to go!!

The silver doors that are on the 4Runner will be my "nice" doors, they will be on the truck most of the time and have windows, door panels, speakers, etc. Down the road I plan on building a set of "rock doors" that I will use for running hard trails where I know body damage will be likely. Those will be 1/2 doors for the front, and full rear doors without windows for the rear (no broken glass).

Even though these are my "nice" doors they will still see some abuse, so I added some reinforcement. I welded a section of 1.25" wide 1/8" thick steel strap to the inside of the door, and a section of 1" by 1/8" to the outside. I drilled holes through the outside steel strap so I could rosette weld it through the door skin into the inner steel strap. Having the wider material in the inside of the door allowed me to weld around the outside and not burn through the door due to the extra 1/8" of material behind the skin. So now the lower panel of the door has a 1/4" rub rail built into it. :D

<a data-flickr-embed="true" href="https://www.flickr.com/photos/156493849@N03/48026280551/in/dateposted-public/" title="fullsizeoutput_511"><img src="https://live.staticflickr.com/65535/48026280551_171518bc5b_b.jpg" width="769" height="1024" alt="fullsizeoutput_511"></a><script async src="//embedr.flickr.com/assets/client-code.js" charset="utf-8"></script>

<a data-flickr-embed="true" href="https://www.flickr.com/photos/156493849@N03/48026278586/in/dateposted-public/" title="fullsizeoutput_512"><img src="https://live.staticflickr.com/65535/48026278586_10ccbebfef_b.jpg" width="768" height="1024" alt="fullsizeoutput_512"></a><script async src="//embedr.flickr.com/assets/client-code.js" charset="utf-8"></script>

<a data-flickr-embed="true" href="https://www.flickr.com/photos/156493849@N03/48026282736/in/dateposted-public/" title="fullsizeoutput_514"><img src="https://live.staticflickr.com/65535/48026282736_7084183fce_b.jpg" width="1024" height="767" alt="fullsizeoutput_514"></a><script async src="//embedr.flickr.com/assets/client-code.js" charset="utf-8"></script>
As always you come up with some great innovative ideas. I think I am gonna have to borrow the door slider idea:naughty:

based on your experience and getting sick of some of the crap light pods i have been using I sucked it up and got a set of rigid light pods . Light and day difference!
 
[MENTION=67615]Dirtco[/MENTION]

You might want to go a little higher with your door slider panels. I'll tell you the story one day but for now let's just say the obstacle was very well named. lol


rG2BlPS.jpg
 
Holy F#ck! The last time I checked this thread you were doing a SAS. It's bad ass & the attention to detail is amazing. I almost wish you bought another rig to cut up because this rare color was one of the most beautiful 4Runners ever.
 

Attachments

  • 3d30dfdb526a094df0042db735eb90fe.jpg
    3d30dfdb526a094df0042db735eb90fe.jpg
    90.4 KB · Views: 710
  • DSCN2213.jpg~original.jpg
    DSCN2213.jpg~original.jpg
    100 KB · Views: 734
  • df682605000be2bf09b81a6aaa597c21.jpg
    df682605000be2bf09b81a6aaa597c21.jpg
    124.2 KB · Views: 690
  • DSCN0545.jpg~original.jpg
    DSCN0545.jpg~original.jpg
    45.9 KB · Views: 752
Holy F#ck! The last time I checked this thread you were doing a SAS. It's bad ass & the attention to detail is amazing. I almost wish you bought another rig to cut up because this rare color was one of the most beautiful 4Runners ever.

I suspect that he wasn't planning to cut it up like this before it rolled down a hill.

Also, I saw this color in person for the first time the other day. I didn't care for it in pics, but man is it pretty in person.
 
Holy F#ck! The last time I checked this thread you were doing a SAS. It's bad ass & the attention to detail is amazing. I almost wish you bought another rig to cut up because this rare color was one of the most beautiful 4Runners ever.

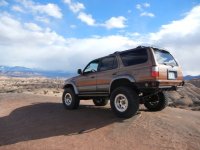
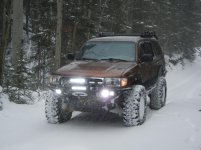
Oh trust me, I never planned to go down this road! The 4Runner was just about perfect after the SAS (besides for fixing the rear suspension geometry and rebuilding the spare tire carrier) and it was perfect for camping and overland style trips!

<a data-flickr-embed="true" href="https://www.flickr.com/photos/156493849@N03/43127569880/in/dateposted-public/" title="IMG_5664"><img src="https://live.staticflickr.com/1932/43127569880_180b4063d7_b.jpg" width="1024" height="576" alt="IMG_5664"></a><script async src="//embedr.flickr.com/assets/client-code.js" charset="utf-8"></script>
<a data-flickr-embed="true" href="https://www.flickr.com/photos/156493849@N03/44319539264/in/dateposted-public/" title="IMG_5791"><img src="https://live.staticflickr.com/1942/44319539264_421f2e5a50_b.jpg" width="1024" height="576" alt="IMG_5791"></a><script async src="//embedr.flickr.com/assets/client-code.js" charset="utf-8"></script>
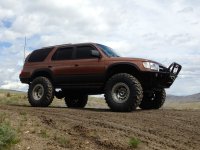
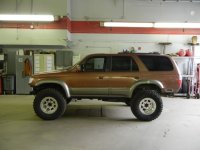
And then this happened, and literally turned my world upside down. All the details are several pages back, I'm just trying to make the best of a bad situation.

<a data-flickr-embed="true" href="https://www.flickr.com/photos/156493849@N03/32267502678/in/dateposted-public/" title="brPlDI7iQ4mG52%bCwECnA"><img src="https://live.staticflickr.com/4887/32267502678_6f5353ba55_b.jpg" width="768" height="1024" alt="brPlDI7iQ4mG52%bCwECnA"></a><script async src="//embedr.flickr.com/assets/client-code.js" charset="utf-8"></script>
<a data-flickr-embed="true" href="https://www.flickr.com/photos/156493849@N03/46088541722/in/dateposted-public/" title="fullsizeoutput_498"><img src="https://live.staticflickr.com/4805/46088541722_b4aa2b5261_b.jpg" width="1024" height="768" alt="fullsizeoutput_498"></a><script async src="//embedr.flickr.com/assets/client-code.js" charset="utf-8"></script>
 
[MENTION=67615]Dirtco[/MENTION]

You might want to go a little higher with your door slider panels. I'll tell you the story one day but for now let's just say the obstacle was very well named. lol


rG2BlPS.jpg

Ouch! I'll have another set of doors for harder trails, and if I do waste a door its not the end of the world. I just figured if I was filling the holes where the cladding was located i might as well add a little strength.
 
Oh trust me, I never planned to go down this road! The 4Runner was just about perfect after the SAS (besides for fixing the rear suspension geometry and rebuilding the spare tire carrier) and it was perfect for camping and overland style trips!

Wow, glad you're ok. I'll have to go back a few pages & catch up.
 
More progress! I removed the old fuel tank and rear suspension, along with the old axle.

<a data-flickr-embed="true" href="https://www.flickr.com/photos/156493849@N03/48148456412/in/dateposted-public/" title="fullsizeoutput_517"><img src="https://live.staticflickr.com/65535/48148456412_490c852852_b.jpg" width="768" height="1024" alt="fullsizeoutput_517"></a><script async src="//embedr.flickr.com/assets/client-code.js" charset="utf-8"></script>

Then I started working on mocking up the suspension, fuel tank, spare tire and tube work. This is where things started to get exciting, and I could actually see what it was going to look like! So here are some of the details; it looks like the rear axle will be getting moved back approximately 7" for a wheel base of roughly 114". The stock fuel tank wasn't going to work so I used my old auxiliary tank for mock up and ordered a new tank for a fuel injected application.

In these pictures the tank is setting a little high, and the spare tire a little low, but it gives you guys a good idea of what the end product will look like. I will probably have a tray above the tank for two Action Packers.

<a data-flickr-embed="true" href="https://www.flickr.com/photos/156493849@N03/48152746592/in/dateposted-public/" title="fullsizeoutput_516"><img src="https://live.staticflickr.com/65535/48152746592_9b4165baee_b.jpg" width="768" height="1024" alt="fullsizeoutput_516"></a><script async src="//embedr.flickr.com/assets/client-code.js" charset="utf-8"></script>

<a data-flickr-embed="true" href="https://www.flickr.com/photos/156493849@N03/48152659626/in/dateposted-public/" title="fullsizeoutput_518"><img src="https://live.staticflickr.com/65535/48152659626_8997c24e00_b.jpg" width="768" height="1024" alt="fullsizeoutput_518"></a><script async src="//embedr.flickr.com/assets/client-code.js" charset="utf-8"></script>
 
Holy crap!! Someone has been busy. This post roll build has really been setting a new bar for thoughtful personalization. I really liked how classy your old wood stained drawer storage system was planned out. I always thought of your rear cargo drawers as the Ethan Allen of cargo options.

But the new geometry out back looks bad ass. Do you think you will try to store anything above you on some sort of roof rack fabrication? For maybe a Hi-Lift? Or do you think that you will find a way to store all that out back? I dig seeing all the progress and I can't wait to see it rolling around again.
 
Holy crap!! Someone has been busy. This post roll build has really been setting a new bar for thoughtful personalization. I really liked how classy your old wood stained drawer storage system was planned out. I always thought of your rear cargo drawers as the Ethan Allen of cargo options.

But the new geometry out back looks bad ass. Do you think you will try to store anything above you on some sort of roof rack fabrication? For maybe a Hi-Lift? Or do you think that you will find a way to store all that out back? I dig seeing all the progress and I can't wait to see it rolling around again.

Thanks Ryder! The sleeping and camping platform is the one item I will miss the most after the accident, but even if I had body swapped the 4Runner once I built a cage the sleeping platform would've been useless. Unfortunately a safe cage and sleeping comfortably inside a vehicle don't really go together.

I'm pretty sure I've found a home for most of my regular gear inside or on the back of the truck. Camping gear on the other hand is a work in progress; I thought long and hard about sleeping options, and after exploring several options I decided to go with an OzTent. They have the same build quality as a nice roof top tent but are lighter and the main tent sets up in about 30 seconds (once you get it out of the bag). It will be really nice for Overland style trips when I'm camping at different places every night.

<a data-flickr-embed="true" href="https://www.flickr.com/photos/156493849@N03/48216147761/in/dateposted-public/" title="8538936038_25e64986fc_b"><img src="https://live.staticflickr.com/65535/48216147761_c973f8a809_b.jpg" width="1024" height="683" alt="8538936038_25e64986fc_b"></a><script async src="//embedr.flickr.com/assets/client-code.js" charset="utf-8"></script>

For trips that I'm camping in one spot for several days I got the side and front panel kit, along with the floor. It will take more time to set up but it really transforms the "simple" tent into something much more comfortable!

<a data-flickr-embed="true" href="https://www.flickr.com/photos/156493849@N03/48216195467/in/dateposted-public/" title="CilGqYzWgAAZTSD"><img src="https://live.staticflickr.com/65535/48216195467_74cd5d0493_b.jpg" width="1024" height="768" alt="CilGqYzWgAAZTSD"></a><script async src="//embedr.flickr.com/assets/client-code.js" charset="utf-8"></script>

To carry the tent I plan on building a very basic, light weight, removable roof rack; pretty much some crossbars with stops and maybe a spot to put some firewood. I also bought an Inno cargo box to carry my camping gear since the cargo room in the 4Runner is pretty much gone. So when I'm doing Overland style camping trips I'll have the cargo box and tent up on the roof, but the rest of the time the roof will be empty for running harder trails and being able to park in my garage.

<a data-flickr-embed="true" href="https://www.flickr.com/photos/156493849@N03/48216199777/in/dateposted-public/" title="846dd080-3c76-419c-b68d-d45c2878047d"><img src="https://live.staticflickr.com/65535/48216199777_7e73cd4cc5_b.jpg" width="784" height="248" alt="846dd080-3c76-419c-b68d-d45c2878047d"></a><script async src="//embedr.flickr.com/assets/client-code.js" charset="utf-8"></script>

<a data-flickr-embed="true" href="https://www.flickr.com/photos/156493849@N03/48216154861/in/dateposted-public/" title="RV_Bag_Replacement"><img src="https://live.staticflickr.com/65535/48216154861_6a46ffd7eb_z.jpg" width="616" height="442" alt="RV_Bag_Replacement"></a><script async src="//embedr.flickr.com/assets/client-code.js" charset="utf-8"></script>
 
Last edited:
Nice choice in camp tents. I was seriously looking at Oztents a few months back. I ended up going with a Kodiak Canvas 10x10 VR tent. Kodiak Canvas Tent 6011VX 10 x 10 Super Deluxe With Free Ground Tarp I really dig it, but I might just pick up either a smaller version, or get an Oztent. I just mounted up my new Sperpa Matterhorn roof rack, so now I would have somewhere to put an Oztent. I even tried my hand at hammock camping a few weeks ago. I will need some more practice with that one if I am to make it work. lol. What Oztent did you end up going with? I really like that they can be mounted and dismounted a heck of a lot easier than a RTT. One other benefit with the Oztent is that they are not as dependent on being staked down like the Kodiak. I don't think you could find much better, especially if you plan to camp a night, then move.
 

Members online

Forum statistics

Threads
278,310
Messages
3,554,080
Members
248,016
Latest member
Advally Service

Trending content

Back
Top