DIY 3.5" JL Audio dash speaker upgrade - Wow!! (detailed how-to)

I'd love to see you squeeze a 4" in there, it may be wide enough to bolt right into the stock holes. Not sure about the magnet height though, especially on the passenger side

You might be able to swing that on the driver's side, but I think it would take major work to fit a 4" speaker on the passenger side.

A good 3.5" coaxial speaker makes a lot of difference, without a lot of effort/expense.

In doing some research I know there is work to be done to get a 4" to fit, but I think its worth a shot. A 4 inch speaker will play a lot better off access down to 300-350HZ. A review of the AudioFrog GS42's that I'm thinking of springing for, says that they were successfully installed in a 4Runner with "extensive modifications" I just don't know what that means. Another speaker I'd like to run, but I do not feel like paying for is the Illusion C3CX that Simplicity in Sound put in a 4R. Between the two of those things I think I can make it work. Ill probably order both the 3.5 and the 4 so that I can get it done in one day.
 
After seeing a few posts about speaker upgrades, I decided to do one to the dash speakers in my '18 TRD Pro, and thought I'd share. In short, this lower cost, relatively easy upgrade is well worth it, and makes a huge difference in sound quality!

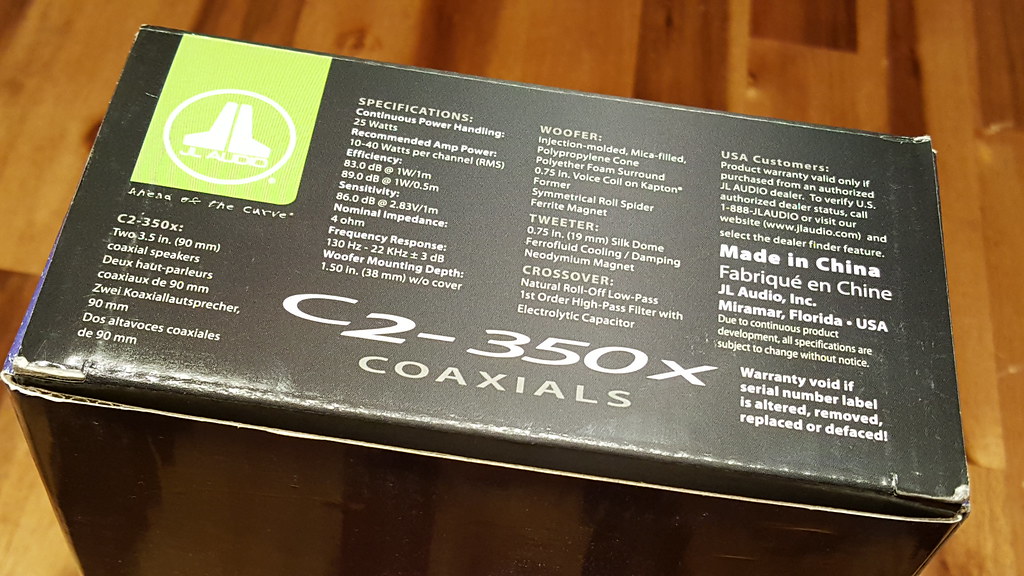
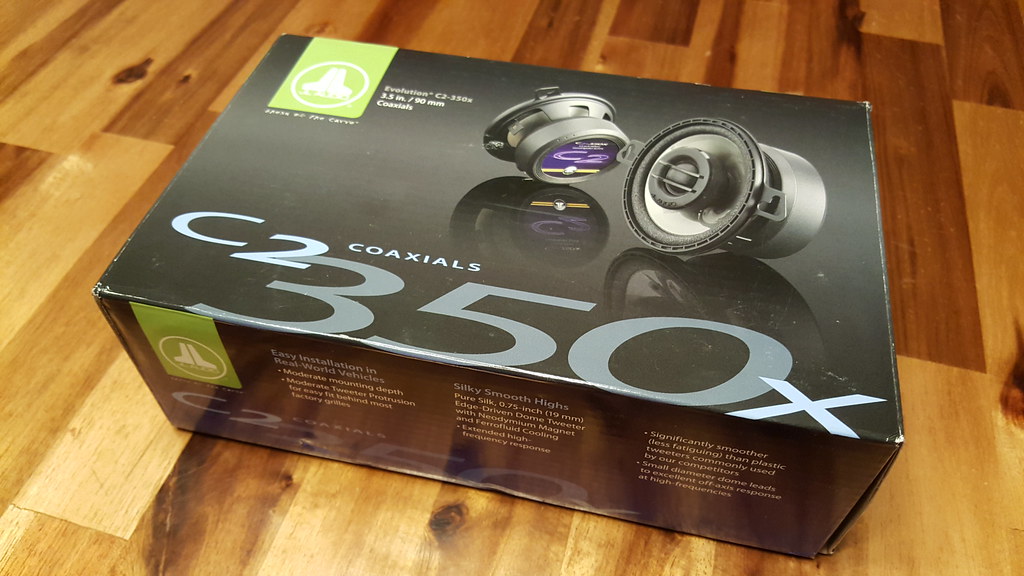
Rather than just going with a popular tweeter upgrade (aka, the Subaru/Kicker plug and play tweeters), I decided to go with 3.5" coaxial speakers from JL Audio - the C2-350x models. These full range speakers cost ~$80, and I bought mine at Amazon - https://www.amazon.com/dp/B001UDNXOQ

43711064030_a5a86c2e03_b.jpg


44802913074_b10626b28e_b.jpg


I also purchased a pair of tweeter wiring harness adapters, so I didn't have to cut the factory wiring (others have taken apart the stock speakers to make an adapter plug of sorts, or kind of "jumpered" the male portion of the 4 wire factory plug). I got the adapters from Taco Tunes - 2010-2020 Toyota 4Runner Tweeter Speaker Wiring Harness Adapter Connector (pair) - Taco Tunes - Toyota Audio Solutions

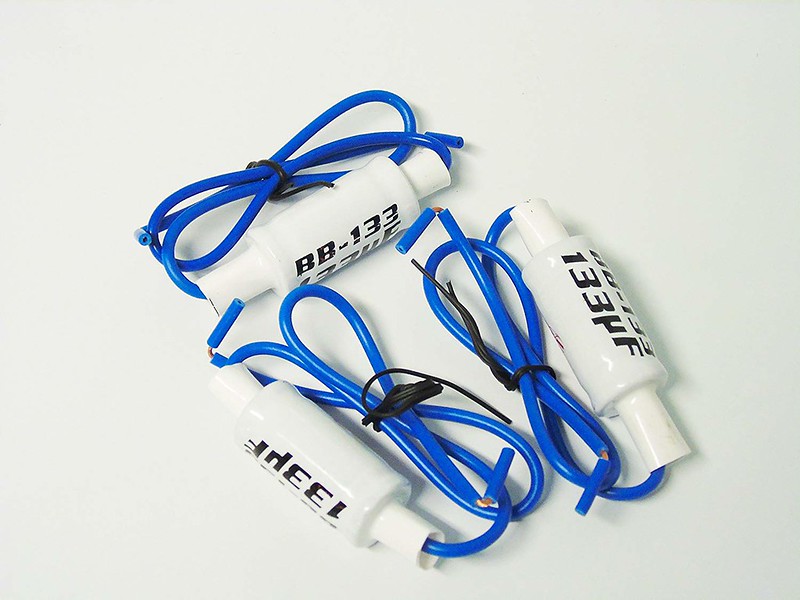
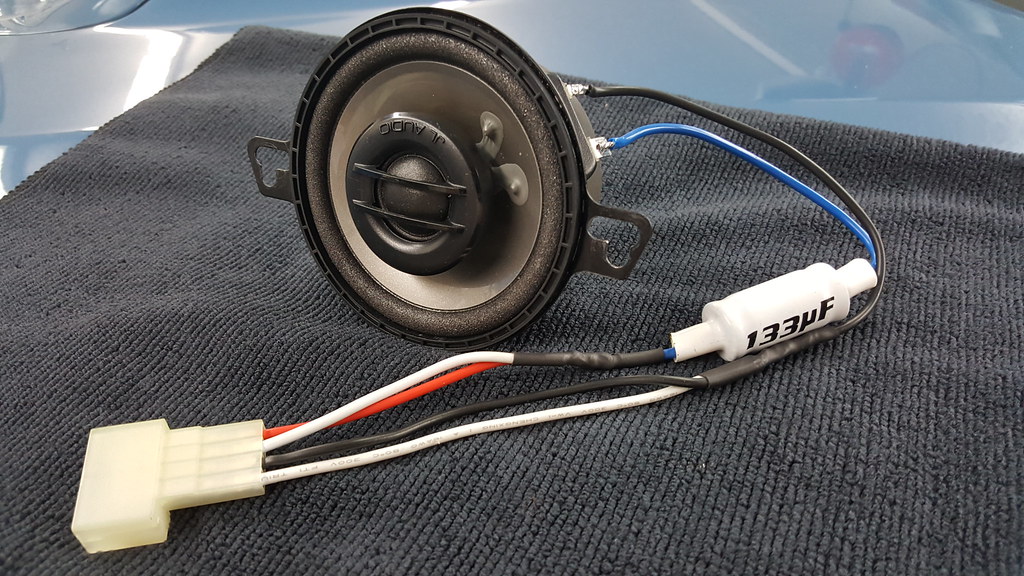
To limit lower frequency sounds from being played by these speakers, and prevent "clipping" at higher volumes, I also bought a pair of 133 microfarad capacitors (aka "bass blockers"), to cut sounds below 300 Hz - https://www.amazon.com/dp/B017AJ5ECW

31664017048_efc49007d5_c.jpg


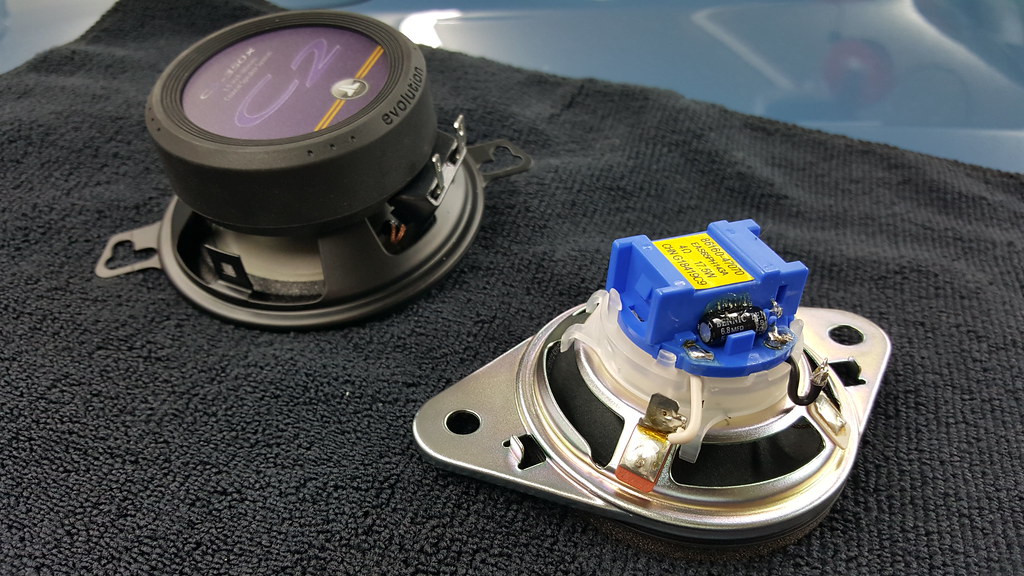
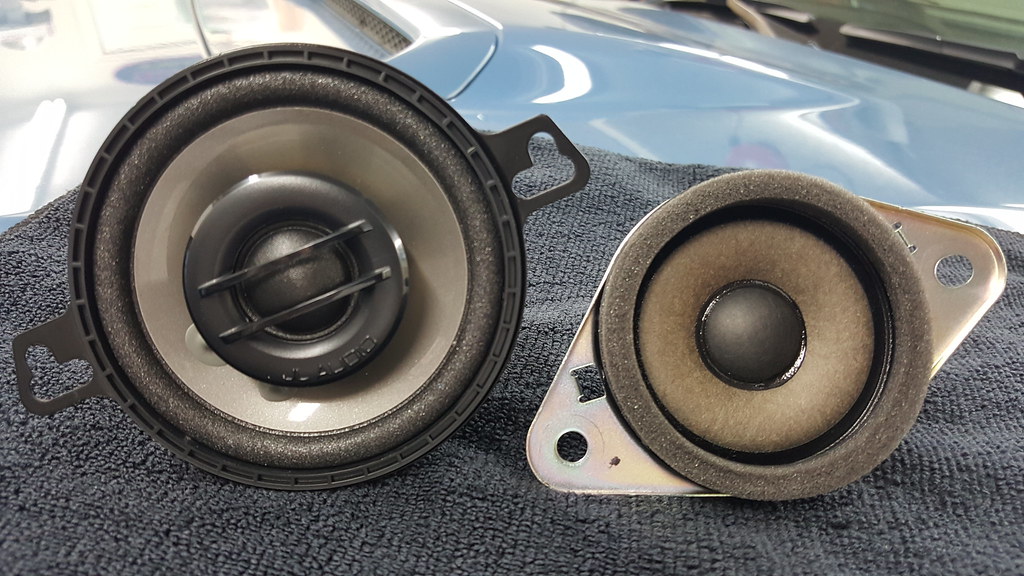
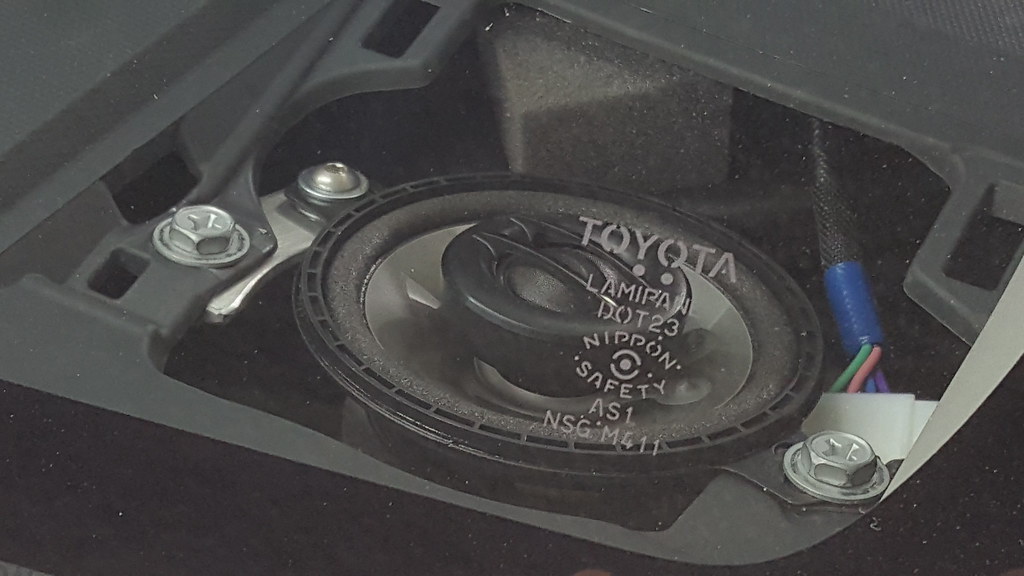
The construction differences between the OEM and JL Audio speakers are notable:

31655918458_d576d078a6_b.jpg


45477811642_f6967df3cb_b.jpg


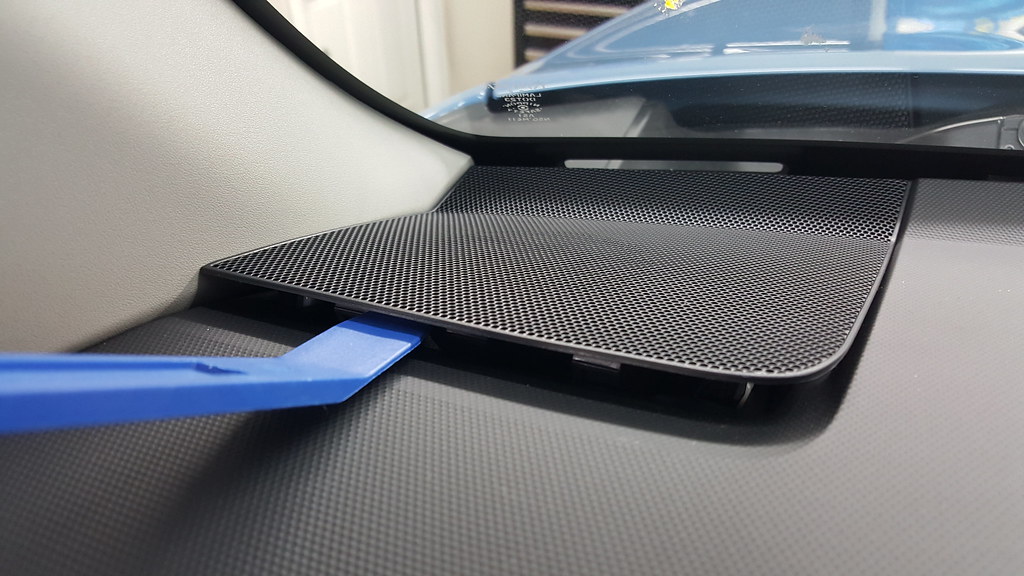
Removal of the stock speakers is easy. I started by using a plastic trim tool (part of a set like the ones at https://www.amazon.com/dp/B00ZRJCYQ2), and gently prying from the center/rear-most portion of the speaker grills to "pop" the two clips that hold them in.

44802906664_403ed4ed3a_b.jpg


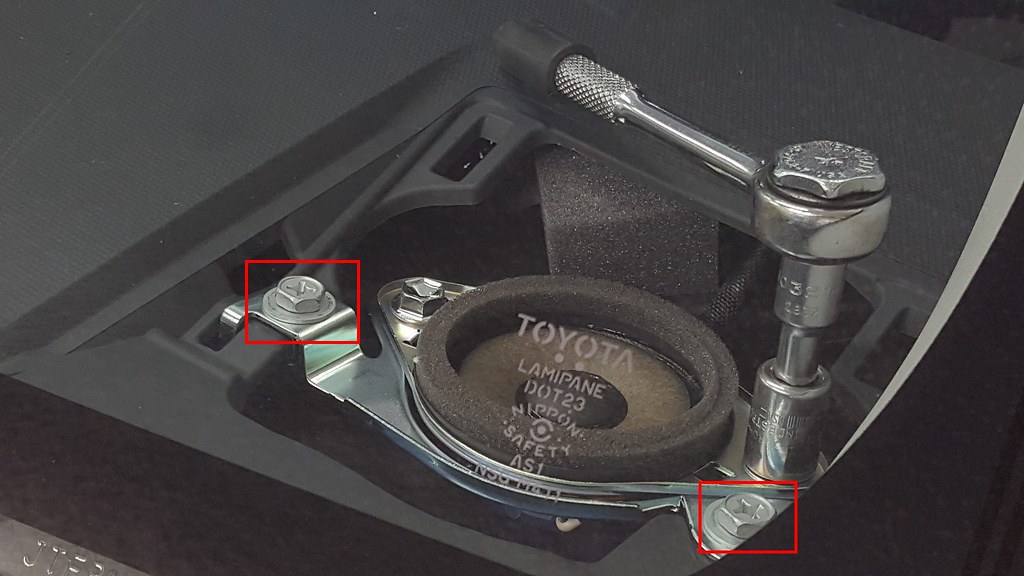
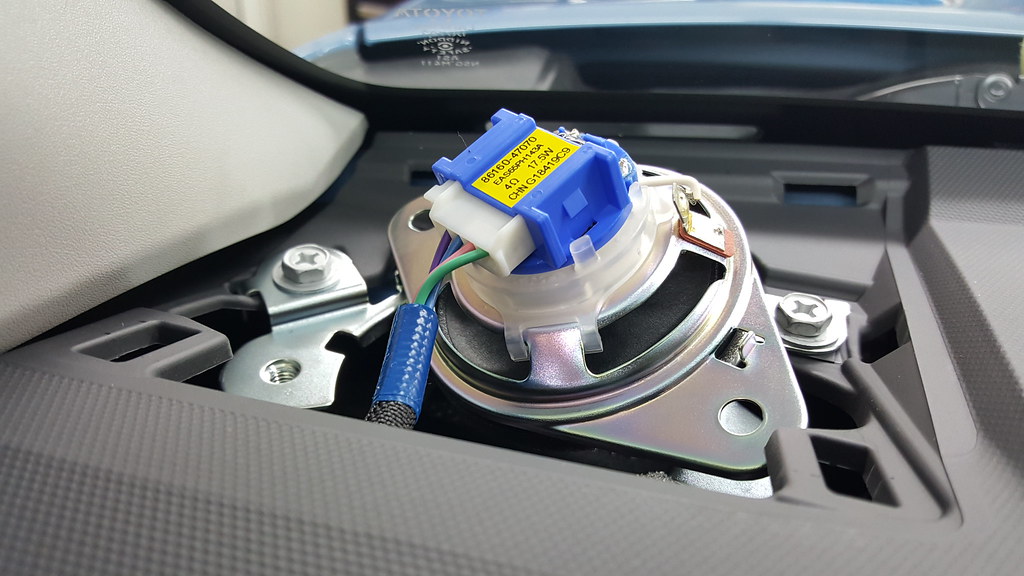
From there, a small ratchet, extension, and 10mm socket was used to remove the two hex head screws (with Phillips patterns in the top, as highlighted in red in the image below). After these screws have been removed, the speaker mount and speaker can be lifted out as an assembly. Push the tab on one side of speaker plug/harness to release it from the blue "cap" of the stock speaker, and disconnect the speaker assembly (the second image below is one where the factory mount is still in place, but I suggest removing the speaker and bracket as an assemblly, via the Phillips head screws)

44622671725_a3e2be3c19_b.jpg


30587465807_0087c113ee_b.jpg


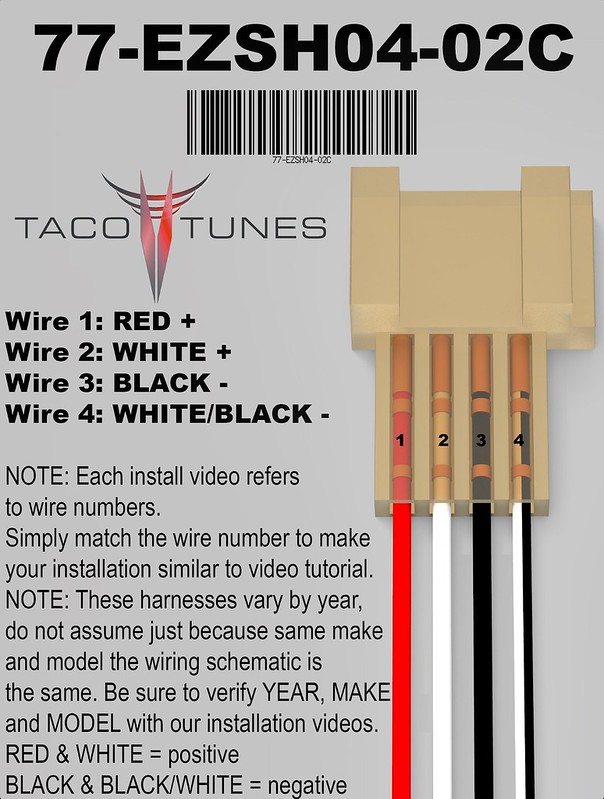
The Taco Tunes adapter harnesses make wiring a pretty simple affair. Because of the way that the door speakers are wired with the dash speakers, there are four wires in the factory dash speaker harness/plug. To mimic the same using the Taco Tunes adapter harnesses, make four wires into two -- red and white wires go together for the positive side, and black and white/black go together for the negative side. I cut the long wires of the Taco Tunes adapter harnesses down to about six inches, to reduce bulk when installed under the dash.

The capacitor is connected inline, on the positive side wire. Joints were soldered and finished with heat shrink tubing.

44802909344_b9496e3a8f_b.jpg


43711065220_f77be5bc6b_c.jpg


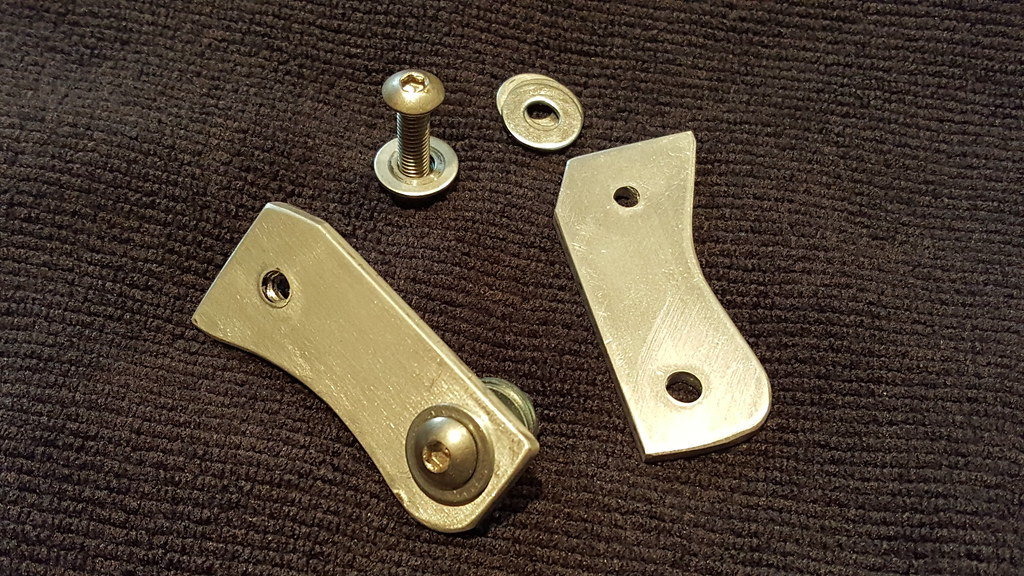
Next, I fabricated some mounting tabs out of 1" wide x 1/8" thick aluminum bar stock, which can be purchased at most hardware or home improvement stores. These didn't have to have as complex of a shape as I made them, and a simple rectangle would have worked, but mine are shaped like they are due to earlier plans changing a bit, and not wanting to re-make the brackets.

Rectangular tabs would be 1.75" long and .75" wide. Two holes are drilled in the tab, 1 5/16" apart. The smaller one at the top (which the Phillips head screw will go into) was drilled using a 5/32" bit, and the larger one was drilled with a 3/16" bit.

The hardware used to attach the tabs to the speakers is 8-32 button head machine screws that are 3/4" long, with matching nuts and washers. I put one washer under the screw head, two washers between the aluminum tab and speaker (for spacing), and one washer under the aluminum tab.

45477817022_2a0b5cc7be_b.jpg


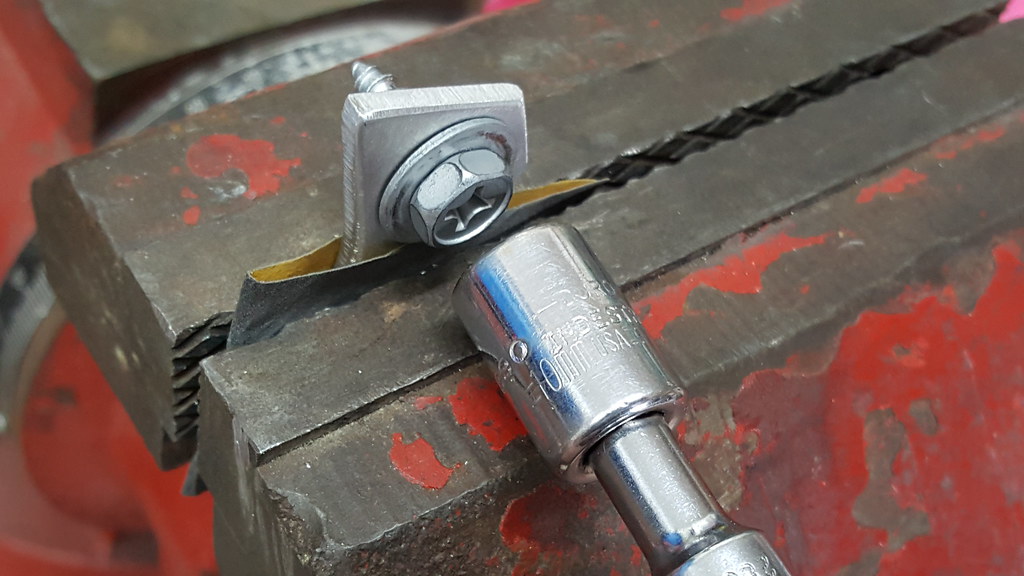
The Phillips head screw can be used to make threads in the smaller/top hole. It takes a little force to start the screw in the hole, but do this, tighten until snug, and then remove the screw. It is much easier to do this outside of the vehicle, than inside when mounting the tab/speakers in the dash.

45477818142_2ca28aa247_b.jpg


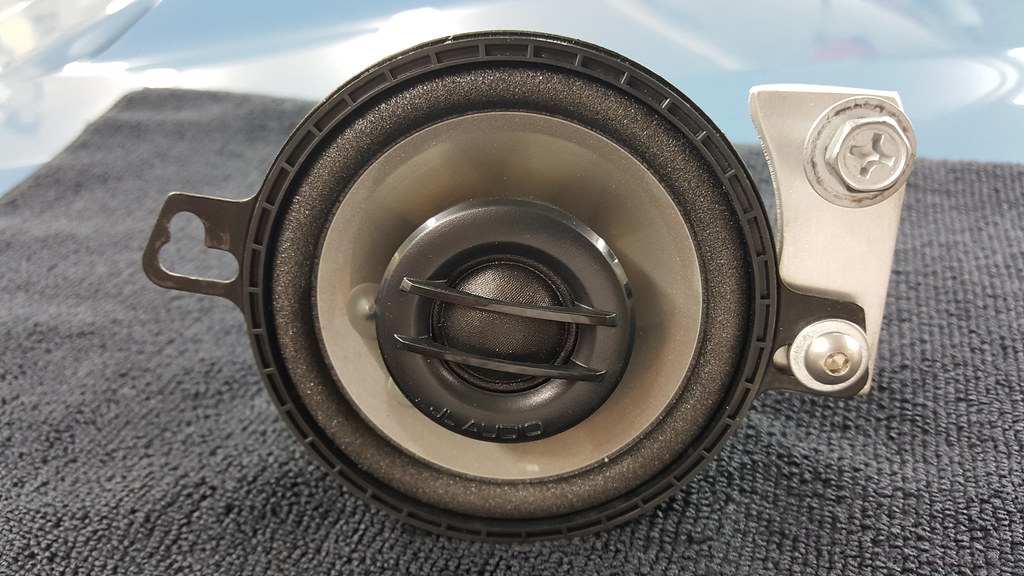
This photo depicts what the tab looks like when mounted on the speaker. The Phillips screw was removed prior to putting the speaker in the dash. I put blue thread locker (aka Loctite) on the button head hardware, and tightened it fairly well, but just loose enough so that I could move/align the tab with the speaker in the dash hole.

43711055790_3f0a973a0a_b.jpg


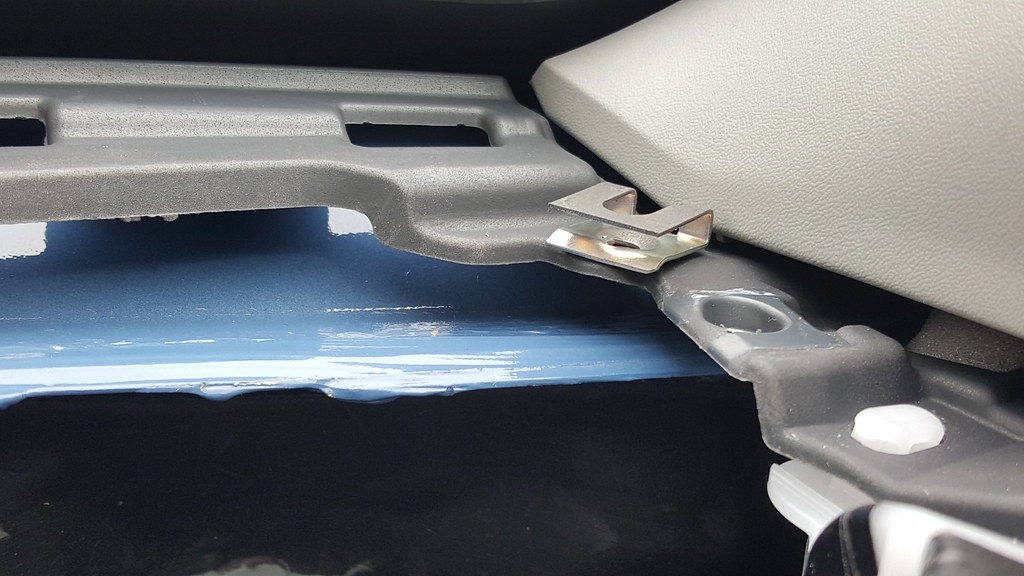
When installing the speakers in the dash, the side of the speaker without the "tab" attached will be fastened using the Phillips head screw and existing "spring nut" that is already installed on the dash plastic. On the opposite side, you'll need to remove the "spring nut" by simply sliding it off the dash plastic (don't drop it into the dash hole, or it may be hard to retrieve. The photo below shows one of the spring nuts after it has been removed.

44802910274_38758eb2de_b.jpg


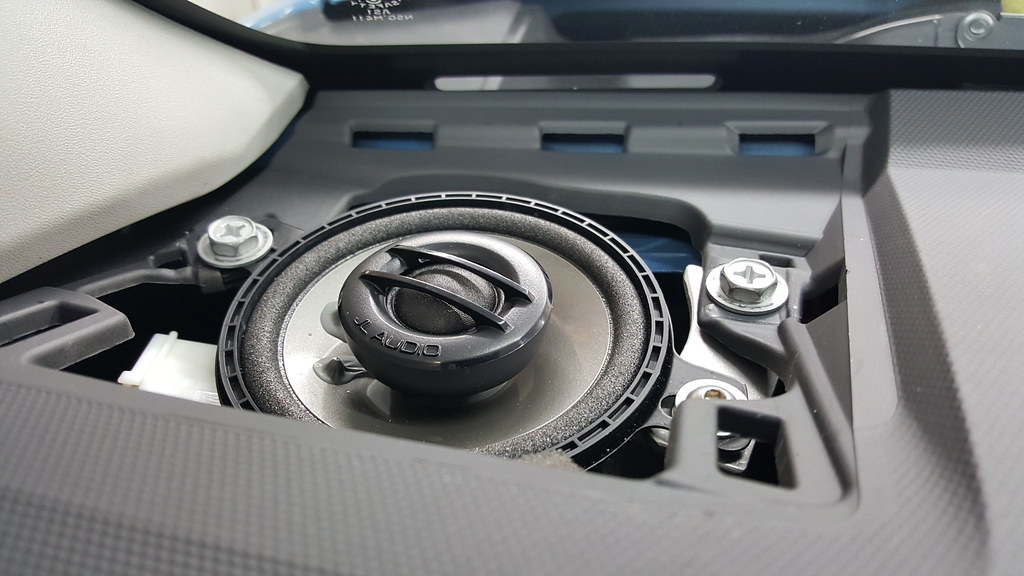
After plugging the factory speaker wiring harness to the speaker, and tucking in the wires, the speaker can be carefully dropped into the dash hole. On the driver's side, put the speaker "ear" on top of the spring nut that is on the left, and loosely fasten it with one of the Phillips head screws. The fabricated "tab" on the other side of the speaker goes under the dash plastic where the spring nut previously was. Insert the Phillips screw through the top of the dash, and tighten it into the tab below, as depicted in the images below. Don't overtighten the Phillips screws on either side of the speaker, and it is a good idea to put some thread locker on them.

The installation of the passenger side speaker is similar, but it is a tighter fit due to the ductwork for the defroster vent below the speaker hole. It took some wiggling and pushing down to get the speaker into position, and clearing the sheet metal closest to the windshield.

45477815032_c5bd61f60e_b.jpg


43711057330_3a89d46886_b.jpg


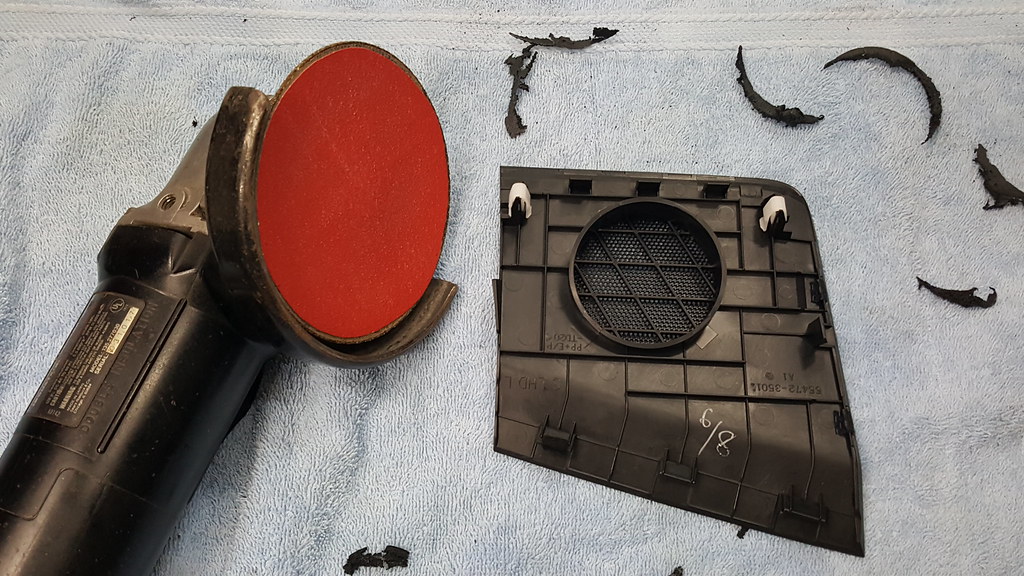
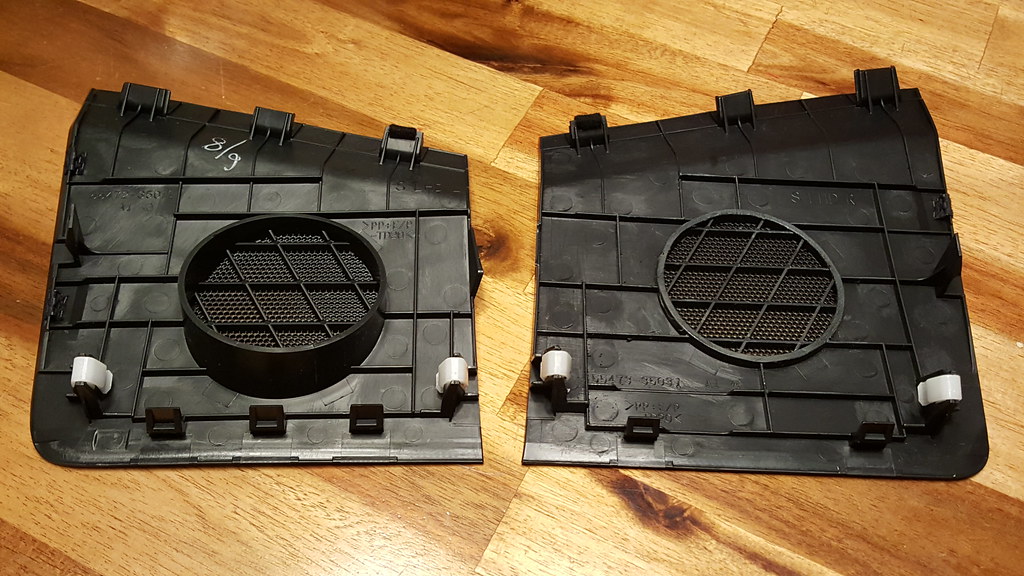
The OEM speaker grills have a ring on the bottom side that meets up with foam that is on top of the factory dash speakers. I used an angle grinder and sanding disc to carefully sand away/remove both rings, so that the back of the grills was essentially flat, and no speaker interference would occur.

45477821512_ef02886a5e_b.jpg


30587470377_c303295337_b.jpg


Snap the speaker grills back into place, and the installation is done.

Now crank up some tunes, and enjoy the much improved sounds, as well as the satisfaction that you did it yourself!!

Followed this write up today to install some Hertz 3.5s in the dash. Thanks!
 
After seeing a few posts about speaker upgrades, I decided to do one to the dash speakers in my '18 TRD Pro, and thought I'd share. In short, this lower cost, relatively easy upgrade is well worth it, and makes a huge difference in sound quality!


Rather than just going with a popular tweeter upgrade (aka, the Subaru/Kicker plug and play tweeters), I decided to go with 3.5" coaxial speakers from JL Audio - the C2-350x models. These full range speakers cost ~$80, and I bought mine at Amazon - https://www.amazon.com/dp/B001UDNXOQ


43711064030_a5a86c2e03_b.jpg


44802913074_b10626b28e_b.jpg


I also purchased a pair of tweeter wiring harness adapters, so I didn't have to cut the factory wiring (others have taken apart the stock speakers to make an adapter plug of sorts, or kind of "jumpered" the male portion of the 4 wire factory plug). I got the adapters from Taco Tunes - 2010-2020 Toyota 4Runner Tweeter Speaker Wiring Harness Adapter Connector (pair) - Taco Tunes - Toyota Audio Solutions


To limit lower frequency sounds from being played by these speakers, and prevent "clipping" at higher volumes, I also bought a pair of 133 microfarad capacitors (aka "bass blockers"), to cut sounds below 300 Hz - https://www.amazon.com/dp/B017AJ5ECW


31664017048_efc49007d5_c.jpg


The construction differences between the OEM and JL Audio speakers are notable:


31655918458_d576d078a6_b.jpg


45477811642_f6967df3cb_b.jpg


Removal of the stock speakers is easy. I started by using a plastic trim tool (part of a set like the ones at https://www.amazon.com/dp/B00ZRJCYQ2), and gently prying from the center/rear-most portion of the speaker grills to "pop" the two clips that hold them in.


44802906664_403ed4ed3a_b.jpg


From there, a small ratchet, extension, and 10mm socket was used to remove the two hex head screws (with Phillips patterns in the top, as highlighted in red in the image below). After these screws have been removed, the speaker mount and speaker can be lifted out as an assembly. Push the tab on one side of speaker plug/harness to release it from the blue "cap" of the stock speaker, and disconnect the speaker assembly (the second image below is one where the factory mount is still in place, but I suggest removing the speaker and bracket as an assemblly, via the Phillips head screws)


44622671725_a3e2be3c19_b.jpg


30587465807_0087c113ee_b.jpg


The Taco Tunes adapter harnesses make wiring a pretty simple affair. Because of the way that the door speakers are wired with the dash speakers, there are four wires in the factory dash speaker harness/plug. To mimic the same using the Taco Tunes adapter harnesses, make four wires into two -- red and white wires go together for the positive side, and black and white/black go together for the negative side. I cut the long wires of the Taco Tunes adapter harnesses down to about six inches, to reduce bulk when installed under the dash.


The capacitor is connected inline, on the positive side wire. Joints were soldered and finished with heat shrink tubing.


44802909344_b9496e3a8f_b.jpg


43711065220_f77be5bc6b_c.jpg


Next, I fabricated some mounting tabs out of 1" wide x 1/8" thick aluminum bar stock, which can be purchased at most hardware or home improvement stores. These didn't have to have as complex of a shape as I made them, and a simple rectangle would have worked, but mine are shaped like they are due to earlier plans changing a bit, and not wanting to re-make the brackets.


Rectangular tabs would be 1.75" long and .75" wide. Two holes are drilled in the tab, 1 5/16" apart. The smaller one at the top (which the Phillips head screw will go into) was drilled using a 5/32" bit, and the larger one was drilled with a 3/16" bit.


The hardware used to attach the tabs to the speakers is 8-32 button head machine screws that are 3/4" long, with matching nuts and washers. I put one washer under the screw head, two washers between the aluminum tab and speaker (for spacing), and one washer under the aluminum tab.


45477817022_2a0b5cc7be_b.jpg


The Phillips head screw can be used to make threads in the smaller/top hole. It takes a little force to start the screw in the hole, but do this, tighten until snug, and then remove the screw. It is much easier to do this outside of the vehicle, than inside when mounting the tab/speakers in the dash.


45477818142_2ca28aa247_b.jpg


This photo depicts what the tab looks like when mounted on the speaker. The Phillips screw was removed prior to putting the speaker in the dash. I put blue thread locker (aka Loctite) on the button head hardware, and tightened it fairly well, but just loose enough so that I could move/align the tab with the speaker in the dash hole.


43711055790_3f0a973a0a_b.jpg


When installing the speakers in the dash, the side of the speaker without the "tab" attached will be fastened using the Phillips head screw and existing "spring nut" that is already installed on the dash plastic. On the opposite side, you'll need to remove the "spring nut" by simply sliding it off the dash plastic (don't drop it into the dash hole, or it may be hard to retrieve. The photo below shows one of the spring nuts after it has been removed.


44802910274_38758eb2de_b.jpg


After plugging the factory speaker wiring harness to the speaker, and tucking in the wires, the speaker can be carefully dropped into the dash hole. On the driver's side, put the speaker "ear" on top of the spring nut that is on the left, and loosely fasten it with one of the Phillips head screws. The fabricated "tab" on the other side of the speaker goes under the dash plastic where the spring nut previously was. Insert the Phillips screw through the top of the dash, and tighten it into the tab below, as depicted in the images below. Don't overtighten the Phillips screws on either side of the speaker, and it is a good idea to put some thread locker on them.


The installation of the passenger side speaker is similar, but it is a tighter fit due to the ductwork for the defroster vent below the speaker hole. It took some wiggling and pushing down to get the speaker into position, and clearing the sheet metal closest to the windshield.


45477815032_c5bd61f60e_b.jpg


43711057330_3a89d46886_b.jpg


The OEM speaker grills have a ring on the bottom side that meets up with foam that is on top of the factory dash speakers. I used an angle grinder and sanding disc to carefully sand away/remove both rings, so that the back of the grills was essentially flat, and no speaker interference would occur.


45477821512_ef02886a5e_b.jpg


30587470377_c303295337_b.jpg


Snap the speaker grills back into place, and the installation is done.


Now crank up some tunes, and enjoy the much improved sounds, as well as the satisfaction that you did it yourself!!


Just switched mine out to the exact same ones today. Much better sound quality!
 
So dumb question.
In looking at the pix in this thread , it looks as though the speakers attach directly to plastic...has the added weight of the upgraded speakers caused any plastic to crack? I know in the Silverado world dash cracking is common. Was concerned that adding a heavy speaker to something designed for a light one may cause plastic fatigue over time and break the mounting tab.
 
So dumb question.
In looking at the pix in this thread , it looks as though the speakers attach directly to plastic...has the added weight of the upgraded speakers caused any plastic to crack? I know in the Silverado world dash cracking is common. Was concerned that adding a heavy speaker to something designed for a light one may cause plastic fatigue over time and break the mounting tab.

Mounting points seem pretty stout and solid to me for any speaker that could fit in that space - at least the ones recommended in the Crutchfield site.
 
So dumb question.
In looking at the pix in this thread , it looks as though the speakers attach directly to plastic...has the added weight of the upgraded speakers caused any plastic to crack? I know in the Silverado world dash cracking is common. Was concerned that adding a heavy speaker to something designed for a light one may cause plastic fatigue over time and break the mounting tab.

Not worried in the least, the mounts are solid and there's little-to-no wiggle room really, so even after years, I don't expect vibration to take any toll.
 
DIY 3.5" JL Audio dash speaker upgrade - Wow!! (detailed how-to)

Just did the JL install with the bass suppressors.Well worth the 100$. Just an FYI-if you just cut up your old brackets with a hacksaw , they work great and you won’t have to shave down the grills. I reused the blue plugs too. Once you hear the new ones you won’t be putting the old ones back in anyhow.


Sent from my iPhone using Tapatalk
 
Last edited:
Are the bass blockers necessary in a JBL equipped runner where the door speaker and dash speaker outputs are already crossed over from the amp?
 
Installed these for a fifteen minute test and they went right back in the box for a refund. The stock JBL speakers sounded better (fuller, warmer, louder, and highs were more crisp and less shrill).

Have four other different sets coming whenever USPS decides to get back on schedule. Hope one of the incoming four is worth the upgrade.
 
In for posts and comments. Did the Subaru Tweeter swap and was disappointed by lack of Mids hoping 3.5s may due the job.

Would it be better to just go a component setup at this point around $150-$200 price point?
 
Last edited:
In for posts and comments. Did the Subaru Tweeter swap and was disappointed by lack of Mids hoping 3.5s may due the job.

Would it be better to just go a component setup at this point around $150-$200 price point?

I would just get components. Even the 3.5s handle high frequencies better than mid-low frequencies. The tweeters only take care of the highs. The woofers in the doors take care of the mids and lows. You can get a decent entry level component set for that much. It will be an improvement over stock speakers for sure, but you will always be limited by the factory EQ and terrible stock HU, you really need an amp to make them shine. But that will require a new HU, LOC or DSP.

I was actually planning on getting coax speakers for the doors and 3.5s for the tweets but am now second guessing because that means I will have 6 tweeters in the car with 4 in the front. It might be too bright for me. So I’m also looking for a good component set for the front to get a more balanced sound.
 
Installed these for a fifteen minute test and they went right back in the box for a refund. The stock JBL speakers sounded better (fuller, warmer, louder, and highs were more crisp and less shrill).

Have four other different sets coming whenever USPS decides to get back on schedule. Hope one of the incoming four is worth the upgrade.

I did the same thing, though it took me a couple of days to try and get it to sound right. I followed the write-up with my 15 Limited with JBL and replaced the dash speakers with the JL Audio C2-350x. While I was at it, I replaced the front door speakers with the JL C2-690tx and covered the doors with 80mil sound deadening material.

I thought the clarity was better, but I couldn’t get it to equalize off the stock head unit. I thought maybe I could get over the 4ohm speaker vs 2ohm system by fading to the front and turning up the volume, but still the rest of my speakers and sub were too loud. Even with the bass turned down, as soon as I would hear “DJ Khaled” at the beginning of a song, I knew that little JBL 8” sub would get to working too hard for its own good. On top of that, the active crossover at the amp prohibited the 3-way door speakers from using any mids and highs, so those were useless.

After a few days, I took the JL speakers out and reinstalled the stock speakers for the time being - back to the drawing board. It looks like I’m going to have to go with the PAC AmpPro, separate amp and component speakers route. This JBL system is not going to make it easy...

On a side note, I did learn that the sound deadening alone has a significant impact on the speakers when I put the stock JBLs back in. I’m a believer in that stuff now!
 
Last edited:

Members online

Forum statistics

Threads
278,315
Messages
3,554,123
Members
248,016
Latest member
Advally Service

Trending content

Back
Top