BamaDrewski
New member
OK. I decided to replace all of the AC components on my 2000 T4R Limited after the AC died. I got a nice 14 years of service out of the original system.
Here are a few things I would recommend to anyone doing this. First off, make sure you purchase Denso parts. I found most of mine on Amazon and the prices were really inexpensive. (Denso is the OE supplier to Toyota)
Here is what I purchased:
New Condenser
New Evaporator Core
New Compressor
New Expension Valve
New Reciever/Drier
New O-Ring kit from Advance Auto Parts.
AC Pressure Sensor from Autozone (Brand is Santech)
One new hose
The AC compressor was not difficult to get out after I decided to do the following:
1. Removed the skid plates (you will need this to tension the compressor belt and other things)
2. Removed the bolts holding on the power steering pump and move out of the way. (No need to disconnect the lines to the pump – BUT disconnect the little sensor connected to the pump)
3. Removed the air box.
4. Removed the fan shroud and fan (Trust me – this helps!)
Once the space was opened up, I was able to disconnect the sensor from the compressor, and then remove the bolts holding the compressor on to the bracket. TIP: To access the bolts holding the lines to the compressor and the top two bolts that mount the compressor, take two long extensions and access through the rubber flip down “curtain” in the passenger wheel well. This gives you straight shot.
With the air box, power steering pump and fan shroud out of the way, you can ease the compressor up through the top between the passenger fender well and the engine.
For the bottom bolts on the compressor, access them from up top. They will not come all the way out because they are long and will hit the frame. They will unscrew enough to release the compressor from the bracket. TIP When installing the new compressor, MAKE SURE to put in the two bottom bolts before wiggling the compressor into place and then tighten the two bottom bolts once it is in place.
I also took out the evaporator. It’s fairly easy.
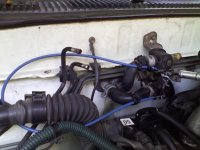
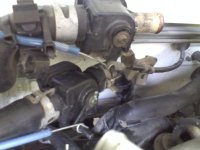
1. Disconnect the liquid line and the discharge line under the hood on the passenger firewall. WARNING: The liquid line has a special connector. I found it was easy to remove with a very small jewelers screw driver when pushing down the tabs from the top.
2. Just remove the glove box, the horizontal support for the glove box (4 bolts)
3. Take out the top of the glove box and disconnect the wiring that is attached to the top.
4. Remove the plastic air vent tube running horizontally behind the glove box (Just pops out – no screws)
5. Disconnect the wiring to the cooling unit (box holding the evaporator)
6. Tuck the cooling unit harnesses out of the way.
7. Remove 4 bolts holding the cooling unit onto the body.
8. Pull the unit down a little and pull out. (Be careful here because as you pull the unit out, the evaporator drain and grommet in the firewall will probably fall out and land under the truck)
9. The cooling unit box has three clips on the side (they pop off) and then 3 screws holding it together.
10. Remove the clips and screws.
11. The unit comes apart revealing the evaporator core and expansion valve. (The evaporator box was really nasty and the evaporator was on its last leg. I cleaned the box with a vacuum and then washed it in the dishwasher and it looks like new)
Flushing the lines (liquid line, discharge line, etc.)
I bought a can of AC PRO aerosol AC flush from Advance. It has a tube and pointed rubber tip. I flushed all the lines and blew them out with air. I set them aside to put on when all the parts were in.
Compressor Priming
I purchased the compressor from Amazon. It’s the Deno 10PA version and is an exact match to the original one on the truck. You have to relieve the pressure on the unit when it arrives, take off the shipping plate and pour out the factory oil. It had 100cc’s in it. I replaced it with PAG46 (with dye) from Advance. YOU MUST REUSE THE OLD COMPRESSOR MANIFOLD PLATE. Simply take off the old plate, clean it up, replace the compressor gasket (comes with the compressor) and use the old compressor bolts to attach the old manifold plate to the new compressor.
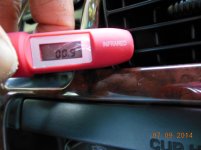
Everything is back in. From here, take it to a shop and have them vacuum down the system for about an hour. The system only takes about 1.5lbs of R134a and a good shop can make sure it is "metered in" in the right amount and flow. With all new components, there is no need to use that "leak seal" stuff. Hope this has been a helpful write-up. Feel free to contact me with any questions.
Here are a few things I would recommend to anyone doing this. First off, make sure you purchase Denso parts. I found most of mine on Amazon and the prices were really inexpensive. (Denso is the OE supplier to Toyota)
Here is what I purchased:
New Condenser
New Evaporator Core
New Compressor
New Expension Valve
New Reciever/Drier
New O-Ring kit from Advance Auto Parts.
AC Pressure Sensor from Autozone (Brand is Santech)
One new hose
The AC compressor was not difficult to get out after I decided to do the following:
1. Removed the skid plates (you will need this to tension the compressor belt and other things)
2. Removed the bolts holding on the power steering pump and move out of the way. (No need to disconnect the lines to the pump – BUT disconnect the little sensor connected to the pump)
3. Removed the air box.
4. Removed the fan shroud and fan (Trust me – this helps!)
Once the space was opened up, I was able to disconnect the sensor from the compressor, and then remove the bolts holding the compressor on to the bracket. TIP: To access the bolts holding the lines to the compressor and the top two bolts that mount the compressor, take two long extensions and access through the rubber flip down “curtain” in the passenger wheel well. This gives you straight shot.
With the air box, power steering pump and fan shroud out of the way, you can ease the compressor up through the top between the passenger fender well and the engine.
For the bottom bolts on the compressor, access them from up top. They will not come all the way out because they are long and will hit the frame. They will unscrew enough to release the compressor from the bracket. TIP When installing the new compressor, MAKE SURE to put in the two bottom bolts before wiggling the compressor into place and then tighten the two bottom bolts once it is in place.
I also took out the evaporator. It’s fairly easy.
1. Disconnect the liquid line and the discharge line under the hood on the passenger firewall. WARNING: The liquid line has a special connector. I found it was easy to remove with a very small jewelers screw driver when pushing down the tabs from the top.
2. Just remove the glove box, the horizontal support for the glove box (4 bolts)
3. Take out the top of the glove box and disconnect the wiring that is attached to the top.
4. Remove the plastic air vent tube running horizontally behind the glove box (Just pops out – no screws)
5. Disconnect the wiring to the cooling unit (box holding the evaporator)
6. Tuck the cooling unit harnesses out of the way.
7. Remove 4 bolts holding the cooling unit onto the body.
8. Pull the unit down a little and pull out. (Be careful here because as you pull the unit out, the evaporator drain and grommet in the firewall will probably fall out and land under the truck)
9. The cooling unit box has three clips on the side (they pop off) and then 3 screws holding it together.
10. Remove the clips and screws.
11. The unit comes apart revealing the evaporator core and expansion valve. (The evaporator box was really nasty and the evaporator was on its last leg. I cleaned the box with a vacuum and then washed it in the dishwasher and it looks like new)
Flushing the lines (liquid line, discharge line, etc.)
I bought a can of AC PRO aerosol AC flush from Advance. It has a tube and pointed rubber tip. I flushed all the lines and blew them out with air. I set them aside to put on when all the parts were in.
Compressor Priming
I purchased the compressor from Amazon. It’s the Deno 10PA version and is an exact match to the original one on the truck. You have to relieve the pressure on the unit when it arrives, take off the shipping plate and pour out the factory oil. It had 100cc’s in it. I replaced it with PAG46 (with dye) from Advance. YOU MUST REUSE THE OLD COMPRESSOR MANIFOLD PLATE. Simply take off the old plate, clean it up, replace the compressor gasket (comes with the compressor) and use the old compressor bolts to attach the old manifold plate to the new compressor.
Everything is back in. From here, take it to a shop and have them vacuum down the system for about an hour. The system only takes about 1.5lbs of R134a and a good shop can make sure it is "metered in" in the right amount and flow. With all new components, there is no need to use that "leak seal" stuff. Hope this has been a helpful write-up. Feel free to contact me with any questions.