DIY: Roof Rack Delete (w/ pics)

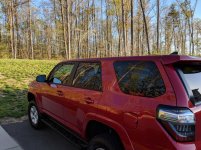
Did mine a few days ago...
 

Attachments

  • IMG_20180420_184739.jpg
    IMG_20180420_184739.jpg
    138.3 KB · Views: 2,883
Where's the cheapest place to buy these kits?

Google it, from what I saw when I ordered mine...from McGeorge Toyota here in town, they're all about the same regardless of where they come from....cheaper price, more shipping, or the reverse.

You're gonna pay between $50-60 all said and done. Just jump on one and roll with it...

Has anyone noticed if there is less wind noise after deleting the roof rack?

Naa, never had any crossbars to start with
 
For those of you who did silicone. Where did you put it? I plan on doing this later this week when the parts come in, but I've been told different things for silicone so I figure I'd get it form those who have done it.

One said they filled the entire bolt hole with Silicone. One said they just did the bolt itself, where others said just around the hole and top of the bolt.

What exactly is the correct way? I don't want to do overkill and cause issues later if I decide to go with a real roof rack, but I also don't want to do the opposite and have leaks.

Thanks!
 
For those of you who did silicone. Where did you put it? I plan on doing this later this week when the parts come in, but I've been told different things for silicone so I figure I'd get it form those who have done it.

One said they filled the entire bolt hole with Silicone. One said they just did the bolt itself, where others said just around the hole and top of the bolt.

What exactly is the correct way? I don't want to do overkill and cause issues later if I decide to go with a real roof rack, but I also don't want to do the opposite and have leaks.

Thanks!

I used the white thread-seal/plumbers tape on the threads of the bolts and put a bead of silicone around the base of the little "tubes" that the bolts screw into. There's a slight gap between the tube and body.

I only let the silicone sit for a minute or 2 and then put the replacement parts on.

It's been a couple of weeks for me, so far so good, even after multiple drive-thru car washes.
 
1.) Order your parts: The following parts will be needed to accomplish the roof rack delete. You will need the following:

8pcs - Part# 90119-08C47 (roof bolts w/ rubber washers)
4pcs - Part# 63185-42020 (roof brackets w/ foam pads - TE already have this under the installed roof rack)
4pcs - Part# 75596-35030 (roof plastic covers)

Needed something to plug the bolt holes while I get my roof rack painted. This thread was helpful. Thank you!
 
I used the white thread-seal/plumbers tape on the threads of the bolts and put a bead of silicone around the base of the little "tubes" that the bolts screw into. There's a slight gap between the tube and body.


I only let the silicone sit for a minute or 2 and then put the replacement parts on.


It's been a couple of weeks for me, so far so good, even after multiple drive-thru car washes.


What type of silicone did you use?


Sent from my iPhone using Tapatalk
 
Confused.

I’m confused on something so maybe someone can help me. When looking at the original post the OP says to put the brackets with the arrow pointing out. In the first picture of the brackets it has the arrow point out but in the second picture (with one bolt in place) the bracket is facing the opposite way with the arrow pointing in. Which is the correct way? I’ve read through the thread and don’t see an answer.
 
I’m confused on something so maybe someone can help me. When looking at the original post the OP says to put the brackets with the arrow pointing out. In the first picture of the brackets it has the arrow point out but in the second picture (with one bolt in place) the bracket is facing the opposite way with the arrow pointing in. Which is the correct way? I’ve read through the thread and don’t see an answer.

As I recall, there is only one way to install it and have the cap fit correctly, but I cannot remember which way is the correct way.
 
Just my .02 -

I installed mine with the arrows pointing out and have yet to experience any issues, have also been through a mechanical/drive through car wash repeatedly.
 
Just finished my wife's limited. She is not sure about it yet but I love it, especially when washing / waxing.

The plastic covers will only fit one way on the brackets and line up correctly. I temp installed the brackets both ways and it did not appear to make a difference. All brackets and covers are identical.

Like another poster stated, I used 3M 4200, which is what I use on my boat. I put some on the mating surfaces and the threads. 4200 is the best sealant made that is not permanent. If you know you will never reverse this mod, 5200 is permanent and I use it below the waterline on my boat. Beware it does not like to be removed.

https://www.amazon.com/gp/product/B0000AY6B0/ref=oh_aui_detailpage_o06_s00?ie=UTF8&psc=1
 
Can anyone confirm whether or not the 14+ Trails have the brackets already installed like the 11-13 Trails?
 

Members online

No members online now.

Forum statistics

Threads
278,316
Messages
3,554,112
Members
248,016
Latest member
Advally Service

Trending content

Back
Top