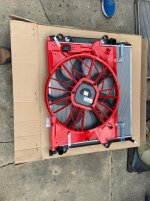
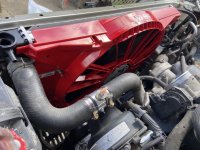
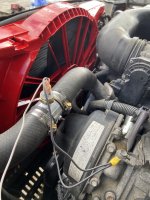
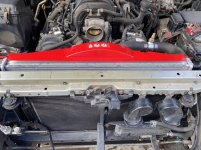
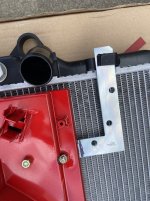
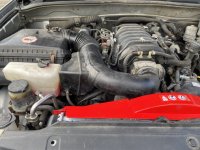
Electric fan conversion with pics

MY06T4R

Member
Parts needed

1 Mercedes E320 engine fan
1 Painless performance 185 on 175 off fan switch part #30111
1 Auto Meter radiator hose sensor adaptor part #2283
10' 8 gauge red wire
10' 8 gauge black wire
1 Toyota 4 pin relay with big spades
10' wire loom from harbor freight
1 fail-safe 170 degree thermostat part# 7302-170
1 felt pro thermostat gasket part # 35555
1 15 amp mini fuse
2 gallons of antifreeze
4 3/8 nuts
15' of 18 gauge wire
2 National Hardware® 5" x 7/8" Zinc Flat Corner Brace
Model Number: N234-955
2 National Hardware® 4" x 5/8" Mending Braces
Model Number: N272-732
10 zip ties
1 pack of washers Grip Fast® 1/4" Grade 8 Zinc Flat Washer - 93 Count
Model Number: G8FW14-93
1 pack of lock washers Grip Fast® 1/4" Grade 8 Zinc Split Lock Washers - 93 Count
Model Number: G8LW14-93BB
1 pack of bolts Grip Fast® 1/4"-20 x 2" Zinc Grade 8 Hex Bolt - 16 Count
Model Number: G8HB142-16
1 pack of nuts Grip Fast® 1/4"-20 Yellow Zinc Grade 8 Coarse Thread Hex Nut - 54 Count
Model Number: G8HN14-54
1 10 gauge wire end loop for ground

Optional Parts

1 can of Rust-Oleum, Cherry Red 252459 Automotive 12-Ounce Enamel Spray Paint
1 Denso radiator part#221-3124

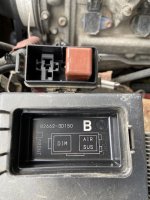
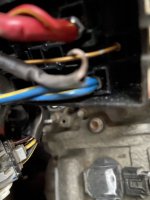
I used the pre-wired air suspension relay location and 50 amp under hood fuse, I ran a 18 gauge wire to the inside and used a blank fuse location that was ignition on and a 15 amp fuse. I ran the fan ground wire to the battery.


Here is a link to the video showing the duty cycle of this fan and how quick it cools the coolant down. I just uploaded it a few minutes ago.

YouTube
 

Attachments

  • IMG_0370.jpg
    IMG_0370.jpg
    54.5 KB · Views: 3,909
  • 9DP9%8F9SKyEVmQOZbx7Ag copy.jpg
    9DP9%8F9SKyEVmQOZbx7Ag copy.jpg
    130.3 KB · Views: 2,846
  • YAzfCy3UTeO8FBUDOuJoYw copy.jpg
    YAzfCy3UTeO8FBUDOuJoYw copy.jpg
    131.3 KB · Views: 3,080
  • 6%+Ob6EkRYSDlX7pPqheng copy.jpg
    6%+Ob6EkRYSDlX7pPqheng copy.jpg
    133.5 KB · Views: 299
  • mlqrnRsuTpejBH72Nqqxfw copy.jpg
    mlqrnRsuTpejBH72Nqqxfw copy.jpg
    130.5 KB · Views: 3,375
  • 0u6XV%IVQAikNeOpUNP5BQ copy.jpg
    0u6XV%IVQAikNeOpUNP5BQ copy.jpg
    129.2 KB · Views: 334
  • YhWSRNQ%TG6DG67b0KR8qg copy.jpg
    YhWSRNQ%TG6DG67b0KR8qg copy.jpg
    129.5 KB · Views: 272
  • XO8yZTAtQIeOTK5W6ujI1g copy.jpg
    XO8yZTAtQIeOTK5W6ujI1g copy.jpg
    131 KB · Views: 3,026
Last edited:
Register to hide this ad
Nice Writeup!

I'm trying to learn everything I can, what is the benefit of an electric fan over the engine driven stock fan? I understand that it would probably help at low rpms, since the engine isn't spinning the fan as fast, but curious about the other benefits? Does the fan clutch suck on these vehicle or is more failsafe with the electric? Thanks
 
Looks pretty slick.

I'd suggest trying to find a way to get the shroud covering the rest of the radiator surface so the fan will be pulling air across the entire radiator instead of just the section under covered by the shroud.

Interested in seeing what your coolant and trans temps look like after this mod and comparing it to the stock numbers.

Captured in Wayback Machine for posterity: https://web.archive.org/web/20200513162016/https://www.toyota-4runner.org/3488244-post1.html
 
Last edited:
I used the pre-wired air suspension relay location and 50 amp under hood fuse, I ran a 18 gauge wire to the inside and used a blank fuse location that was ignition on and a 15 amp fuse. I ran the fan ground wire to the battery.

I like that, using existing unused electrical sources. Did you have to take the auxiliary relay box apart to run the wiring, and was that a universal fuse holder usually for stereo installations?
 
I like that, using existing unused electrical sources. Did you have to take the auxiliary relay box apart to run the wiring, and was that a universal fuse holder usually for stereo installations?

Yes, once you take the auxiliary relay box off you need to pop the bottom off and connect to or replace the existing wires to the relay. I am not sure how to upload a video to this site, but I will make a video giving instructions or take some more pictures of what I did. I will try to find time to do a write up if anyone is interested. I tried initially to upload more pictures but it cut me off.
 
Nice Writeup!

I'm trying to learn everything I can, what is the benefit of an electric fan over the engine driven stock fan? I understand that it would probably help at low rpms, since the engine isn't spinning the fan as fast, but curious about the other benefits? Does the fan clutch suck on these vehicle or is more failsafe with the electric? Thanks

I did this for better MPG and engine performance. I am unaware of the stock fan failing very often.
 
Looks pretty slick.

I'd suggest trying to find a way to get the shroud covering the rest of the radiator surface so the fan will be pulling air across the entire radiator instead of just the section under covered by the shroud.

Interested in seeing what your coolant and trans temps look like after this mod and comparing it to the stock numbers.

Captured in Wayback Machine for posterity: https://web.archive.org/web/20200513162016/https://www.toyota-4runner.org/3488244-post1.html

I would have liked to have a shroud that covered the entire radiator as well, however given the time I had that was not possible to fabricate further. That being said, this fan moves so much air it is unreal, it only runs for about 45-50 seconds and it shuts off because it has cooled the coolant off that fast. I have a video of it cycling that I would upload if I could. I will upload to my youtube page and share the link.
 
Yes, once you take the auxiliary relay box off you need to pop the bottom off and connect to or replace the existing wires to the relay. I am not sure how to upload a video to this site, but I will make a video giving instructions or take some more pictures of what I did. I will try to find time to do a write up if anyone is interested. I tried initially to upload more pictures but it cut me off.

Photos will suffice :nod: So the actual terminals/sockets are already there, just a matter of connecting/upgrading?
 
Photos will suffice :nod: So the actual terminals/sockets are already there, just a matter of connecting/upgrading?

If you are using the air suspension relay then yes, at least on mine it was prewired with its own fuse in the under hood fusebox, I removed the one spade and took the OE wire out and installed my wiring, the smaller 2 wires I cut and soldered my wires to them and ran one to the sensor and the other inside the cab to the fuse box and installed it in a blank fuse location that was key on hot. I will get pictures tonight and post them. I am sure there are other ways to do it, however it was just my preference and less of a headache trying to find a spot to place a fuse under the hood.
 
I'm curious of the results of your coolant temps when cruising, when idle for a long period, and when under heavier loads going uphill...oh, and also, the mpg-potential changes...well done, looks good!
 
I'm thinking of utilizing the air suspension circuit for lighting, 50 amps is more than enough.

Looking at my '03's wiring diagram theres a brown w/yellow stripe wire that energizes the relay, hoping it's in the existing dash harness where the suspension ECU would be (behind the inside fusebox) so I won't have to run wiring through the firewall.
 
[MENTION=379513]MY06T4R[/MENTION]

Looks great. I would like to know how much clearance there is from the back of the fan to the front of the engine?

What year E320?

Why did you switch to 170 degree themostat? I thought unleaded engines require 180 degree stats to help burn and effect fuel mileage.
 
Looking forward to seeing what you gain out of this. I wonder if the engine spools up quicker without falling on it's face over 4k if having no mechanical fan. Keep us posted.
 
Photos will suffice :nod: So the actual terminals/sockets are already there, just a matter of connecting/upgrading?

Here is a picture from underneath the relay housing. I hope this helps.
 

Attachments

  • GkO0SL4fTAakeh0RKMjOBA copy.jpg
    GkO0SL4fTAakeh0RKMjOBA copy.jpg
    107.1 KB · Views: 2,635
I'm thinking of utilizing the air suspension circuit for lighting, 50 amps is more than enough.

Looking at my '03's wiring diagram theres a brown w/yellow stripe wire that energizes the relay, hoping it's in the existing dash harness where the suspension ECU would be (behind the inside fusebox) so I won't have to run wiring through the firewall.

I looked and looked for that connector, followed schematics and was still unable to locate the wire or right connector. Send pictures if you fins it.
 
[MENTION=379513]MY06T4R[/MENTION]

Looks great. I would like to know how much clearance there is from the back of the fan to the front of the engine?

What year E320?

Why did you switch to 170 degree themostat? I thought unleaded engines require 180 degree stats to help burn and effect fuel mileage.

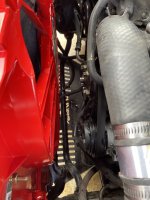
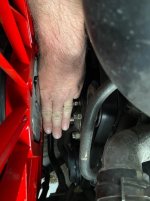
I switched to the lower temperature thermostat just for performance add ons later, might as well do it now, even with the lower temp thermostat it still runs about 180* the thermostat just opens at 170* the fan does not kick on until 185*. The fan came from a 2005 Mercedes E320. I am including a picture with my hand in between to gauge how much room.
 

Attachments

  • fullsizeoutput_7e6.jpg
    fullsizeoutput_7e6.jpg
    59.6 KB · Views: 1,183
I looked and looked for that connector, followed schematics and was still unable to locate the wire or right connector. Send pictures if you fins it.

Will do! I already have the fuse box loose and hopefully have the rest of the interior apart soon...taking the carpet out to do a thorough cleaning since rodents pooped and peed on it :rant:
 
Parts needed

1 Mercedes E320 engine fan
1 Painless performance 185 on 175 off fan switch part #30111
1 Auto Meter radiator hose sensor adaptor part #2283
10' 8 gauge red wire
10' 8 gauge black wire
1 Toyota 4 pin relay with big spades
10' wire loom from harbor freight
1 fail-safe 170 degree thermostat part# 7302-170
1 felt pro thermostat gasket part # 35555
1 15 amp mini fuse
2 gallons of antifreeze
4 3/8 nuts
15' of 18 gauge wire
2 National Hardware® 5" x 7/8" Zinc Flat Corner Brace
Model Number: N234-955
2 National Hardware® 4" x 5/8" Mending Braces
Model Number: N272-732
10 zip ties
1 pack of washers Grip Fast® 1/4" Grade 8 Zinc Flat Washer - 93 Count
Model Number: G8FW14-93
1 pack of lock washers Grip Fast® 1/4" Grade 8 Zinc Split Lock Washers - 93 Count
Model Number: G8LW14-93BB
1 pack of bolts Grip Fast® 1/4"-20 x 2" Zinc Grade 8 Hex Bolt - 16 Count
Model Number: G8HB142-16
1 pack of nuts Grip Fast® 1/4"-20 Yellow Zinc Grade 8 Coarse Thread Hex Nut - 54 Count
Model Number: G8HN14-54
1 10 gauge wire end loop for ground

Optional Parts

1 can of Rust-Oleum, Cherry Red 252459 Automotive 12-Ounce Enamel Spray Paint
1 Denso radiator part#221-3124

I used the pre-wired air suspension relay location and 50 amp under hood fuse, I ran a 18 gauge wire to the inside and used a blank fuse location that was ignition on and a 15 amp fuse. I ran the fan ground wire to the battery.


Here is a link to the video showing the duty cycle of this fan and how quick it cools the coolant down. I just uploaded it a few minutes ago.

YouTube

This is not going to work and you will have to remove it. I tried this exact setup years ago and this MBZ fan was not strong enough to cool the engine while towing or crawling. Driving around town was fine but this fan still had much less cooling capacity than the fan from an MBZ S600, even that fan wasn't enough for high engine loads. I think you are wasting your time and losing power by installing this.

FYI - CFD calcs on the factory fan are 10,000cfm. Have you done CFD for this fan or discovered its max CFM?
 
This is not going to work and you will have to remove it. I tried this exact setup years ago and this MBZ fan was not strong enough to cool the engine while towing or crawling. Driving around town was fine but this fan still had much less cooling capacity than the fan from an MBZ S600, even that fan wasn't enough for high engine loads. I think you are wasting your time and losing power by installing this.

FYI - CFD calcs on the factory fan are 10,000cfm. Have you done CFD for this fan or discovered its max CFM?

Can you share your calculations? Really interested in reading more about the work you did and the results you found.
 

Members online

Forum statistics

Threads
278,309
Messages
3,554,066
Members
248,016
Latest member
Advally Service

Trending content

Back
Top