
You are using an out of date browser. It may not display this or other websites correctly.
You should upgrade or use an alternative browser.
You should upgrade or use an alternative browser.
FX-R Projector Retrofit Write-Up (as experienced by SQ.MD)
- Thread starter SQ.MD
- Start date


SQ.MD
New member
Okay so now that the glass lens and the headlamp are separated, we have to try to fit the projector into the headlamp. Many people use a circular drill but to cut a two-two and a half inch hole on the back where the bulb goes. However, I did not have such a bit but did have a dremel. So I basically cut alongside the base of the back of the bulb using single cuts. It looks like this:

After I did this, I sanded the rough edges down using the sanding attachment for the dremel. Since I was sanding, I also sanded the inside of the headlamp housing. I had intentions to paint so now was a good time. I also sanded the shroud since this was going to be painted as well. This is a picture of the big hole in the back all cleaned up. Also note the right headlamp is sanded the and left isn’t. On the bottom of the picture, you can see the base of where the bulb used to go:

Picture of the shroud sanded. The left is sanded and the right is not.

With both headlamps sanded all around:

Result of my watch after sanding for awhile:

I then took some painters tape and outlined the edges of the lights (where the sealant was). Then I took automotive primer and primered both the housing and the shrouds (2 coats):

Then I sanded the primered headlamps and taped out the inside of the housing. I wanted the trim of the headlamps to be a different color and what used to be the reflective housing a different color. So I decided to paint the trim first and taped the reflective portion of the housing:

After I did this, I sanded the rough edges down using the sanding attachment for the dremel. Since I was sanding, I also sanded the inside of the headlamp housing. I had intentions to paint so now was a good time. I also sanded the shroud since this was going to be painted as well. This is a picture of the big hole in the back all cleaned up. Also note the right headlamp is sanded the and left isn’t. On the bottom of the picture, you can see the base of where the bulb used to go:
Picture of the shroud sanded. The left is sanded and the right is not.
With both headlamps sanded all around:
Result of my watch after sanding for awhile:
I then took some painters tape and outlined the edges of the lights (where the sealant was). Then I took automotive primer and primered both the housing and the shrouds (2 coats):
Then I sanded the primered headlamps and taped out the inside of the housing. I wanted the trim of the headlamps to be a different color and what used to be the reflective housing a different color. So I decided to paint the trim first and taped the reflective portion of the housing:
SQ.MD
New member
Here is a picture of the outside trim of the headlamp and the shrouds painted. I used automotive wheel metallic paint (I did 3 coats of this metallic paint). It is the same paint I used to paint my grill when I did the satoshi grill mod. Note the reflective portion of the headlight still only has been primered:

In this picture, the left headlamp only has been primered whereas the right headlamp has the trim painted metallic gunmetal/silver:

After two hours, I then taped up the trim of the headlamps (where there is metallic paint) so I could paint the reflective portion of the housing. I decided to use flat black wheel paint. Sorry but I forgot to take a picture of this part.
*** note, if I were to do this retrofit again (Which I won’t!), I would paint the housing after I drilled the holes to where to mount my projectors. As the picture below shows, that area gets super messy and dirty so might as well wait and paint all this when you know for SURE where the projector is going:

Now you have to decide where exactly you will be drilling four holes to mount the projector. Follow the rule: Measure 10 times, drill once (I exaggerate because it IS that important –otherwise your cutoff will be fudged). This is where I drilled my holes, I used a dremel bit to drill the holes because my drill was out of battery and I wanted to get as much done as possible while I was down in my garage:
It would be smart to remove your nonretrofit headlights from your 4runner and place the current ones (the ones you are working on) in their place to just get an idea of where the projectors should mount. For each light, since this is a very important step, I did attach the headlamp to the black housing each time I wanted to check the alignment. I attached them together at all four anchors mentioned in the beginning of this write-up. I didn’t want to be lazy and only attach by the white knobs because this might affect the cutoff later. Be sure to wire the projectors so you could see the cutoff (I only connected the low beam and not the high beam). Use a sharpie to mark the areas (4) where you will drill. Align the projector with the holes and measure again. Repeat until you are certain the holes are correct. Then drill away – four holes for each headlamp.
I used a total of 8 #8-32 x 2inch screws and a box of their respective nuts and washers. You will really only need 16 nuts and 8 washers but I bought more just in case. I also bought an extra packet of the screws just incase. You can return them later as long as you don’t open them (if you really wanted to). Here is a picture of the screws:

***This would be a good time to paint your headlamps (if you plan to) since I recommend doing it now instead of earlier since the paint job would look messy after all that drilling. Also, this would be a good time to put aluminum tape on the projector where light escapes. It makes a big different in the final project and I recommend taping the projector up with aluminum reflective tape.
Projector aluminum taped up:

Without taping up the projector the light escapes into the housing:

By taping up the projector, the final product looks better with no light bleeding:

In this picture, the left headlamp only has been primered whereas the right headlamp has the trim painted metallic gunmetal/silver:
After two hours, I then taped up the trim of the headlamps (where there is metallic paint) so I could paint the reflective portion of the housing. I decided to use flat black wheel paint. Sorry but I forgot to take a picture of this part.
*** note, if I were to do this retrofit again (Which I won’t!), I would paint the housing after I drilled the holes to where to mount my projectors. As the picture below shows, that area gets super messy and dirty so might as well wait and paint all this when you know for SURE where the projector is going:
Now you have to decide where exactly you will be drilling four holes to mount the projector. Follow the rule: Measure 10 times, drill once (I exaggerate because it IS that important –otherwise your cutoff will be fudged). This is where I drilled my holes, I used a dremel bit to drill the holes because my drill was out of battery and I wanted to get as much done as possible while I was down in my garage:
It would be smart to remove your nonretrofit headlights from your 4runner and place the current ones (the ones you are working on) in their place to just get an idea of where the projectors should mount. For each light, since this is a very important step, I did attach the headlamp to the black housing each time I wanted to check the alignment. I attached them together at all four anchors mentioned in the beginning of this write-up. I didn’t want to be lazy and only attach by the white knobs because this might affect the cutoff later. Be sure to wire the projectors so you could see the cutoff (I only connected the low beam and not the high beam). Use a sharpie to mark the areas (4) where you will drill. Align the projector with the holes and measure again. Repeat until you are certain the holes are correct. Then drill away – four holes for each headlamp.
I used a total of 8 #8-32 x 2inch screws and a box of their respective nuts and washers. You will really only need 16 nuts and 8 washers but I bought more just in case. I also bought an extra packet of the screws just incase. You can return them later as long as you don’t open them (if you really wanted to). Here is a picture of the screws:
***This would be a good time to paint your headlamps (if you plan to) since I recommend doing it now instead of earlier since the paint job would look messy after all that drilling. Also, this would be a good time to put aluminum tape on the projector where light escapes. It makes a big different in the final project and I recommend taping the projector up with aluminum reflective tape.
Projector aluminum taped up:
Without taping up the projector the light escapes into the housing:
By taping up the projector, the final product looks better with no light bleeding:
SQ.MD
New member
As for the final mounting of the projectors, I first put the screw through the hole on the corner of the projector (there are four holes) and then used a nut to tighten this screw to the projector. I did this 3 more times for each projector and then took this assembly and put the screws through the four holes I drilled on the headlamp. To secure the projector to the housing, I used a washer and a nut for each bolt on the back. When I was certain the mounting was correct, I used blue loctite on each nut to make sure they would not loosen. Here is a picture if I make no sense:


Now since this write-up is entitled “as experienced by SQ.MD”…I shall explain how I made this entire project almost look horrendous by my “innovative” uses of LEDs. I always liked LEDs but didn’t want to opt for a halo ring because I think it looks funny (to each his own, right?) I wanted something different so I decided to put LEDs around my shroud. In my mind, I thought it would look awesome. However after I put them around the shroud and EVEN JB-WELDED it all, since the LED strip was not flexible and would not remain wrapped around the shroud by its own adhesive backing, I realized it looked like crap! I was sooo pissed! Here is what I was pissed about:


I was so pissed, I stopped working on this for a few days! I was so mad, I bought myself an iPad 2 and waited in line for 5 hours:


Now since this write-up is entitled “as experienced by SQ.MD”…I shall explain how I made this entire project almost look horrendous by my “innovative” uses of LEDs. I always liked LEDs but didn’t want to opt for a halo ring because I think it looks funny (to each his own, right?) I wanted something different so I decided to put LEDs around my shroud. In my mind, I thought it would look awesome. However after I put them around the shroud and EVEN JB-WELDED it all, since the LED strip was not flexible and would not remain wrapped around the shroud by its own adhesive backing, I realized it looked like crap! I was sooo pissed! Here is what I was pissed about:
I was so pissed, I stopped working on this for a few days! I was so mad, I bought myself an iPad 2 and waited in line for 5 hours:
SQ.MD
New member
However, as I began posting my complaints on my build thread, GottaBeTRD posted a picture which I drew inspiration from (mad props man!). Long story short, I decided to rip the LEDs off (ruining my paint job) and was stuck with JB-Weld everywhere. I decided to clean that mess up by using needle nose pliers and pulling the JB-Weld remnants off.

I then used a dremel to cut holes along the border of the shroud. My plan was to place my LED strip inside the shroud and have the light escape these cut out ovals & elongated ovals. All this was done using a simple bit on my dremel (the same bit I used to create holes to put the screws/bolts through from the projector). This is what it looked like:


I then sanded everything down again:

Primered and then sanded again:

And Finally painted (for the freakin’ second time!):

I let all that dry and the next day, I began my LED placement. This is a picture of the inside of the shroud:

I put aluminum foil tape along the inside to reflect all the light:

I then used a dremel to cut holes along the border of the shroud. My plan was to place my LED strip inside the shroud and have the light escape these cut out ovals & elongated ovals. All this was done using a simple bit on my dremel (the same bit I used to create holes to put the screws/bolts through from the projector). This is what it looked like:
I then sanded everything down again:
Primered and then sanded again:
And Finally painted (for the freakin’ second time!):
I let all that dry and the next day, I began my LED placement. This is a picture of the inside of the shroud:
I put aluminum foil tape along the inside to reflect all the light:
SQ.MD
New member
I then placed the LED in and used RSV ultra black silicone to keep it in place:

Then I let all that settle/harden and then put Aluminum reflective tape on the back to decrease any LED light escaping:

Then I placed the shroud back on. To keep the shroud in place I wrapped some aluminum tape around the projecting edge of the projector. This gave the shroud a more snug fit. I also used some silicone on the inner edge of the shroud just incase. With it all in place, it looked amazing:

Way better than this:

I then began to think about sealing the lights. Since I wanted to seal the headlamp assembly tight, I used ultra black RSV silicone. I first tried using JB-Weld, but I felt like it was to runny and wouldn’t stay. So I definitely recommend ultra black silicone. I sealed the four holes that I drilled (the ones with the nut/washer) and also sealed the gaps inbetween the projector and the headlamp. I had some huge gaps so it required some creativity in getting them all filled. After the silicone began to settle, I used some cardboard to smooth it out and not make it look all globby around the projector. Be sure to not let your red high beam wires or LED wires get stuck to the silicone! Here is a picture:


I let all this settle/harden for 24 hours.
Now it was time to close everything all up and put the clear glass lens back on the headlamp. I decided to not use the oven (since I didn’t want to melt the LED strip) and instead used a regular hair dryer. I had it on high heat and began melting the gray silicone around the glass lens. I would touch it occasionally to see how soft it was. Then I did the same to the headlamp. I spent about 5-8 minutes doing this on each light before I felt it was melted enough to adhere appropriately. I then put the two together and squished it all really hard. If some portions didn’t fit super tight, I directed some heat in that either until I could squeeze the two sides together. Once the fit was good, I placed the four metal clips (which were in my sandwich bags I created when I first started this project) back on. This is what the retrofit looked like at that point:

SUPER HAPPY AT THIS POINT!!!!!!!!!!!!!!!!!!!!!!!!!!!!!!!!!!!!!!!!!!!!!!!!!!!! :guitar3:
Then I let all that settle/harden and then put Aluminum reflective tape on the back to decrease any LED light escaping:
Then I placed the shroud back on. To keep the shroud in place I wrapped some aluminum tape around the projecting edge of the projector. This gave the shroud a more snug fit. I also used some silicone on the inner edge of the shroud just incase. With it all in place, it looked amazing:
Way better than this:
I then began to think about sealing the lights. Since I wanted to seal the headlamp assembly tight, I used ultra black RSV silicone. I first tried using JB-Weld, but I felt like it was to runny and wouldn’t stay. So I definitely recommend ultra black silicone. I sealed the four holes that I drilled (the ones with the nut/washer) and also sealed the gaps inbetween the projector and the headlamp. I had some huge gaps so it required some creativity in getting them all filled. After the silicone began to settle, I used some cardboard to smooth it out and not make it look all globby around the projector. Be sure to not let your red high beam wires or LED wires get stuck to the silicone! Here is a picture:
I let all this settle/harden for 24 hours.
Now it was time to close everything all up and put the clear glass lens back on the headlamp. I decided to not use the oven (since I didn’t want to melt the LED strip) and instead used a regular hair dryer. I had it on high heat and began melting the gray silicone around the glass lens. I would touch it occasionally to see how soft it was. Then I did the same to the headlamp. I spent about 5-8 minutes doing this on each light before I felt it was melted enough to adhere appropriately. I then put the two together and squished it all really hard. If some portions didn’t fit super tight, I directed some heat in that either until I could squeeze the two sides together. Once the fit was good, I placed the four metal clips (which were in my sandwich bags I created when I first started this project) back on. This is what the retrofit looked like at that point:
SUPER HAPPY AT THIS POINT!!!!!!!!!!!!!!!!!!!!!!!!!!!!!!!!!!!!!!!!!!!!!!!!!!!! :guitar3:
SQ.MD
New member
The next day, I took my 97 hazy headlights off my 4runner and put these babies in! This project was definitely worth it. I had to do some serious headlight aiming but I had gotten the hard part done.
From this:

To this:

Cutoff (not completely aligned but you get the point):

25ft+ away:

Light spread:

LEDs come on with daytime running lights:


From this:
To this:
Cutoff (not completely aligned but you get the point):
25ft+ away:
Light spread:
LEDs come on with daytime running lights:
Last edited:
SQ.MD
New member
FINAL results:
Daytime shots:
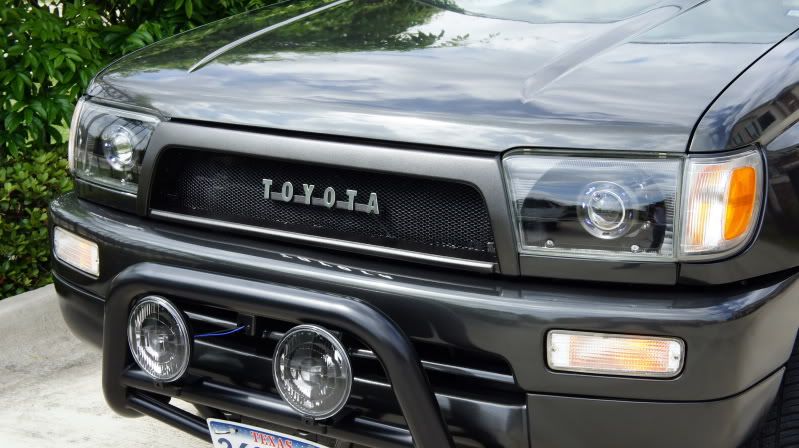
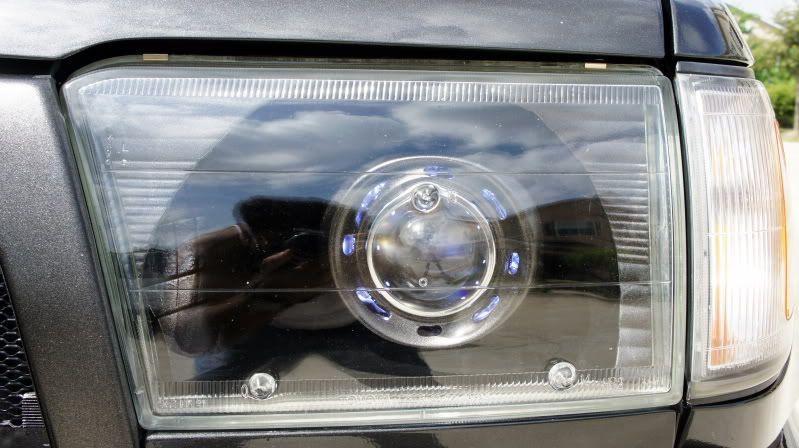
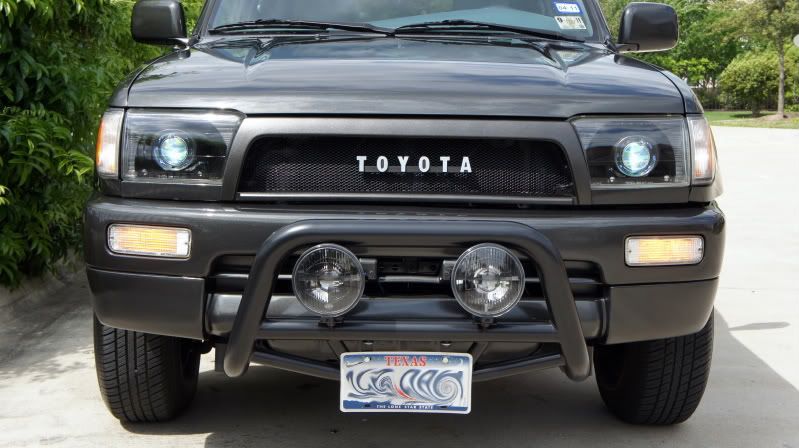
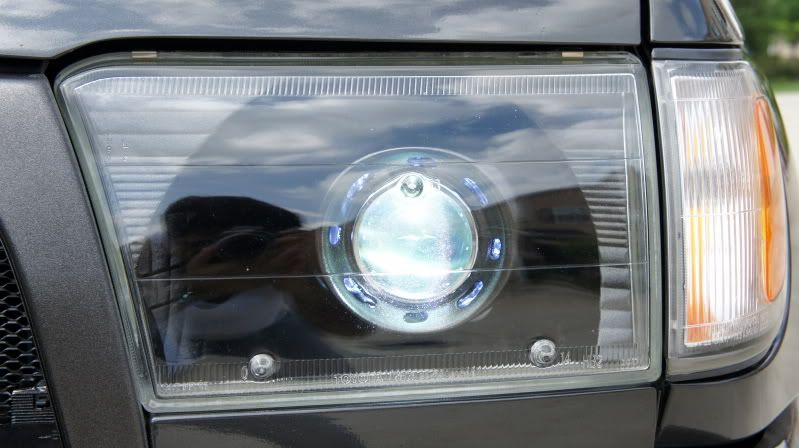
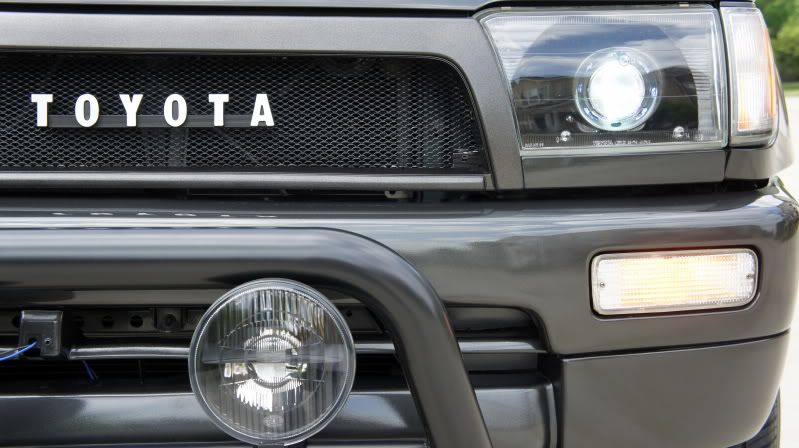
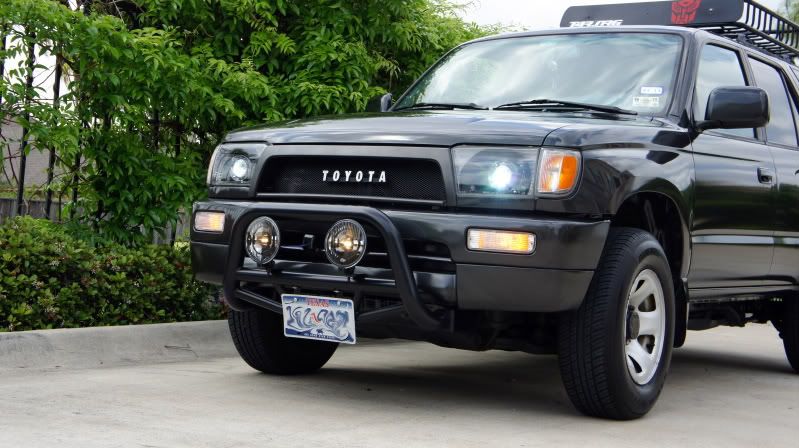
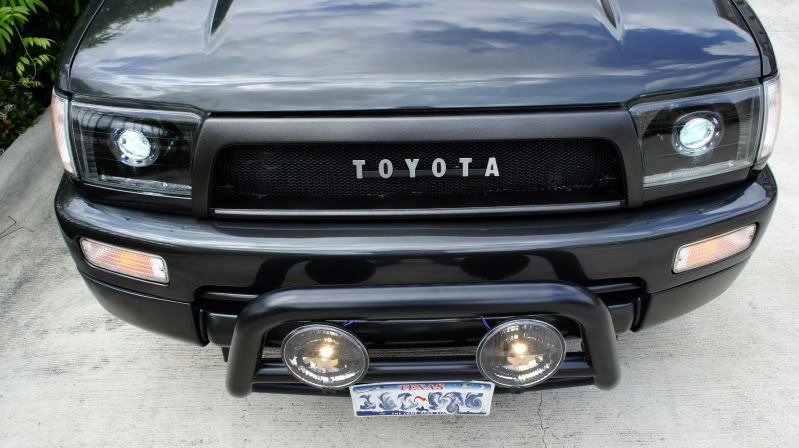
Oh and thanks to GottaBeTRD for his help along the way: his journey through the process is documented here: http://www.toyota-4runner.org/3rd-gen-t4rs/80110-planning-my-projector-retrofit-6.html
Another one of my references was this one site, can’t find it now but will credit it when I do!
I hope this write-up helps those of you who take upon this retrofit and good luck!
Daytime shots:
Oh and thanks to GottaBeTRD for his help along the way: his journey through the process is documented here: http://www.toyota-4runner.org/3rd-gen-t4rs/80110-planning-my-projector-retrofit-6.html
Another one of my references was this one site, can’t find it now but will credit it when I do!
I hope this write-up helps those of you who take upon this retrofit and good luck!

SilverBullet01
Senior Member
ok, this is making me want to get off my butt and finish my retrofit.
damn, i still need to get one more headlight since i messed one up, and some new shrouds...
damn, i still need to get one more headlight since i messed one up, and some new shrouds...


GottaBeTRD
New member
nice write up man, i think if i ever want to get into a 2nd retrofit with FxR's ill for sure use this.
Silverbullet you gotta get on that man! i was waiting for you to do yours too then i became impatient and just did it. SQ.MD im sure would agree, but the light output is so worth the blood the sweat and stess that it takes to put these together.
that LED's in the shroud look great man! another option for those who want to do this are some ring lights you can buy from TRS. but IMO i think the leds will last longer.
Silverbullet you gotta get on that man! i was waiting for you to do yours too then i became impatient and just did it. SQ.MD im sure would agree, but the light output is so worth the blood the sweat and stess that it takes to put these together.
that LED's in the shroud look great man! another option for those who want to do this are some ring lights you can buy from TRS. but IMO i think the leds will last longer.

Rock Slide
Senior Member
Install looks great. I'm really glad you went a step futher and painted the reflective housing black...looks sick like that on black 4Runners. :bigok:

binhsterbinh
Member
Great work on the FX-R retros. I've decided to do Morimoto D2S projectors with Apollo Shrouds. I'm going to try and do a similar paint scheme to yours. In addition, I'll open up a set of clear corners and black out the housings.
Projectors should be here in a week from TRS.
Thanks everybody for the inspiration.
Projectors should be here in a week from TRS.
Thanks everybody for the inspiration.

SQ.MD
New member
ok, this is making me want to get off my butt and finish my retrofit.
damn, i still need to get one more headlight since i messed one up, and some new shrouds...
do it, DO IT!!! you could get shrouds from TRS, but they are rather expensive if you do not purchase them from a kit...but from what I remember, they do have refurbished ones...like with minor scratches or something
Excellent retrofit! Props for making it unique and the write-up is the best one I have come across for the 4Runners. As others said, you have me inspired to get rolling on mine!
thanks man! I'm glad the time I spent can help some of ya'll. My way to give back to the 4runner community!
nice write up man, i think if i ever want to get into a 2nd retrofit with FxR's ill for sure use this.
Silverbullet you gotta get on that man! i was waiting for you to do yours too then i became impatient and just did it. SQ.MD im sure would agree, but the light output is so worth the blood the sweat and stess that it takes to put these together.
that LED's in the shroud look great man! another option for those who want to do this are some ring lights you can buy from TRS. but IMO i think the leds will last longer.
yeah, the ring lights would have definitely saved me alot of stress and worry but like you said, LEDs might last longer (possibly be brighter too?) thanks again for the positive remarks!
Install looks great. I'm really glad you went a step futher and painted the reflective housing black...looks sick like that on black 4Runners. :bigok:
yeah, I happen to like that black look on my shadow mica 4runner as well :wink2:
Great work on the FX-R retros. I've decided to do Morimoto D2S projectors with Apollo Shrouds. I'm going to try and do a similar paint scheme to yours. In addition, I'll open up a set of clear corners and black out the housings.
Projectors should be here in a week from TRS.
Thanks everybody for the inspiration.
good luck man! PM me if you have any questions regarding how to get the headlamps open and on painting n such. PM gottabeTRD regarding morimoto install.
also, regarding opening up the clear corners...I don't know if that would be a great idea because your turn signals have a really tiny bulb and I think the reflective housing is super essential to proper illumination. if you paint the inside black, it would really dim turn signal indication. perhaps tinting would be better since the entire turn signal would glow (unified light) instead of just a small emission of light with the single bulb showing if you were to paint the housing. just my two cents
These look great!! I want some now! How much did the total project cost if you don't mind me asking?
thanks man! well this project depends on what you have already. I had to buy OEM toyota clear 99 headlights in order to do this which set me back ~$110. I didn't have an HID kit so I bought one from DDMtunning for ~$50. Then I bought the PnP upgrade kit from TRS for ~$200. So all in all, the retrofit items cost me $360. Add ~$20 for screws/bolts/nuts/paint/reflective tape. So that now totals ~$380.
*However, I have someone who wants to buy my OEM 97 headlights for $150 so if I subtract that from 380...this project will have cost me ~$230 in the end.
**But if you want to get EXACT, the girlfriend bought me the PnP upgrade kit for our approaching five year anniversary so REALLY...this cost me $30 dollars...lol :reddance:

xskydivingdudex
Senior Member
Wow great write up dude... damn i shouldve got in contact with u before i did mine bc mine has slits in the back of the projector so the light bleeds but i guess its not terrible but just not as ideal. Though i dont think im gonna take it apart and fix it..

4-Ripcord
New member
This is such a funny picture, looks like a transformer (hence the transformer logo on the roof rack?)
Great job man! You and GottaBeTRD have such brilliant ideas when it comes to the best retrofits EVER!
GottaBeTRD
New member
thanks Ripcord.
SQ.MD
New member
This is such a funny picture, looks like a transformer (hence the transformer logo on the roof!
Ripcord, you just made my day. I have loved transformers since i was a kid and for you to say the above...lol thanks!!!

3rd gen king
New member
I'm a fellow Houston runner, and I'm wondering if that was a kit? Or did you fab that up? Price?
And you have some sweet pics, I'm in the heights and never see any sick runners but there is a lot of tacos!
But yeah if you could maybe help me out if I have the funds for the retro??
And you have some sweet pics, I'm in the heights and never see any sick runners but there is a lot of tacos!
But yeah if you could maybe help me out if I have the funds for the retro??
Similar threads

- Replies
- 24
- Views
- 17K


- Replies
- 9
- Views
- 2K


