Hella 500 floating front bumper mounts...(install pics)

Oh, I see what you're saying after I scrolled up a bit and saw the design you were referring to. I was talking about the design showed off by 810moto in the original post -- sorry for the confusion.
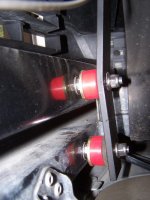
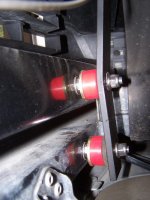
mine works pretty well. just used the poly end link bushings as a dampner and all stainless steel hardware.
 

Attachments

  • daystar light install (14).jpg
    daystar light install (14).jpg
    128.5 KB · Views: 1,315
I think they look really good on top of the bumper as well, but I didn't want to drill holes through the top of the bumper. I also wanted to be able to put them on and take them off easily for road trips. I can put both on, or take both off, within about 5 minutes. Now I just need to get the wiring done where they will be plug and play.:D

Yeah, sometimes drilling bumpers causes further damages especially to the surface of the car. I also agree on placing some wires for them to function. :frog:

--------------------------
Toyota parts
 
I think they look really good on top of the bumper as well, but I didn't want to drill holes through the top of the bumper. I also wanted to be able to put them on and take them off easily for road trips. I can put both on, or take both off, within about 5 minutes. Now I just need to get the wiring done where they will be plug and play.:D

I agree on placing wires in order for it to function. It's true that drilling bumpers is not good. I might cause damage in the future most especially to the car's surface.

---------------
Toyota Parts
 
mine works pretty well. just used the poly end link bushings as a dampner and all stainless steel hardware.

That's very intuitive on the poly bushings..:bravo: I did the similar idea for my lights on the roof rack, used a diff'rent material rubber , though.
 
MOMO , I think the Hella Black Magics would look sick on your t4r. I put them on my second gen , after I painted the bumpers black , they blended in really well.
 
yah , the $120.00 price tag is a bit steep. thank god for income taxes lol

lol......yep, i saw my check for a few minutes, then it was gone......3 year old twins will do that to ya.....lol

This company actually has the templates for our trucks and the Hella 500. Not as good as the Black Magics, but could look pretty cool.

http://www.lamin-x.com/
 
Last edited:
It still needs some work, but I'm pretty happy with them. I have to say they are quite a bit more spotty than I expected. I thought they would be much more of a flood light. I also used a 5" yellow tinted PIAA that I bought a while back. Need to pain the PIAA and clean it up, as well as add some hood stops to the light brackets, but they definitely help. Also, my high beams are HIR bulbs which are MUCH brighter than stock. FYI, use an add-a-fuse instead of splicing a factory wire. I did my install without altering the factory wiring in any way. I could take it out in about 10 minutes.

IMG_0899.jpg~original


IMG_0900.jpg~original


IMG_0901.jpg~original


IMG_0902.jpg~original


IMG_0903.jpg~original


IMG_0904.jpg~original


IMG_0905.jpg~original
 
drill/tap the frame holes for 3/8's. Mounted using grade 8 3/8x1" with flat and lock washers. There is quite a bit of wobble, so I'm going to put a hood stop under the mount on either side and have it lang on the black part of the bumper under the hood.
 
@lonesouth.
you should go to pepboys and get some of those end link bushings(under $20) like i did. it helps with the wobble effect...not 100% but certainly helps dampen the vibrations of steel on steel. I am going to make a piece that goes diagonal between the two bars to stiffen it up a bit more also.

good work.
 

Attachments

  • daystar lite install (6).jpg
    daystar lite install (6).jpg
    128.5 KB · Views: 2,121
thanks for the idea! I'm talking about right under the lip of the hood. I'll drill the bracket and install an adjustable hood stop that will rest on the top of the bumper. Hopefully, that will be enough to stop the wagging.

Right now I have a suction cup under one side and a piece of cooling hose under the other.

f46d9a7c.jpg~original
 
Had mine welded. Mounts cut and creased to not bend under pressure. Labor done by Iron Pig over a year ago. Great Job!
 

Attachments

  • 2011-10-06_16-31-46_275.jpg
    2011-10-06_16-31-46_275.jpg
    145.6 KB · Views: 1,785
Last edited:

Members online

Forum statistics

Threads
278,315
Messages
3,554,104
Members
248,016
Latest member
Advally Service

Trending content

Back
Top