Homemade....Let's see what you've made

I'll join. I'm (almost) a dentist, so I work in millimeters. Trying to cut down on pocket bulk between keys, knife, phone, wallet, and usually a tactical light.
8ca65a425b25f4d84116dd138717a25d.jpg

This is so badass, want to see/ hear more.
 
I think I've posted in this thread before, but here is an update.

Front Bumper Build:
Bandit Runner's 3rd gen front bumper build - YotaTech Forums
6d50d175-44e6-45b6-bfc0-6e7fd13446a5_zpsd586fe34.jpg~original

Front Skid Plate Build:
Bandit Runner's skid plate build - YotaTech Forums
PICT0770.jpg


Rear Bumper Build:
Bandit Runner's 3rd Gen Rear Bumper Build - YotaTech Forums
3006_zps76f67c1d.jpg~original


Sliders (Not built, Just modified):
Customized 4xInnovation Slider Steps - Pics - YotaTech Forums
PICT0181.jpg


Cargo Box Build:
Bandit Runner's Cargo Box - YotaTech Forums
PICT0223.jpg


Snorkel Build:
http://www.toyota-4runner.org/3rd-gen-t4rs/109438-bandit-runners-custom-snorkel-build.html
PICT1990_zps8285c260.jpg~original


Roof Rack Build:
http://www.toyota-4runner.org/3rd-gen-t4rs/125705-bandit-runners-roof-rack-build.html
PICT1945_zps08d83265.jpg~original


Flat Belly Skid Plate:
PICT1576.jpg~original


12 position Switch Panel:
IMG_2693_zps542d0969.jpg~original


Lower Control Arm Skids:
IMG_0276_zps6fde59ea.jpg~original


Tail Light Guards (Not built from scratch, but heavily modified):
PICT1520.jpg~original


Custom Grille:
PICT2109_zps637ca1d5.jpg~original


That's just the big stuff. Many more little things. I'm currently working on a rear diff skid:
skd_1_zps3e3394b2.jpg~original
 
Last edited:
Ack!! Double post. Sorry. Bandit you build some of the coolest stuff. Gotta say it's always fun to watch what you will come up with next.
 
Thanks! I have a couple kind of crappy shots, hopefully it give you an idea what I did.

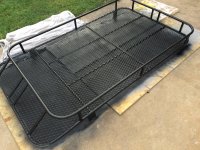
Started by building the frame out of Uni-Strut. (Don't mind the dog)


Getting painted.


Different angle.
I really like the low profile and simplicity. Haven't seen the uni - strut before. How's the strength?

I have a design and hopefully it gets built soon lol but I am going for low profile and full length as well.
 
I really like the low profile and simplicity. Haven't seen the uni - strut before. How's the strength?

I have a design and hopefully it gets built soon lol but I am going for low profile and full length as well.

The uni-strut is very strong. I've had the rack loaded with probably 150 lbs of gear, plus myself standing on it to strap everything down. No issues. The cross members are 3/4" square tube and are notched into the uni-strut and welded. I chose not to run the expanded metal mesh the full length because the front of the rack sits on two 2.5" diameter rubber feet directly on the roof. There is no roof deformity, and I used stainless hardware throughout. I will say though, the uni-strut was a complete pain in the neck to spray inside because of the "C" channel design. I plan on taking it off, sandblasting, and having it powder coated in the spring.
 
The uni-strut is very strong. I've had the rack loaded with probably 150 lbs of gear, plus myself standing on it to strap everything down. No issues. The cross members are 3/4" square tube and are notched into the uni-strut and welded. I chose not to run the expanded metal mesh the full length because the front of the rack sits on two 2.5" diameter rubber feet directly on the roof. There is no roof deformity, and I used stainless hardware throughout. I will say though, the uni-strut was a complete pain in the neck to spray inside because of the "C" channel design. I plan on taking it off, sandblasting, and having it powder coated in the spring.

Cool thanks for the info! I think I might have gone a little overboard on the frame then. Here's what I cooked up so far.

b6cfc58c8f709fad2edf23026f3a1ca3.jpg
 
questions about husband's 4runner

My husband has done so many upgrades to his 2000 4runner including: mud tires, suspension lift, front grill, sidebars, and a few other things I can't think of right now. He wants to build a front bumper and I want to get him the metal to build it for xmas. I need to know how much metal and what kind. I've done a little research on metals and it looks like either steel or aluminum. Any info would be much appreciated! Thanks!
 
My husband has done so many upgrades to his 2000 4runner including: mud tires, suspension lift, front grill, sidebars, and a few other things I can't think of right now. He wants to build a front bumper and I want to get him the metal to build it for xmas. I need to know how much metal and what kind. I've done a little research on metals and it looks like either steel or aluminum. Any info would be much appreciated! Thanks!

Thats fantastic!

So i just made my own recently, I used a 4x4' sheet of A36 steel, it was 3/16" thick. The cost should be somewhere around 100-120 if you pick it up from a steel yard, so do some research and find some yards in your area. Btw i just barely fit 2 4x4' in the back of my 4runner.

Another thing thats really helpful is getting about 15 foamcore sheets from the dollar store, they are 3/16" thick and easy to cut, which makes them great for making mock ups. Also he needs to have at least a 140amp mig welder, an angle grinder with cut off wheels, a grinding wheel, and an 80 grit flap disk. If he can make a computer model that makes it even easier if he decides to get it water jetted or something.

If you have more questions feel free to ask.
 
I was really stumped at first on how, because I couldn't figure out a way, but I ended up using a 3/4 minerallac strap, with a bolt going into the original bolt holes for the cross members. So I can take 6 bolts out and pick it straight up and off the roof.

That was a super idea. If I had tools (bending/riveting) I would steal this idea.
 
That was a super idea. If I had tools (bending/riveting) I would steal this idea.

I just used a 3/4 EMT hand conduit bender for it, and a hand held pop-rivet gun that I got at Lowes/Home-Depot. You could probably get both at Harbor Freight for super cheap and they would work fine. Bending takes some time to get used to and learn, but with some extra pieces and some practice, you could easily do it. There's plenty of videos out there to watch too. I would go for it if you're wanting to do it cheap and don't have the skills or means to weld!
 
Cool thanks for the info! I think I might have gone a little overboard on the frame then. Here's what I cooked up so far.

That looks awesome! Are your mounting feet going to hook into the channel like Thule/Yakima feet, or did you plan on utilizing the stock rails? What are your plans to support the front of the rack against the roof?
 
That looks awesome! Are your mounting feet going to hook into the channel like Thule/Yakima feet, or did you plan on utilizing the stock rails? What are your plans to support the front of the rack against the roof?

So far the plan is to hard mount the entire thing to the stock mounting holes for the rails with a solid rubber isolator (1/8 or so) and then for the front feet I hope to use 3m double sided tape to keep them from rattling or bouncing. After that I am just going to adjust the design as it needs to.
 
How about antenna bezel removal tools for the 3rd gen powered antenna and the 1st gen Tacoma whip style. Yeah I know, you can buy them but why do that when you can get paid to make your own. I wanted the correct tool to do this because the bezels always get scarred up when using pliers.
<a href="https://www.flickr.com/photos/34007886@N03/13235909493" title="Untitled by xcmtb83, on Flickr"><img src="https://farm8.staticflickr.com/7085/13235909493_b04c308f7c_b.jpg" width="1024" height="768" alt="Untitled"></a>


The quad Cadillac horn mount.
<a href="https://www.flickr.com/photos/34007886@N03/7786118484" title="20120814_194132 by xcmtb83, on Flickr"><img src="https://farm9.staticflickr.com/8431/7786118484_b5ed5b18e3_b.jpg" width="1024" height="768" alt="20120814_194132"></a>


A 3rd Gen bearing removal too for the press. It utilizes the studs on the hub body and the buts that hold the hub to the axle housing.
<a href="https://www.flickr.com/photos/34007886@N03/8263738298" title="Untitled by xcmtb83, on Flickr"><img src="https://farm9.staticflickr.com/8339/8263738298_34a4236cdd_b.jpg" width="768" height="1024" alt="Untitled"></a>

<a href="https://www.flickr.com/photos/34007886@N03/8262669557" title="Untitled by xcmtb83, on Flickr"><img src="https://farm9.staticflickr.com/8351/8262669557_c16f3506b9_b.jpg" width="1024" height="768" alt="Untitled"></a>

<a href="https://www.flickr.com/photos/34007886@N03/8262668755" title="Untitled by xcmtb83, on Flickr"><img src="https://farm9.staticflickr.com/8202/8262668755_577777a282_b.jpg" width="1024" height="768" alt="Untitled"></a>


Headrest storage solution for those of us in the '96-'98 years.
<a href="https://www.flickr.com/photos/34007886@N03/10813769074" title="Untitled by xcmtb83, on Flickr"><img src="https://farm6.staticflickr.com/5527/10813769074_a55fefbb6a_b.jpg" width="1024" height="768" alt="Untitled"></a>

<a href="https://www.flickr.com/photos/34007886@N03/10872709735" title="Untitled by xcmtb83, on Flickr"><img src="https://farm3.staticflickr.com/2846/10872709735_5bed006b14_b.jpg" width="768" height="1024" alt="Untitled"></a>
 
xcmtb83, those headrest mounts are great!!! I have a '99, but somehow missed out on the addition that Toyota added to the second half of the generation to hold them to the back of the second row seats. Can you show how you made them? Also, have you tried painting the metal posts to match the leather?
 
xcmtb83, those headrest mounts are great!!! I have a '99, but somehow missed out on the addition that Toyota added to the second half of the generation to hold them to the back of the second row seats. Can you show how you made them? Also, have you tried painting the metal posts to match the leather?

Thanks. I made them on an old turd just like the one below. Columbus brought over the one I used to use. :biggrin1: I shouldn't complain though I don't even have access to a CNC anymore, just manual stuff here in the toolroom. Making those brackets on a manual mill would just be annoying, wouldn't look as nice and would take too long to make any money on them.

Paint would never stick to the shafts nor would it slide in and out very easy.

picture-1.jpg
 
This is a great thread and the pictures are incredible. I'm gonna attempt to build a rear cargo box to organize all my fishing equipment once and for all. I'm pretty good at working in wood and for me that's the best option. In some of those pictures some of the wooden boxes were covered in what looks like grey carpeting. I think it looks pretty good and was wondering where can I get some. Is it some type of marine carpet or something else. How did you put it on, glue staples other. I wish I could build the other stuff, but outta my league. Thanks again
 
Lowes or home depot for carpet. Just regular short pile (or whatever it is called). It's cheap. I used carpet glue and staples easy to do.
 
0c1034b408482984bf197a71f35b81a3.jpg


Finished that roof rack

Working on some tow shackle mounts now. Should have them done. Then after that the two next builds will be disc brake mounts and a compressor mount. That should keep me busy for most of the summer lol.
 

Members online

Forum statistics

Threads
278,316
Messages
3,554,123
Members
248,016
Latest member
Advally Service

Trending content

Back
Top