How to install new CV Axles

I didn't go and use a heavy hammer to pop it in w/o reading up on the process first.

Not quite sure if this means you didn't use a heavy hammer at all, or if you waited until you read up on the process before you used it. At any rate, it takes a good bit of persuasion to get the axle out, and you need to plan on the same amount to get the new one in and seated.

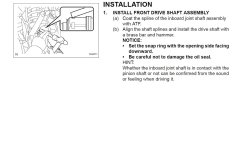
I think the C-clip opening should be down. I believe the theory is that the c-clip will settle to the bottom of the groove, and stick out more at the bottom than at the top. With the notch at the bottom, there's less material impeding insertion of the shaft.

It should go in either way, however. Obviously, during removal of a CV shaft, there's no way to see whether the C-clip is turned just right, and the shaft still comes out given enough effort.
 
I always use a dead blow or a block of wood and BFH to give it a couple thunks. Slides right in.

Sent from the drivers seat of my 05 4runner.
 
Not quite sure if this means you didn't use a heavy hammer at all, or if you waited until you read up on the process before you used it. At any rate, it takes a good bit of persuasion to get the axle out, and you need to plan on the same amount to get the new one in and seated.

I think the C-clip opening should be down. I believe the theory is that the c-clip will settle to the bottom of the groove, and stick out more at the bottom than at the top. With the notch at the bottom, there's less material impeding insertion of the shaft.

It should go in either way, however. Obviously, during removal of a CV shaft, there's no way to see whether the C-clip is turned just right, and the shaft still comes out given enough effort.

I always use a dead blow or a block of wood and BFH to give it a couple thunks. Slides right in.

Sent from the drivers seat of my 05 4runner.

Thank you gents, I'll do so as instructed. I'm still at work and gathering intel. It's funny how the previous axle had to problem going in but this one is being a bugger!!
 
Thank you Setty and everyone who contributed to this thread.

Now, my question:

How much convincing did it take you to get the replacement axles in?

I swapped mine out this weekend and the passenger side was a nightmare.

Driver side went in fairly easy. With a whack, C-clip facing up for those wondering, but the passenger side took a while. I finally got it seated and hammered it home with a 4lb hammer.

Thanks again guys.
 
4 lb hammer sounds about right. I used a 3 lb hammer and a brass rod against the machined notches in the inner axle housing. Took about 3-4 good whacks. You can feel and hear when it seats.

A 16oz carpenter's hammer probably won't get it done - there's too much mass to move for a light hammer to be effective.
 
Just replaced a passenger cv shaft yesterday. One good pop to remove it. Lined up the new CV for a straight shot. A few good whacks on the cv nut area with a rubber mallet sent it home.


Sent from my iPhone using Tapatalk
 
Just replaced a passenger cv shaft yesterday. One good pop to remove it. Lined up the new CV for a straight shot. A few good whacks on the cv nut area with a rubber mallet sent it home.


Sent from my iPhone using Tapatalk

When you say "CV nut are" are you referring to the end where the axle nut screws on? If so, is there any risk of damage to the joints themselves being forced together like that?
 
I wouldn't feel comfortable hammering on the end of the CV axle that goes into the wheel, for exactly the reason of possibly damaging the joints. The FSM calls for driving it in (and out for removal) with a slide hammer with a special attachment that fits in the machined grooves in the inner housing that sits next to the diff. That keeps all forces from being transmitted through the joints.
 
i found the best way to remove the inner cv from the diff (without a slide hammer) is to take a chisel to one of the notches on the inner cup. Try to hit directly outward and it will pop out nice and clean. also be sure to replace diff seals while you got it all apart.
 
When you say "CV nut are" are you referring to the end where the axle nut screws on? If so, is there any risk of damage to the joints themselves being forced together like that?


Yes where the cv nut threads on. It doesn't take a lot of force to get the cv in.

I wouldn't feel comfortable hammering on the end of the CV axle that goes into the wheel, for exactly the reason of possibly damaging the joints. The FSM calls for driving it in (and out for removal) with a slide hammer with a special attachment that fits in the machined grooves in the inner housing that sits next to the diff. That keeps all forces from being transmitted through the joints.


Rubber mallet isn't going to cause any damage. Light taps will get the axle in.


Sent from my iPhone using Tapatalk
 
Rubber mallet isn't going to cause any damage. Light taps will get the axle in.

My experience is that it takes a lot more than "light taps" from a rubber mallet to get the c-clip to pop in and seat fully. Might depend on how your c-clip is feeling on that day, but I'd be a bit worried about retention if the axle goes in that easily.

Me, I'll stick to applying impact forces to the FSM recommended spots, which are the machined grooves on the inner housing.

From the FSM...
 

Attachments

  • CVinstall.jpg
    CVinstall.jpg
    103 KB · Views: 824
Thank you Setty and everyone who contributed to this thread.

...C-clip facing up for those wondering...

Maybe we're saying the same thing a different way, but this might be your issue. The opening in the C-clip should be on the bottom of the axle. This lets the meat of the "C" stay tighter to the axle due to gravity pulling it down in the groove. The smaller profile of the C-clip in turn means less resistance going in.

#2, did you lube the splines before inserting into the diff per the FSM?

For me, it was just a couple of light taps using a pry bar on the inner housing notches as shown in the FSM.

-Brent
 
My experience is that it takes a lot more than "light taps" from a rubber mallet to get the c-clip to pop in and seat fully. Might depend on how your c-clip is feeling on that day, but I'd be a bit worried about retention if the axle goes in that easily.


Me, I'll stick to applying impact forces to the FSM recommended spots, which are the machined grooves on the inner housing.


From the FSM...


I can agree to that. I was going with the rubber mallet first, second option was a long chisel on the notches but did not have to do that.


Sent from my iPhone using Tapatalk
 
I'm doing same thing to, my seals seem to be deeper then flush, but maybe the got moved when I pulled axle? is there a danger of putting them in to deep or to shallow? or will they pretty much settle where they need to?
 
I'm doing same thing to, my seals seem to be deeper then flush, but maybe the got moved when I pulled axle? is there a danger of putting them in to deep or to shallow? or will they pretty much settle where they need to?


what seal are you asking about ?


Sent from my iPhone using Tapatalk
 
what seal are you asking about ?


Sent from my iPhone using Tapatalk
passenger side diff seal, also guy at autozone said I would never be able to get wheel nut torqued properly even with a torque wrench and I should pay a shop to do it...sounds crazy to me if u use a torque wrench...which I will should be fine... do I need thread lock on the wheel nut, connects bearings to cv axle?
 
My experience is that it takes a lot more than "light taps" from a rubber mallet to get the c-clip to pop in and seat fully. Might depend on how your c-clip is feeling on that day, but I'd be a bit worried about retention if the axle goes in that easily.

Me, I'll stick to applying impact forces to the FSM recommended spots, which are the machined grooves on the inner housing.

From the FSM...
yeah I had to hit the heck outta mine to get it in, I just put it back in to wheel hub so it would be stable then hit it in....
 
Here it goes. This is my first write up and unfortunately I don't have any pics and Don't want to do it again anytime soon. From me having to do it 5 times in the last 2 weeks I hope this will help those so you don't have my problems...

Tools
1 21mm socket
1 19mm socket
1 17mm socket
1 35mm socket
1 10mm hex head socket
BFH (big effing hammer)
Also a rubber mallet is a plus...or just hit the old axle with the big one as it's coming out anyways.
1 short prybar (12 inches)
1 long prybar (36 inches)
little screwdriver and little hammer to pop off the dust cover

Materials
1 new/remanned axle
1 cotter pin
1.5 quarts of gear lube 80/90 or 75/90


Removal

1. Jack up the truck, take off the tire.
2. Take off the two 19mm bolts under the bottom of the rotor that attach it to the control arm.
3. Take off the sway bar endlink from the knuckle 17mm nut.
4. Get a screw driver and pound it in to pop off the outside black dust cover. (be gentle and patient don't deform it just go slow and work your way around the cover.)
5. Take out the cotter pin that hold on the little thingy around the big hub nut.
6. Take a 35mm socket to the hub nut. (I used an air impact and it came right off....good luck with a big bar ;)
7. Take a rubber mallet and hit the center threads of the old axle to loosen it from the hub...make sure it starts moving a bit. A few good whacks should loosen it up.
8. Have a buddy swing out the rotor a bit while you push the threads through the hub (possibly some light taps with the hammer to get it through) Also, DON'T pry on the inside of the hub...could screw up some bearings.
9. Now you got the outside out...use a slide hammer (who has one of those?) Or a pry bar and a huge hammer...HUGE being the keyword. I used a 10 lb sledge. But just light swings on it. The weight is the key. You can't wind up anyways...just some light/medium taps with the huge hammer and it should start coming out. Keep the taps coming until you can wiggle it... (good to have a buddy on the other end supporting the axle some.)
10. Get a bucket, the gear oil will start dripping out (smells worse than death)

Install

1. lube up the new axle with grease. Make sure C-clip opening is facing up.
2. Set it in place and push it in as far as you can with your hands.
3. Get a really big pry bar (~36 inches) and thread it in there to get on the lip of the axle.
4. Use said HUGE hammer...and some gentle taps and it will go in.
5. Move the rotor out a bit and thread in the other end into the hub (easy)
6. Put the hub nut back on. along with the sway bar nut and the bottom control arm bolt and voila all done. and the tire...

BTW refill with oil using 10mm hex socket

The reason I did it 5 times is because my seals were leaking oil like crazy afterwards so after getting it all together I've had to redo each side seal (PITA).

The Side seals are Toyota part number
90311-47013 for the PASSENGER side
and I believe 90311-47012 for the DRIVER side...still waiting to get the right one. (WHY oh WHY are they different sizes???)

The 12 is smaller than the 13.

~10 bucks for the 47012 and 18 bucks for the 47013

I recommend replacing these seals too while you're at it so you don't have to do it again like me.

Just use your little pry bar and pry them out of the end (be mean to it). To install just set them in flush with the outside...and let the axle push it back in when you hammer it in. That way you don't have to deal with more leaking.


Notes: You don't need to take sensors or upper ball joint or hub or anything else out. This is literally 2 bolts and 2 nuts...that's it. Trust me i've done it like 5 times now and with air tools I can get it out and back in in about 45 minutes...Before I figured out the HUGE hammer with light/medium taps I spent an hour and a half trying to get the new axle in and out. but just go BIG on the hammer and light on the hits and you're golden.

I haven't seen any good CV axle right-ups on this forum seen a taco one and an FJ writeup but they took way more off than needed. Hope this helps everyone and if anyone is doing this and wants to add pics...much appreciated.

thnx so much, autozone axles come with dust cover btw...so far axles r on and no leaks yet, just gonna drain diff n change it now , finish buttoning up before I test drive it, hoping a leak would show itself already....
 
Mucho thanks for writing this up!

I have a few noob questions, hopefully you wonderful people can help me sort out,

1) what kind of grease is ok to use on splines? Can I use the pink mobilone that goes I. The drive shaft zork?
2) how much gear oil should I be expecting to come out? Will one quart be enough to replenish?

EDIT: my bad guys, the gear oil question popped in my head as I was searching thru the pages and forgot it was mentioned in the initial post ��
 
Last edited:

Members online

Forum statistics

Threads
278,316
Messages
3,554,113
Members
248,016
Latest member
Advally Service

Trending content

Back
Top