I need some help with fridge install and wiring

Agent_Outside

New member
I have multiple specific questions I'm hoping to get answered.

I'm going to run a Dometic fridge, either a CFX35W or a CFX45W. They both have the same footprint the 45 is just a couple inches taller. I'm not sure which one to go with. I want to keep the stock privacy cover in the rear cargo area and I want the fridge on the right side.

Does anyone have either of these fridges?

Looking at specs and taking some measurements the 45 will barely clear the privacy cover but it won't clear the roller mechanism at the back of it where it retracts into. With measuring tape its to close to determine if it will fit in front of the retracting roller and still clear the hatch when closing. I'd need to test fit it before being comfortable with making that purchase. I'm hoping someone has tried the setup.

The 35 WILL fit but my concern is the ability to open the lid or if it will hit the roller and not let it open far enough to be useful, so I'm considering the slide system. How much does the Dometic slide add to the overall height of a mounted cooler? Also, how are you guys mounting the slide without buying a Goose Gear platform or anything like that? If the slide makes it to high and it won't fit the privacy cover, then I might as well do the 45 anyway.

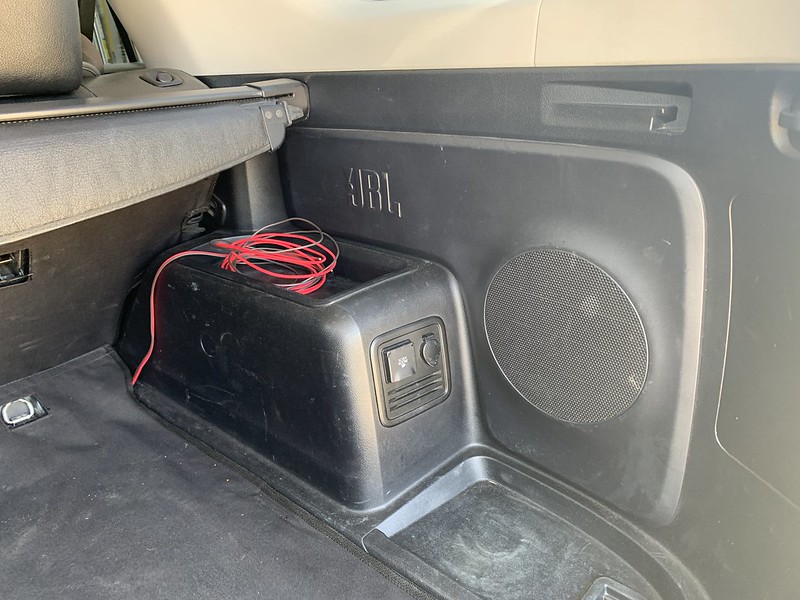
The last question is where are you guys with the JBL sub in the right rear corner running your power hook up? Also are you guys cutting the 12v plug off and putting a real more secure connection or just wiring a 12v socket and plugging it in?

I have the electrical system all sorted out and done and I ran my power wire to the back, it's just a matter of where to go from here.

48633490543_4759b7b5e5_c.jpg
 
Register to hide this ad
FYI,

my CF shut off when it was right next to the side of the wheel well. No air circulation. I ended up turning it so it would be against the hatch and no issues. Maybe the cfx will be better. But also keep in mind it was 90 outside and i was trying to drive the fridge to 16.
 
FYI,

my CF shut off when it was right next to the side of the wheel well. No air circulation. I ended up turning it so it would be against the hatch and no issues. Maybe the cfx will be better. But also keep in mind it was 90 outside and i was trying to drive the fridge to 16.

m not sure about the CF but on the CFX the compressor and all the vents are in the front. Idealy I want it as far back the hatch as possible (as in towards the rear of vehicle by the tailgate) which should give it plenty of room to breath and I can still stuff crap behind it.
 
I don't have the 35 or 40 (they dont make a cfx45) but the dometic slide will add about an inch to the height of the overall dimensions. If the added height wont clear the privacy cover then I would skip the 35/40 and go straight to the 50. The hatch opening of the 50 is better as it opens width-wise instead of length-wise and this would allow you to open the fridge lid without sliding the fridge out all the time. I have my 65 on a dometic slide mounted on the goosegear plate but it seems like our favorite guy, aiden james, makes a cheaper version of the plate system - AJC 5th Gen 4Runner Gear Plate – Aiden James Customs. Or you can make your own with plywood.
 
Last edited:
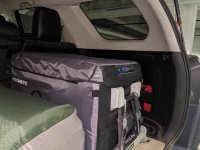
I'll try to help if I can here. I have the Dometic CFX35 and the slide. It's mounted on a 3/4" plywood base. I don't have the privacy cover but hopefully I can give some perspective. The slide elevates the height of the fridge by about 1". Even with my fridge jacket it looks like you have about an inch clearance from the fridge to the rear most attachment point of the privacy cover. It looks like it will hit the roller aspect. I definitely think you'll need the slide and to be honest that will make it much easier to use. Sometimes I will occasionally open the fridge without sliding if something is up high or closer to me but anything that is further back or deeper you will want the slide unless you want to hop into the cargo area. With the slide you could keep your privacy cover on and still use the fridge without having to roll the privacy cover back and forth.

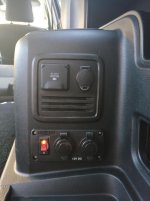
I have mine hooked up with the 12V cigarette with a Blue Sea Accessory panel. No issues with security so far and I've taken it on rocky roads and bombed down corrugated washes as well. It's pretty secure. Although eventually one of these days will likely switch to an anderson plug for reasons you mentioned above.

Sorry for the poor pictures. Just took them in my not well lit work parking garage.
 

Attachments

  • IMG_20190828_101732-1024x768.jpg
    IMG_20190828_101732-1024x768.jpg
    112 KB · Views: 2,593
  • IMG_20170910_183803-1740x2320.jpg
    IMG_20170910_183803-1740x2320.jpg
    136.8 KB · Views: 2,390
Last edited:
i have the CFX 40, it's a good size and I could definitely go smaller for just myself but when I'm camping with the wife I'm not sure I would want anything smaller.

I just used a $5 locking marine plug and put it under the factory location
BTyx5py.jpg


For privacy I just throw an old black sheet over whatever I have in the back, even with the stock tint you can't tell there is anything back there if you look in the window. I originally made a fancy cover that had rivet loops and attached to the rear headrests and hooked to the rear tie downs but eventually it just got replaced with about half of a twin black sheet haphazardly thrown over whatever i'm carrying in the back. I lived downtown with onstreet parking in a neighborhood where car breakins were a daily occurance and never had an issue.
3JqCNhg.jpg
 
I'll try to help if I can here. I have the Dometic CFX35 and the slide. It's mounted on a 3/4" plywood base. I don't have the privacy cover but hopefully I can give some perspective. The slide elevates the height of the fridge by about 1". Even with my fridge jacket it looks like you have about an inch clearance from the fridge to the rear most attachment point of the privacy cover. It looks like it will hit the roller aspect. I definitely think you'll need the slide and to be honest that will make it much easier to use. Sometimes I will occasionally open the fridge without sliding if something is up high or closer to me but anything that is further back or deeper you will want the slide unless you want to hop into the cargo area. With the slide you could keep your privacy cover on and still use the fridge without having to roll the privacy cover back and forth.

I have mine hooked up with the 12V cigarette with a Blue Sea Accessory panel. No issues with security so far and I've taken it on rocky roads and bombed down corrugated washes as well. It's pretty secure. Although eventually one of these days will likely switch to an anderson plug for reasons you mentioned above.

Sorry for the poor pictures. Just took them in my not well lit work parking garage.


That looks like it would be just about right for what I’m looking for. Do you ever realistically feel like that fridge is to small? What did you do with the extra cable to ensure it doesn’t get punched in the slide?
 
SN_85, very clean set up. Where id you get the accessory panel that you mounted the outlets to? Did you run something like a 10ga hot wire straight from the battery?
 
That looks like it would be just about right for what I’m looking for. Do you ever realistically feel like that fridge is to small? What did you do with the extra cable to ensure it doesn’t get punched in the slide?

It's actually just about right. So it's usually just me and my gf and we might do 2-3 days at a time. We typically have some food left over in the fridge. When it's only me then it's quite a bit of space. Also a lot of things like drinks can be stored warm and then added to the fridge later when you plan to drink it that day and as when more space clears up. I could see a scenario if you have kids or are out for an extended period amount of time that space becomes an issue. The key thing is to organize well. I keep things either vacuum sealed or in a tupperware to save space.

So I have about an inch between the slide and the sidewall trim. The Dometic fridge 12v plug cable is actually quite long so even when it's fully extended out I still have plenty of slack. It hasn't been pinched yet. I did have that problem when I had my Indel B fridge and tembo tusk slide. It would get pinched and I'd have to be careful about how I slide it out.

SN_85, very clean set up. Where id you get the accessory panel that you mounted the outlets to? Did you run something like a 10ga hot wire straight from the battery?

It's the Blue Sea Below Deck panel. So I have an aux battery in the engine bay and a Blue Sea Blade Fuse Block as well. Aux Battery --> Blue Sea Blade Fuse panel --> 10ga wire through the fire wall --> under the kick panel --> then under the wheel well trim. If you pop open the OEM 12V and AC panel (just a few tabs) you can gain enough access underneath the wheel well tray to use a stubby phillips head and loosen it. That way you don't rip up and destroy the tray if you don't want to. That will gain you enough access to route the cable underneath with a coat hanger.

You can get them on Amazon but I had ordered mine when I did my dual battery setup from Off-Grid Engineering.

https://www.amazon.com/Below-Deck-C...cessory+panel&qid=1567021520&s=gateway&sr=8-1

https://www.amazon.com/Blue-Sea-Sys...cessory+panel&qid=1567021520&s=gateway&sr=8-9

Blue Sea/ OGE Auxiliary Power Outlet System – Off-Grid Engineering
 
I pulled up the rear floor and carpet and made my own “plate” with 3/4” irch ply and then painted it with bedliner. For power, I used the ARB install kit. If you alreAdy ran wire you could skip the kit and buy just the ARB receptacle. It works with my dometic cfx50 cord and is threaded to ensure it will not unplug due to vibration. I mounted the receptacle near the front of the wheel well leaving room to clear the fridge/slide and rear of rear seat. This is on the passenger side. I run an odessey 34R with the hkb diode and carry a lithium jump pack for back up.

Im sure you are aware, but for the sake of someone just researching this.... the fridge has several settings to force it to shut off at certain voltages to prevent totally draining the battery. This is especially important on a single battery set up like mine. This prevents you being stranded. For this reason you should not use the factory wiring by converting the rear outlet to “always on”. The wiring is too small to carry full voltage at that length and your fridge will cut off prematurely. I ran 2awg to a distribution block under the drivers seat for audio gear and tapped into that for the fridge wiring. Ill be tieing in there again soon to install a HAM radio.
 
I pulled up the rear floor and carpet and made my own “plate” with 3/4” irch ply and then painted it with bedliner. For power, I used the ARB install kit. If you alreAdy ran wire you could skip the kit and buy just the ARB receptacle. It works with my dometic cfx50 cord and is threaded to ensure it will not unplug due to vibration. I mounted the receptacle near the front of the wheel well leaving room to clear the fridge/slide and rear of rear seat. This is on the passenger side. I run an odessey 34R with the hkb diode and carry a lithium jump pack for back up.

Im sure you are aware, but for the sake of someone just researching this.... the fridge has several settings to force it to shut off at certain voltages to prevent totally draining the battery. This is especially important on a single battery set up like mine. This prevents you being stranded. For this reason you should not use the factory wiring by converting the rear outlet to “always on”. The wiring is too small to carry full voltage at that length and your fridge will cut off prematurely. I ran 2awg to a distribution block under the drivers seat for audio gear and tapped into that for the fridge wiring. Ill be tieing in there again soon to install a HAM radio.

I have my whole electrical system sorted out at this point. My objective was to design and build a dual battery system that is permanently isolated from the starter battery, charged by solar, DC-DC charger, or an AC shore power hook up, protected by a low voltage disconnect and supplies power to a custom power distribution module which operates any and all non-OEM electrical components, most of which are controlled by a custom switch panel in the dash. Plus I wanted to make and incorporate a plug and play roof top tent electrical box that will provide a tent power outlet, red tent interior lights (red doesn’t attract bugs), white tent interior lights, and controls for the roof rack mounted exterior camping lights.

I started with planning the project. I researched everything, the individual components, amperage requirements, amperage limits of the connectors, waterproofing ratings, quality, durability, compatibility, bang for your buck value, expected life, etc, etc, etc. I wanted to determine what pieces would best fit my intended use. From there I made a wiring diagram.
47990708091_829c4903f5_c.jpg


This was basically my blueprint to get all the ideas in my head on paper. I wanted to confirm everything I was planing was plausible and will work the way I had envisioned. When I was satisfied in the layout and everything in theory should be functional I used it as a reference while I built it all out. I wanted to do a nice clean installation once, the first time and a good diagram was a key factor in that. Plus it’s nice to be able to troubleshoot with ease down the line if ever necessary. I got everything listed out - connectors, which wire goes to which terminal, what the wires are for, what color wiring each system uses, relay pin designations, the parts and pieces I’m going to use for assembly, the weakest link in each circuit in terms of amperage limitations so I could fuse each thing safely and appropriately. I’ve never been a fan of popping a hood and seeing a rats nest disaster of wires, attention to detail has always been important to me.

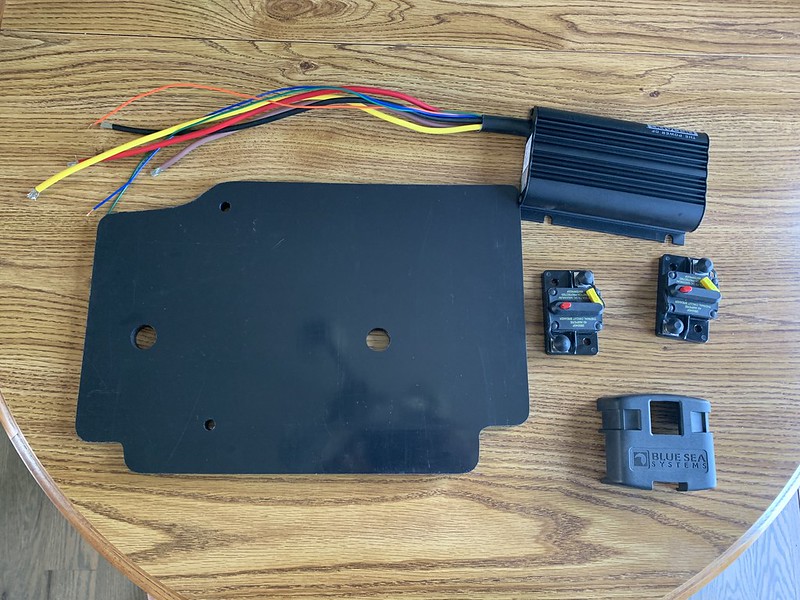
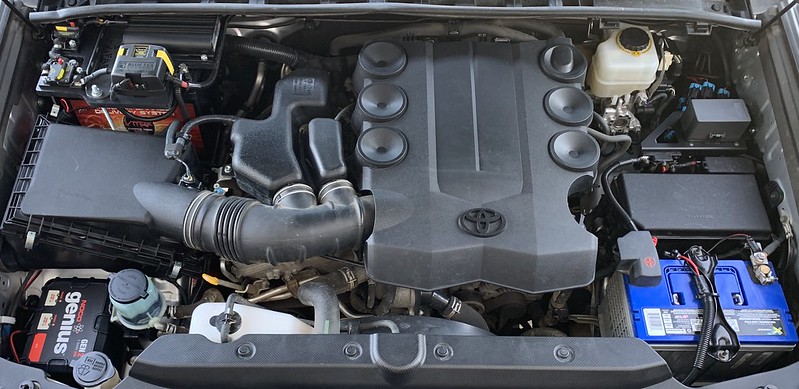
For the dual battery setup there's a power wire from the positive terminal of an X2 Power (rebranded Northstar for Batteries Plus) BCI Group 24F 76ah AGM dual purpose deep cycle starter battery to a Blue Sea 40 amp circuit breaker. From the circuit breaker, the power wire runs to the red battery input wire on the RedArc DC-DC 12 volt 25 amp dual input (DC and solar) charger. The brown power output wire on the RedArc goes to another BlueSea 40 amp circuit breaker. From the circuit breaker, a power wire goes to the positive terminal of the Vmax Charge Tanks BCI Group 24 SLR85 85ah deep cycle accessory battery mounted in a C4 Fabrication passenger side firewall battery tray. A power wire from the accessory battery goes to a BlueSea 80 amp circuit breaker. From the circuit breaker, a power wire runs to a BlueSea low voltage disconnect. From the low voltage disconnect, a power wire runs to the positive terminal on the power distribution module. The power distribution module ground wire connects to the negative terminal of the starter battery. The accessory battery negative terminal has a cable to chassis ground and a wire to the ground the low voltage disconnect. The blue wire from the RedArc goes to an ignition on reference under the dash. The orange (charge profile) and green (remote indicator led) wires from the RedArc are not being utilized in my application and are terminated and weather sealed. The yellow wire off the RedArc is capped and weather sealed, it will be used as the solar input at a later date.
48311770027_afaf7eb1ca_c.jpg


48311657511_fc6206a155_c.jpg


48311608861_50634e41e7_c.jpg


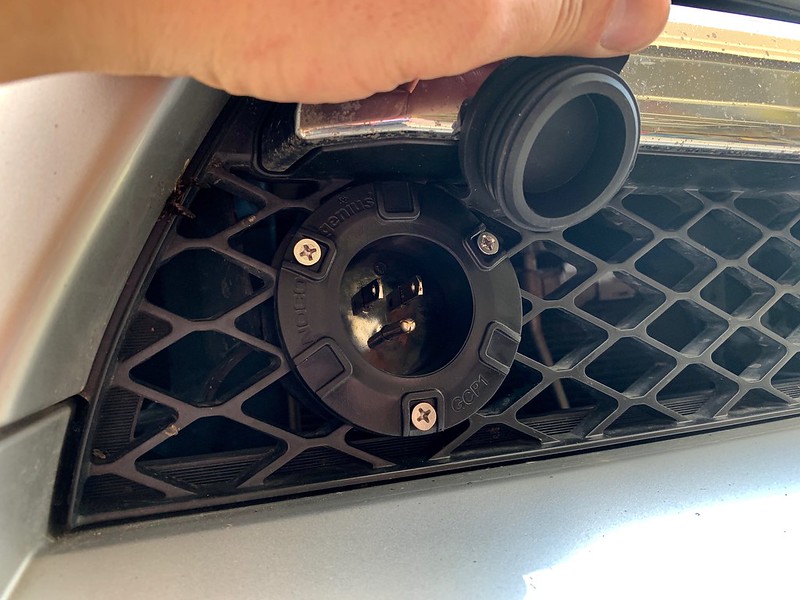
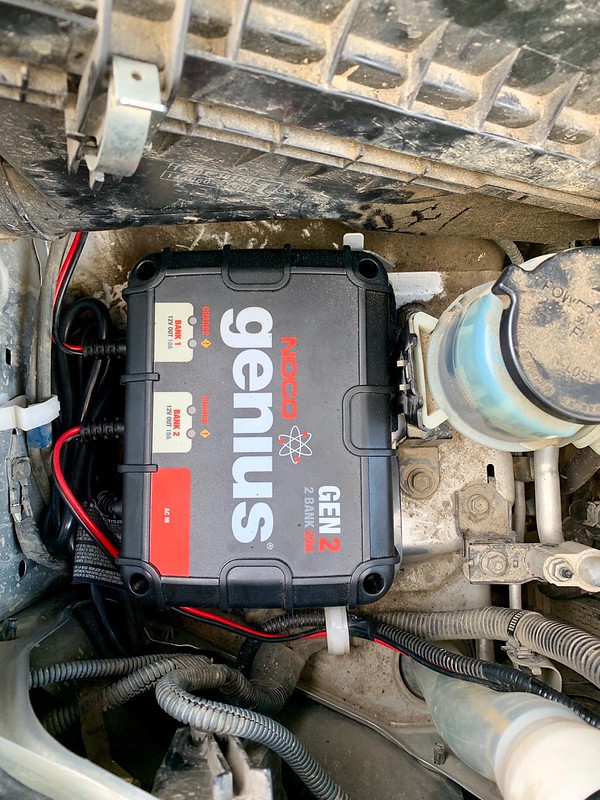
I installed an onboard waterproof NOCO Genius Gen 2 dual bank 20 amp charger. It connects to both of the batteries and when plugged into shore power (normal house AC outlet in the front grill) it will smart charge and maintain each battery individually while supplying up to 10 amps per battery as needed. I can ensure the batteries are topped up before leaving on a trip and if we're at a campground or something with an electrical hookup I can run everything in the truck by plugging it into an extension cord. I made the mounting plate out of half inch thick HDPE for most of the components to sit on top of the accessory battery, and I cut up the modified the hold down to clear wiring laid out in the positions I wanted them. I made a second mounting bracket for the onboard AC charger behind the passenger headlight.
48368011972_ec42b7cf82_c.jpg


48368011422_c6b9f96569_c.jpg


For the Power Distribution Module I started with a Bussman 10 circuit power distribution module mounted in a Shrockworks bracket. I modified 2 BlueSea bus bars to fit for ground points on each circuit. There are 5 fused circuits and 5 relayed circuits. I wired it all to be plug and play using Metri-Pack 280 Series, Delphi Weather-Pack, and Molex Mini-Fit Jr connector housings, terminals, and seals depending on the circuit and intended use, and it’s all type TXL Primary Wiring (OEM Specification: Ford M1L-123A, Chrysler MS-8288, SAE J-1128), with marine grade dual wall adhesive lined heat shrink, ISO 280 35 amp micro relays, and ATC blade fuses.
47386437302_d30091d993_c.jpg


46716220724_df5f38d041_c.jpg


33591816318_1cc3bb4751_c.jpg


48633849531_8b60ca3d98_c.jpg


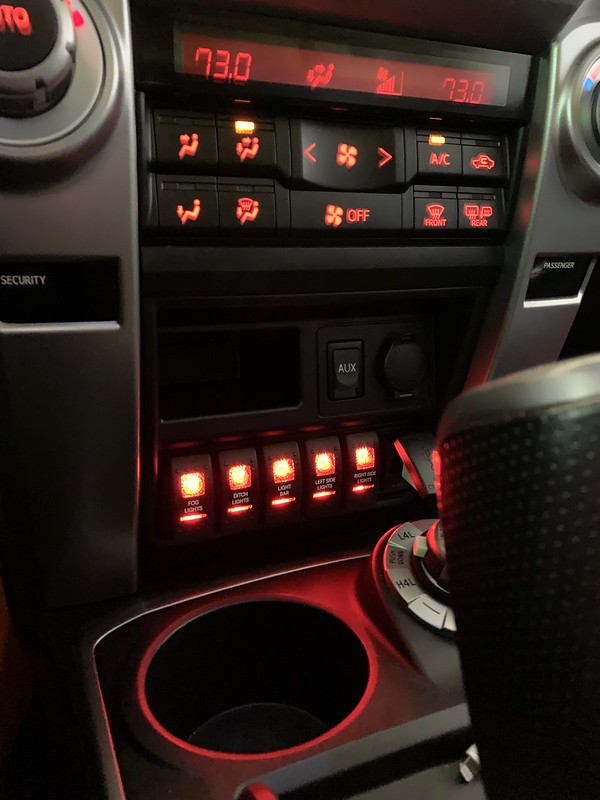
For a Switch Panel I picked up a new OEM dash compartment for a 2014+ (without the door), custom Contura II switches, a Blue Sea 1039 dual USB fast charger, and a blank mounting panel to install them in, and made it all fit. The switch backlighting is a match to the factory dashboard backlighting.
47388994311_97b2c4b4bc_c.jpg


46772570624_20f51a08dd_c.jpg


46903715345_bd327d64de_c.jpg


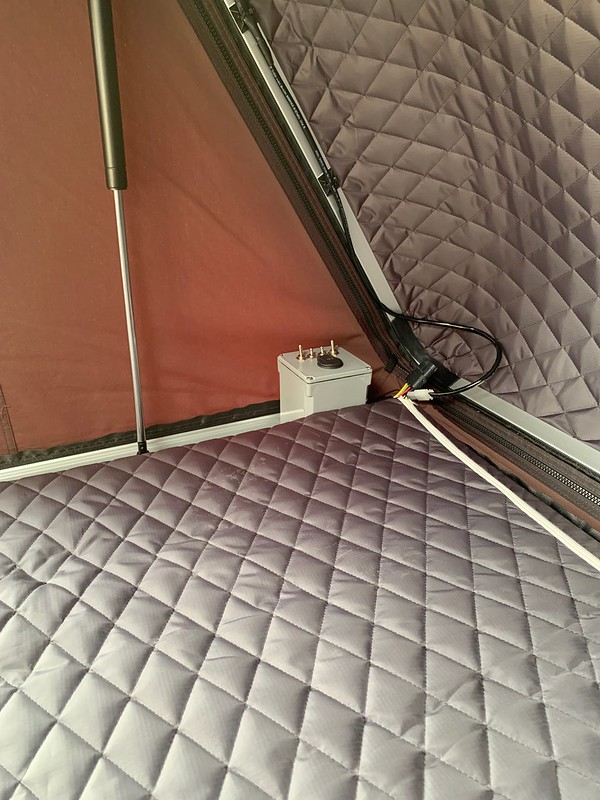
For the roof rack camping lights I wired them with a connector right at the front along the inside edge of the lower portion of the side rails. I can unplug the connection on the passenger side and plug in the roof top tent electrical box inline. With the right side light switch on the dash turned on it provides power and ground to the tent box which contains its own internal fuse box to run a power outlet, the interior lights, and control the exterior lights.
33663149158_f74515ee76_c.jpg


40892507173_5bc722dedf_c.jpg


46953774375_8ce1bc60cf_c.jpg


32922069087_60a95c6ef1_c.jpg


40899603533_c058cde9b3_c.jpg


It's all together, weatherproofed, and fully functional. I performed voltage drops on each connection to verify everything is correct and it performed flawlessly over our first weekend camping trip with everything installed. All of the aftermarket lights and accessories are powered by the second battery with the lone exception of the interior switch panel backlighting so the starter battery is not at any risk of being drawn down. While I ran the ignition reference wire for the RedArc to the interior. The red wire from the original post is ran to the back awaiting a hookup for the fridge. I have 2 more still unused circuits I pulled into the interior that I haven't decided what to do with yet - im thinking maybe a second row power outlet and possibly a small water pump (RV faucet) hook up from running fresh water.

48633489348_d97e3e049f_c.jpg


48633990137_918610f1dd_c.jpg
 
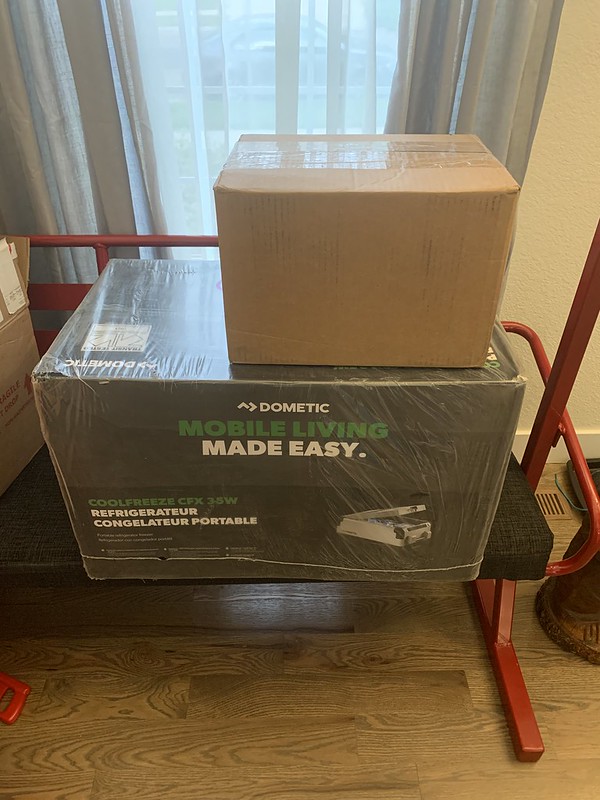
After sn 85's pics and info, I decided to move forward with the CFX35w. I ordered the fridge and insulated cover, and I opted to go with Anderson connects so I have those on order as well.
 
After sn 85's pics and info, I decided to move forward with the CFX35w. I ordered the fridge and insulated cover, and I opted to go with Anderson connects so I have those on order as well.

That is a really clean, functional setup. I searched for the Blue Sea/OGE system with wiring yesterday but could not find one in stock anywhere. Amazon has the belowdeck panel in stock.
 
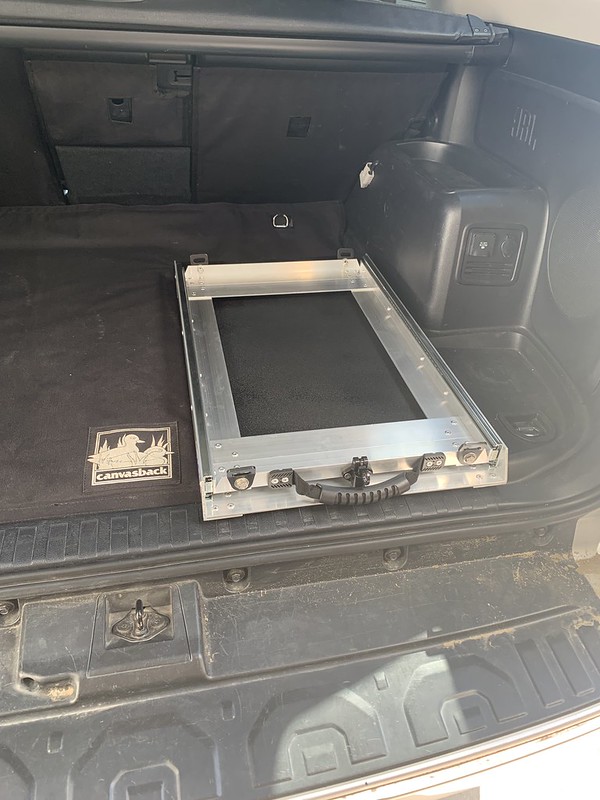
So for a slide I decided to go with DFG Offroad. They make fridge specific sliders that seem to be the lowest profile and being all aluminum they said 13.8 lbs.
 
Last edited:
48683536917_5c54414e4d_z.jpg


48683363256_0b3552989c_c.jpg


Running wiring and planning out a slide mount.
48683363496_54aa0e8752_c.jpg


I only have 3 rivnuts on hands so I had to order more but here's the plan. I made a cut a board out of 1/2" birch plywood and shaped it slightly to fit snug up against the passenger side trim. I'm going to put 2 or 3 rivnuts in that crossbar to mount th front of the board. I verified its open under neight the bod so I'll put 2 or 3 more in the back along with metal spacers. I'll cut out holes in the styrofoam layer for the spacer to pass through. I cut the insulation off the underside of the trunk carpet where the board will sit to reduce the height a little bit. Right now I'm still waiting on the fridge slide to continue, its held up being shipped out of FL because of hurricane Dorian causing problems. Once the board is mounted I'll line up the slide to have it as far forward and the side as I can without anything hitting anything. When the mounting is figured out I'm going to use pronged t nuts inder the board to mount the slide from the top. I'd trim down the board as much as possible then Bedliner the whole board to keep it protected and waterproof. With this setup when I take it out for ski season its 4 quick bolts to remove the side and no other hassle.

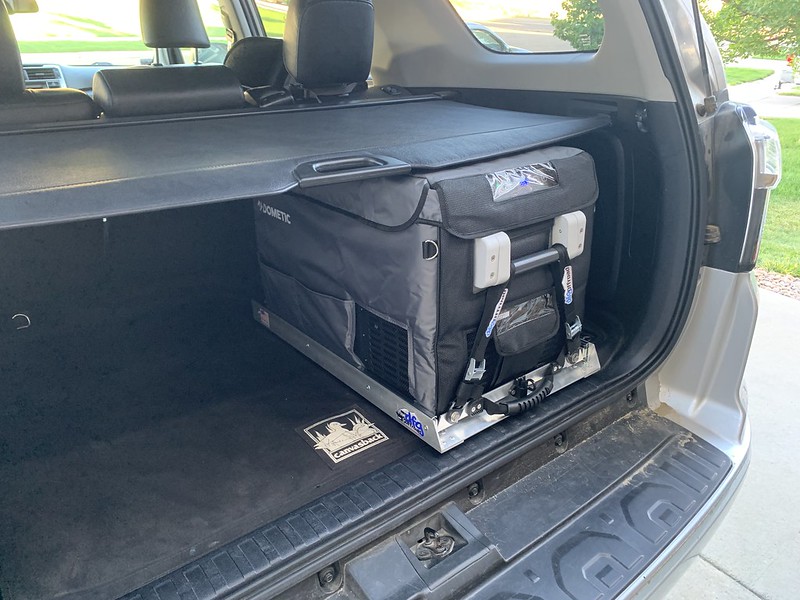
It should right about here, it'll still clear the privacy cover.
48683363526_e7be162d99_c.jpg


I got the wiring almost buttoned up yesterday. Its ran, it's grounded, and I put some temporary terminals on it to just to turn it on so I could verify the wiring. Dometic has a hardware socket kit thats 25 feet of 10 gauge wire, seeing as I'm running one of the smaller fridges and my run of wire is only about 17 feet or so I opted to go with 12 awg. the temporary hook up was to verify the wire is gauged ok to not impede function. As the fridge compressor starts the max voltage drop on startup is right around .28 volts, that'll work fine. 0.0 is ideal but not worth running like 6 or 8 awg. The performance will be just fine, the one potential concern is the battery protection could kick in earlier if it thinks the battery is lower than it is because of a voltage drop. But, I have everything aftermarket running through a low voltage disconnect right at the second battery so I don't need to utilize the fridges internal battery protection.

I realize I didn't take many pictures, I'll try to grab a few more today, especially if I finish up the wiring.
 
Running wiring and planning out a slide mount.

I only have 3 rivnuts on hands so I had to order more but here's the plan. I made a cut a board out of 1/2" birch plywood and shaped it slightly to fit snug up against the passenger side trim. I'm going to put 2 or 3 rivnuts in that crossbar to mount th front of the board. I verified its open under neight the bod so I'll put 2 or 3 more in the back along with metal spacers. I'll cut out holes in the styrofoam layer for the spacer to pass through. I cut the insulation off the underside of the trunk carpet where the board will sit to reduce the height a little bit. Right now I'm still waiting on the fridge slide to continue, its held up being shipped out of FL because of hurricane Dorian causing problems. Once the board is mounted I'll line up the slide to have it as far forward and the side as I can without anything hitting anything. When the mounting is figured out I'm going to use pronged t nuts inder the board to mount the slide from the top. I'd trim down the board as much as possible then Bedliner the whole board to keep it protected and waterproof. With this setup when I take it out for ski season its 4 quick bolts to remove the side and no other hassle.

It should right about here, it'll still clear the privacy cover.
48683363526_e7be162d99_c.jpg


I got the wiring almost buttoned up yesterday. Its ran, it's grounded, and I put some temporary terminals on it to just to turn it on so I could verify the wiring. Dometic has a hardware socket kit thats 25 feet of 10 gauge wire, seeing as I'm running one of the smaller fridges and my run of wire is only about 17 feet or so I opted to go with 12 awg. the temporary hook up was to verify the wire is gauged ok to not impede function. As the fridge compressor starts the max voltage drop on startup is right around .28 volts, that'll work fine. 0.0 is ideal but not worth running like 6 or 8 awg. The performance will be just fine, the one potential concern is the battery protection could kick in earlier if it thinks the battery is lower than it is because of a voltage drop. But, I have everything aftermarket running through a low voltage disconnect right at the second battery so I don't need to utilize the fridges internal battery protection.

I realize I didn't take many pictures, I'll try to grab a few more today, especially if I finish up the wiring.

Fridge seems small for a family of three and a case of beer. Just sayin’.
 
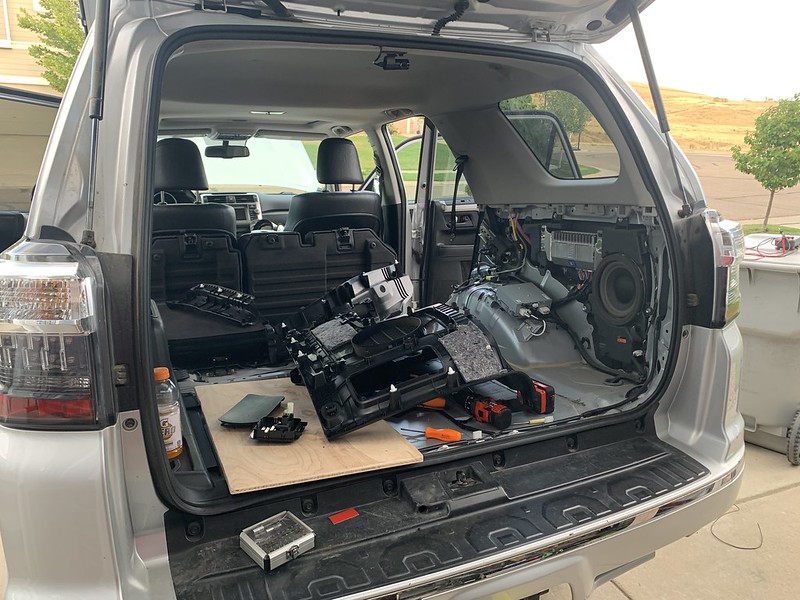
I went out of town for a few days and then got sick. Today I finished up the car side wiring. Still waiting for the slide to move forward from here. It should get delivered Thursday, we’ll see how much I can get done before I go back out of town again.

48712336241_282b9862e6_c.jpg


48712003923_0789fbb1f0_c.jpg


48712337371_136fdd134e_c.jpg
 
I got the fridge install finished.


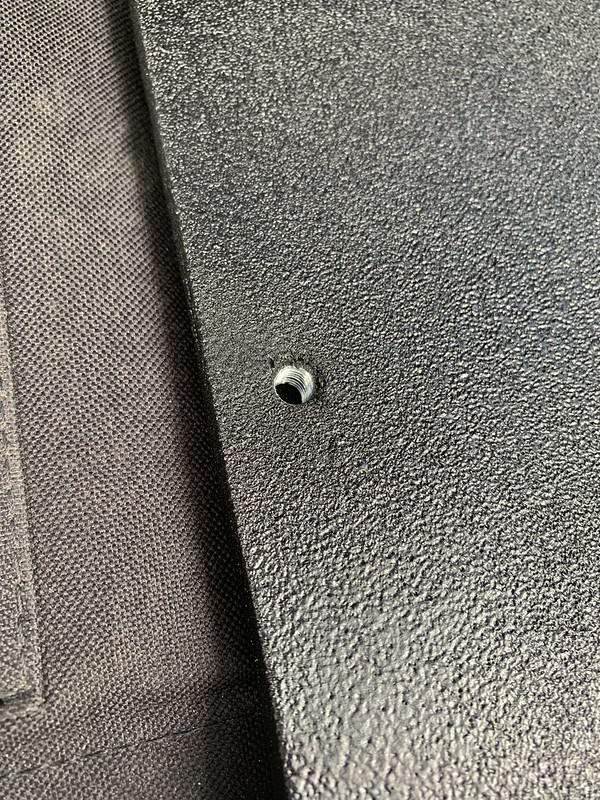
I was kinda planning out the space. I didnt have enough rivnuts on hand so I had to order more but this was the gist of it. I wanted to to do 3 rivnuts along the brace and 2 towards the back with spacers.

48683676788_fe556386a2_c.jpg


Rivnuts installed
48733437761_421cfbcf69_c.jpg


I cut off the insulation from the underside of the carpet where the board would sit to give it a more solid surface on the hard foam under the carpet and bring the overall height down a hair.
48733481067_f7a2d63a1e_c.jpg


I countersunk the 5 holes to mount the board the to the floor of the body so it sits flat and flush and for the side to attached I used pronged t nuts that were glued and hammered in. Then I coated the board with black primer/sealer scuffed it up and hit it with 4 coats of bedliner.
48733438101_fda6460b0c_c.jpg


I cut holes in the thick foam for the spacers to slide in, then I cut small holes in the trunk carpet for the bolts to pass through and I cut out a scetion of the Canvas Back liner so it can just be permantly sandwiched in there and mounted up the board. Its supper solid, it doesnt flex or move.
48733106868_63a76a87b8_c.jpg


From there I bolted up the DFG Offroad slide.
48733617317_53b7185373_c.jpg


48733437606_ffe79a7b13_c.jpg


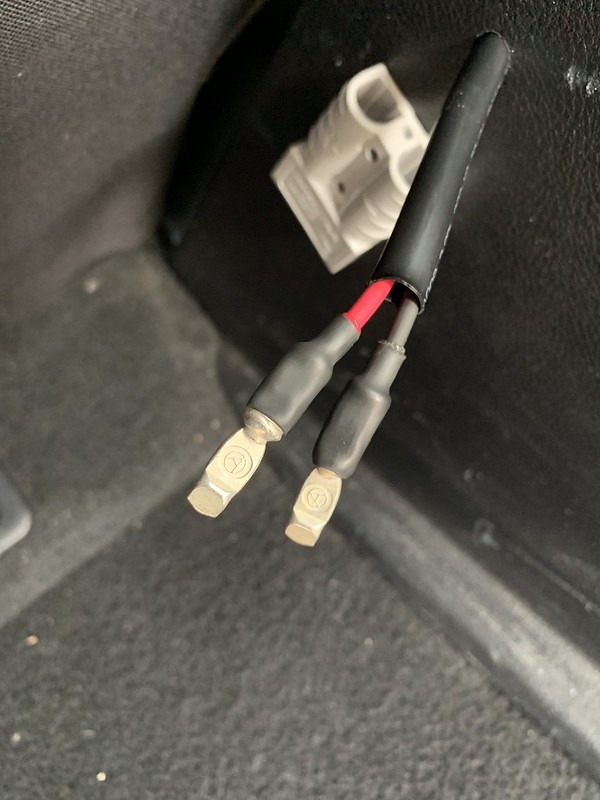
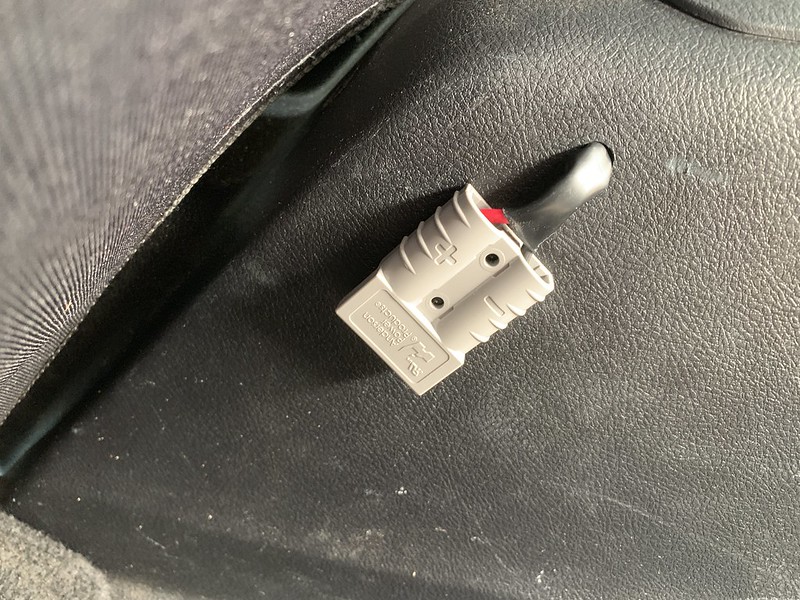
I checked to see how long I'd need the wiring before cutting the 12v plug off and installing an Anderson SB50 connection.
48733480917_669f0ae5d2_c.jpg


When I was planning everything I was measured known dimensions out with a tape measure and made some assumptions about the unknowns and it was going to be to close to tell if it would fit with the privacy cover or not. I'm happy to say it all came together exactly how I had hoped.

You can retract the cover and the fridge can be opened and closed as it sits. With the cover in place, it can be slid right out and opened.

48733480727_f4b0babd9a_c.jpg


48733480767_f6f485a329_c.jpg


YouTube
 

Members online

No members online now.

Forum statistics

Threads
278,316
Messages
3,554,111
Members
248,016
Latest member
Advally Service

Trending content

Back
Top