
Icon lift do it yourself?

I read some great instal write-ups on the fj site... But I still have a billion more questions... I definitely don't want to have a Baggie of spacers and washers left over afterwards not know where there go...

So far I have not seen anyone go into any details on the common sense stuff that most mechanically inclined folks probably already know...

Here is off the top of my head...
Do I lube any of the components besides the UCA ball joint (hope that's the right name).
What does everything get torqued back to? Where to find each torque spec info?
When bolting the long control arm bolt if I can't fit my torque wrench on the nut due to lack of room should I buy/rent a torque wrench that is like a crescent style torque wrench?
Does anything get loctight installed for saftey?

The install shouldn't be too crazy if I can attempt to tackle the front sway bar with a ratchet tow strap to secure it before unbolting as suggested... Seems like that is has been the biggest issue people have had

I know I am over thinking this but very smart people built and engineered my truck I don't want to miss anything that might comprise the safety while driving it to myself or others on the road.

until metal tech delivers my icon stage 2 I have way too much time on my hands...

Did you read this DIY on a stage 2? ICON Vehicle Dynamics (IVD) stage 2 on a 2010 - Toyota FJ Cruiser Forum
It's about the same accept you won't have the sway bar relocate spacers and washers to worry about with the KDSS. It takes 2 people to put the Icon UCA's together and on really.I'm about to get off work now and can answer more of your questions tomorrow.
 
Don't worry about torquing to specific #'s. I only have a big torque wrench that I use for wheel lugs. It never fits anywhere easily so all the fasteners during the suspension install were done by hand feel. Nothing has loosened up, and I don't think anything was over torqued.

You need to lube the UCA bushings, the ball joint is pretty much already filled.

Have anti-seize on hand and put it on most all fasteners during installation.

The control arm bolt was TIGHT. Have a BIG breaker bar to tighten it back up. Harbor Freight has a decent breaker bar that is like 2' plus. Also the UCA ball joint torque number was super high. Basically get a big bar and tighten it as much as you can. I think I lowered the vehicle to put the final tightness on that nut.

Try the racket strap, but also have a pretty darn big punch so you can lever the sway bar back into place. I know you have seen it, but the suspension tools pictures at my shutterfly site is EVERYTHING I used that was left out of the tool box at the end of the day including coveralls, used zip ties and gloves :biggrin2:

Also, I did not have trim removal tools. Used diagonal cutters to pry up the plastic retainers.
 
Last edited:
Harper this is great, it has all the torque specs on the write-up.
Thanks:bravo:
I strongly recommend using a torque wrench and the proper torque for any place there is a bushing,bearing or gasket on any vehicle if at all possible. There are clamping forces involved rather then shear and torque is much more critical to the proper operation with less noise and long life of such. As well as internals of course like engines,tranny's, transfer cases and diffs. On the Rolls Royce jet engines I work on and rebuild here at work ,we torque EVERY bolt and nut without exception.

As you will see the long UCA bolts have to be removed and fed thru from the engine bay. To do this the battery cable bracket has to be taken loose and moved on the Drivers side . On the pass. side the AC hard line has to be move inward from the rubber block that clamps it to get the bolt out. You'll know when you get to it as you think those long bolts won't come out.... they will and where an extra set of hands come in handy.

You can get on the front long UCA nuts with a torque wrench(85 ft/lbs)and deep well socket no problem by taking the brake hard line brackets loose from the frame and moving them out of the way while holding the head of the bolt with a wrench.

The Icon ball joint is hard to torque the top 12 point bolt because you have to hold the ball joint taper from turning.The guy in the DIY used two nuts tightened together but the newer Icons we just installed are different and came with self locking nuts instead of cotter pinned ones. We just ran one of the nuts down and then used the other one to lock them together so we could hold it and torque the 12 point bolt to with red locktite called out. This is a critical torque IMO so the taper bolt top cap and taper can't move.
IMO,Improper torque of that bolt caused this and basically trashed his ball joint and now makes noise.

9c48T.jpg~original

DYBBY.jpg~original


Also the rod ends should be turned out a few turns before install because with them turned in the whole way they hit the spindle and made a mark as we found out.
These rod ends and this one is in the whole way.....loosen the two bolts and turn the collar with 1/4" punch to move it outwards.
iconuca.jpg~original


Good luck and I can pm you my ph.# in case you get stuck.
 
I strongly recommend using a torque wrench and the proper torque for any place there is a bushing,bearing or gasket on any vehicle if at all possible. There are clamping forces involved rather then shear and torque is much more critical to the proper operation with less noise and long life of such. As well as internals of course like engines,tranny's, transfer cases and diffs. On the Rolls Royce jet engines I work on and rebuild here at work ,we torque EVERY bolt and nut without exception.

As you will see the long UCA bolts have to be removed and fed thru from the engine bay. To do this the battery cable bracket has to be taken loose and moved on the Drivers side . On the pass. side the AC hard line has to be move inward from the rubber block that clamps it to get the bolt out. You'll know when you get to it as you think those long bolts won't come out.... they will and where an extra set of hands come in handy.

You can get on the front long UCA nuts with a torque wrench(85 ft/lbs)and deep well socket no problem by taking the brake hard line brackets loose from the frame and moving them out of the way while holding the head of the bolt with a wrench.

The Icon ball joint is hard to torque the top 12 point bolt because you have to hold the ball joint taper from turning.The guy in the DIY used two nuts tightened together but the newer Icons we just installed are different and came with self locking nuts instead of cotter pinned ones. We just ran one of the nuts down and then used the other one to lock them together so we could hold it and torque the 12 point bolt to with red locktite called out. This is a critical torque IMO so the taper bolt top cap and taper can't move.
IMO,Improper torque of that bolt caused this and basically trashed his ball joint and now makes noise.


Also the rod ends should be turned out a few turns before install because with them turned in the whole way they hit the spindle and made a mark as we found out.
These rod ends and this one is in the whole way.....loosen the two bolts and turn the collar with 1/4" punch to move it outwards.


Good luck and I can pm you my ph.# in case you get stuck.

Harper thanks for all the info... I feel like a have been studying for a big test... Hopefully I will get all of the parts in mon or Tuesday from metaltech so I can stop will all the questions and actually get it done. Been collecting all the tools this week and I think I am way over my budget on what I would have cost me to pay a shop, but this way I'll have the tools for when I have to do this job on my 6th or 7th gen. :biggrin2:
 
Harper thanks for all the info... I feel like a have been studying for a big test... Hopefully I will get all of the parts in mon or Tuesday from metaltech so I can stop will all the questions and actually get it done. Been collecting all the tools this week and I think I am way over my budget on what I would have cost me to pay a shop, but this way I'll have the tools for when I have to do this job on my 6th or 7th gen. :biggrin2:

Look at it this way, even if you go over budget vs a shop's installation fee, you still end up ahead with a whole bunch of tools to keep after the install. Win-win situation in my book since you have the know how to do the install yourself.
 
Hey Vegas I'm right there with you. I just purchased my new lift as well and am both excited and slightly nervous to do the install myself. I have been reading everything and trying to wrap my head around the whole install. I think I have most all of the necessary tools and a good understanding of how to do this. I just wish some of these guys like Harper, Socaltrail, Ride, Limamike, Antman, ect lived close to give me a hand :D. I plan on taking pictures as I go though and really taking my time and thinking things through. Anyway, let me know how you make out as I'll be a mere weeks behind you installing mine (on the opposite side of the country!).
 
The install isn't too bad. I actually had a mechanic from my base to help me out though, and an auto hobby shop with all the tools I'd ever need (costed $30 + alignment). It did help to have someone there who actually knew the names of all the components the instructions referenced.

As for torque settings, I just torqued everything down as much as I could until it wouldn't turn anymore. Some of the angles are tough to get a torque wrench into.

Had I not had the snafu with the UCA's, it would've been a pretty quick install actually. The only thing you really have to watch out for is the wires and brake lines that run down to the rotors and rear axle. If you let the rotors/rear axle just drop, I could see how you would easily damage one of those lines.

But after it's all done, all the hype is definitely true! It rides like a dream now!
 
Now that I've driven around for a few days, maybe I'll go back through and tighten all the bolts down one last time.
 
Hey Vegas I'm right there with you. I just purchased my new lift as well and am both excited and slightly nervous to do the install myself. I have been reading everything and trying to wrap my head around the whole install. I think I have most all of the necessary tools and a good understanding of how to do this. I just wish some of these guys like Harper, Socaltrail, Ride, Limamike, Antman, ect lived close to give me a hand :D. I plan on taking pictures as I go though and really taking my time and thinking things through. Anyway, let me know how you make out as I'll be a mere weeks behind you installing mine (on the opposite side of the country!).

Yeah I'm pretty bitter that a lot of the guys on the forum that are super helpful and actually know what they are doing live so far away... And if any of them visit Vegas they would probably be eating a 99cent shrimp cocktail and gambling on the strip then spend their vacation under my truck, can't blame them

I have been reading every post on this site and starting to checkout the fj forum. Just be careful the more you read the more question that come up... I think once you have the truck In the air it shouldn't be too crazy. especially cause we get to learn for others mistakes or what they would do different...

Never seen anything like this forum... sure you get some sarcastic comments when you start a thread that has already been discussed to death... But people on here take so much time to go out of their way to help someone they have never met is pretty cool.

Hopefully I'll get my setup next week!!! Good luck to you... Try not to mess up your $40k truck that was working perfectly before you decided to take it apart:redbrick:
 
The install isn't too bad. I actually had a mechanic from my base to help me out though, and an auto hobby shop with all the tools I'd ever need (costed $30 + alignment). It did help to have someone there who actually knew the names of all the components the instructions referenced.

As for torque settings, I just torqued everything down as much as I could until it wouldn't turn anymore. Some of the angles are tough to get a torque wrench into.

Had I not had the snafu with the UCA's, it would've been a pretty quick install actually. The only thing you really have to watch out for is the wires and brake lines that run down to the rotors and rear axle. If you let the rotors/rear axle just drop, I could see how you would easily damage one of those lines.

But after it's all done, all the hype is definitely true! It rides like a dream now!


Yeah I saw your post about left over parts and I was hoping the they sent you extra spacers so you didn't have to pull it all apart again... But hey thank god you didn't damage your truck and nothing broke while driving that could have hurt you or others on the road.

Pretty cool that you have a place with all those tools and a lift at your disposal for so cheap.
 
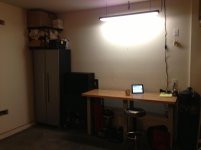
A little off topic.. But in preparation for doing the instal I realized I am lacking some tools and I am pretty sure one of the write-up said you need a work bench to put together the UCA...

Got a torque wrench today and a pitman puller and two more jack stands and a little bottle jack to be used with some blocks of wood for additional muscle

Game on.
 

Attachments

  • image.jpg
    image.jpg
    81.8 KB · Views: 638
As it looks, I might actually be heading out to Vegas in mid January for some work. I won't have my own car, but hey, I'll be there and willing to help if you are ok taking your car apart in the parking lot whereever the military decides to house me.

To put together my LR UCA's, I just held the damn thing to the ground and used an impact wrench. One with a big enough socket to fit around that huge nut. Regardless, I am a little jealous of your workbench.
 
Vegas,

I think waiting is the worst part about all of this. I was in the same boat since I purchased my lift before I even took delivery on my new rig. I did the same thing you are doing, a ton of research. I had a leg up though since I had just lifted two FJ's in the past two months. The only thing new was the KDSS that I had to deal with.

Once you get the parts and start doing the job, it will make more sense to you. You will thank yourself for doing so much research.

Good luck and you can always ask here if you get stuck.
 
Because KDSS is a lift kit in and of itself depending on the terrain is a lift necessary w/KDSS?

KDSS does nothing to lift your suspension, it merely allows thick sway bars to move more freely when articulating off-road. In addition, it helps prevent body sway on-road with the use of the above mentioned thick sway bars.
 
KDSS does nothing to lift your suspension, it merely allows thick sway bars to move more freely when articulating off-road. In addition, it helps prevent body sway on-road with the use of the above mentioned thick sway bars.

No I hear ya I have a TE w/KDSS. Going up and down certain terrain it lifts to keep the cabin as level as possible thus llifting. On a flat surface obviously it does nothing. I'm contemplating lifting next year but my concerns are affected gas mileage if any and having a higher center of gravity. Since I offroad 3" would most likely help. Just thinking out loud a bit, I had yet to hear my thought of when going up and down on certain terrain KDSS is in and of itself a type of on the spot lift. Most likely I'll do it, the higher center of gravity is my biggest concern.
 

Members online

Forum statistics

Threads
278,310
Messages
3,554,080
Members
248,016
Latest member
Advally Service

Trending content

Back
Top