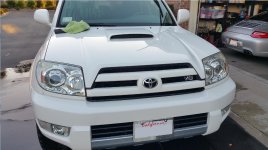
Installed Morimoto D2S HID Projectors on my '04

[MENTION=19297]chaz[/MENTION]
do you feel a little jealous with his cutoff versus what you got?
unless you source out another used headlight, you can try and salvage the projector and lens, all you need is the internals of the used headlights, the high beam and low beam mount.
 
no, what i got is working fine so far, the cutoff seems good & the oem ballasts with phillips newest 5000k d2s bulbs work very well.
 
Update to the project:

I decided to abort and go back to my stock halogen headlights because of the messed up alignment. Money down the drain. Until...

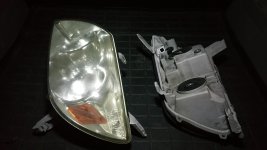
A few weeks ago I found a set of OEM headlights for sale on Craigslist - $35 and I took them home. The plastic was pretty yellowed out and cloudy but it's nothing that can't get looking pretty again (look up "Sylvania Headlight Restoration Kit").
 

Attachments

  • 20160826_211641.jpg
    20160826_211641.jpg
    120.8 KB · Views: 887
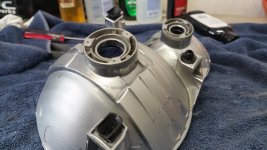
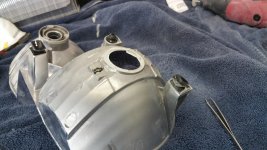
Next, the headlights go in the oven to loosen up the adhesive sealant that holds them together. Pop 'em open and extract the reflectors. Here you can see the back side of the reflector where the stock halogen bulbs (9006) screw in. This part needs to be dremel'd/sanded down and drilled out using a hole saw. Here's the before and after. Be careful to get the hole saw as close to being centered as you can. A drill press doesn't hurt, but you can do it by hand if you're careful.
 

Attachments

  • 20160905_154208.jpg
    20160905_154208.jpg
    135.3 KB · Views: 939
  • 20160905_162122.jpg
    20160905_162122.jpg
    139.4 KB · Views: 917
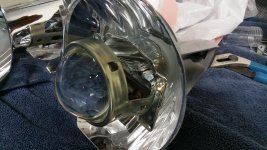
Now we can get the projector fitted. Note the rubber washer/gasket that fits between the projector and the original reflector. This is where I screwed up before; I left this out and just glued the whole thing in place with JB Weld. This time around I didn't do this. I just tightened the entire assembly in place very snugly.
 

Attachments

  • 20160906_203712.jpg
    20160906_203712.jpg
    142.8 KB · Views: 917
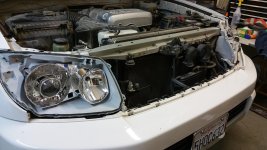
Headlights are now mocked up on the truck but not yet sealed/glued shut. This is to get the alignment as good as I can get. It's most difficult to get rotational alignment; the up/down part is easy enough w/ the adjustment screws.

Important note: Be sure to get the lower-most headlight bolt in place. It's a b*tch, but you must do this while aligning the lamps to ensure they're as close to being in their final position as possible.

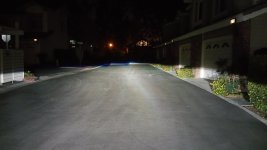
To align the beams, I started by using a bubble level to measure the beam pattern as projected against my garage wall but ultimately I waited until it was dark outside, pointed the truck down the street and just eyeballed the pattern as best as I could.
 

Attachments

  • 20160910_211723.jpg
    20160910_211723.jpg
    140.6 KB · Views: 943
Next up, remove the headlights and glue them back together. I painstakingly removed as much of the original glue as I could and stuffed a bunch of windshield sealant tape (butyl rubber) in its place. This stuff is very stretchable and moldable. I used a hairdryer to warm them up a little so the tape would mold more easily.

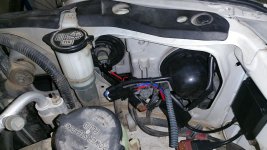
Once the headlights were sealed, back into the truck they went. Again, don't forget those lower headlight bolts. Here's a shot of the back-side wiring. A couple notes:
- I used a 9005/9006 wiring adapter "Y" so I could split the high-beam wire to both the original halogen high-beams *and* the bi-xenon solenoid that comes in the projector. This required a little bit of splicing and soldering (don't forget the heat shrink tubing).
- I used an 85mm ID / 90mm OD rubber dust cap to re-cover/seal the back side of the projector.
- I also cut and re-soldered the factory low-beam headlight wiring in order to reverse the polarity. Toyota uses a reverse polarity on the headlights for some reason.
- I used the stickiest/toughest 3M double sided sticky tape to adhere the ballasts to the sheetmetal. I'll re-visit this periodically to make sure it holds.
- Plastic zip-ties to tidy up all the wiring.
 

Attachments

  • 20160911_195247.jpg
    20160911_195247.jpg
    141.6 KB · Views: 882
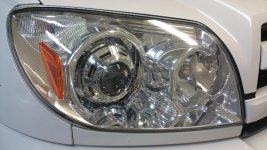
Finished product and alignment. I'd say those old $35 junker headlights cleaned up quite nicely :)

Oh and BTW - the quad high-beam setup is incredible. Let me put it to you this way: There is ZERO need for me to get any sort of aftermarket light bar!
 

Attachments

  • 20160912_214911.jpg
    20160912_214911.jpg
    140.5 KB · Views: 900
  • 20160910_211158.jpg
    20160910_211158.jpg
    123.8 KB · Views: 1,256
Finished product and alignment. I'd say those old $35 junker headlights cleaned up quite nicely :)

Oh and BTW - the quad high-beam setup is incredible. Let me put it to you this way: There is ZERO need for me to get any sort of aftermarket light bar!

nice, i think it needs a little more tweaking, surprise you did not want to wait for the 4.0 version.
 
Yep, I'd done some tweaking since that shot was taken. They're pretty dialed in now.

I guess I should clarify - I got my projectors from DDM Tuning. They're the "D2S v2" projectors. Amazingly bright output.
 
Loving the new projectors! They survived their first car wash today without leaking :)
 

Attachments

  • lights.jpg
    lights.jpg
    123.4 KB · Views: 424
F#King Wow, GREAT JOB! Thanks for sharing the pics. I've had my retros done by a retrofitter, but man that is costly. I never quite understood how they get the alignment right, your pics instantly put those doubts to rest. Forever.
 
Loving the new projectors! They survived their first car wash today without leaking :)

Hey just curious how the projectors are holding up? I am in the process of reading and learning about retrofits and intent to do mine soon. The Morimoto d2s kit seems to be a good deal.

What shrouds did you use? Do you remember the hole saw size you used?
 
Yes, those DDM projectors are the ones I went with. Standard 35W 4300K bulbs. I don't feel 55W bulbs are necessary.
 
So the second time around, you didn't use any jb at all, and just snugged the screws?

For alignment, you were just looking to mock up the left to right alignment correct? Any tips for this? I assume this step is the final step before snugging up the projector screws.

What about vertical alignment? Is there a certain measurement you were looking for; for the cutoff? Thanks again for the help!
 
So the second time around, you didn't use any jb at all, and just snugged the screws?

For alignment, you were just looking to mock up the left to right alignment correct? Any tips for this? I assume this step is the final step before snugging up the projector screws.

What about vertical alignment? Is there a certain measurement you were looking for; for the cutoff? Thanks again for the help!

The only thing I used JB weld for the 2nd time around was to permanently glue the Range Rover shrouds (the shiny chrome cosmetic bits) to the projector assembly. As far as attaching the projector to the stock housing, there's no JB Weld. I did this intentionally so I'd be able to tweak the rotational alignment once I had the headlights bolted into the truck. That's where I goofed the first time. Now that I've had them on the truck for about a year, I can tell that the rotational alignment is starting to drift a little, but it's pretty insignificant and not enough to overcome my laziness/perfectionism.

The left-to-right alignment wasn't something I messed with. I don't think there's an easy way to adjust this. I wish there were because that way I could aim both the L and R units "cutoff" point to the exact same spot. In practice, it hasn't been a big deal. Maybe someone else has a solution for this.

You can adjust the vertical alignment fairly easily using the screws on the back of the headlamp housings. I started by using two cars w/ factory HID headlamps (see earlier posts in the thread), taking pictures of their output and then using those pics to align the new ones. You can also try putting masking tape on your garage wall to mark off the light coming from the stock bulbs. That should get you somewhat close.

One last observation: The cheap Chinese-made HID ballasts have two quirks about them:
1) They take several seconds to bring the bulbs up to full brightness. This is different compared to factory OEM systems where the bulbs are on full blast within 2 or 3 seconds.
2) They create EMI/RF interference that affects AM radio reception.

We get what we pay for....

 
Last edited:
The only thing I used JB weld for the 2nd time around was to permanently glue the Range Rover shrouds (the shiny chrome cosmetic bits) to the projector assembly. As far as attaching the projector to the stock housing, there's no JB Weld. I did this intentionally so I'd be able to tweak the rotational alignment once I had the headlights bolted into the truck. That's where I goofed the first time. Now that I've had them on the truck for about a year, I can tell that the rotational alignment is starting to drift a little, but it's pretty insignificant and not enough to overcome my laziness/perfectionism.

The left-to-right alignment wasn't something I messed with. I don't think there's an easy way to adjust this. I wish there were because that way I could aim both the L and R units "cutoff" point to the exact same spot. In practice, it hasn't been a big deal. Maybe someone else has a solution for this.

You can adjust the vertical alignment fairly easily using the screws on the back of the headlamp housings. I started by using two cars w/ factory HID headlamps (see earlier posts in the thread), taking pictures of their output and then using those pics to align the new ones. You can also try putting masking tape on your garage wall to mark off the light coming from the stock bulbs. That should get you somewhat close.

One last observation: The cheap Chinese-made HID ballasts have two quirks about them:
1) They take several seconds to bring the bulbs up to full brightness. This is different compared to factory OEM systems where the bulbs are on full blast within 2 or 3 seconds.
2) They create EMI/RF interference that affects AM radio reception.

We get what we pay for....

Really appreciate the detailed response!

So the test fit on the truck (where you mentioned to put in the bottom headlight screw), this step is to align the cut off patterns before everything is tightened down?
 

Members online

Forum statistics

Threads
278,316
Messages
3,554,120
Members
248,016
Latest member
Advally Service

Trending content

Back
Top