Interior Lighting mod

Well, I finally got around to replacing my LEDs in the 5th gen 4runner and they look great. I had done this in my SR5 4th Gen, but this vehicle was a little bit more difficult.

Thanks for the info everyone and especially Shawn719 for the instructions on getting the map lights and Snooperstyle for the mirrors!

Congrats on your completion! Thanks for the thanks!
 
question re: removing sunglass console...

The map light area you will need to open the "sunglass" area and unscrew two phillips screws and then pull unit straight down (two tabs on the other end - ). This will give you access to the bulbs.

After removing the screws, I attempted to pull the sunglass console area; however, it wasn't coming off very easy. I was afraid I was going to break something.

Shawn719,
you indicate "unscrew two phillips screws and then pull unit straight down (two tabs on the other end)"

-- Do you pull the sunglass end straight down, or the entire unit?
-- How much force is needed when you pull straight down?

-- Do you run the risk of breaking the two tabs at the other end?

Are there any "gotcha's" when removing the console?
- wires/connectors to be aware of etc?

Thanks in advance for your help!
-enduro
 
However, these same bulbs DO FIT in the puddle lights that are in the doors of the vehicle, but only if you remove part of the light assembly...something that will become obvious to you once you pull one of them out.

Hey Snooperstyle I haven't taken off the puddle lights in the doors yet, but was wondering how difficult it is to "remove part of the light assembly". Like you mentioned, I'm sure this will become obvious once I have it apart but I was wondering if I should just install the WLED-xHP5 High Power SMD WLED-xHP5 (194 type) 360 degree Wedge Base bulbs Specifications instead of the larger WLED-xHP9-T. Installing the smaller 5 led vs the 9 led would install without any additional modifications. Would there be a significant amount of light loss?I just need to justify one bulb over the other. Thanks so much! :cheers:
 
Hey Snooperstyle I haven't taken off the puddle lights in the doors yet, but was wondering how difficult it is to "remove part of the light assembly". Like you mentioned, I'm sure this will become obvious once I have it apart but I was wondering if I should just install the WLED-xHP5 High Power SMD WLED-xHP5 (194 type) 360 degree Wedge Base bulbs Specifications instead of the larger WLED-xHP9-T. Installing the smaller 5 led vs the 9 led would install without any additional modifications. Would there be a significant amount of light loss?I just need to justify one bulb over the other. Thanks so much! :cheers:

It is a clear plastic piece that kind of wraps around the bulb. I think it is either a heat shield, a reflective piece, or a vibration reducing piece...or some combination of all. Using LEDs, heat is no longer an issue (it is significantly less hot). Support/vibration is not an issue so far. I had to remove it when I took out the old bulb anyways (I think), in order to unplug it from the housing. I don't see any reason to keep the piece in there.

I really like the amount of light that I have using the bulbs that I had listed on this thread before, so going back to the smaller LED might be a disappointment if you have already seen the larger ones...just my two cents though. Also, if you are going to go with a different color, such as blue or red, then you will want the larger LED bulbs.
 
How to Replace Map Lights without dropping sunglass console

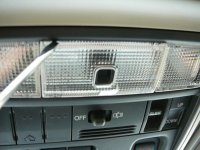
Replacing the map lights is quite easy without having to pull the "sunglass" console down.

Tools needed:
- small flat head screw driver
- electrical tape
- scissors

Accessing the bulbs:
1. Use the flat head screw driver to gently pry the center lens out a little bit at each point
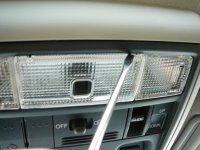
2. After the center lens is removed gently pry the side lenses out.

Removing the Bulbs
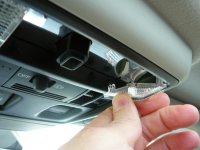
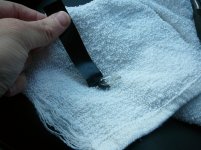
1. cut a strip of electrical tape. (mine was about 3 inches long, but could have been shorter)
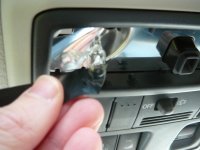
2. wrap one end of the electrical tape around the bulb as much as you can
3. with your fingers grab the tape and bulb and gently work the bulb out.

Install Bulbs & Lens covers
1. Replace bulbs with desired LEDs (I used WLED-xHP5 -- Cool White)
2. Make sure bulbs are installed correctly. With the hidden map light switch turned on touch the bulb to the socket to see if you have it positioned correctly, if so, then firmly insert the bulb)
3. Repeat on the other side.
4. Snap side lenses into place first
5. Snap center lens into place and you're all done!
 

Attachments

  • AccessMapLights-1.jpg
    AccessMapLights-1.jpg
    134.2 KB · Views: 5,188
  • AccessMapLights-2.jpg
    AccessMapLights-2.jpg
    134.7 KB · Views: 5,013
  • AccessPassengerMapLight.jpg
    AccessPassengerMapLight.jpg
    132.6 KB · Views: 5,121
  • PullMapLightBulb.jpg
    PullMapLightBulb.jpg
    137.1 KB · Views: 8,543
  • ElectricalTapeToPullBulb.jpg
    ElectricalTapeToPullBulb.jpg
    136.9 KB · Views: 4,936
Last edited:
Has anyone tried the "WLED-WHP18-TAC Wedge Base Bulb" in the doors or in the puddle lamps? It's 150 lumen!! :wow: (vs the 35 in the 9led)
 
Great advice on the tape. That worked pretty well.

I performed this mod this weekend. Not to difficult. I did the map lights, dome light, rear hatch lights, and mirror puddle lights. Used the bulbs listed on page 4 of this thread.

Two things I noticed:
1. The map light bulbs are directional. Meaning polarized, even though the package said not polarized.
2. The dome light bulb doesn't fit very securely. I imagine that with a good shake it will come loose in the housing.

All in all pretty easy to do and it makes a huge difference light wise.

Thanks all for the info.

Replacing the map lights is quite easy without having to pull the "sunglass" console down.

Tools needed:
- small flat head screw driver
- electrical tape
- scissors

Accessing the bulbs:
1. Use the flat head screw driver to gently prior the center lens out a little bit at each point
2. After the center lens is removed gently prior the side lenses out.

Removing the Bulbs
1. cut a strip of electrical tape. (mine was about 3 inches long, but could have been shorter)
2. wrap one end of the electrical tape around the bulb as much as you can
3. with your fingers grab the tape and bulb and gently work the bulb out.

Install Bulbs & Lens covers
1. Replace bulbs with desired LEDs (I used WLED-xHP5 -- Cool White)
2. Make sure bulbs are installed correctly. With the hidden map light switch turned on touch the bulb to the socket to see if you have it positioned correctly, if so, then firmly insert the bulb)
3. Repeat on the other side.
4. Snap side lenses into place first
5. Snap center lens into place and you're all done!
 
door puddle lights - adding to SR5

RE: Installing door puddle lights in SR5

Has anyone done this upgrade?

Before I ask this question, I tried several sites looking for this part# and couldn't come up with one. I know I've seen a link or note to where to download the full parts book, but I've not been able to locate it again on this forum. If anyone could please let me know a good place to find all part#'s for the 5th GEN that would be greatly appreciated!

Has anyone lined the part# for the puddle lights found in all 4 doors (bottom inner corners of door panel)?

My SR5 does not have them. I popped the cover off the hole to see if wires would by chance be hanging back there and didn't find any. My assumption is that I will have to pop the door panel and tie into the mirror puddle lights?

-b
 
Replacing the map lights is quite easy without having to pull the "sunglass" console down.

Tools needed:
- small flat head screw driver
- electrical tape
- scissors

Accessing the bulbs:
1. Use the flat head screw driver to gently prior the center lens out a little bit at each point
2. After the center lens is removed gently prior the side lenses out.

Removing the Bulbs
1. cut a strip of electrical tape. (mine was about 3 inches long, but could have been shorter)
2. wrap one end of the electrical tape around the bulb as much as you can
3. with your fingers grab the tape and bulb and gently work the bulb out.

Install Bulbs & Lens covers
1. Replace bulbs with desired LEDs (I used WLED-xHP5 -- Cool White)
2. Make sure bulbs are installed correctly. With the hidden map light switch turned on touch the bulb to the socket to see if you have it positioned correctly, if so, then firmly insert the bulb)
3. Repeat on the other side.
4. Snap side lenses into place first
5. Snap center lens into place and you're all done!

+1!!

I did this today, and the whole thing took less than 2 minutes. Huge improvement!
 
LED lighting

Someone mention in the forum cant remember where that the turn signal on the side mirror is and LED if not has anyone change thoses to LED?
 
Did anyone else have to trim the contact wires on the bulbs since they wrap around both sides of the base? I installed the WLED-xHP5's to replace my map lights and they would not work. I noticed the contact wires on the bulb wrapped around the base, but the original stock bulb connectors were only exposed on one side each. then I went back to the website and there was a little note on an information page about the connectors and socket contacts (see image). I didn't notice this mentioned in the thread, though I admit I didn't read it very thoroughly. Once I trimmed the wires so they were only exposed on one side, they worked perfectly. Was it just me?

wedgecontacts.gif
 
Did anyone else have to trim the contact wires on the bulbs since they wrap around both sides of the base? I installed the WLED-xHP5's to replace my map lights and they would not work. I noticed the contact wires on the bulb wrapped around the base, but the original stock bulb connectors were only exposed on one side each. then I went back to the website and there was a little note on an information page about the connectors and socket contacts (see image). I didn't notice this mentioned in the thread, though I admit I didn't read it very thoroughly. Once I trimmed the wires so they were only exposed on one side, they worked perfectly. Was it just me?

wedgecontacts.gif

I literally just did all my interior lights 10 minutes ago. I used the same lights as you and I trimmed nothing. It was just a one-for-one replacement!
 
Just changed my LP lights out today and discovered the same thing.

But if I remember this thread correctly, what Snooper eventually discovered was that everyone's lights are like that...so while they seem "wrong", they are actually the way it was designed. Odd maybe....but not you're not alone.
 
Has anyone noticed the cargo LED's in the hatch remaining dimly lit with the door shut and the switch in the door position. Mine look like there is a small amount of electricity reaching them even when they should be off. It just worries me. I don't want to continually drain my battery and prematurely age my LED's. They are completely black when I place the switch in the OFF position.
 
But if I remember this thread correctly, what Snooper eventually discovered was that everyone's lights are like that...so while they seem "wrong", they are actually the way it was designed. Odd maybe....but not you're not alone.

Stupid if you ask me. Makes no sense at all. That is why I switched mine and now the LEDs shed a nice even amber light over my plate, instead of on the pained rear lift gate door. It won't be a problem until you put in the LEDs because the stock incandescent ones are less directional than those particular LEDs.
 
Has anyone noticed the cargo LED's in the hatch remaining dimly lit with the door shut and the switch in the door position. Mine look like there is a small amount of electricity reaching them even when they should be off. It just worries me. I don't want to continually drain my battery and prematurely age my LED's. They are completely black when I place the switch in the OFF position.

I just installed all the LEDs listed on page 4 in my 4runner tonight. I have the same problem as you with one of my LEDs in the liftgate remaining dimly lit when it should be completely off (the other LED stays off as it should). Could this be that the LED that stays slightly on is defective? Have you figured out what causes this or how to fix it? I also noticed that my 2 map overhead lights (both white) are very slightly different colors. Anyone else notice this?
 
After changing most of the lights to LED I have the same issue also. My liftgate lights stay dim even after the car is off...the puddle lamps also do the same thing. I thought they would turn off after awhile but the next morning they were still dimly lit. Weird thing about is that the only lights that do completely turn off are the map and license plate lights. Anyone else notice this and have an idea why?
 
After changing most of the lights to LED I have the same issue also. My liftgate lights stay dim even after the car is off...the puddle lamps also do the same thing. I thought they would turn off after awhile but the next morning they were still dimly lit. Weird thing about is that the only lights that do completely turn off are the map and license plate lights. Anyone else notice this and have an idea why?

Got the same problem. I just leave it off and turn them on if I need it. I'm going to find a way to install a resistor big enough to keep them off while it's in the door on position. I imagine a 6ohm will be enough.
I just thought it was because I put a huge led plate in it. It's got 24 and I just stuffed the whole plate in there.
 

Members online

Forum statistics

Threads
278,306
Messages
3,554,045
Members
248,016
Latest member
Advally Service

Trending content

Back
Top