JBurt's 97 Build Thread

Thanks! I would love to not be busy. No time for my 4runner.

The new booster is working perfectly. I found that it was easier to maneuver it in there by taking out the charcoal canister. Every once in a while I would get a p0406 code. The last time I had my canister out I replaced all the hoses. I also noticed a small crack at the bottom.

IMG_35651.jpg~original


Replacing the hoses last time didn't do anything, so I used some epoxy on the crack just for kicks (I don't really care about evap codes, we don't have to get smogged here). It's been a week and a half code free. I love cheap fixes.
 
Well it took long enough.

Only 4 months from delivery to painted.

5/15/15
IMG_9139_zpsjerjmud6.jpg~original


124e4348-bf10-411e-8eda-ad7ecdc3b8b9_zpsqe0ehhtv.jpg~original


IMG_9141_zps7enstlmw.jpg~original


Feels good. I had hoped maybe I could put them on this weekend, but I remembered I want to change my diff/transfer case oil, and I would need to take them off for that, so I'll wait until after I change the oil to put on the skids.

Another bright note is still not p0406 code.
 
Last edited:
Excellent color choice! Also yay on the no code, hope it stays disappeared! I like that you found and shared that little crack. Noted for future use. :)
 
Still no p0406.

2 questions. Is this too much play in my steering rack?


I checked and there is no play in the shaft, so no tack weld needed. I've already replaced the rack guide, so is it time for a new rack?

2nd question, I get a popping sound in my front end mainly when turning left under acceleration. CV shaft? It's a NAPA one with about 3k on it. It may be worth it to just swap it out.

I haven't put on skids yet. I want to see about the rack and change gear oil in the diffs and t-case.
 
So I've had a build thread over on Yotatech for a while but I haven't ever done anything really amazing to my 4runner. It is hands down the best car I've ever owned and I love it.
103.gif
42.gif
 
Popping when accelerating leftward also check upper ball joint and sway bar bushings/links, and the lower ball joint and bolts too. Heck, just check everything. :D
The steering guide nut isn't too loose? (steering would feel weird/loose too). Seems like a bit of movement to me, but am not qualified as to say whether there's is or isn't.

As little sleep as you may have had recently you may be hallucinating at this point.:wacko:
 
Well, I'm replacing one of the last things on the front end of my truck.

Tomorrow I should have a big brown box with a safari steering rack delivered to my house. Their price has dropped to $395 plus they give a discount for forum members. It'll be good to get rid of a leaking rack, and hopefully it'll also eliminate my steering play. I don't think it's the slip joint in the column, but we'll see.

Then I'll finally install my skids.
 
Well, I'm replacing one of the last things on the front end of my truck.

Tomorrow I should have a big brown box with a safari steering rack delivered to my house. Their price has dropped to $395 plus they give a discount for forum members. It'll be good to get rid of a leaking rack, and hopefully it'll also eliminate my steering play. I don't think it's the slip joint in the column, but we'll see.

Nice price!! You're getting the one with the solid guide? If it's not already got poly mount bushings definitely consider adding them in. The rack is so much fun to do, for me it was helpful to look at the new rack to see the angles the lines go in so I could blindly imitate them while pulling the old rack. I've done a little writing and pics in the old build thread but it's not hard. Just occasionally annoying.

Then I'll finally install my skids.

And magically something will require you to take them off again. :D
Bet it'll look good!
 
I've looked at your steering rack installation. It should be very helpful. I've got poly bushings on my current rig in good shape so I'll just swap those over. They do come with the sold guide. I replaced that on my current rack trying to eliminate play and the roller guide had tons of play in it. Much better design.
 
Love the rig!!!:nod: Nice unique blue:artist:, you have any photos with the new tires and skids?
 
Love the rig!!!:nod: Nice unique blue:artist:, you have any photos with the new tires and skids?

Thanks! I do have some pics with the new tires, but unfortunately I haven't put on the skids yet.

However today I put in a new safari steering rack. My only comment is that the power steering pressure lines are not easy at all. You definitely need a 17mm flare nut wrench.

That and once I got done with the rack I raised my Tundra 5100's from the 1st to the 3rd perch in order to mitigate some rubbing and add some height. Then right after I got done adjusting my current shocks I saw a deal I couldn't refuse and now I have these:

IMAG1270_zps85xwhw2i.jpg~original
 
So I got this done this morning. All cleaned up and installed.

IMAG1358_zpskanjpcon.jpg~original


First impression is really good. I didn't have time to go anywhere to really test them out but I did go on a bad washboard road and then a dirt canal bank. Color me very impressed. Makes me realize how harsh the rear is now.

And here's a comparison between the new and old. The King's are .5" greater diameter and that works out to about 56% more volume fluid (assuming the internal reservoir's are the same length, which I have no clue).

IMAG1357_zpsjysyigan.jpg~original
 
Last edited:
Well I finally decided to get moving and install my skids, but I thought I should change the gear oil first. From the looks of it, it had never been changed. It was pretty bad after 200k. The rear and t case went fine, but I stripped out the allen part of the drain plug for the front diff. I was pretty pissed. This was about a month ago. At lease it was stripped with oil still in the diff.

I started a new job and it wasn't a big priority and then Wednesday I was talking to a guy at church about it. We got the idea to weld the allen wrench into the rounded out plug and see if that worked. I soaked it in PB blaster 2 times a day and went over this morning and we did this.

IMG_9428_zpsy6gmbnzb.jpg~original


Here is what it's supposed to look like.

IMG_9429_zps8pr9krsf.jpg~original


I'm sure that the heat from welding helped break the plug loose. I'm really glad it was so easy. Plus I got to check out this guys 40's Willys pickup restoration. He's putting in a 4.3 Vortec, 4 linked rear, 4 wheel discs, etc. I should have taked pics.
 
This weekend I changed my 97 map lights and worthless “garage door opener” holder to a 99 unit with a sunglass holder. It was pretty straightforward and I followed the write up on 4runners.org , but I changed a few things.

I didn’t cut away as much as on the write up but it worked just fine. You’ll be able to see my hack job in the pictures.

You need to extend the power wire for the map lights and add a ground wire. Instead of making a new connector, I just cut the connector out of the original map lights. The 3 inches of so of wire on it is adequate for the new console.

IMAG1635_zpsv5wh8hhf.jpg~original


Then I added a ground wire with a ring connector to the 99 console and extended the power wire with the old connector.

IMAG1636_zpsn6juecij.jpg~original


Instead of adding a new screw I sanded down to bare metal where one of the old screws from the 97 map lights attached (that would now go unused) and attached the ground wire there.

IMAG1637_zpspectiugy.jpg~original


Next you need to cut an additional hole in the light diffuser for the additional moonroof button in the 97. I taped the diffuser to the old console like in the write up, and traced where the hole would go.

IMAG1662_zps3boggx9j.jpg~original


After that I drilled out the corners and used a cut off wheel in a dremel to cut most of the rectangle out.

IMAG1664_zpsiiksvoou.jpg~original


IMAG1665_zpssu0drkp4.jpg~original


Maybe if I was more patient and used a slower speed and less pressure this wouldn’t have turned out so aweful, but it cleaned up alright in the end.
I really didn’t want the lettering for the 99 controls, and in the write up he wasn’t able to find a good way. Before I did any cutting I tried a little bit of acetone where I was going to cut it out anyways. It removed the lettering amazingly, but it also messed up the finish on the diffuser, and some of the acetone ran over into the area that wasn’t going to be cut out.

I tried gently scraping the lettering off with a card scraper and a razor blade, both had no effect. Then I put my buffing wheel on my bench grinder with a medium compound. That worked really well.

There are only two problems. The first is that the compound got all over the plastic. It was easy to come off the front but it collected in the textured part of the back. It took a while to figure out how to clean it out, but dish soap and a stiff bristled brush did the trick.

The other problem is that the diffuser has a matte finish, and where I used the buffing wheel it turned out much glossier and smooth. It feels different but it’s not noticeable visually.

IMAG1666_zpssimc5zzo.jpg~original


IMAG1667_zpssrratlje.jpg~original


The marred area to the left of the new hole is where the acetone spilled over.
Here’s the finished product.

IMAG1668_zpswv7ck8rw.jpg~original


IMAG1670_zpswc76ogcp.jpg~original


I made the new hole a little too far to the left, so it took some additional file work to get it to fit, and there is a little bit of a gap on the left, but I can live with it. Also the front and back of the opening should be beveled so that the switch moves freely. The moonmist on the 99 is a little bit lighter than on the earlier 4Runners but I'm sure it's a closer match than anything I'd find in a spray can. I’m okay with how it turned out but if I find another diffuser I’ll do it over again. If anyone wants to avoid making the hole and wants to trade let me know.

Nice way to spend a little time on the weekend. Now my sunglasses have a home.

 
Thanks Hab. I've had that stupid thing sitting in my garage for months. I'm glad I finally got around to it.

Next thing on my list is to fix my lowest speed for my blower motor via your write up. Thanks for that.
 
Hey JBurt,
There is additional write up on Yota that allows you to convert your existing 2 button wiring for the sunroof buttons to use the one button on the new console. The relay is already included with the new console. I did this to my 1998. Now I use the new console with only one button for both open/close & tilt, no need to cut the second hole. There are no additional parts needed, uses the existing wiring. Let me know if you need more info.
Thanks,
Randy
 
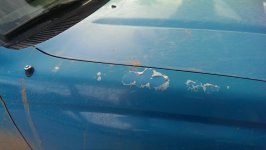
So looks like the next mod is new paint.

Any color suggestions? I'm thinking just going back to the stock evergreen pearl.
 

Attachments

  • IMAG1987.jpg
    IMAG1987.jpg
    131.8 KB · Views: 448

Members online

Forum statistics

Threads
278,309
Messages
3,554,068
Members
248,016
Latest member
Advally Service

Trending content

Back
Top