JDM/Blacked Headlights - DIY Guide

QUESTION! The third picture is broken so i wasn't sure how you sprayed it. But when you spray the paint into the headlights in general, did you cover the plastic reflective piece? I sprayed paint the orange piece on my corners black. But i had to tape and covered it with newspaper so it wouldn't spray into the white piece. I plan to do this project on my '97 4runner but need heavy planning before i perform this project. Thanks!
 
The orange reflector pieces just pop right out, when you're done painting you just fit them right back in.
 
trd_style said:
QUESTION! The third picture is broken so i wasn't sure how you sprayed it. But when you spray the paint into the headlights in general, did you cover the plastic reflective piece? I sprayed paint the orange piece on my corners black. But i had to tape and covered it with newspaper so it wouldn't spray into the white piece. I plan to do this project on my '97 4runner but need heavy planning before i perform this project. Thanks!

yea.. like 00328 said, the plastic orange reflector piece comes off and goes on. It fits via a little tab.
 
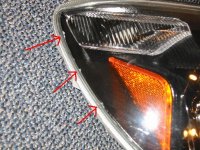
no, i'm not talking about my corners. i'm talking about the headlights. how do you cover the silver piece? here's a picture. it's the space in red. how do i cover that?
 

Attachments

  • dscf0001.jpg
    dscf0001.jpg
    54.9 KB · Views: 745
trd_style said:
no, i'm not talking about my corners. i'm talking about the headlights. how do you cover the silver piece? here's a picture. it's the space in red. how do i cover that?

You won't need to cover it as the piece that you will be painting will come off. Please do not paint the area when it is marked red in the above picture. The surrounding piece comes off so therefore no masking is required.
 
trd_style said:
no, i'm not talking about my corners. i'm talking about the headlights. how do you cover the silver piece? here's a picture. it's the space in red. how do i cover that?


Oooops! Sorry, thought you were talking about a 4th gen.
 
i wanna see what a galactic grey with gg painted lights would look like, cant figure out if it would look good, or the silver looks better or if it will look ricey
 
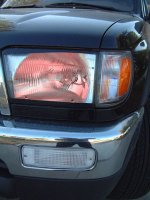
Here's my OEM housings painted black

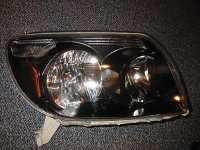
I am happy with mine so far.... not installed yet, but I like the way they look so far. I put about 15 coats of paint on it: but it didn't take that long since I bought this "Fusion" paint that is supposed to bond to plastic very well and recoating can be done every 30 seconds or so. So I made sure I applied very light coats. I tried coating it with a glossy clearcoat, but it made the surface actually DULLER ?! and uneven for some reason. I just recoated in black.

Tips:
That oven bake time/temp is only an estimate. 180 degrees for 10-15 minutes works fine too. The silicone sealant cools and hardens rather quickly so you have to move fast.

I found that taking the pieces apart were very easy after baking them. BUT, I found that putting the pieces back together was the most difficult thing to do in this whole project. When you pull the pieces apart, the clear cover and the housing BOTH have residual silicone on their edges. Well, putting them back together with the black part sandwiched in the middle is VERY tedious because you don't want to get any silicone on the black part. The silicone is sticky because you'll have to bake the housing again to get it back together correctly (to loosen up the silicone).

It's tough to explain, and I'm sorry that I don't have pics or any tips on HOW to do it correctly because I only had 2 shots to do it (left and right housing) and I didn't get it right either time. You'll see from the first pic below that I got some of that silicone on the edge of the black part.... on both housings.

 

Attachments

  • headlight2.jpg
    headlight2.jpg
    59.7 KB · Views: 681
Oh yeah, and much props to iForce for being the guinea pig on this project and for posting his guide!!!!
 

Attachments

  • headlight1.jpg
    headlight1.jpg
    68.7 KB · Views: 695
If it makes you feel any better, I also have a couple of tiny white spots on the edges also. I thought they were from chipping off the black paint while trying to get the lights back together again.
You are absolutely right, the worst part is trying to get everything situated so they fit together again.
I love them, get a lot of looks.

BTW not to get nit picky, but I think it's more of a glue than a silicone, and it burns like hell if you get it on you when it's melted.
 
Last edited:
silicone, glue....tomayto, tomahto. :D

Yes, that stuff gets extremely hot and sticky. After I put the first one back together, I was thinking of actually REMOVING all the siliclue from the clear cover on the second light so I would avoid the same problem. Then I decided that this was taking WAY too much time as it was, and my house already stunk of spray paint and melting plastic....
 
Wow.. I was just searching around today and stumbled upon these threads about painting the head light housing. I like the Black headlights so much but dont want to pay the money. This is A VERY COOL MOD and will definately copy.

Couple of ?s for I-Force and Atomic punk
1. What color and brand of paint did you use. I realize its balck but what it a certain kinda of black. Be specific!!
2. So the housing and the reflector come apart right... there is no masking needed?
Do you sand the chrome part at all before painting to help it to stick? Or would this be a bad idea b/c it would take away the smoothness.:bouncy2:
 
faster4runner04 said:


Couple of ?s for I-Force and Atomic punk
1. What color and brand of paint did you use. I realize its balck but what it a certain kinda of black. Be specific!!
2. So the housing and the reflector come apart right... there is no masking needed?
Do you sand the chrome part at all before painting to help it to stick? Or would this be a bad idea b/c it would take away the smoothness.:bouncy2:

1) I used an epoxy spray paint - called "Fusion", which is made for applying on plastic. Sold at Ace hardware stores. Semi-gloss black.

2) No masking needed. The headlight assembly consists of 3 main pieces - the clear plastic front, the rear housing, and the reflector assembly. You'll need to remove some screws (maybe 4 or 5 of them) on the outside of the assembly after you warm it up to fully disassemble all 3 pieces.

3) I used either 00 or 000 steel wool and fully scuffed the reflector part before painting. The wool appeared to just dull the surface. Then I cleaned it with alcohol. I didn't prime the surface because the paint is supposed to stick without it, and it did.

Use very light coats - the Fusion dries in like 5 minutes, so I was able to put on about 10 very thin coats in less than an hour. Then I tried to clearcoat it with a gloss spray paint, but that didn't work out so well (not sure why, but it actually DULLED the finish?!)... so I just recoated it with the black and it looks great.

Hope that helps.

faster4runner04, email or PM me... I have a question for you.
 
Last edited:
oops... meant to write that I scuffed the removable chrome part that I was going to paint black - NOT the reflectors. Sorry 'bout that.

Thanks for noticing BEFORE you painted the reflectors black.
 
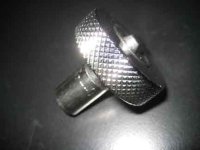
I just wanted to say I replaced mine with JDM Blacks without removing the bumper. You just need to remove the two screws on the fender bottom to squeeze your arm up to get at the inside bolt. (red circled one) -It's really an exercise in patience though because it's hard to get the threads started from reaching up there and very little room for a socket. I used a an ultra compact socket that fit in there easy enough but that was the only real pain in the @ss procedure. (pic)
 

Attachments

  • stubby.jpg
    stubby.jpg
    6.1 KB · Views: 547
OK- So I've got the bumper off and the headlights out. Its 35 degrees F where I am right now, so I'm going to wait until tomorrow to do the painting. I will be painting the parts in a heated, ventilated garage a mile from my house. Does anyone foresee any problems in prying the headlight apart, and then transporting them to be painted?

Also.. must I take any precautions so that I will not get paint on the glue?
 

Members online

Forum statistics

Threads
278,310
Messages
3,554,080
Members
248,016
Latest member
Advally Service

Trending content

Back
Top