jfry008
New member
Bought my 08' 4wd SR5 in Feb/2016:
How she sits now with Icon coilovers and MT LT rear:


Bought it in MD...$14000...114,000 mi..craigslist
How she sat with bilstein 5100s, moog fj springs, and 1.5" daystar spacer:

Started getting her up to date on maintenance:
-Bridgestones off of a new 2016 4Runner w/ <100 miles (craigslist $400 mounted and balanced)
-F&R diffs, x-fer case w/ mobil 1 synthetic gear oil (the old oil had never been changed..smh)
-OEM engine & in-cabin air filters (the old ones were filthy..the incabin was like a tray full of leaves..couldnt see the filter)
-Greased drive shafts, CV-2 Redline red moly (probably never done before..black goo oozed out)
-transmission full drain and refill, 12qts ATF WS, eBay $89
(Drain and refill write up ATF Exchange (using the cooling line) - Toyota 4Runner Forum - Largest 4Runner Forum)
-spark plugs, denzo oem, eBay
-cleaned & greased sunroof (white lithium grease)
-greased all hinges and locks (white lithium grease)
-OEM PCV (cheap insurance)
-both front hub assemblies from [MENTION=100129]nj636[/MENTION] (my front left bearing was bad so I went ahead and changed both)
***PRO TIP rent a 3-arm gear puller from autoparts store to pull the old hubs**
Then added a few simple mods:
-LEDs in interior and exterior, bright white (had to drill out the license plate bulb cover screws, heads just fell apart from rust)
-LEDs for gage cluster and everything else
-Black WeatherTech FloorLiners, front and middle
-Black weathertech cargo liner
-(removed)USB console charger, thanks to [MENTION=114846]Bluesky 07[/MENTION] Adding a Console USB Power Port to my 2007 Sport - Toyota 4Runner Forum - Largest 4Runner Forum
-added smoker kit ($25 eBay)
-rear diff breather


-JL 10W3V3 on a 500/1 w/bass knob..on a 0ga wire to a distribution block...gives me options if I need power in the rear for anything else

-got the 2013 TE rims on craigslist for $330..guy had them in storage..practically brand new. Got them mounted with new TPMS service kits.
Then I started researching a economical lift (what I thought was going to be economical lol) decided on:
-FJ Moog springs front and rear ~$110 rock auto
-Bilstein 5100s front and rear $330 shipped from http://downsouthmotorsports.com/i-8...le-shocks-03-2009-w-optional-rear-shocks.html
-Daystar 1.5" rear spacer $40 amazon
-Energy suspension poly control arm bushings, rockauto $80
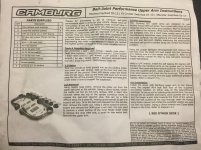
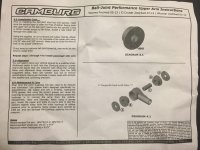
-Wanna-be Camburg UCAs eBay $235 shipped
-new OEM camber bolts, $130 (anti-seized the crap out of them)
-KYB top hats, rockauto $42
-Icon sway bar spacers, $40 eBay
Removing old rubber LCA bushings, let the torch do the work then rubber comes out easy
Camburg wanna-be UCAs, i still need to put a grease fitting in the ball joints. I like how every joint on it has a grease fitting. Also, the bushing grease that came with the Energy Suspension bushings is ridiculously sticky..way more viscous than the grease that came with the UCAs..so I used the thick stuff for all bushings

A few road blocks on the road to a lifted runner:
1. Seized nut on driver side strut (top), sawzaw time


You can see that the top part completely twisted trying to remove the nut
2. Driver side UCA ball joint nut stripped out, sawzaw time:

3. I went ahead and hacked off the top nuts on both rear struts, they were being a pain in the you know what..I guess all those years of being driven in the salted MD roads took their toll...because I PB Blasted the bolts 5 times over a 3 week period..sheesh
I was pretty impressed with these blades..I only used 1 to cut through everything mentioned.
DEWALT Reciprocating Saw Blades, 8-Inch, 14/18TPI, 5-Pack (DWA4188) - Sawzall Blades - Amazon.com
Ebay wannabe Camburgs installed, also Moog FJ springs and 5100's @ 2.5"

4/40/16 (with bilstein 5100s, top notch, 1.5" rear spacers, FJ 4x4 springs)
LF 24.5"
RF 24.5"
LR 25.5"
RR 25.5"
2/2/17 (with bilstein 5100s, top notch, FJ 4x4 springs in front & metaltech LT in rear)
LF 24"
RF 24"
LR 26"
RR 26"
--Wish list--
-component speakers all around?
How she sits now with Icon coilovers and MT LT rear:
Bought it in MD...$14000...114,000 mi..craigslist
How she sat with bilstein 5100s, moog fj springs, and 1.5" daystar spacer:
Started getting her up to date on maintenance:
-Bridgestones off of a new 2016 4Runner w/ <100 miles (craigslist $400 mounted and balanced)
-F&R diffs, x-fer case w/ mobil 1 synthetic gear oil (the old oil had never been changed..smh)
-OEM engine & in-cabin air filters (the old ones were filthy..the incabin was like a tray full of leaves..couldnt see the filter)
-Greased drive shafts, CV-2 Redline red moly (probably never done before..black goo oozed out)
-transmission full drain and refill, 12qts ATF WS, eBay $89
(Drain and refill write up ATF Exchange (using the cooling line) - Toyota 4Runner Forum - Largest 4Runner Forum)
-spark plugs, denzo oem, eBay
-cleaned & greased sunroof (white lithium grease)
-greased all hinges and locks (white lithium grease)
-OEM PCV (cheap insurance)
-both front hub assemblies from [MENTION=100129]nj636[/MENTION] (my front left bearing was bad so I went ahead and changed both)
***PRO TIP rent a 3-arm gear puller from autoparts store to pull the old hubs**
Then added a few simple mods:
-LEDs in interior and exterior, bright white (had to drill out the license plate bulb cover screws, heads just fell apart from rust)
-LEDs for gage cluster and everything else
-Black WeatherTech FloorLiners, front and middle
-Black weathertech cargo liner
-(removed)USB console charger, thanks to [MENTION=114846]Bluesky 07[/MENTION] Adding a Console USB Power Port to my 2007 Sport - Toyota 4Runner Forum - Largest 4Runner Forum
-added smoker kit ($25 eBay)
-rear diff breather
-JL 10W3V3 on a 500/1 w/bass knob..on a 0ga wire to a distribution block...gives me options if I need power in the rear for anything else
-got the 2013 TE rims on craigslist for $330..guy had them in storage..practically brand new. Got them mounted with new TPMS service kits.
Then I started researching a economical lift (what I thought was going to be economical lol) decided on:
-FJ Moog springs front and rear ~$110 rock auto
-Bilstein 5100s front and rear $330 shipped from http://downsouthmotorsports.com/i-8...le-shocks-03-2009-w-optional-rear-shocks.html
-Daystar 1.5" rear spacer $40 amazon
-Energy suspension poly control arm bushings, rockauto $80
-Wanna-be Camburg UCAs eBay $235 shipped
-new OEM camber bolts, $130 (anti-seized the crap out of them)
-KYB top hats, rockauto $42
-Icon sway bar spacers, $40 eBay
Removing old rubber LCA bushings, let the torch do the work then rubber comes out easy
Camburg wanna-be UCAs, i still need to put a grease fitting in the ball joints. I like how every joint on it has a grease fitting. Also, the bushing grease that came with the Energy Suspension bushings is ridiculously sticky..way more viscous than the grease that came with the UCAs..so I used the thick stuff for all bushings
A few road blocks on the road to a lifted runner:
1. Seized nut on driver side strut (top), sawzaw time
You can see that the top part completely twisted trying to remove the nut
2. Driver side UCA ball joint nut stripped out, sawzaw time:
3. I went ahead and hacked off the top nuts on both rear struts, they were being a pain in the you know what..I guess all those years of being driven in the salted MD roads took their toll...because I PB Blasted the bolts 5 times over a 3 week period..sheesh
I was pretty impressed with these blades..I only used 1 to cut through everything mentioned.
DEWALT Reciprocating Saw Blades, 8-Inch, 14/18TPI, 5-Pack (DWA4188) - Sawzall Blades - Amazon.com
Ebay wannabe Camburgs installed, also Moog FJ springs and 5100's @ 2.5"
4/40/16 (with bilstein 5100s, top notch, 1.5" rear spacers, FJ 4x4 springs)
LF 24.5"
RF 24.5"
LR 25.5"
RR 25.5"
2/2/17 (with bilstein 5100s, top notch, FJ 4x4 springs in front & metaltech LT in rear)
LF 24"
RF 24"
LR 26"
RR 26"
--Wish list--
-component speakers all around?
Last edited: