New member into/ build thread from the beginning.

Today did the last piece of chasing the dreaded p0420 and p0430 codes

Pacesetter 750050 passenger side Amazon $265
Pacesetter 750051 driver side one of my wholesalers $211 (amazon is $233 plus tax)
OEM Head bolts 16 pcs 90080-12008 $5.75 list $92
OEM Head Bolt nuts 16pcs 90080-17187 $2.81 list $44.96
OEM Toyota Red Box Bank 1 upstream $151 cost (didnt know rockauto sold oem denso SMH)
Denso Bank 1 down stream, rockauto 2344261 $49
Denzo Bank 2 Upstream, rockauto 2344138 $42
Denso Bank 2 downstream, rock auto 2344260 $54

Labor for drivers side, muffler and muffler tip $225
Labor for passenger side $180 (3 hours labor)

Approximatly $1425 later, hopefully no more check engine light and stinky exhaust
 
Last edited:
Took off the 275/70/18 BFG Rugger Trail TA's


Replaced them with 285/65/18 BGF All Terrain TA KO's

white letters out!


picture of before and afters.


Hey Gshadow how are you liking the tires,did you notice any different in fitment or run into any issues rubbing going from the rugged trails to bfg at ko's ? I want to run these tires i just wish i could run a bigger size like 275 or 285 but i'm going to running them on the stock 18's with spidertrax along with fj and 2/1. I just don't want to have to do major trimming or always have rubbing issues as some get.
 
I love the KO's, don't get me wrong the rugged trails were nice too. Btw they are for sale too. The KO's ride nice and look nice and does real well offroad!

Everyone says there is rubbing issues, I have none. Except it rubbing on the front flappers and a little bit of the front of the Fender liner and bumper. When I get back to a computer I will post pictures of what I did.
 
[MENTION=93434]gshadow325[/MENTION] I was going to just do this all myself, but since you are a wiring man, i wanted to get your input and guidance. You have helped me figure a lot out in Momo's thread with Diodes etc. Its funny because 2000-2002 I installed car stereo and alarms at Circuit City, we had a diode technical guy so i never dealt with many diodes and relay's. They just always worked lol.

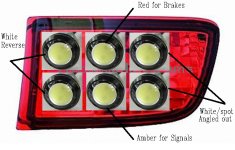
Here are my thoughts. I want to use the Eagle Eye Led's off Ebay. I am going to be placing them into the useless red reflectors in our rear bumper. Thanks [MENTION=50591]gaterose[/MENTION] for giving me the idea. Thinking of 6 in each one. 4 white, 1 red and 1 amber. I will attach a pic at the end

I want the first 2 to be wired like you mentioned with Momo, have the lights working with reverse but also able to turn them on with a switch. So i think you have covered that already. I want the amber to work with signals, which I can just tie into the signal, should I use relay etc? Same as with the red, hook into the brakes. The last 2 whites i will include with the first 2 to run on a switch only, maybe even tie into the first 2, not sure yet.

I hope this makes sense. Let me know your thoughts please.
 

Attachments

  • Bumper Lens.JPG
    Bumper Lens.JPG
    108.2 KB · Views: 2,460
Last edited:
[MENTION=93434]gshadow325[/MENTION] I was going to just do this all myself, but since you are a wiring man, i wanted to get your input and guidance. You have helped me figure a lot out in Momo's thread with Diodes etc. Its funny because 2000-2002 I installed car stereo and alarms at Circuit City, we had a diode technical guy so i never dealt with many diodes and relay's. They just always worked lol.

Here are my thoughts. I want to use the Eagle Eye Led's off Ebay. I am going to be placing them into the useless red reflectors in our rear bumper. Thanks [MENTION=50591]gaterose[/MENTION] for giving me the idea. Thinking of 6 in each one. 4 white, 1 red and 1 amber. I will attach a pic at the end

I want the first 2 to be wired like you mentioned with Momo, have the lights working with reverse but also able to turn them on with a switch. So i think you have covered that already. I want the amber to work with signals, which I can just tie into the signal, should I use relay etc? Same as with the red, hook into the brakes. The last 2 whites i will include with the first 2 to run on a switch only, maybe even tie into the first 2, not sure yet.

I hope this makes sense. Let me know your thoughts please.

easy peasy..wire the rears like i posted for momo, since these are LEDs it will draw very little power, and led's are polarity dependant. just wire them up in parallel, in case you dont know what i mean parallel...positive to positive, negative to negative. just tap those sucker right into the same rear lights for the brake and for turn.

BUT

i think it would not look right with just one led out of 6 that did blink and one that turned red when you hit the brakes. thats just my opinion, but i would get them wired up and see how it looks.


btw, how about using these guys for your project?
Flush Mount LED Bolt
good company and been around for a while
 
Hey Gshadow how are you liking the tires,did you notice any different in fitment or run into any issues rubbing going from the rugged trails to bfg at ko's ? I want to run these tires i just wish i could run a bigger size like 275 or 285 but i'm going to running them on the stock 18's with spidertrax along with fj and 2/1. I just don't want to have to do major trimming or always have rubbing issues as some get.

i did daystars too, but here is what i did to my truck to get the 275/70/18's to clear, the 285/65/18's are actually a little smaller like , 33.25 vs 32.75

i trimed the front a little bit


here it is at a better angle so you can see


and took the front flaps off.

here is my front setup if you were wondering


here was my alignment specs from the first day with 275/70/18 bfg rugged terrain ta's on
before


after


here are my specs with the 285/65/18 BFG at ko's
before, well i needed another alignment because i went and did this with my truck the day before
<iframe src="//player.vimeo.com/video/77352474" width="500" height="281" frameborder="0" webkitallowfullscreen mozallowfullscreen allowfullscreen></iframe> <p><a href="http://vimeo.com/77352474">Getting Dirty in the Pine Barrens @ Frenchies Pit 10/19/2013</a> from <a href="http://vimeo.com/user21976357">Ste Ve Zee</a> on <a href="https://vimeo.com">Vimeo</a>.</p>

before


after


rubbing has alot to do with caster, too much caster front or rear will mean rubbing on body mounts or moving the fender up some more.
 
i did daystars too, but here is what i did to my truck to get the 275/70/18's to clear, the 285/65/18's are actually a little smaller like , 33.25 vs 32.75

i trimed the front a little bit


here it is at a better angle so you can see


and took the front flaps off.

here is my front setup if you were wondering


here was my alignment specs from the first day with 275/70/18 bfg rugged terrain ta's on
before


after


here are my specs with the 285/65/18 BFG at ko's
before, well i needed another alignment because i went and did this with my truck the day before
<iframe src="//player.vimeo.com/video/77352474" width="500" height="281" frameborder="0" webkitallowfullscreen mozallowfullscreen allowfullscreen></iframe> <p><a href="http://vimeo.com/77352474">Getting Dirty in the Pine Barrens @ Frenchies Pit 10/19/2013</a> from <a href="http://vimeo.com/user21976357">Ste Ve Zee</a> on <a href="https://vimeo.com">Vimeo</a>.</p>

before


after


rubbing has alot to do with caster, too much caster front or rear will mean rubbing on body mounts or moving the fender up some more.

Thanks i appreciate it! I guess it pry has a lot to do with your wheels being aftermarket so your offset works better for the bigger tires, even with the spidertrax on my stock 18's i don't think i'll be able to run a tire that big without a lot of cutting moving and trimming. I guess i'll just stick to the 275 or the 265 , the only thing is the 275 bfg ko's aren't rated for severe snow and i kind of want that living in ny so not sure? Either way im getting these tires ive heard nothing but great things!! But thanks again for the feedback and the help!..
 
Last edited:
well it has been a month since i did this but should update the build thread :P

So there are plenty of threads on how to get to the JBL amp and sub.

like this one, but i would not have removed the front panel like that
http://www.toyota-4runner.org/4th-gen-t4rs/89645-how-replace-jbl-subwoofer.html

or this one is a good one
How to Remove the Navigation ECU from a 2003 Toyota 4Runner

Here is what you got when you remove the amp. Kenwood makes a nice 5 channel called the XR900.5 that will fit in the oem locatation. I sold my last one a week ago, so i used a X700.5 and mounted that under the passenger seat.


at the amp connector the big one. peel back the harness to reveal several twisted pairs of wires. they are for various speakers thruout the car. here's

what you got:
AT JBL AMP

Front/left pink+ violet- these two will go to tweeters too from the amp
front/right light green+ blue- these will also go to front tweeters too
right/rear red+ white-
left/rear black+ yellow-
rear tweeters are tied together green/white+ brown-
subwoofer brown+ green/white- for coil 1
subwoofer blue/black+ blue/red- for coil 2

RADIO Connections:
12volt constant blue/yellow
accessory grey
ground brown
illumination green

My parts list
Kenwood KFC-X693 6x9 front speakers
Kenwood KFC-X173 6.5" rear speakers
OEM rear tweeters on D pillars
OEM front tweeters in front doors
Kenwood X700.5
PAC LC-1 line level control aka bass knob
Kenwood DNN-990HD previously installed
Metra ASWC previously installed
Bluetooth steering wheel mod (look it up)
Sirius SXV200v1 sirius tuner
Kenwood KFC-XW800f 8" subwoofer

Front doors:
get kenwood 6x9, removed oem crossover. take it out, your ears will thank you later. sounds like butt if you dont. front tweeters are mounted in parallel with the 6x9's from the factory and they have a capacitor style bass filter so you will be ok.


rear doors:
get 6.5" speakers. straight up install nothing special

connections at rear jbl amp:
just run all those connections to your location for your amp. i extended mine to go under the passenger seat. i removed my seat for ease of install.

Subwoofer:
the kenwood 8" sub loves being in that enclosure. i get boom boom with no space taken up. thats how i like it now. i have my convertible with the big bass when i want it.


Power wiring:
Here is a little hint for all you guys. you dont have to run it over to the drivers side from the passenger under seat. you can go thru the passenger side grommet. open your hood look over the fender from the passenger side into the engine. look down at the big rubber pass thru. you will see a little nipple looking thing. get a pair of cutters and snip it. then give the newly found hole a spray of WD-40 or your favorite lube. then poke your 4 or 8 guage power wire thru. You will push aout 6 inches in, then go to the other side under the passenger side and reach up to grab your wire you just ran thru.

NOTE: once you got your power line thru the fire wall. DO YOURSELF a favor. Squeeze a nice blob of silicone glue on the wire from the outside, so you dont get water coming in, just in case.

Picture of the said big grommet on passenger side. also how i routed it along the fire wall zip tied to the brake line so the wire does not fall on the engine.

screwdriver is pointing to the grommet and the wire loom hiding the red power cable


Kenwood DNN990HD


Bluetooth steering wheel mod, added in the right side buttons


PAC LC-1 (bass knob). took it apart and flush mounted it.


OEM amp and OEM sub and 10 years and 172k worth of dust and dirt


Kenwood KFC-XW800f, flat subwoofer. no modification to the OEM sub box is necessary. direct drop in and plug and play! well plug in and wire it up :)


MSRP for everything installed? $2230!! from crutchfield
Kenwood DNN990HD $1399
Kenwood X700.5 $349
Kenwood KFC-X693 $149
Kenwood KFC-XW800f $169
Kenwood KFC-X173 $99
Metra ASWC-1 $79

Labor should run you about $350
Misc parts $50 (power cables, rca wires, and fuses)

Cheap huh? :) And Why all kenwood? Kenwood's Excelon products all carry a 2 year warranty, from speakers to amps to radio! Good stuff!


BTW-please dont cheap out on tape. BUY 3M SUPER 33. i know its expensive BUT you are doing this yourself, and saving money...so why not spend some money or better materials. IMHO, you dont need to shrink wrap, but thats personal preference. From folling this guide you will save a bunch of money, spend that money you saved on a good soldering iron. I own 3 Solder-It Pro 150 butane irons. Highly recommend it. Also use Master butane. it is high quality filtered fuel. Use something else and you will regret it with clogged iron. buy 0.7mm Diameter Tin Lead Rosin Core Flux Solder Soldering Wire.
You got questions? fire away
 
DIY MOD: Dashboard light always on and dimmer still works. Applies to 03's

did this about a week ago and love it ever since!!

So i have 5% window tint, many times i cant see how fast i am going during the daytime. Since i had to install the newest Drone Mobile DR-3100 in my truck to replace the last generation DR-2000. New one works off Verizon's 4G/LTE network. Unlike everyone else on the market uses 2G and 3G aka viper's smart start. Enough about technology, lets get down to the nitty gritty...the MOD!

Vehicle: 2003 4runner V8, read this does not need to apply to 2004 and newer cars

CONCEPT:
Provide power to guage cluster when vehicle is running. No loss of functionality. Dimmer will still dim cluster, regardless if the car is running or not. If car is not running and parking lights are turned on. dimmer still works and it will still turn on cluster.

parts: two 1amp diodes as shown in the picture. some know how to get the cluster out.


-so go to the right connector at the cluster.
-you need to go to the left row of the right connector
-two wires you are concerned with is
*red/blue is ignition power
*green is power coming from dimmer switch(this wire was original power supply to cluster that only had power when the parking lights were turned on

green will be cut in half. trim back some of the tape that is covering the harness so you have more wire to work with.


red/blue will need to be stripped back


diodes need to be used like this


this is the diodes installed before insulation


here is a video of it in action. click on the picture to see the video
 
DIY MOD: How to make under hood lighting.

did this last month too but never updated the build thread! LoL

Wacky wednesday hump day mod day. something for you to think about doing this weekend! lol

Something that i wanted for a while to do on my own cars. I have done this for many customers before. Most were existing bulbs like in a ford f350 super duty.

So here it is, the magic recipe

-get a mercury switch $3 ebay
Mobilistics Mercury Tilt Switch for Alarms Lights Etc | eBay
-strip leds, i use two 60cm adhesive backed LED strips. ebay has them.
60cm led strip in eBay Motors | eBay
-few small 1/2" self tapping screws
-some wire loom 3-4feet
-some wire about 8 feet
-fuse holder
-ring terminal


i have led strips in stock and have been using this vendor for over 3 years and good quality but expensive. $22 per strip, but they work. consistantly and low failure rate!


enough about the hardware needed. pictures and the how to!

use mercury switch


-Use some alcohol to clean the area on the hood


-YUK the crap that came off the hood.


-clean this area behind the weather strip on the top of the hood but before the hood liner. this is the underside of the hood


-this is the shot of the little tab on the drive's side near the windshield cowl. this tab hold the hood blanket to the hood. there is one on each side of the hood.


-Eventually you will be doing this with the mercury switch and the ring terminal. You will take one end of the two wires from the mercury switch cut it short and attach a ring terminal to it. screw it into the tab like this picture.


-You will run the wires from the led strip light down behind the hood blanket. you will have two wires from the led strip light, one positive and one negative. you will take the negative from the strip light and wire one end to the mercury switch. the other end of the mercury switch will be cut short and wired up to the ring terminal and grounded to the same place where we mounted the mercury switch in the above picture.

-i have the wire running down to the hood hinge on the drivers side. i used some dynamat sound deadening material i have around the shop. cut it into a strip and used it to hold down the power line.


-i ran the wire down to a hole on the hinge and zip tied it. if you look at the passenger side where the washer hose line comes to the hood hinge. you will see what i am trying to accomplish.


-pushed the wire as far back as possible and tucked it under the plastic cowl. wire loomed it and it was coming out from under the cowled, like in the next picture.


-wire come to the fuse and the fuse is tapped into a constant power. the one with the yellow connector on it, in the next picture.


btw- since it is leds, i only used a small small fuse..5amp fuse
Thats it for wiring, since t4r.org only allows for 20 pictures in a post....next post is the money shots!
 
Pictures yayayayayaya

PICTURES YAYAYAYAYAYA


this is the hieght the hood is set at for shutting the light off


the level of the hood right before the light turns off


Just imagine its pitch black dark as hell out there and you trying to jump start someone elses car. or what ever reason you need the hood open at night time!!

they so bright and awesome!
 
30 miles with Nitto Mud Grapplers 33x12.50x18, my impressions and some pictures

in case you missed it, i ran mud grapplers for 30 miles!

Yes you can fit 5 33" 12.50 x 18" Nitto Mud Grapplers in your 4th Gen 4runner!


Got a chance to buy these at a great deal. They came off a 2014 10th Anniversary Rubicon. Previous owner said they were too loud, i didnt believe they were that loud. I sold lots of Nitto Grappler series tires, Dura, Terra, Trail and crossteks...Never did a set of Mud, so i had no idea what i was getting myself into. The most agressive Nittos i did was the Trail grapplers. Those were nice and noise was tolerable when i drove them on a soft top 2014 unlimited wrangler. Honestly, how bad can the muds be?

So, i did what any normal person with access to a tire balancing and wheel mounting machine would do

A: Buy them, install them, if I like them i got them at a awesome price
B: Dont like them, sell them and maybe make some money while i am at it

Win Win either way i look at it.

So i install them saturday afternoon, nearly broke my back since they are so heavy!

Sizing them up.


Got one on and went for a ride around the block, it rides real nice.


So on with the rest.


This is how close they were to the rear and the front of the fender liner. they rubbed a little bit only in reverse while turning.


This is how they sat past the fender line


All mounted up and heading home.


When i got home, i sat on the grass and took these pictures. While i was admiring how great these tires looked the kids rode their scooters up and down the driveway.


While sitting there, I just couldnt get over that humming noise these tires make. I do love how i was able to ride over and off sidewalks like nothing. I went over railroad tracks like they didnt exist. Ride was so smooth. turning was sloppy and mushy like any big tire would be. Something i am not used to. So handling really sucks, noise really sucks. LOOKS REALLY GOOD :P not really my cup of tea. Woke up at normal 6am the next day and drove back to my shop and put back on my good ole BFGoodrich All Terrian TA KOs. Drove 125 that day, and really sat back and said to myself, the enjoy what you have. So i did!!! Got home and promptly put up a craigslist ad, and some ads on a few toyota forums.

In less than 8 hours after the ad went up. There was a deal struck. They went to a Navy girl, she's on her third jeep and just got this one 2 weeks ago.

Here are the mud grapplers on what i call a mini hummer, 2011 Jeep Wrangler Sahara Unlimited


Hate to see them go. I think they would have been real nice out on the trails. I could not justify having $2000 tied up in tires just sitting there.

Verdict: they should be real nice off roading tires but to me, i dont think they should be on a daily driver. very noisy, i had to turn the radio real loud to drown out the roar. I must be getting too old for this stuff. I love to hate them, love the look-hate the noise.
 
Today did the last piece of chasing the dreaded p0420 and p0430 codes

Pacesetter 750050 passenger side Amazon $265
Pacesetter 750051 driver side one of my wholesalers $211 (amazon is $233 plus tax)
OEM Head bolts 16 pcs 90080-12008 $5.75 list $92
OEM Head Bolt nuts 16pcs 90080-17187 $2.81 list $44.96
OEM Toyota Red Box Bank 1 upstream $151 cost (didnt know rockauto sold oem denso SMH)
Denso Bank 1 down stream, rockauto 2344261 $49
Denzo Bank 2 Upstream, rockauto 2344138 $42
Denso Bank 2 downstream, rock auto 2344260 $54

Labor for drivers side, muffler and muffler tip $225
Labor for passenger side $180 (3 hours labor)

Approximatly $1425 later, hopefully no more check engine light and stinky exhaust

still after all this crap, i got a P0430 code to mess with until

-installed these Dorman 42009 $5 spacers, cleared p0430 and it has yet to come back!

Yes, so here i am posting pictures

follow his instructions in first post. http://www.toyota-4runner.org/problems-warranty-issues/92619-10$-fix-failed-catalytic-converter.html

just to clarify, i had to read his post 2 times to see where he was going with it. but its all good info.

you need 3/8 bit and 1/2 bit
you need wd40 as a lubricant while drilling it out
you need a vice to hold the sucker down
you dont use a vice, you will not drill a perfect hole. you might damage the threads on the spacers.

YMMV, :)

Here are the spacers. from left to right, spacer with 3/8 hole, spacer with 1/2 hole, o2 sensor so you can see how big the end is and why you need to drill a 1/2" hole.


spacer with 1/2" hole drilled in it already on the o2 sensor


now the spacer with 3/8" hole on top of the other spacer and on top of the other sensor


sensor installed on passenger side rear aka bank 2 sensor 2


its been 200 miles since i did this. i did this @ 3/4 tank. i just filled up the tank 75 miles ago. i usually get the p0430 pop back on when i fill up for the next 30 miles. so i figured now i can report back with positive results. also my car used to get a sulfer smell, now it does not any more. smells sqeuaky clean!

Cant believe after spending $1425 to change everything, i stilled needed $5 spark plug anti fouler to fool the ecu to stop the dreaded p0430 code!

Moral of the story, if you smelling rotten eggs constantly at idle. Your car is bad. If you getting codes like a bad cat, with no smell. try these $5 trick first on the rear sensors. I did it and now wished i did it sooner. Hindsight is crystal clear 20/20!! and $1425 cheaper!
 
Great build thread!

I was wondering if your P0430 has come back at all after installing the spark plug anti fouler for the 02 sensor?
 
Great build thread!

I was wondering if your P0430 has come back at all after installing the spark plug anti fouler for the 02 sensor?

500 miles and no CEL!!

Also a note for the winch install, i mistakenly installed a 5th gen mount on my 4th gen. LoL
 
What? You received the wrong one?

Nope, my dumb ass put the wrong one on. i ordered both a 4th gen and a 5th gen. with no labels on either box, i put the wrong one on BUT, if i didnt i would not be able to put on the curt front hitch reciever! In hind sight. it all kinda worked out. slight extra trimming of the bumper cap to make it fit thats all.

Even with my mistake, after talking to bud, I am very happy with the end result. He is a stand up guy that really knows his product. Bud apologized for not having proper labels, but then again my dumb butt didnt open up both boxes i got to make sure i got what i needed. I installed the first one i opened and assumed thats the right one LoL. it kinda looks right, since i only had one set of pictures to compare to. i didnt realize the difference!!

Did everything get straightened out? Yes, Bud straighted it all out and i have another 5th gen mount coming :)
 

Members online

No members online now.

Forum statistics

Threads
278,312
Messages
3,554,089
Members
248,016
Latest member
Advally Service

Trending content

Back
Top