nglayton
Senior Member
DC Power XP-270 Install pics & notes
While the install is not hard to do, it is kind of a pain. I also bought this upgraded alternator on an excellent group buy a long while back, like almost a year ago. These group buys are going to keep my wallet thin..... I just finally got around to installing it when a I had a few extra vacations days to use up. Plus the OEM alternator has almost 90k miles on it so I figured I should be pro-active. I plan on installing my BB HW mount as well as my Warn winch in the very near future so now was the time to upgrade.
This isn't really a how-to, well okay maybe it is. Anyway, here is my experience and some quick pics.
First, I thought this was sold as a direct replacement....just drop it in they said.... HA! HA!:rofl:
1) It's 1/2" longer (deeper) than the the original Toyota OEM alternator. There is space, but it makes it a lot tougher to wiggle into the hole it has to go into.
2) The stud for the Positive cable is 2 sizes bigger than the original cable, so you have to drill it out to fit. Luckily I read this some place else and drilled it out before I had everything back in place. I had a lot more room to do it while everything was out, than I would have had I discovered this after I got the new one in.
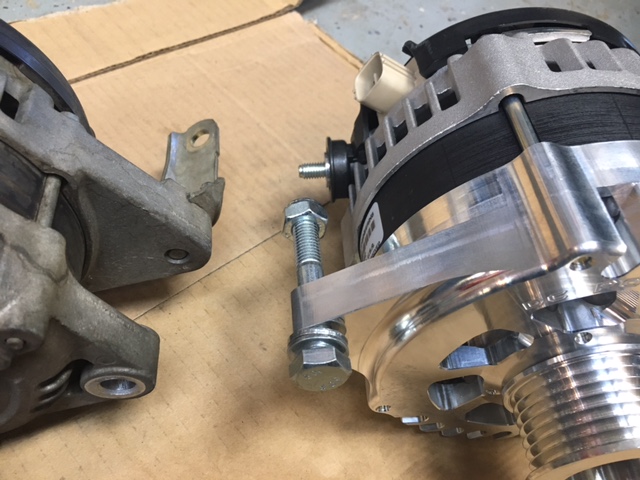
3) Original Toyota alternator has 2 bolts in front, 2 on the side and one in the back. --> The XP-270 only has the 2 front bolts. Now granted the 2 on the side are only holding cables and harnesses in place and the one on the back is overkill, but still from 5 down to 2 seems, well odd. The harness will need some zip ties or something.
Here's what I did to get this thing installed.
1) Disconnect the battery cables and REMOVE THE BATTERY and the battery tray - this just flat out gives you more room to work with.
EDIT: I just remembered...also under the battery tray is a 2-3" long bracket that holds the wiring harness out with 10mm bolt to the fender well. I took this out to help the harness lay flat against the fender well, that also gave me more wiggle room.
2) Release tension on tensioner pulley to let serpentine belt slip off alternator pulley. Use a 14mm wrench or socket and just pull it all the way up. It should let the belt slide right off.
3) Jack up the T4R and take the driver side front wheel off. Then remove the rubber skirt/shield, to access alternator from inside the wheel well, to the rear of the shock and spring.
4) Remove the two bolts on the front of the alternator 14mm(easily accessed from the engine bay) but leave one loosely in place to keep the alt from falling once the rear bolt is off.
5) Remove the 2 bolts on the side of the alternator holding the harnesses and wires. 10mm. One is easy get from the engine bay, the other is easier from the wheel well in front of the spring and shock.
6) Cut various other Toyota black tape (on wires) to the back of the alternator. Cut the tape to release the wire from the harness, DO NOT cut the wires! This a small bracket on the back of the OEM alternator, that does nothing but hold those wires in place. This is why we love Toyota, total overkill by the Toyota engineers, it must have wiggled once or something in a test.
7) Remove the rear bolt on the alternator bracket, accessed through the wheel well. This one that everyone struggles with. You can barely see this mother through the wheel well. It's an "L" bracket attached to the side of the engine and the bottom back mount of the alternator. It's attached directly behind the lower bolt you took out from the front. Damn near impossible to see unless you know where to look. If you have about a 2-3 foot extension on a 12mm wobbly socket this is a piece of cake and easy. Loosen the bolt and bracket from the engine and take the bracket out with the alternator because you don't need it for the new one.
8) Once you have it all loose you can pop the top cap on the positive terminal of the alternator and remove the cable from alternator. You have to take the main stud off before the control wire socket will come up and off.
9) Pull the old alternator out, sideways a bit, then forward and up. It takes a lot of wiggling. Be careful of the radiator hose and the air conditioning line. Personally I took the radiator hose off and shoved it off to the left side to make it easier. I lost about 1/2 - 2/3's of a gallon of anti-freeze in the process, but it was so much easier, it was worth it.
Then install the new alternator and reverse the steps to get it all hooked up.
Remember to drill out the OEM cable or you will never get it on the new alternator.
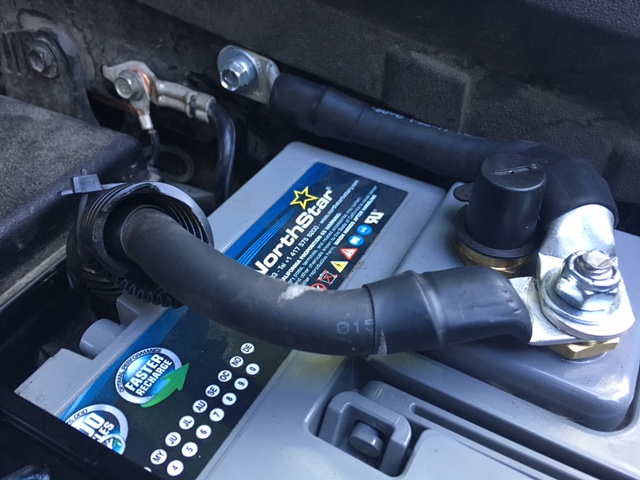
Now is also a good time to do the "BIG 3" upgrade if you are so inclined.
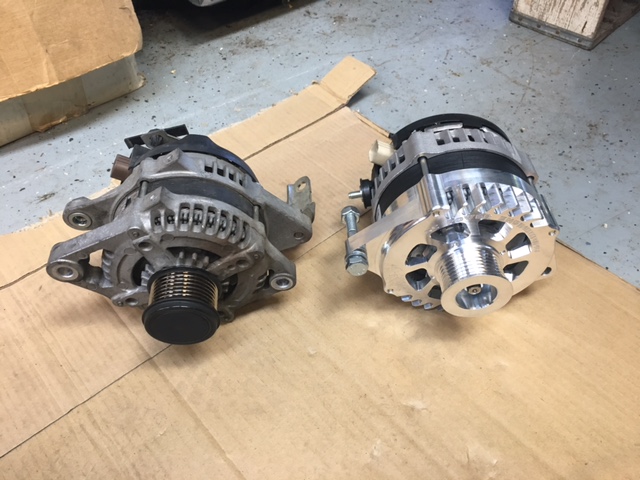
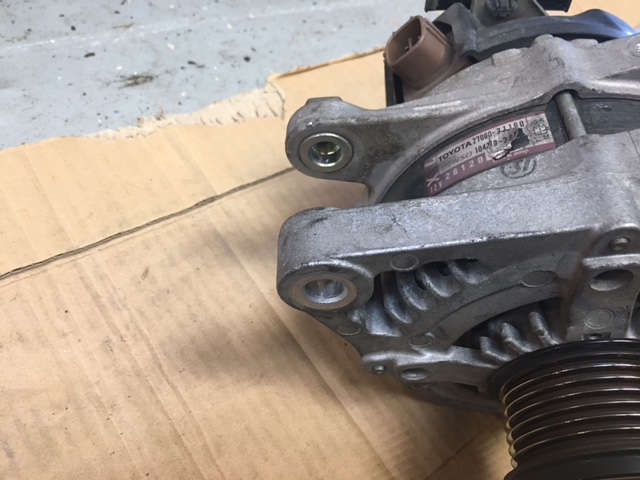
Some side by side comparison shots for the old and the new alternators.
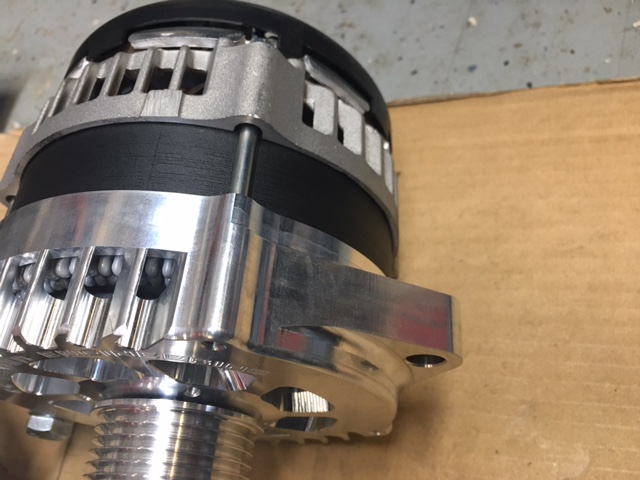
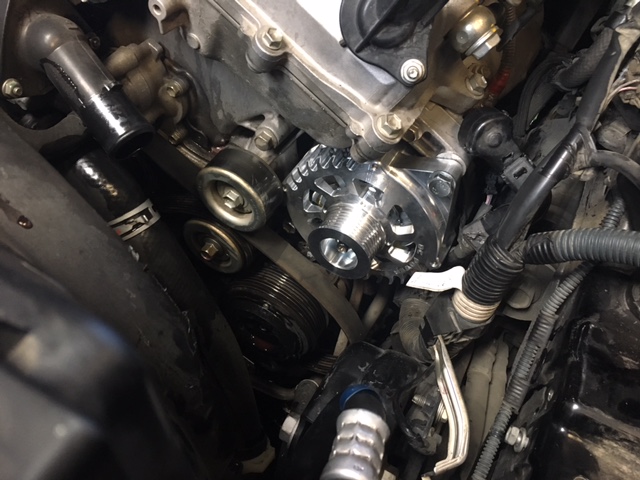
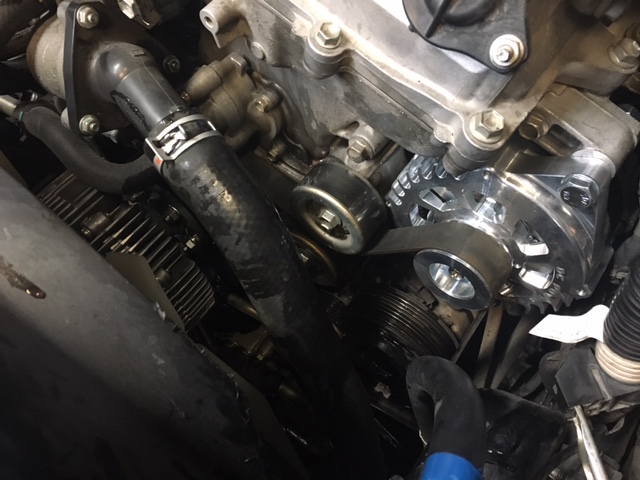
Here's a couple of it installed!
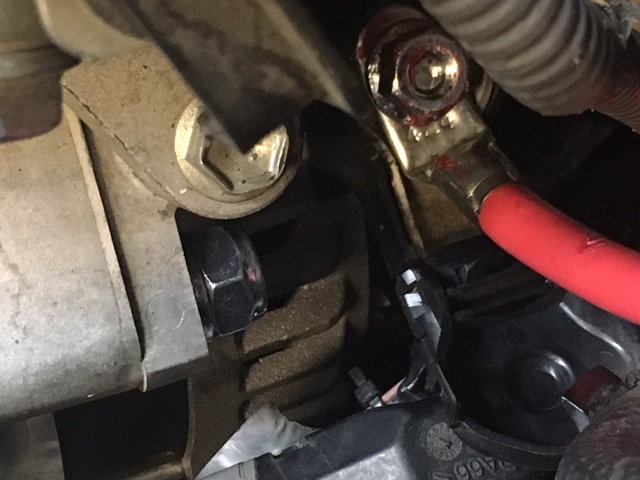
A couple of shots of my "Big 3 Cable Upgrade" I'm still not real sure if it's snake oil or not, but since I had all the parts on hand and didn't have to spend any extra $$ or pay anyone to do it, I figured why not?
While the install is not hard to do, it is kind of a pain. I also bought this upgraded alternator on an excellent group buy a long while back, like almost a year ago. These group buys are going to keep my wallet thin..... I just finally got around to installing it when a I had a few extra vacations days to use up. Plus the OEM alternator has almost 90k miles on it so I figured I should be pro-active. I plan on installing my BB HW mount as well as my Warn winch in the very near future so now was the time to upgrade.
This isn't really a how-to, well okay maybe it is. Anyway, here is my experience and some quick pics.
First, I thought this was sold as a direct replacement....just drop it in they said.... HA! HA!:rofl:
1) It's 1/2" longer (deeper) than the the original Toyota OEM alternator. There is space, but it makes it a lot tougher to wiggle into the hole it has to go into.
2) The stud for the Positive cable is 2 sizes bigger than the original cable, so you have to drill it out to fit. Luckily I read this some place else and drilled it out before I had everything back in place. I had a lot more room to do it while everything was out, than I would have had I discovered this after I got the new one in.
3) Original Toyota alternator has 2 bolts in front, 2 on the side and one in the back. --> The XP-270 only has the 2 front bolts. Now granted the 2 on the side are only holding cables and harnesses in place and the one on the back is overkill, but still from 5 down to 2 seems, well odd. The harness will need some zip ties or something.
Here's what I did to get this thing installed.
1) Disconnect the battery cables and REMOVE THE BATTERY and the battery tray - this just flat out gives you more room to work with.
EDIT: I just remembered...also under the battery tray is a 2-3" long bracket that holds the wiring harness out with 10mm bolt to the fender well. I took this out to help the harness lay flat against the fender well, that also gave me more wiggle room.
2) Release tension on tensioner pulley to let serpentine belt slip off alternator pulley. Use a 14mm wrench or socket and just pull it all the way up. It should let the belt slide right off.
3) Jack up the T4R and take the driver side front wheel off. Then remove the rubber skirt/shield, to access alternator from inside the wheel well, to the rear of the shock and spring.
4) Remove the two bolts on the front of the alternator 14mm(easily accessed from the engine bay) but leave one loosely in place to keep the alt from falling once the rear bolt is off.
5) Remove the 2 bolts on the side of the alternator holding the harnesses and wires. 10mm. One is easy get from the engine bay, the other is easier from the wheel well in front of the spring and shock.
6) Cut various other Toyota black tape (on wires) to the back of the alternator. Cut the tape to release the wire from the harness, DO NOT cut the wires! This a small bracket on the back of the OEM alternator, that does nothing but hold those wires in place. This is why we love Toyota, total overkill by the Toyota engineers, it must have wiggled once or something in a test.
7) Remove the rear bolt on the alternator bracket, accessed through the wheel well. This one that everyone struggles with. You can barely see this mother through the wheel well. It's an "L" bracket attached to the side of the engine and the bottom back mount of the alternator. It's attached directly behind the lower bolt you took out from the front. Damn near impossible to see unless you know where to look. If you have about a 2-3 foot extension on a 12mm wobbly socket this is a piece of cake and easy. Loosen the bolt and bracket from the engine and take the bracket out with the alternator because you don't need it for the new one.
8) Once you have it all loose you can pop the top cap on the positive terminal of the alternator and remove the cable from alternator. You have to take the main stud off before the control wire socket will come up and off.
9) Pull the old alternator out, sideways a bit, then forward and up. It takes a lot of wiggling. Be careful of the radiator hose and the air conditioning line. Personally I took the radiator hose off and shoved it off to the left side to make it easier. I lost about 1/2 - 2/3's of a gallon of anti-freeze in the process, but it was so much easier, it was worth it.
Then install the new alternator and reverse the steps to get it all hooked up.
Remember to drill out the OEM cable or you will never get it on the new alternator.
Now is also a good time to do the "BIG 3" upgrade if you are so inclined.
Some side by side comparison shots for the old and the new alternators.
Here's a couple of it installed!
A couple of shots of my "Big 3 Cable Upgrade" I'm still not real sure if it's snake oil or not, but since I had all the parts on hand and didn't have to spend any extra $$ or pay anyone to do it, I figured why not?
Last edited:
 I will try to find it again or hopefully they will put it back up in the same place and it will just work again.