OKAY, Parts came in and installed, but...

Skullduggery

New member
Still having issues...

I replaced the AFM and it runs MUCH better, but from time to time it runs REAL crappy. I mean that it goes to the point of missing REAL bad.

I don't think it is the used AFM as this one is doing EXACTLY what the one that I borrowed was doing (I think it is better then the one I borrowed, but who's counting). So not sure at this point.

I replaced plugs and wires today, so I know they are good. No help here, so the old ones were fine (in the spare parts pile!).

I did notice that it does not have a PCV valve. There is a plastice nozzle in the place of it (at least that is were I think it goes). I bought a new one today, but I don't know for sure where it goes, or what direction it goes in, which is suction and so on.

If someone could take a picture of the their engine on the passenger side of the truck that would be great. Focus on the hoses that are on the top.

That shoul help with that issue. I don't think that the PCV valve is the issue, but it is one of the problems for sure.

Looking for some suggestions as to what should I do next? What should be on the test plan from here.

I had thought of rebuilding the injectors, not sure if that will help as they all do seem to be working.

Suggestions???

Oh yea, it is rather hard to start when it is cold. Seems to be okay when it is warmed up, but a real Bit$% when it is cold...
 
Last edited:
Register to hide this ad
2nan2vm.jpg

Here, this might help you.
fod6bd.jpg

You might consider replacing the injector o-rings while you have the intake off. It probably is not a bad idea to do the regulator while in there. Ethanol has been doing a number on the rubber fuel components in these trucks lately.
regards
 
Great pictures, thanks for those...

I will have to get to this tomorrow.

Still have questions about some of the things here and about. I will see about gaskets for the fuel injectors tomorrow, hope autozone stocks them! If not it will be a later job. Will also have to check on the regulator.

Thanks again...

I am close I can feel it!!! I want to take it to the DIRT!!! and now I have a friend with one down the street, he is happy too and wants to go and play in the dirt too!!!
 
Well wish I had better news (for me anyway...) Looks like the injectors are in pretty bad shape. Dirty as hell and the caps are crumbling when you touch them, so I ordered a rebuild kit, should be here in a few days...

skullduggery-albums-randy%27s+1992+4runner-picture8615-injectors-were-very-dirty-ordered-rebuild-kit-should-here-few-days.jpg


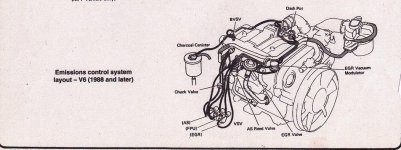
Also noticed that this sensor (The blue one in this picture) does not have any connections to it, know that is NOT right, but I don't know what it is for? Also can't seem to find what should have been connected. Looks like it was vacumme lines, but not sure what was connected to it and where they went??? Any thoughts please let me know...

skullduggery-albums-randy%27s+1992+4runner-picture8617-what-little-blue-sensor.jpg
 
Hey SkullD, the blue "thingy" is called the BVSV, or bi-metal vacuum switching valve. It is part of your EVAP system (although it's also listed under the spark control system in my book), and connects to the charcoal canister on one side, and to the lines above the throttle body on the other. I've included a diagram. Hope this helps!

p.s. @#$%@#$% computers! Well, I'm TRYING to get you that image, but I can't get the stupid computer to "find" it (even though I'm looking right at it!) so I can downsize it in my "paint" program. Basically, the top of the two fittings leads to the small fitting on the canister, while the bottom one leads to the vac. fitting above the throttle body that aims most towards the firewall. Will send pic if I can ever get the dumb machine to cooperate.
 
I think I've got it--hope it's not too small to be of use. At least it should help you figure out the routing.
 

Attachments

  • BVSV resized.jpg
    BVSV resized.jpg
    94.4 KB · Views: 4,233
Thank you very much, that helps a bunch... Any idea what it did? Want to know if that was part of the issue I am having. Funny seen that the center hose on the trottle body was missing and pluged with a drill bit and wondered where that went, know I know!!! ;)

I need to find a replacement for it as both of the nozzles are broken. Now I am waiting for the kit to rebuild the fuel injectors. Not sure if it comes with instructions, but I will need to know how to get them apart. Not sure as they don't seem to come apart easy (I think that may be a good thing too).

Anyone know how to take them apart? Guess I should go search the "Garage" section to see if there is any info there too.

Thanks again for the help...
 
Thank you very much, that helps a bunch... Any idea what it did? Want to know if that was part of the issue I am having. Funny seen that the center hose on the trottle body was missing and pluged with a drill bit and wondered where that went, know I know!!! ;)

I need to find a replacement for it as both of the nozzles are broken. Now I am waiting for the kit to rebuild the fuel injectors. Not sure if it comes with instructions, but I will need to know how to get them apart. Not sure as they don't seem to come apart easy (I think that may be a good thing too).

Anyone know how to take them apart? Guess I should go search the "Garage" section to see if there is any info there too.

Thanks again for the help...

My pleasure, SD! The BVSV controls the flow of fuel vapors from the charcoal canister (that came from the fuel tank) to the intake. It does this by reading the coolant temp. and the amount of vacuum from the throttle body. As for the injectors, you're a braver man than I--I didn't even know these WERE rebuildable by the home mechanic! Most of the info I've ever seen just says to get new or professionally rebuilt ones, so best of luck on that chore. For the record, I believe one or two of the vacuum fittings above the throttle body WILL be plugged when you're done--I'm pretty sure mine has some unused ones. Will check later for sure.
 
Just a quick note regarding my last post--there IS an unused fitting after all is hooked up, at least on a 5-spd model. There are four fittings close to the throttle body opening, with two towards the front and two to the rear, and all are in use; but, there's a fifth fitting slightly apart from these, pointing to the rear, and on my fully-functioning unaltered truck it is plugged off. It is a proper factory plug, not something cobbled together, so I'm sure it's correct.
 
Just a quick note regarding my last post--there IS an unused fitting after all is hooked up, at least on a 5-spd model. There are four fittings close to the throttle body opening, with two towards the front and two to the rear, and all are in use; but, there's a fifth fitting slightly apart from these, pointing to the rear, and on my fully-functioning unaltered truck it is plugged off. It is a proper factory plug, not something cobbled together, so I'm sure it's correct.


Different 4runners with different options and emmissions had various vacuum diagrams.

SD: Your best bet is to look at your vacuum diagram sticker under your hood.
 
Just found out (as I went looking at Autozone and Myers for it). That part is called a "Ported Vacuum Switch". Here is the page in the Manual... It is related to the EVAPORATIVE EMISSION (EVAP)
CONTROL SYSTEM http://www.ncttora.com/fsm/1990-1995_4Rnr/Toyota.4Runner.1990.1995/FSM/95toypdf/95rmsour/1995/954runne/eg1/emission/evaporat.pdf

It is not available at eiter location, they do not stock it. Toyoya sells them for nearly $100.00...

Found one on eBay for $31.00, found myself lucky and bought it.

So, now I have two parts orders on the way...

1. The rebuild kit for the injectors. Kit includes all the rubber parts, the Pintle Cap and the filter. All pretty easy to install. The filter is the toughest and I will only replace them if they are real dirty or clogged.

(does anyone want to see how to rebuild them?) If so let me know and I will see if I can film it, but videos are on you tube.

2. The BVSV Valve (Ported Vacuum Switch) is also on the way. Everything should be here by Monday

I am going to go through all of the Vacuum lines as well, not sure what is good and what is not. Will pull and test them for leaks, pliabilty and brittleness. If found to be in question, they will be replaced.

Moving along... Wish it were faster, but doing what I can with what I can get local. For things I can't get local, I order and wait...

Thanks for everyones help...
Randy
 
Last edited:
Thanks, I may need it. Rebuilding the injectors, while not hard, does require some "special tools" that I do not have, so I have to make them.

The tools are...

1. A way to get pressurized cleaning fluid into the injector. While I seen a few of them, each one different. I chose the easiest to build (I thought) which was a 5ml oral injection tool. It is suposed to fit like a glove, but does not. It does work, but not optimal. If I was going to do this a bunch, I would build something a bit better, but this will work about 80%.

2. You have to hold the injector, the can of carb cleaner, the tray to catch what is sprayed out and the trigger to get the injector to fire. Not easy... If I had an assistant would be better, but as I do not I built a couple of items.

a. An injector wire with battery and trigger.
b. A jar that has a couple of holes to hold the injector.
c. An syringe with an injector tube from that will seal to the injector.

That is pretty much it, I will take some pictures and maybe a video I do this and will do a write up when it is done for anyone else that is planning to give it shot.

So, once again, thank you for the "Good Luck" I may need it! ;)

Randy
 
Not sure if it is something within your budget but a TON of your time and effort can be saved by sending those injectors out.

I send the injectors on my race bike out to a place called Pro Flow

Give them a call.

The owner, Greg, is a wealth of knowledge and has been very helpful in providing information as well as great service.

Disclaimer: I have zero financial stake in suggesting Pro Flow. I am a happy customer and nothing more.
 
Thanks Greg,

That is a great link. I may consider it once I try my luck. I do like to do things myself if possible, though I am not testing the flow, I should be good other then that...

Time is something that I do have right now and other then metering the results I will be doing the same thing.

$20.00 per injector is not to bad though! If I have any issues I will be sending them off...

My test so far look pretty good though...

Thanks
Randy
 
Okay,

Injector parts came in and they are now rebuilt and installed. I have some hoses to buy, which I will do tomorrow then re-assymble it and start testing again.

I did clean the injectors and they needed it for sure. Not sure how they will do now that they are rebuilt, but they did spray well when I tested them.

Here is to testing....

Thanks
Randy
 
Boom!!!

Well....

I put it all back together and it ran GREAT, BUT....

The fan blew up!!!

Crazy I know, but it must have been in bad shape and it blew apart. I have a few cuts and bruses, but am okay. Take a look at the damage...

skullduggery-albums-damage++her+%28during+testing..%29-picture9035-hear-you-can-see-fan-shroud-gone-blown-apart.jpg


Here you can see that there is no more fan! It is all over the driveway... See below...

skullduggery-albums-damage++her+%28during+testing..%29-picture9034-plastic-water-everywhere-will-need-more-parts-now-yea-lol.jpg


Plastic everywhere....!!!

Will need the following parts (as I know it now...)

1. Fan
2. Shroud
3. Radiator
4. Air Box parts (not sure the total damage here)

Glad I made it thought and little damage to myself, but I will be on eBay shopping again it seems...

Life goes on I guess... I am going to give it a short test drive to see if it is running right as I only reved it up once and this all happened...

Will let you know how it goes...

Here's hoping!!!!
 
Last edited:
Okay,

I went to the junk yard and picked up a fan. No radiators so I will have to see if it can be fixed. If not then I will be ordering one.

Also, no shroud, but I can do with out this for a short time, it is winter after all...

I also found the leak in the power steering, picked up the hose at the Junk yard to fix that as well. I also grabbed a Throttle Position Sensor and All of the sensors from under the intake.

Why all of them? Well, I don't know which one is the Knock Sensor! Can someone clue me in please? I can't find a picture in the Factory Service Manual... I just don't know which is which here...

Thanks again... I hope that I get some progress soon... Depressing not moving forward...
 

Members online

No members online now.

Forum statistics

Threads
278,316
Messages
3,554,124
Members
248,016
Latest member
Advally Service

Trending content

Back
Top