Parking Brake Repair Procedure Question

still haven't found the source of the noise yet. Today was pretty uncessfull in that reguard. though like [MENTION=937]TechWrench[/MENTION] said, the noise is coming from one spot.
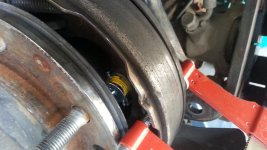
so i think i have a similar issue as these tundras, as i saw similar marks on my parking brake backing plate like in the picture below . anyone experience this before?

shall i just wack it with a hammer to push it back a little?

Question Anyone thought they needed brakes but didnt? making squeel like brakes are needed - Page 2

car is still on jacks XD.
 
still haven't found the source of the noise yet. Today was pretty uncessfull in that reguard. though like [MENTION=937]TechWrench[/MENTION] said, the noise is coming from one spot.
so i think i have a similar issue as these tundras, as i saw similar marks on my parking brake backing plate like in the picture below . anyone experience this before?

shall i just wack it with a hammer to push it back a little?

Question Anyone thought they needed brakes but didnt? making squeel like brakes are needed - Page 2

car is still on jacks XD.

none of that needed.


Car off the jacks today! parking brake was making noise until we engaged it once or twice on the road at low speeds. small click, and poof no more noise!

all noise gone! the parking cable could use a little tightening... Ill have to figure that out another weekend.

All was in high hopes until we were putting on the lug nuts. One snapped with very little torque :( *Cry*

Thanks everyone for their hard work helpping me out :) . Those who are reading the post from google or whatever, please post post if you have any questions, I'll try my best to answer it, but I think every stupid mistake I think I've done and should be posted =P.
 
I have no clue how you got that many tools in that little area.

EDIT:
Finally got it. I ended up using twine to keep the spring compressed while I slide the parking brake shoe back on.

Thanks for the string tip, worked like a charm. The tips from this site are priceless!
 
A couple of shortcuts...

I had to fix my parking brake over the weekend on the passenger side, so I wanted to add a few things here that might help because it's not easy as others have mentioned.

First, the left hand brake shoe has a angle piece of metal attached to it that gets in the way, so the left hand brake shoe is difficult to get on because of that. I assembled the retaining spring and somehow it stayed together (it has a natural tendency to pop off) and managed to slide the brake shoe under it by myself. But the right-hand brake shoe requires two people. There's a metal bar about 4 inches long with a spring on the right side that you have to assemble first before putting the retainer spring on. You cannot hold all that together by yourself unless you had three hands...imho.

Here's what I did. There are three pieces to the retaining spring that's hard to get on. The bottom piece goes into a hole in brake shoe. I taped this down to keep it in place with some thick tape. Now here's where you need two people. One person has to hold the top of the brake shoe (right hand one) in place so as to maintain that bar I mentioned above with the springy spring on its right side in its groove.

Now here's the trick. After you tape down the retainer that goes into the round hole in the shoe, you rotate the hub (only V6 models...sorry...and car needs to be in neutral) and you get a clear shot as rotating the hub gives you a lot more room for putting on the spring and the hat. The 2nd person will need to do that and it's easy with hemostats or needle nose pliers.

As far as parts, I only needed the "hat" and the spring but had to buy the whole kit at Advance for $20. So I have a lot of spare parts.

Getting the parking brake adjusted properly is a little tricky as well...not too lose and not too tight...
 
Thank you for this thread. I replaced my rotors, pads, and yet another frozen front left caliper.

When I pulled my rear rotors, I broke my parking brake. ONLY because of this thread, I was able to put the train back on the tracks after abpout two hours of rebuilding the left e-brake.
 
I need to rebuild my drivers side parking brake... Dreading the job. Saw the $960 comment and that just about killed my intention of taking it to a shop to do it... Going to try the twine trick.
 
I need to rebuild my drivers side parking brake... Dreading the job. Saw the $960 comment and that just about killed my intention of taking it to a shop to do it... Going to try the twine trick.

PM me post, heck Ill do anything i can. I spent 3 weekends, dont wish that on anyone.
 
PM me post, heck Ill do anything i can. I spent 3 weekends, dont wish that on anyone.


I took it apart to look the other day and have some questions:

1) Can I remove just one shoe to change the springs and put the shoe back in without disassembling the entire setup? I believe the two shoes are connected on the bottom side with a bar that sits above the axle applying pressure to both shoes. Is it possible to do a replacement on just one side/shoe?

2) Should I just break the whole system down and replace all the hardware (I bought a kit with all the hardware in it... ) or just replace what broke?

3) If I take out both shoes and replace hardware, is it as simple as replacing the old hardware with new and re assembling the parking brake? Or do I need to adjust the brake and all?
 
I took it apart to look the other day and have some questions:

1) Can I remove just one shoe to change the springs and put the shoe back in without disassembling the entire setup? I believe the two shoes are connected on the bottom side with a bar that sits above the axle applying pressure to both shoes. Is it possible to do a replacement on just one side/shoe?

2) Should I just break the whole system down and replace all the hardware (I bought a kit with all the hardware in it... ) or just replace what broke?

3) If I take out both shoes and replace hardware, is it as simple as replacing the old hardware with new and re assembling the parking brake? Or do I need to adjust the brake and all?

I don't think you can just remove one of the shoes, this job is much easier with 2 people. at least the initial setup.

I strongly suggest keeping with OEM as much as you can. especially the star adjuster. The only thing i'd use from a kit is the springs and the shoe hold down pins. note that one at a C shaped _[-]_ .if that makes sense. you must use that on the side that pivots. It confused me for a long time because the moron who 'fixed' it put a straight one in. but keep everything else stock if you can.

what exactly broke? probably best thing to do is tare it apart, change out the springs, brake clean the entire area. lube up the star adjuster, and all the contact points. the adjustment isn't the hard part. its putting it back together that is difficult. to adjust you will need to put the rotor back on, (I liked to engage the parking brake a few times to center it). (both sides in the air) turn the adjuster till you can't move the rotor anymore (Both directions). the back it off a few clicks ( 5-7? if i recall the manual should say what it is)

I'd take a moment to clean the hub of any rust, throw some muscle grease or anti seize or fluid film on the hub, also clean the area where the rear pads mean the caliper mount. you do not want to have to jam that pad in. if you are in the rust belt, there might be a mm or 2 of rust to cause your pads to jam up and not work properly.

I hope this all makes sense.
 
This just saved a lot of frustration. While doing my rotors I found the retaining clip was off, what a PITA to get back on.
 
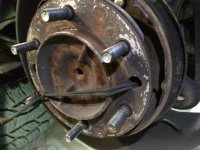
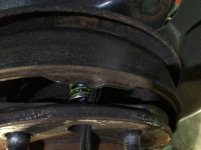
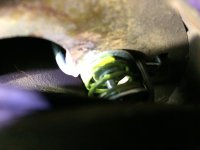
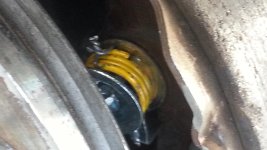
So I finally found the time to do this job. What a PITA. I read up on the procedure and knew what to do but it was not easy to do. It took me about three hours to fix the right shoe/replace the hardware. I ended up using a piece of parachute cord to hold the pin and spring pieces. I tied that up and then moved the shoe into position while using a screw driver to lift the center bar as I seated the shoe...

Very difficult to do alone... I really needed someone else to help but it is doable by yourself...
 

Attachments

  • IMG_1582.jpg
    IMG_1582.jpg
    135.7 KB · Views: 938
  • IMG_1583.jpg
    IMG_1583.jpg
    133.5 KB · Views: 866
  • IMG_1586.jpg
    IMG_1586.jpg
    125.9 KB · Views: 872
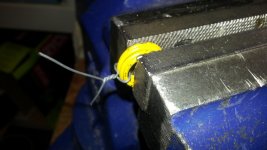
I did a similar procedure w/ wire for the spring & a clamp for the shoe.

I cut the wires after installation to release the spring.
 

Attachments

  • 20170901_144821.jpg
    20170901_144821.jpg
    105.5 KB · Views: 771
  • 20170901_150531.jpg
    20170901_150531.jpg
    111.5 KB · Views: 769
  • 20170901_150543_1.jpg
    20170901_150543_1.jpg
    91.9 KB · Views: 765
I had long needle nose pliers I borrowed from a co-worker, I don't know what kind they were but they were far thinner than the ones I have.

That entire shoe system is a *****! Funny story I'll share. A few days after I purchased this 4Runner I noticed while my window was down going about 20 mph I could a high pitched squeak. It was a late afternoon on a Friday after a pretty damn long day already. My wife wanted to go out that night and spend some time together. I figured I'm just gonna pull the wheels off and see what's going on, shouldn't take long at all. Oh.......After I discovered t was coming from the back, behind the rotor I pulled it off for a little more surgery. Some moron had pulled the rotor off without loosening the tension on the springs. If the shoes are real tight and you force the drum off the shoes you can actually stretch the shoe pins. The locking caps on both pins were up against the axle shield, causing the squeak. I figured this won't take long to fix.... Holy dog smack was I pissed after 2 hours of messing around with it.
I called my wife and told her no go on dinner as I was on a mission to finish this abortion of a brake repair. I took a deep breath, ate a snack and let my brain and frustration regroup.
I bet I tried 20 times to get that freaking clip on. Then it hit me! Just hold the clip, spring and cap and then slide the shoe over it all. I was at a satellite shop of mine and did not have all my usual crap to get a hold of. I cut a piece of 18 gauge wire about 8"s long and did it.

Lord, I have done some frustrating jobs over my years of being a technician but holy hell this kicked my butt. I did the other side in about 30 minutes after I figured out the trick. Toyota should be brow beaten for this particular setup. Why oh why???[/QUOTE]
Resurrecting this post. I said the same thing after going through this over the weekend. Although I am just an amateur I have been wrenching for over 30 years on my stuff. This was probably the most frustrating job I have ever done.
 
That entire shoe system is a *****! Funny story I'll share. A few days after I purchased this 4Runner I noticed while my window was down going about 20 mph I could a high pitched squeak. It was a late afternoon on a Friday after a pretty damn long day already. My wife wanted to go out that night and spend some time together. I figured I'm just gonna pull the wheels off and see what's going on, shouldn't take long at all. Oh.......After I discovered t was coming from the back, behind the rotor I pulled it off for a little more surgery. Some moron had pulled the rotor off without loosening the tension on the springs. If the shoes are real tight and you force the drum off the shoes you can actually stretch the shoe pins. The locking caps on both pins were up against the axle shield, causing the squeak. I figured this won't take long to fix.... Holy dog smack was I pissed after 2 hours of messing around with it.
I called my wife and told her no go on dinner as I was on a mission to finish this abortion of a brake repair. I took a deep breath, ate a snack and let my brain and frustration regroup.
I bet I tried 20 times to get that freaking clip on. Then it hit me! Just hold the clip, spring and cap and then slide the shoe over it all. I was at a satellite shop of mine and did not have all my usual crap to get a hold of. I cut a piece of 18 gauge wire about 8"s long and did it.

Lord, I have done some frustrating jobs over my years of being a technician but holy hell this kicked my butt. I did the other side in about 30 minutes after I figured out the trick. Toyota should be brow beaten for this particular setup. Why oh why???
Resurrecting this post. I said the same thing after going through this over the weekend. Although I am just an amateur I have been wrenching for over 30 years on my stuff. This was probably the most frustrating job I have ever done.[/QUOTE]

Similar experience here. I half contemplated torching the thing before I decided to use zip ties to hold the springs for me.
 
I have no clue how you got that many tools in that little area.

EDIT:
Finally got it. I ended up using twine to keep the spring compressed while I slide the parking brake shoe back on.

^^^This.
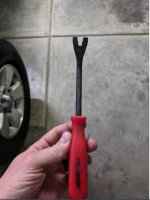
This image helped me alot. Drove off a few days ago and found I had broken a pin. Ordered parts and put new hardware in today. I essentially did the same, but used a trim removal tool and a segment of golf club shaft.

I preassembled the spring/pin/cups, then compressed with my trim tool for the leading pad. It slides on the pin and stays put.

Works perfect to get behind the spring/cups and slide into place. Still takes several tries, but its about as good as its gonna get. Didnt screw with the needle nose pliers, seemed more complicated.

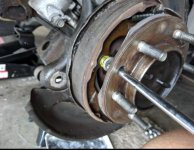
For the trailing shoe. I used a 6 inch shaft of a golf club through the hub hole. The part right after the head that is narrow. Worked well.

Doing some of the reassembly a bit out of order gives you more wiggle room. Before you put in the spring/cup/pin on the trailing shoe (the non straight pin), hang the set the pad in there and install all the top side hardware/springs. It holds the assembly so it doesnt fall out, but gives you some wiggle room.
BUT put the star adjuster and spring on LAST.


You DO NOT have to have the ABS sensor out to do the front side shoe. If you put the pin in first, then the hardware, then your trim tool, then the shoe, its pretty simple. Takes a couple tries. Sure taking it out gives you more room, but also makes the procedure longer.
 

Attachments

  • Screen Shot 2019-02-15 at 9.42.42 AM.jpg
    Screen Shot 2019-02-15 at 9.42.42 AM.jpg
    29.9 KB · Views: 3,939
  • Screenshot_20190215-151628~2.jpg
    Screenshot_20190215-151628~2.jpg
    62.8 KB · Views: 10,355
Last edited:
So, I've read through this entire thread and a couple of others. In the very first post, the instructions say to adjust STARADJUST downward. That's still confusing to me. What's the proper way to adjust it...."toward" or "away" from you. This summer, my parking brake was non-existent. So, I took the wheel off, lined up the hub and was able to adjust the STARADJUST. When I did it (if I recall correctly), I adjusted it downward "toward" me until I could no longer spin the rear hub/axle. Then, I adjusted it "away" from me a few times until the hub would spin again. Afterwards, parking brake and it worked perfectly.

My second question is, how much should a person adjust the STARADJUST in order to safely remove the rear rotor? I've read that some people adjusted 10 rotations and it still messed/bent things up? Should I adjust it (toward or away from me...whichever direction is to lossen it) until it can no longer be adjusted? I am not sure if too much loosening can mess any of the springs up. Thanks in advance for any input!
 
As far as the first question, even the dealer instructions are confusing. I used the 2006 4runner service manual and went upwards to "loosen" the rotor on the passenger side. Wouldn't come off no matter what. As a last ditch effort I went the other way and it worked. Make your best choice and if it won't come off try the other way before giving up.

Someone else can chime on in #2.
 
Last edited:
I have done this on my boat trailer and on a dodge. adjusting is up or down .. adjust up and count the clicks .. 3 clicks then check if the rotor will start to bind . then if so click in the opposite 10 clicks .. do one side at a time .. then with both set at the same 10 clicks see if the park brake pedal goes down about half way ... then IMO that is good.. pedal too high not good .. if a bit lower than half way no problem.
 
My second question is, how much should a person adjust the STARADJUST in order to safely remove the rear rotor? I've read that some people adjusted 10 rotations and it still messed/bent things up? Should I adjust it (toward or away from me...whichever direction is to lossen it) until it can no longer be adjusted? I am not sure if too much loosening can mess any of the springs up. Thanks in advance for any input!
Adjust it all the way. You will not hurt anything.

After reinstalling the rotor turn the star wheel the other way, spinning the rotor by hand every few turns of the star wheel. Back it off just enough that the rotor/hub spin without resistance from the shoes.
 

Members online

Forum statistics

Threads
278,316
Messages
3,554,111
Members
248,016
Latest member
Advally Service

Trending content

Back
Top