
You are using an out of date browser. It may not display this or other websites correctly.
You should upgrade or use an alternative browser.
You should upgrade or use an alternative browser.
Phattyduck's '99 4WD swap
- Thread starter phattyduck
- Start date
phattyduck
Elite Member
The multi-mode cluster is different than the 2WD and non-multimode 4WD cluster. You probably have the visible 4WD indicator over in the gas gauge section of the cluster (never lights up, of course...). If you are doing a multi-mode swap, then you need a multi-mode cluster for the 4WD indicators (up top, center, between the turn signals).So I got my hands on a limited ‘99 ECU with the harness that goes into the engine bay. I’ve got my heads out so that is going to be very convenient. My question now is, will my speedometer cluster automatically light up or is there further modification I have to do to get the 4x4 signal to light up? I tried to get the exact trim and year to prevent as much cross referencing years as possible.
See here: Cluster Differences
-Charlie

raulb21
New member
The multi-mode cluster is different than the 2WD and non-multimode 4WD cluster. You probably have the visible 4WD indicator over in the gas gauge section of the cluster (never lights up, of course...). If you are doing a multi-mode swap, then you need a multi-mode cluster for the 4WD indicators (up top, center, between the turn signals).
See here: Cluster Differences
-Charlie
Yeah, I pulled it while I was there just in case. I am going to need that after all. Mine currently does only have the indicator (not lit up of course). Now I have an interesting issue which, upon a ton of searching on Toyota, and also numerous forums, I cannot seem to match this transmission part number to any year. I have sourced a transmission from a guy online but I always want to confirm part numbers. He is parting out a '99 Limited 4x4. So it should all work rather nice for mine. But I have looked up the part number everywhere and nothing. At all. I'm curious if you, or anyone for that matter has experienced this? The part number is 35010-3D460. The closest match I can find is the '96 but that doesn't match either (It's 35000-3D460). The mystery transmission has the correct j-shifter so am I safe here? Why can't I find that part anywhere? Again, thanks for all the help!
phattyduck
Elite Member
The closest PN you are guessing is for a 4-cylinder.... so that's not it. I bet the part number you got from the seller has a typo or two in it. If it has the right transfer case, the bellhousing top has "VZ" stamped on it, and it has a kickdown (errr... line pressure control) cable, you are safe. I have a '97 trans running just fine in my '99.Yeah, I pulled it while I was there just in case. I am going to need that after all. Mine currently does only have the indicator (not lit up of course). Now I have an interesting issue which, upon a ton of searching on Toyota, and also numerous forums, I cannot seem to match this transmission part number to any year. I have sourced a transmission from a guy online but I always want to confirm part numbers. He is parting out a '99 Limited 4x4. So it should all work rather nice for mine. But I have looked up the part number everywhere and nothing. At all. I'm curious if you, or anyone for that matter has experienced this? The part number is 35010-3D460. The closest match I can find is the '96 but that doesn't match either (It's 35000-3D460). The mystery transmission has the correct j-shifter so am I safe here? Why can't I find that part anywhere? Again, thanks for all the help!
-Charlie
phattyduck
Elite Member
Sport seats installed!
My SR5 had the 'base' seats, bad bolstering, few adjustments, etc. The '97 parts truck that I got all my 4WD swap parts from had the sport seat option... But they were *very* dirty/gross - the sunroof was broken and it was parked outside for some period of time.
So, I disassembled them, laundered the cloth covers, swapped seat and back foam left to right and re-assembled. The only special thing I did was move the passenger occupancy sensor from the '99 passenger seat over to the '97 seat. It doesn't do anything other than flash the light on the dash... but hey, whatever. (the 01/02's do change the SRS system based on occupancy, but not the 99/00 trucks)
Sensor on original foam:

Sensor on '97 foam (white from spray adhesive):

Seats all installed!

The cloth is different, but close enough that it is not a big deal. It is the correct color and a similar pattern... The extra comfort and driver's side adjustment is worth it.
-Charlie
My SR5 had the 'base' seats, bad bolstering, few adjustments, etc. The '97 parts truck that I got all my 4WD swap parts from had the sport seat option... But they were *very* dirty/gross - the sunroof was broken and it was parked outside for some period of time.
So, I disassembled them, laundered the cloth covers, swapped seat and back foam left to right and re-assembled. The only special thing I did was move the passenger occupancy sensor from the '99 passenger seat over to the '97 seat. It doesn't do anything other than flash the light on the dash... but hey, whatever. (the 01/02's do change the SRS system based on occupancy, but not the 99/00 trucks)
Sensor on original foam:
Sensor on '97 foam (white from spray adhesive):
Seats all installed!
The cloth is different, but close enough that it is not a big deal. It is the correct color and a similar pattern... The extra comfort and driver's side adjustment is worth it.
-Charlie


lewiswilkinson
New member
Damn, we are neighbors.
Sorry to hijack - but what lift is on this truck in your sig? I've PMd you
phattyduck
Elite Member
I'm using the free time available from the virus-ocalypse to do a bit of work on the 4Runner that has been waiting in the wings...
Yesterday was poly body mounts day... The sliders made it a bit of a pain to find a good jack location for the body, but I was able to find something that worked:

The old body mounts looked generally still useable (though the rear mount was fairly cracked). Here's a comparison of old vs. new:

I also found a spot where the sliders had been slightly contacting the body, so these mounts hopefully will help in the future:

I still haven't taken it out on a test drive yet, but will today when I fill up the cars with gas...
-Charlie
Yesterday was poly body mounts day... The sliders made it a bit of a pain to find a good jack location for the body, but I was able to find something that worked:
The old body mounts looked generally still useable (though the rear mount was fairly cracked). Here's a comparison of old vs. new:
I also found a spot where the sliders had been slightly contacting the body, so these mounts hopefully will help in the future:
I still haven't taken it out on a test drive yet, but will today when I fill up the cars with gas...
-Charlie

infamousRNR
Senior Member
I’m interested to see what you report back for ride quality. Some say it’s noticeably more harsh & others have reported no harshness in rise quality. Can’t wait to see what you find.

TonyB66
New member
Charlie, having sliders also, I used that same jack point area too. A pretty small spot as I recall...
After the install of the poly bushings, I noticed that the bottoms of my rear Limited doors were lightly dragging on the tops of the sliders. Won't be an issue for you.
Sean, on short trips only, I nor the family did not detect any degradation in ride quality.
After the install of the poly bushings, I noticed that the bottoms of my rear Limited doors were lightly dragging on the tops of the sliders. Won't be an issue for you.
Sean, on short trips only, I nor the family did not detect any degradation in ride quality.

pavelvoivoda
Member
Hi Charlie,Sport seats installed!
-Charlie
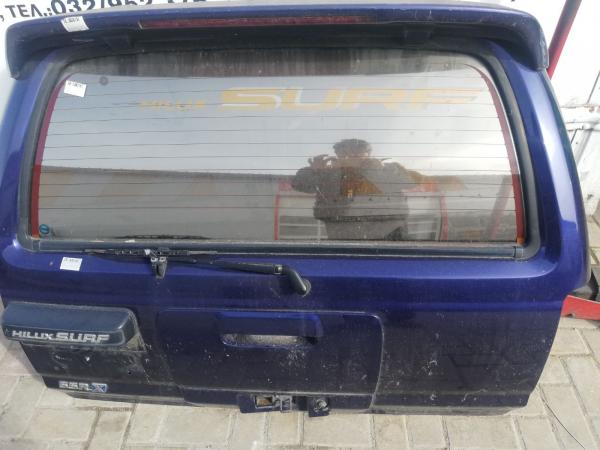
I just changed my seats like a week ago too! Did exactly the same stuff. I got 2 sets from 2 96 Hilux Surfs and managed to build a good set from both.
Now both front seats have the lumbar support. I am only in need of the knob adjustment mechanism for the bottom on the driver's seat, as the sets where both from RHDs!
I will not find one around here, tho.
Here is a pic
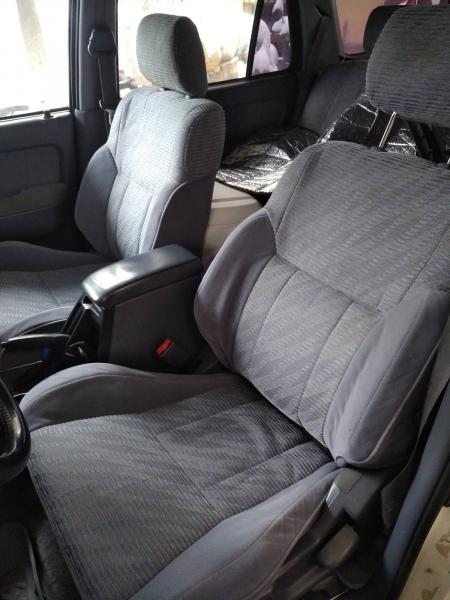
This is what I scored from one of the Hilux's too!
Hey, Im still testing the intercooler on the diesel, but can't find the time to take measurements.
phattyduck
Elite Member
I mostly daily drive a car on coilovers (solid front strut tops, rubber rear) with fully poly bushings all around... so take my opinion with a grain of salt. Oh, and I hooked up my front swaybar again for the first time in a year or so.I’m interested to see what you report back for ride quality. Some say it’s noticeably more harsh & others have reported no harshness in rise quality. Can’t wait to see what you find.
 :
:On the road, the 4Runner is *more* comfortable with the poly bushings. The secondary 'jiggle' is mostly gone, so there is a bit more of a direct feel to the road. This may suck offroad though... so keep that in mind. To really know the full story, I'd need to pull a reasonably heavy trailer and also test it on some washboard and rocks.
-Charlie
phattyduck
Elite Member
With all the extra time I have available at the moment, I was able to knock out a few more things on the 4Runner.
First, I tried to re-seal the rear driver's side door. The vapor barrier plastic wasn't held down to the inner door skin very well and was allowing rain water to leak to the inside where it falls on the door seal instead of to the outside. Big rains coming over the next week, so we will see if the change worked. No pics there.
Also fully flushed the PS fluid and cleaned the reservoir. New o-ring on the reservoir to pump body too. My daughter 'helped' out working on the car for the first time. She was surprisingly into it...
Fully empty fluid (engine off, turn wheel lock to lock)

Helper:

Reservoir off and new o-ring:

-Charlie
First, I tried to re-seal the rear driver's side door. The vapor barrier plastic wasn't held down to the inner door skin very well and was allowing rain water to leak to the inside where it falls on the door seal instead of to the outside. Big rains coming over the next week, so we will see if the change worked. No pics there.
Also fully flushed the PS fluid and cleaned the reservoir. New o-ring on the reservoir to pump body too. My daughter 'helped' out working on the car for the first time. She was surprisingly into it...
Fully empty fluid (engine off, turn wheel lock to lock)
Helper:
Reservoir off and new o-ring:
-Charlie
TonyB66
New member
With all the extra time I have available at the moment, I was able to knock out a few more things on the 4Runner.
First, I tried to re-seal the rear driver's side door. The vapor barrier plastic wasn't held down to the inner door skin very well and was allowing rain water to leak to the inside where it falls on the door seal instead of to the outside. Big rains coming over the next week, so we will see if the change worked. No pics there.
Also fully flushed the PS fluid and cleaned the reservoir. New o-ring on the reservoir to pump body too. My daughter 'helped' out working on the car for the first time. She was surprisingly into it...
Nice to see Charlie, and the helper too! What did you use to seal that plastic vapor barrier? I used a bead of 100% silicone some time back and the last I had checked it did the job well.
Rains coming here too, right now actually. I've been clearing-out a culvert under the driveway when it rains, and that's where I'm going now. Hope you and the family are well...
phattyduck
Elite Member
I want to keep that plastic removable still, so I re-used what was there. The dirtiest of the sealant was removed, I grabbed some from the top where it was still in good shape and carefully re-spread and mixed it up in place. Then rolled it back down with a small wood roller. The 'right' way to do it is with new butyl sealant tape, which is the same stuff you can buy for re-sealing headlights.Nice to see Charlie, and the helper too! What did you use to seal that plastic vapor barrier? I used a bead of 100% silicone some time back and the last I had checked it did the job well.
I just checked (after ~3" of rain in the last 24 hours) and there may still be some water sneaking by the inner seal. Nothing made it to the point where it goes over the top of the door seal on the frame though, so I probably won't mess with it anymore.
-Charlie
phattyduck
Elite Member
Brake upgrade time!!
This all started as a quick little project to upgrade the rear wheel cylinders from the smaller ones used on the 15" wheel trucks to the bigger 16" wheel truck cylinders... (no pics there, just simple swap) When I was bleeding the brakes, I ruined the master cylinder. It was questionable for a while (slight bleed-down while stopped at a light) but it is now undriveable.
So, new a new OEM master cylinder was ordered and has arrived. While waiting for that (and knowing I'd have to do a full brake bleed again), I figured it was a good time to do the Tundra brake upgrade too...
A few pics:


As you can see, my backing plates are already for the larger brakes (swapped the knuckles with the 4WD swap, kept the smaller brakes as they were in much better shape that the 4WD truck parts). I had also already trimmed the backing plates to clear the Trundra brakes... So, now I just need to install the master cylinder (after a bench bleed!) and swap the lines over at the calipers and bleed the brakes.
Let's hope there are no soft pedal issue that others have reported in some cases...
-Charlie
This all started as a quick little project to upgrade the rear wheel cylinders from the smaller ones used on the 15" wheel trucks to the bigger 16" wheel truck cylinders... (no pics there, just simple swap) When I was bleeding the brakes, I ruined the master cylinder. It was questionable for a while (slight bleed-down while stopped at a light) but it is now undriveable.
So, new a new OEM master cylinder was ordered and has arrived. While waiting for that (and knowing I'd have to do a full brake bleed again), I figured it was a good time to do the Tundra brake upgrade too...
A few pics:
As you can see, my backing plates are already for the larger brakes (swapped the knuckles with the 4WD swap, kept the smaller brakes as they were in much better shape that the 4WD truck parts). I had also already trimmed the backing plates to clear the Trundra brakes... So, now I just need to install the master cylinder (after a bench bleed!) and swap the lines over at the calipers and bleed the brakes.
Let's hope there are no soft pedal issue that others have reported in some cases...
-Charlie
raulb21
New member
I also got the first bit of wiring for the 4WD system done. These are the wires that run the ADD VSV's. Just two power wires and a ground that connects to the driver's fender. The two wires that run into the cab are there in the dash harness, so all I had to do was clip them into the engine bay side of the plug under the dash after getting them in to the cab through the grommet.

You can just barely see them going to the back side of the large plug above my hand:

I still have to connect up the transfer case position indicator switches and the ADD position switch. I have to pull apart that side of the dash to see what wiring is already there to decide my plan of attack there. I also have to put in a few bulbs for the 4WD light and ATP light.
-Charlie
So like many of us I've been using some new found free time to get some projects done. I've been busy with the swap (along with the full engine rebuild) for the last few months. Engine is done now I'm getting all of the 4x4 details set up. I swapped the 4x4 ECU+harness to make all of those wires just plug and play but when it comes to the VSV wires I had no choice but to cut those from the donor. So my question for you is how did you get those set up? I got the grounds in their place but in the harness inside the car did you use quick splice adaptors to tap into existing wires or was there blank spot in the plug you had to pin them into? I just want to be 1000 percent sure I'm getting those into the existing wires correctly and just need to be pointed in the right direction. I can plug and unplug and ECU and harness all day but if I'm splicing things and looking for two wires in a harness the fear and confusion starts rising so I'd rather ask than do something stupid
 I have successfully wired a trailer brake controller and that's basically the extent of my wiring abilities.
phattyduck
Elite Member
Well, hopefully you didn't literally cut them from the donor... I 'just' pinned the two wires right into the stock connector there under the dash. The ground wires I trust you have figured out.So like many of us I've been using some new found free time to get some projects done. I've been busy with the swap (along with the full engine rebuild) for the last few months. Engine is done now I'm getting all of the 4x4 details set up. I swapped the 4x4 ECU+harness to make all of those wires just plug and play but when it comes to the VSV wires I had no choice but to cut those from the donor. So my question for you is how did you get those set up? I got the grounds in their place but in the harness inside the car did you use quick splice adaptors to tap into existing wires or was there blank spot in the plug you had to pin them into? I just want to be 1000 percent sure I'm getting those into the existing wires correctly and just need to be pointed in the right direction. I can plug and unplug and ECU and harness all day but if I'm splicing things and looking for two wires in a harness the fear and confusion starts rising so I'd rather ask than do something stupid

If you right click and open in a new window the interior under-dash picture, you can see the two wires needed for the VSVs run up to the left side of the big connector in the picture. The left side is side of the harness that runs out to the engine bay. I was able to match the colors/positions of the wires on both sides of the connector there to cross-reference and make sure it was correct before plugging inserting them into the connector. Once the white locking bar is lifted a bit, the pins just slide in and click in place for OEM reliability.
If I was using a donor truck of the same year, I would have pulled that whole harness and swapped it...
Depending on year, etc. the position and color changes. You will need diagrams for your specific year.
-Charlie
phattyduck
Elite Member
Had a rough weekend with the 4Runner. Master cylinder bench bled, worked out fine... Installed on truck, brakes bled... and, the new (OEM!) master cylinder leaks out the back side (between booster and master cylinder). A new one is on the way...
So pretty, yet coming right back out:

So, the 4Runner is down for another week and a half... Gotta get it up and running 100% so I can do some major maintenance on the 3s-gte Camry Alltrac. 200k miles and it is ready for a bunch of work (timing belt stuff, motor mounts, rear diff mounts, rear suspension bushings, re-doing oil filter relocation - you know, normal stuff for a 30 year old turbo, 4wd car).
-Charlie
So pretty, yet coming right back out:
So, the 4Runner is down for another week and a half... Gotta get it up and running 100% so I can do some major maintenance on the 3s-gte Camry Alltrac. 200k miles and it is ready for a bunch of work (timing belt stuff, motor mounts, rear diff mounts, rear suspension bushings, re-doing oil filter relocation - you know, normal stuff for a 30 year old turbo, 4wd car).
-Charlie
Similar threads


- Replies
- 3
- Views
- 5K
- Replies
- 3
- Views
- 6K


