Plug and Play Rear Camera Override Dongle

Hi,

I saw that there is a video input. Would that work for 2014 4runner? It seems like just RCA out? I was thinking of connecting a chrome cast to my screen.
 
Hi,

I saw that there is a video input. Would that work for 2014 4runner? It seems like just RCA out? I was thinking of connecting a chrome cast to my screen.
Me too. I think we're constrained by the resolution of the display and would have to down convert.
Would you need WiFi in your car to use chrome cast?

Sent from my SM-G930V using Tapatalk
 
Me too. I think we're constrained by the resolution of the display and would have to down convert.
Would you need WiFi in your car to use chrome cast?

Sent from my SM-G930V using Tapatalk

Yes it is currently just an RCA video input. You can get an hdmi to rca converter and input any hdmi source though. The chromecast usually needs a wifi network to use it fully but you can use it directly to mirror your device.
 
Yes it is currently just an RCA video input. You can get an hdmi to rca converter and input any hdmi source though. The chromecast usually needs a wifi network to use it fully but you can use it directly to mirror your device.

Wouldn't you also need an audio input for Chromecast or any other movie playing device like a DVD player?
 
the nav display is really low resolution, if you want to watch video an android/ipad tablet and mount would be a much better investment
 
Works with Prestigious Society!

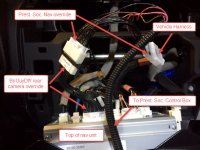
I'm happy to report that the BriGuyDIY rear camera override works with the Prestigious Society Navigation Override. They connected in serial. To turn off/on the nav nanny, I press - - + + on the steering wheel volume. Then of course I use the AOB rear camera switch to activate the rear camera override. Both can be used at the same time. Perfecto!

Here is a picture of the situation, looking down at the nav unit:

override wiring.jpg

In the photo, you can see I have not yet connected the Prestigious Society ground wire.
 

Attachments

  • override wiring.jpg
    override wiring.jpg
    102 KB · Views: 3,373
Last edited:
True Plug-N-Play

I purchased Brian's rear camera dongle and video selector kit about three weeks ago. I was really excited about the two solutions he offered because I really wanted a front facing camera for offroading and I wanted something that didn't require permanently splicing into the factory harness of a $40k vehicle.

The rear camera dongle went in perfectly, but because of my own ineptitude, I couldn't install the video selector kit. For the life of me, I couldn't remove the wire terminals from the factory plug. I wrote to Brian and he sent many emails and even created a video to try to help me. Unfortunately the 2013 plug was a little different from the ones on his 4Runner and using a pin wasn't working for me.

Finally Brian took it upon himself to create a custom adapter for me that would be truly plug-n-play. He sourced the factory Toyota plugs and built an adapter that integrated the RCA plugs.

I got a chance to test it out this morning and it worked perfectly. It took me 5 seconds to plug in the adapter and everything worked! Yahoo, I am now able to feed in my front facing camera with no pulling terminals out and no splicing.

Here is the **PITA** plug that was causing me the problems. You need a special tool or be really good with a pin to pry the white retaining clips out. I tried for two days and couldn't remove the terminals.

NAV%20Connector_zpsm6morxfy.jpg~original


Here is the adapter Brian built for me. You can see that the RCA plugs are integrated.

camera%20nav%20adapter_zpsufmfvnjz.jpg~original


Here is the the female connector from the adapter plugged into the male factory connector.

IMG_2365_zpsdbf9ebpe.jpg~original


Here is the male connector from the adapter plugged into the NAV and this is what it looks like complete. < 5 seconds, click, click, and you are done!

IMG_2366_zpswj95uuao.jpg~original


If you are looking for something plug-n-play or you are not that good with wiring, check out his products.


I think Brian may soon be offering this adapter for sale on his site and/or he now offers to make custom adapters and harness for you. If you go to the bottom of his products page, you will see an order form to request a custom harness.

Brian truly embodies customer service and I will recommend him and his products to anyone!!!

 
Last edited:
Sweet!

This is totally near the top of the list.

I see he got a 4 channel selector too, bam that is it.

Have to source some decent cameras. I looked a few weeks ago, man what a rabbit hole that is. So many to choose from without a clue which is a decent all-around weather proof unit
 
Joystick installed

Just wanted to share how I implemented a switch for the cameras. Maybe someone finds this useful. I did not want multiple buttons and/or remote control because I appreciate the simplicity and the large size of all the stock knobs in the car and want the same for cameras. My solution is a latching joystick installed were most people install a button.

27391292881_aaf920c978_b.jpg


It's very easy to use without having to look at it. When the lever in the "neutral" position, the reverse camera picture comes up when the car is put in reverse. When the lever is shifted in any of four directions, head unit shows a picture from a camera that corresponds to the chosen direction.
 
I finally got around to installing my dongle today. I was leery of tearing the dash apart on a brand new truck, but it all went smoothly. The male plug on the dongle was extremely tight plugging into the back of the radio. I ended up tapping it in with the socket extension I used to remove the radio. That sucker's *not* coming out of there!

I put my AOB switch to the right of the ignition so it is in reach of the passenger if needed, and I ran wires over to the left panel for illumination. I didn't hook them up yet, as I'll be adding my LED bar switch, too, so I'll illuminate them both at the same time.

Thanks a bunch for putting these together, Brian!
Steve
 
Bravo. Very cool. Would love to see a video of it in action.

Below is a quick video. You will notice that there's no feed from left or right cameras. I need to grow balls before I can bring myself to drilling ~1" holes in the mirrors so I can install the cameras. Also, when the lever is moved to the center from the front position, feed from the rear camera is shown for an instant. That's because even though the joystick deactivates the override and connects the rear camera feed at the same time, it takes about 0.5 sec before head unit understands that the car is not in reverse anymore and shuts down the video. I can fix this if I find some inexpensive true-off-delay relays that will reconnect the default video feed with a delay.

https://youtu.be/C3ptXZgea7U

This is a diagram of the switching box that I made for this project.

27464963135_467f798103_b.jpg


The cost of components is considerably more than $35-50 for a video switch box from aliexpress, but I enjoyed putting it all together so much.
 
Below is a quick video. You will notice that there's no feed from left or right cameras. I need to grow balls before I can bring myself to drilling ~1" holes in the mirrors so I can install the cameras. Also, when the lever is moved to the center from the front position, feed from the rear camera is shown for an instant. That's because even though the joystick deactivates the override and connects the rear camera feed at the same time, it takes about 0.5 sec before head unit understands that the car is not in reverse anymore and shuts down the video. I can fix this if I find some inexpensive true-off-delay relays that will reconnect the default video feed with a delay.

https://youtu.be/C3ptXZgea7U

This is a diagram of the switching box that I made for this project.

The cost of components is considerably more than $35-50 for a video switch box from aliexpress, but I enjoyed putting it all together so much.

Very creative solution. Nice job!
 
Installed my rear camera dongle a while ago with an AOB switch. Worked awesome... didn't get around to also hook up the ground and the illumination switch at that time. Recently got the 4 channel switch, a feont facing camera, and another AOB switch.

Hooked up everything, and works fine... gotta figure one thing out though. Tapped my illumination wire and ground wire off some other AOB switches that work perfectly. When I hooked up the 2 new camera switches to illumination and ground, the top lights come on as a constant on, like I powered the switches. Only thing is, doesn't matter is the switch is on or off, the top light is still on....

Not a problem at all with the stuff that is being sold here, bit possibly an AOB switch problem... hard to believe it is a wiring problem as the same color wires are run between the switchs that work flawlessly, and to see that do not...
 
Installed my rear camera dongle a while ago with an AOB switch. Worked awesome... didn't get around to also hook up the ground and the illumination switch at that time. Recently got the 4 channel switch, a feont facing camera, and another AOB switch.

Hooked up everything, and works fine... gotta figure one thing out though. Tapped my illumination wire and ground wire off some other AOB switches that work perfectly. When I hooked up the 2 new camera switches to illumination and ground, the top lights come on as a constant on, like I powered the switches. Only thing is, doesn't matter is the switch is on or off, the top light is still on....

Not a problem at all with the stuff that is being sold here, bit possibly an AOB switch problem... hard to believe it is a wiring problem as the same color wires are run between the switchs that work flawlessly, and to see that do not...

Check this and see if it helps with your issue.
http://www.toyota-4runner.org/2319720-post259.html
 
Check this and see if it helps with your issue.
http://www.toyota-4runner.org/2319720-post259.html

Yea... figured it may be a polarity issue between the radio and the switch. For now I'll leave un-illuminated and play with it again when time permits. That would totally explain the illumination issue on the back-up camera switch, but not really the feont camera switch that was getting power off a tapped AOB switch and (red wire) straight to camera...

Oh... just a small tease, but I do have one issue.... seems that I need to get a male-to-male adapter for both cameras to work..
 
Update: Saker was right about the polarity on the rear camera switch, but my front camera issue still continues. Double checked all my wires again. Red is going to camera, green is connected to add-a-fuse ignition, black is to stick groundand blue to illumination. Even without the blue connected, top light still comes on. And I know that my wires are correct , because reversing the wires doesn't power the camera.

Also, what are people using for front cameras? I bought a camera off amazon works fine, BUT.. Image is mirrored... left is right and right is left..... ordered a non-mirrored camera to swap out....
 
Last edited:

Members online

No members online now.

Forum statistics

Threads
278,316
Messages
3,554,120
Members
248,016
Latest member
Advally Service

Trending content

Back
Top