Rear Differential Breather Mod For Dummies

The only issue I could see would be the size of the ARB filter in that area (most who do it that way just terminate the tube with the original one way valve from the differential). If you can get the filter to fit in the area then yes it is a good idea, but I think it will really crowd the area especially if you are running a secondary breather line for the locker. As an FYI I have heard from several people after this posting that there is enough line to make two runs to the engine compartment just make sure you measure carefully as there won't be much excess to work with. Good luck with the install!

I am actually doing the mod tonight with OEM parts. I thought I would just clarify one thing as to reduce confusion for anyone. It's a 2-way breather, not a 1 way.
 
I am actually doing the mod tonight with OEM parts. I thought I would just clarify one thing as to reduce confusion for anyone. It's a 2-way breather, not a 1 way.


The stock OEM breather for the rear differential is a 1 way breather. It's spring loaded. Gas escapes when the rear end is hot and creates a vacuum when it cools. The front OEM breather is a 2 way, and is commonly used for the replacement rear breather when relocating it to "higher ground".
 
Last edited:
The stock OEM breather for the rear differential is a 1 way breather. It's spring loaded. Gas escapes when the rear end is hot and creates a vacuum when it cools. The front OEM breather is a 2 way, and is commonly used for the replacement rear breather when relocating it to "higher ground".

Right, I wanted to make sure people understood that it wasn't a 1way as previously described.
 
Right, I wanted to make sure people understood that it wasn't a 1way as previously described.

There is a certain amount of coffee that is required in the morning for me to function correctly. Much like coins for a pay phone, or beers required before drinking Fireball. As you can see, I have not hit the required amount of caffeine this morning... Carry on, nothing to see here. :ranger:
 
Right, I wanted to make sure people understood that it wasn't a 1way as previously described.

Ok, brain kicking on here... Just finished my coffee...
u9QoHec9uGfq8.gif


Re-read what he wrote, then when you wrote, then what I wrote. What I was originally trying to say is correct. The rear differential comes stock with a 1-way breather, as [MENTION=120701]Cymon[/MENTION] was describing in his original comment. Many people install the stock front differential 2-way breather on the rear axle when relocating their differential.

Stock 4Runner:
  • front differential = 2-way
  • rear differential = 1-way

4Runner after "OEM" differential relocation:
  • front differential = 2-way
  • rear differential = 2-way (using OEM front differential part)

That should be as clear as it can get...
 
[MENTION=105875]96r50[/MENTION]
So you have the arb filter up there and the lines just zip tied to the filler tube supporting the filter or did you secure the filter itself to the filler tube using the filter's self tapping screw holes and zip ties?


Sent from my iPhone using Tapatalk


I didn't see the point in the ARB kit. I used fuel line and vacuum line to extend the rear differential and e-locker lines respectively. I capped each of those lines with 2-way breather valves from Toyota. Both lines are zip tied to the filler neck and extend as high as possible into the fender. They're definitely higher than the stock breather locations in the engine bay and that's enough for me.
 
I didn't see the point in the ARB kit. I used fuel line and vacuum line to extend the rear differential and e-locker lines respectively. I capped each of those lines with 2-way breather valves from Toyota. Both lines are zip tied to the filler neck and extend as high as possible into the fender. They're definitely higher than the stock breather locations in the engine bay and that's enough for me.


If i would have done my homework first i would have done it exactly as you have. But now that i dropped the money on the arb kit i feel i should try to use it if possible. If the arb filter doesnt fit up there then i will write it off to ANOTHER life lesson (i should be soooo smart by now with all my life lessons but thats my curse) and get the oem 2 way. Thanks again [MENTION=105875]96r50[/MENTION].


Sent from my iPhone using Tapatalk
 
Great post, I am going to give this a shot. Hearing about your background gave me the confidence that the non-mechanic type can be successful doing this mod.
 
Great post, I am going to give this a shot. Hearing about your background gave me the confidence that the non-mechanic type can be successful doing this mod.

Glad it can boost some confidence, that was one of the main reasons for the post. If you have questions or need help don't be afraid to ask, or PM me!

:cheers:
 
ok... so did I buy something I didnt need?
90404-51319 union.

115471d1295833941-axle-vent-issue-solution-breather-tubes-adapters.jpg

I am guessing that this is for the DIY person running 1/2" fuel line hose?


Since I have the ARB kit, im guessing (and its in the box) that it has this fitting is all I actually needed.

Step 3:
Replace OEM Breather with ARB two-way fitting. Use the wrench to unscrew the old breather.

194414d1457290507-rear-differential-breather-mod-dummies-img_4492.jpg


Then I can grab some home depot parts such as a plastic T fitting so I can tie in the locker and the diff on the same ARB hose to the front filter. Then use this method to plug into the locker.


Answered my own question.
E locker is 1/8 barb
A 1/8 barb x 1/4 barb would have been ideal. However this was not available anywhere local. Also I don't know how well a poly tube would hold a barb.

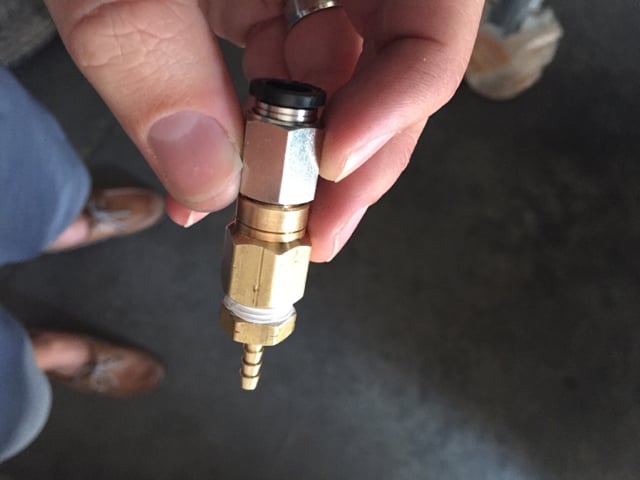
Parts I used- purchased at Home Depot
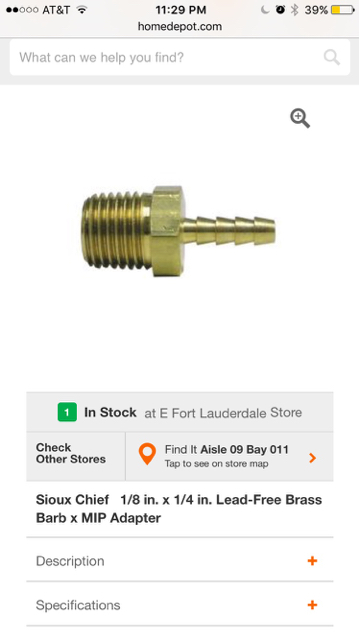
Brass 1/8 barb x 1/4 MIP adapter - LFA-85
659fafa9321f24769bf0f6f51d4e0339.jpg

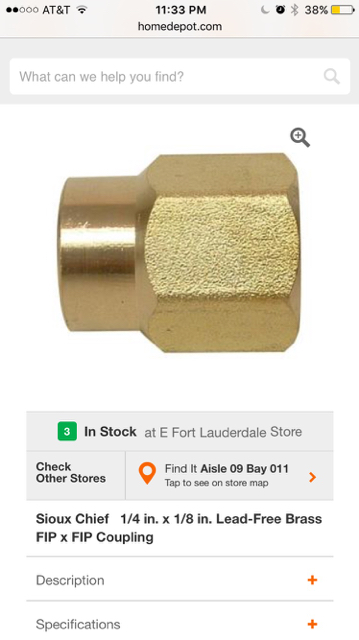
Brass 1/4 FIP x 1/8 FIP coupling - LFA-734
824c2dad81b24028f8662ea6f3ac9e6f.jpg


5459b250cd249fcf4b19771692eea9c9.jpg


Wanted to double check before going to the Depots!
 
ok... so did I buy something I didnt need?
90404-51319 union.

115471d1295833941-axle-vent-issue-solution-breather-tubes-adapters.jpg

I am guessing that this is for the DIY person running 1/2" fuel line hose?


Since I have the ARB kit, im guessing (and its in the box) that it has this fitting is all I actually needed.


Then I can grab some home depot parts such as a plastic T fitting so I can tie in the locker and the diff on the same ARB hose to the front filter. Then use this method to plug into the locker.


Wanted to double check before going to the Depots!

Yes, the part 90930-03031 is the similar part to the fittings in the ARB kit and the one shown in the picture. That is all you need to tie into the differential. You are also correct about the t-fitting.
 
ok... so did I buy something I didnt need?

90404-51319 union.


115471d1295833941-axle-vent-issue-solution-breather-tubes-adapters.jpg


I am guessing that this is for the DIY person running 1/2" fuel line hose?


Since I have the ARB kit, im guessing (and its in the box) that it has this fitting is all I actually needed.


Then I can grab some home depot parts such as a plastic T fitting so I can tie in the locker and the diff on the same ARB hose to the front filter. Then use this method to plug into the locker.


Wanted to double check before going to the Depots!

Yes, you do not need to buy any Toyota parts to run the ARB. The kit has the ARB filter included.

For e-locker only: If you're going to run a plastic T then you don't need any of the HomeDepot parts that I posted. You'll just need a T that can accommodate the ARB tubing on two ends and the third end is a 1/8 barb for the e-locker hose.

My pictures that I posted were from running two separate lines. Maybe overkill but I already paid for the ARB kit so why not run two separate lines. There is just enough line in the kit to run both. I also felt these brass fitting were much more reliable than a plastic universal T.
 
I was leaning torwards the plastic Tee because of being in IL,
We love the salt on our roads!

I was looking at a 3/16 ID size barb for the ARB hose.


Thanks for the perfect info guys!
 
This is a great thread. Thanks for posting.

I just bought a '16 SR5 4x4 and, living in Florida as well, any offroad area is going to be under water from June-November. I used to have a Jeep and my diff/tranny were constantly milky from water intrusion.

Maybe it was mentioned, but how deep can you go with this mod? I'm assuming the transfer case and transmission are a bit higher than the diff, but how much?

Also, that kit from Amazon has everything needed, correct?

From everything I've read on this forum the T case & tranny have two way breathers already located up in the engine bay. If you are going to run two separate lines (dif & elock) you will need an adapter between the e locker hose & arb hose. I used a plastic universal vacuum coupler for mine. You can see a pic of it on my build: http://www.toyota-4runner.org/5th-gen-t4rs/221286-tank-~-my-build.html

As for how deep? Well I guess that depends on how wet you want your feet to get!

P.S. Don't cut the ARB line exactly in two. You will need about a foot more on the dif line for suspension travel.
 
I have the SR5, so I am assuming I don't have an E Lock? Is that correct?

That's good to hear about the tranny and t-case. Sounds like all I have to do is the diff breather in that case.

Yes, you will only need to re-route the rear differential as our SR5's do not have the e-locker on the rear differential, and everything is included in the Amazon kit. As [MENTION=95618]ADKexplorer[/MENTION] stated, all of the other breather lines are already located high up in the firewall. If you get water up there you will have bigger issues than water in a differential or t-case.

As for how deep can you go, that depends on how you drive it. Relocating the breathers does not have as much to do with going deep as it does with allowing for the differential to breathe so a vacuum is not created from temperature differences inside and outside the differential, which could potentially suck water in (this is a highly debated topic on the forum anyway).

The limit to water fording in the 4runner has more to do with your air intake which is located in the front passenger side fender (you can see the air slits on the front of the fender liner the next time you look under). Because of this location (about the same height as the upper 1/3 of your tire), the upper limit of water fording is usually assumed to be 24-30 inches. This is if you do it correctly, driving at a slow steady speed with no wake. You could also hydrolock your engine in less than 12" of water if you drive too fast allowing a wake to get up into the manifold.

Hope this helps! If you haven't already check out the Florida 4runner's group on Facebook. Good group of guys that regularly get together to go out.

https://www.facebook.com/groups/Florida4runners/

Enjoy the new ride!
 
I looked up hydrolock on Wikipedia and they showed a bent piston rod. Wow. I better slow down when I blast through washouts, or look into the cost of a snorkel.
 
Just did this install - took exactly 2 hours.

Hardest part for me was finding a way to the engine bay that didn't get hot or move, and knowing how much slack to to give the line between the frame and rear diff (I did about 8" of slack)

How does the breather thing actually work? It looked like a dremel cut off wheel in between some plastic pieces.
 
Just did this install - took exactly 2 hours.

Hardest part for me was finding a way to the engine bay that didn't get hot or move, and knowing how much slack to to give the line between the frame and rear diff (I did about 8" of slack)

How does the breather thing actually work? It looked like a dremel cut off wheel in between some plastic pieces.

It is essentially an open line with a filter. It allows air to flow in and out so a vacuum is not created within the differential when there is a difference in temperature between the differential and any water it is submerged in.

Congrats on the install!
 
Thanks, and thanks again for the info. It really helped.

Last question ;) How much should the piece screwed into the diff be torqued to? I'd guess that it was about 20ft lbs when I stopped, but it didn't seem to stop spinning. It just got harder, but it never really felt like it bottomed out and I didn't want to strip it.

Thoughts?
 

Members online

Forum statistics

Threads
278,312
Messages
3,554,089
Members
248,016
Latest member
Advally Service

Trending content

Back
Top