

darrylj
New member
I replaced my front speakers today with Polk DB351s and wanted to put a few pics and instructions up. There were a few snags along the way that I wish I'd seen documented. This was done on a 2015 SR5 with nav but no JBL. It's not even a year old yet, so this sort of change was a brave step on my part.
Tools: small screwdriver, larger screwdriver, 10mm socket & ratchet, electrical tape, duct tape, a Dremel, a grinder, soldering iron and solder, flashlight or worklight.
Not needed: no custom bracket or connectors needed. No need to modify the dash.
Sorry about the picture quality: the good camera went dead and I had no replacement AA batteries post Xmas, same with the 2nd camera, so this is the 3rd choice emergency auxilliary camera, without flash.
This takes 1-3 hours. Although I did not test this, it's my understanding that the dash speakers are wired in parallel with the front door speakers, not series, but the wires for the door speakers travel THROUGH the blue socket on the dash speakers. So when you unplug the dash speakers, it breaks the circuit for the door speakers as well. So the fate of your door speakers depends on your skill in getting the dash speakers correct.
The speaker grates can be removed with a very small screwdriver. I added electrical tape over the end, but it kept pulling off so I carefully worked without it. Use a very small screwdriver to pry up the front, enough to then use a larger screwdriver to finish popping up the front.
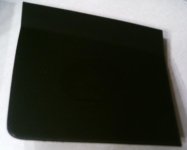
The two catches you need to pop out are shown below with straight red lines, about 2 inches in on each side. You can release the catches by pushing forward toward the windshield, then prying up. The two red circle catches on the sides (with white clips) can't really be touched, so just leave them along and theyll pop out just fine.
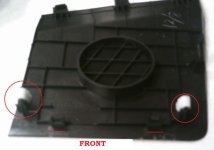
Remove the speakers AND the speaker brackets using a 10mm socket. Do not confuse the left and right brackets (they are NOT identical). Do not confuse the bracket screws and the speaker screws (speaker screw ends are flat, bracket screw ends are pointed). Unplug the speakers by inserting the small screwdriver into the side of the plug to release the plug catch; then the plug will slide right out.
Remove the blue female plug socket by prying back the little white catches; there's also a soft adhesive that holds the socket on to the back of the speaker. Unsolder the black and white wires from the speaker (if you don't have the ability to solder/unsolder, this whole project will be almost impossible). Discard the old speakers once you have the new speakers working. Once you see the old-world quality and workmanship of the original speakers, you'll have little regret in discarding them. The DB351s are 2 or 3 times as heavy as the original speakers.
Solder the black wire to the + terminal of the new speaker, and the white wire to the other terminal. Also (this step is probably optional) unsolder the small black capacitor on the blue socket and remove it. Using the large black capacitors included with the DB351s, solder those in place instead. See photos below.
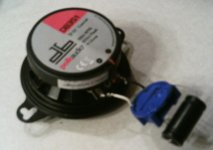
In the next photo, the spots where the original capacitor was attached are marked with purple arrows, and the old capacitor marked with a gray square. Also note the red circles on the speaker mount holes: you're going to want to dremel off those corners marked with green circles, or fold them down with a needlenose pliers (I used pliers). But you will need to dremel away some metal on the green circle closet to the speaker: the holes on the DB351 don't match the original speaker unless you a) dremel the holes bigger and closer to the speaker, b) very slightly bend the speaker brackets wider, and c) grind off some sections of the original speaker brackets (remember when using the dremel on the speaker holes that during the process you'll either have to cover the magnet with a bag or when you're done remove the metal shavings from the magnet using duct tape. They'll stick like...well...a magnet.)
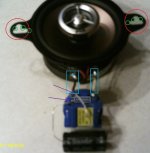
Now plug in the speakers and test them. If they work, unplug them again, cover the exposed wires on the capacitor with electrical tape (optional), and on to the brackets.
Both brackets have to be very slightly bent to widen them (but not too much) and some of the metal needs to be ground off. You can put the brackets next to each speaker, compare, and go back and grind unti they fit. You have to grind away more on the left bracket than the right, so be careful you don't weaken it too much. If I did it again, I'd probably add JB Weld on the weak points (optional). I had a grinder available right there, so grinding it was easy. The places where I ground away material are marked with red lines in the images below.
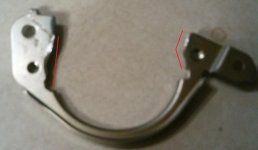
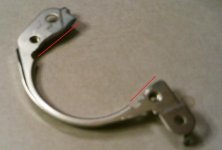
How much do you grind away? Simple: enough so the bracket fits nicely against the speaker base (not the magnet, but the metal frame/base) but the holes still line up from speaker to bracket. You're basically expanding (via grinding) the arc of the original circle to be a slighly larger circle.
You should now be able to put the bracket over the speaker from the side, plug them in, tuck the blue socket safely into the dash as you carefully insert the bracket/speaker, put the screws back, (test the speakers AGAIN before you) tighten everything up. Pop the grates back on by inserting the tabs by the windshield first, then pushing down on the front (toward the seats) to get it to lower and lock. (no need to remove any material from the inside of the grates, they fit fine with the DB351s.)
I highly recommend using the original plug or a replacement plug: I must have removed and put back the speaker/brackets about 5 times trying to get everything perfect, and had I soldered everything into place that would have been a miserable process. Remember to release the plug with a small screwdriver each time you unplug it.
Hopefully this post will aid someone in replacing their dash speakers.
Tools: small screwdriver, larger screwdriver, 10mm socket & ratchet, electrical tape, duct tape, a Dremel, a grinder, soldering iron and solder, flashlight or worklight.
Not needed: no custom bracket or connectors needed. No need to modify the dash.
Sorry about the picture quality: the good camera went dead and I had no replacement AA batteries post Xmas, same with the 2nd camera, so this is the 3rd choice emergency auxilliary camera, without flash.
This takes 1-3 hours. Although I did not test this, it's my understanding that the dash speakers are wired in parallel with the front door speakers, not series, but the wires for the door speakers travel THROUGH the blue socket on the dash speakers. So when you unplug the dash speakers, it breaks the circuit for the door speakers as well. So the fate of your door speakers depends on your skill in getting the dash speakers correct.
The speaker grates can be removed with a very small screwdriver. I added electrical tape over the end, but it kept pulling off so I carefully worked without it. Use a very small screwdriver to pry up the front, enough to then use a larger screwdriver to finish popping up the front.
The two catches you need to pop out are shown below with straight red lines, about 2 inches in on each side. You can release the catches by pushing forward toward the windshield, then prying up. The two red circle catches on the sides (with white clips) can't really be touched, so just leave them along and theyll pop out just fine.
Remove the speakers AND the speaker brackets using a 10mm socket. Do not confuse the left and right brackets (they are NOT identical). Do not confuse the bracket screws and the speaker screws (speaker screw ends are flat, bracket screw ends are pointed). Unplug the speakers by inserting the small screwdriver into the side of the plug to release the plug catch; then the plug will slide right out.
Remove the blue female plug socket by prying back the little white catches; there's also a soft adhesive that holds the socket on to the back of the speaker. Unsolder the black and white wires from the speaker (if you don't have the ability to solder/unsolder, this whole project will be almost impossible). Discard the old speakers once you have the new speakers working. Once you see the old-world quality and workmanship of the original speakers, you'll have little regret in discarding them. The DB351s are 2 or 3 times as heavy as the original speakers.
Solder the black wire to the + terminal of the new speaker, and the white wire to the other terminal. Also (this step is probably optional) unsolder the small black capacitor on the blue socket and remove it. Using the large black capacitors included with the DB351s, solder those in place instead. See photos below.
In the next photo, the spots where the original capacitor was attached are marked with purple arrows, and the old capacitor marked with a gray square. Also note the red circles on the speaker mount holes: you're going to want to dremel off those corners marked with green circles, or fold them down with a needlenose pliers (I used pliers). But you will need to dremel away some metal on the green circle closet to the speaker: the holes on the DB351 don't match the original speaker unless you a) dremel the holes bigger and closer to the speaker, b) very slightly bend the speaker brackets wider, and c) grind off some sections of the original speaker brackets (remember when using the dremel on the speaker holes that during the process you'll either have to cover the magnet with a bag or when you're done remove the metal shavings from the magnet using duct tape. They'll stick like...well...a magnet.)
Now plug in the speakers and test them. If they work, unplug them again, cover the exposed wires on the capacitor with electrical tape (optional), and on to the brackets.
Both brackets have to be very slightly bent to widen them (but not too much) and some of the metal needs to be ground off. You can put the brackets next to each speaker, compare, and go back and grind unti they fit. You have to grind away more on the left bracket than the right, so be careful you don't weaken it too much. If I did it again, I'd probably add JB Weld on the weak points (optional). I had a grinder available right there, so grinding it was easy. The places where I ground away material are marked with red lines in the images below.
How much do you grind away? Simple: enough so the bracket fits nicely against the speaker base (not the magnet, but the metal frame/base) but the holes still line up from speaker to bracket. You're basically expanding (via grinding) the arc of the original circle to be a slighly larger circle.
You should now be able to put the bracket over the speaker from the side, plug them in, tuck the blue socket safely into the dash as you carefully insert the bracket/speaker, put the screws back, (test the speakers AGAIN before you) tighten everything up. Pop the grates back on by inserting the tabs by the windshield first, then pushing down on the front (toward the seats) to get it to lower and lock. (no need to remove any material from the inside of the grates, they fit fine with the DB351s.)
I highly recommend using the original plug or a replacement plug: I must have removed and put back the speaker/brackets about 5 times trying to get everything perfect, and had I soldered everything into place that would have been a miserable process. Remember to release the plug with a small screwdriver each time you unplug it.
Hopefully this post will aid someone in replacing their dash speakers.








