Request troubleshooting advice for 1st gear manual transmission shifting glue

Status
Not open for further replies.

mom

Banned
[Solved]Request troubleshooting advice for 1st gear manual transmission shifting glue

I would like to kindly request your helpful troubleshooting advice for a new problem with my 1997 Toyota 4Runner 2WD (W59) manual transmission (about 110 thousand miles, all in Silicon Valley, some of it in the hilly mountains surrounding the valley).

Shifting into first gear was always clumsy, but the dealer said that was normal after I brought it to them twice while my then-new 97 4Runner was under warranty way back in 1996.

The only other problem I've had was about five years ago when the manual transmission was slipping badly (in all gears) on uphill runs, so I had the clutch replaced (about 50 thousand miles ago or so).

Recently (within the last week), two bad things are now happening (only in first gear):
1. It doesn't 'feel' like the shift lever is going all the way into first (it's almost as if there is a spongy glue resistance when there should be a firm feeling of sliding into the 1st gear 'slot').
2. Sometimes it pops right back out of first gear as I start up (say at a traffic light).

Both of these anomalies started at the same time and did not happen before (when my clutch needed to be replaced); so I don't know if it's the clutch or something else.

I do like to DIY - but fixing a transmissions may be wholly beyond me - but I also hate to get fleeced or to bring it in to the shop when it may need a minor adjustment.

So, may I ask for your helpful debugging advice as to what I can do in order to narrow down the cause of this hard-shifting problem?

Note: I apologize for not posting a picture for you as I don't know what photo I could post that would 'show' the problem to you.
 
Last edited:
Register to hide this ad
How do I remove the brown side garnish & the black console panel?

Check the shifter lever ball seat and shifter socket, and replace if it/they are excessively worn

Thanks OS2E for that great idea!

In that helpful first link, the supplier showed "installation instructions"; but they assumed the console box has already been removed.
attachment.php

--------------------------------------------------------------------------------------------------------------------

Your second link shows a helpful DIY which says to remove the forward push-pin fastener and then just "slide forward and remove"; but my 1997 "upper console panel garnish" appears to be held in with an additional (hidden?) fastener.

66603d1340592227-how-do-you-post-text-interspersed-pictures-diy-what-am-i-doing-wrong-diy.jpg

--------------------------------------------------------------------------------------------------------------------
The Chilton and Factory manuals simply say (page MT-4) "Remove the upper console box".

FWIW, to help you understand where I'm stuck, here is a pictorial description of what I tried so far ...
attachment.php

66593d1340591116-how-do-you-post-text-interspersed-pictures-diy-what-am-i-doing-wrong-01_how_to_remove_panel.jpg

66594d1340591125-how-do-you-post-text-interspersed-pictures-diy-what-am-i-doing-wrong-02_looking_in_the_manual.jpg

66595d1340591131-how-do-you-post-text-interspersed-pictures-diy-what-am-i-doing-wrong-03_manual_stinks.jpg

66596d1340591137-how-do-you-post-text-interspersed-pictures-diy-what-am-i-doing-wrong-04_remove_phillips_head_screw.jpg

66597d1340591145-how-do-you-post-text-interspersed-pictures-diy-what-am-i-doing-wrong-05_remove_other_phillips_head_screw.jpg

66598d1340591153-how-do-you-post-text-interspersed-pictures-diy-what-am-i-doing-wrong-06_not_how_to_remove_the_pin.jpg

66599d1340591163-how-do-you-post-text-interspersed-pictures-diy-what-am-i-doing-wrong-07_again_not_how_to_remove_pin.jpg

66600d1340591172-how-do-you-post-text-interspersed-pictures-diy-what-am-i-doing-wrong-08_pin.jpg

66601d1340591210-how-do-you-post-text-interspersed-pictures-diy-what-am-i-doing-wrong-09_pushing_in_the_center_pin.jpg

66602d1340591216-how-do-you-post-text-interspersed-pictures-diy-what-am-i-doing-wrong-010_this_removes_the_pin_reasonably_well.jpg

The manual just says "Remove console box".
The referenced DIY made it look so easy to remove the console box.

So, it 'must' be easy. Would you kindly tell me what step I'm missing?
Q: How should I remove the two brown side "panel garnish" plates and the black "upper console panel" surrounding the shift lever?
 
Last edited:
Yeah, those plastic fasteners are a PITA. I break about 50% of them trying to get them out.

I think the panel around the shift lever just pulls up, no fasteners (that what the automatic dash is). Same as the radio panel, and the center console around the e-brake lever.
 
YI think the panel around the shift lever just pulls up, no fasteners

Hi Nelson,
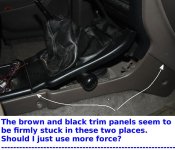
It probably is that simple because the DIYs didn't even bother to mention this step. But for the life of me, I can't get either the brown side panels off or the top black plate surrounding the shift lever.

Maybe I'm not using enough force?
 

Attachments

  • side_panels_stuck.jpg
    side_panels_stuck.jpg
    53.8 KB · Views: 7,893
Hi Nelson,
It probably is that simple because the DIYs didn't even bother to mention this step. But for the life of me, I can't get either the brown side panels off or the top black plate surrounding the shift lever.

Maybe I'm not using enough force?

The shifter panel is held down by the center console panel (the one around the e-brake). Open the center console compartment, then pull straight up on that plastic. It should pop out, then you can get the shifter panel off.
 
Open the center console compartment, then pull straight up on that plastic. It should pop out, then you can get the shifter panel off.

Hi Nelson,
Thanks. You gave me the courage to keep trying (I'm always breaking stuff when I use force).

None of the quoted DIYs or shop manuals explained this step so everyone must just 'know' it (somehow).
attachment.php


As you said, I had to pry up on that center console black plate simultaneously with pulling outward (toward the front doors) on the brown garnish panels.
attachment.php


Wiggling and prying and pulling ... the black garnish came off! Thanks.
attachment.php


BTW, I wonder "why" the referenced DIY said to "remove" the two brown side panels?

Anyway, I'm ready to go to the next step!
 
Here's where I'm stuck next ...
66613d1340598772-how-do-you-post-text-interspersed-pictures-diy-what-am-i-doing-wrong-z1_remove_bolts.jpg

66614d1340598779-how-do-you-post-text-interspersed-pictures-diy-what-am-i-doing-wrong-z2_lift_and_pull.jpg

66615d1340598784-how-do-you-post-text-interspersed-pictures-diy-what-am-i-doing-wrong-z3_rubber_on_both_sides.jpg

66616d1340598789-how-do-you-post-text-interspersed-pictures-diy-what-am-i-doing-wrong-z4_rubber_cap.jpg

66617d1340598794-how-do-you-post-text-interspersed-pictures-diy-what-am-i-doing-wrong-z5_rubber_cap_removed.jpg


Wow. It must take super human force to press and turn that shift lever cover off!
attachment.php


I still haven't been able to get that shift lever cover off.
Q: Is there a tool that will help me get that cover pressed down against the spring and then twisted off?
(Will the spring shoot out?)
 
Last edited:
No, the "metallic cap" as you call it, won't shoot out.

No, it should not take a lot of force the push it down and rotate it.

Put your thumbs on the wider areas on either side, and then push the "metallic cap" down. With it pressed down a bit, rotate the cap counter-clockwise, and the cap will pop up just slightly, and the shift lever can be pulled out of the transmission. Re-installation is just the reverse of removal.

DO NOT put water on the shift lever when sliding the rubber cap back down into place, or when reinstalling the boot. You do not want water in the transmission. Just slide the rubber cap back down, even with the friction of the "cap" and lever being dry of lubrication. Then slide the shifter boot down the shift lever, with the black painted part of the lever clean and dry.

Bear in mind that a worn shift lever seat or shifter socket, might not be the problem.

This is just a fairly common issue on older Toyota manual transmissions, and a new seat and socket might fix your problem.
 
No, the "metallic cap" as you call it, won't shoot out. No, it should not take a lot of force the push it down and rotate it.

Thanks O2SE for the confirmation, which echoes the instructions in the manual for removing the 2WD shift lever and give me courage to keep trying.
attachment.php


Bear in mind that a worn shift lever seat or shifter socket, might not be the problem.

Interestingly, the shop manual says it could be the following (but it doesn't mention the fluids, seats or sockets for these two problems):
attachment.php


Anyway, given your encouraging advice, I was able to press-and-spin that inner 'shift lever cap' off only after donning gloves to protect my fingers and adding a pushing force with a small 1/8" screwdriver in the counterclockwise direction!
(And, you were right, the strong spring did 'not' shoot out at me!)
attachment.php


attachment.php

66632d1340604244-how-do-you-post-text-interspersed-pictures-diy-what-am-i-doing-wrong-transmission_seat.jpg


EDIT: Oh oh ... I think I found a possible culprit (just as you said it could be):
attachment.php


attachment.php


What I 'think' may have happened is the top of the two-piece bushing shattered.
My next two steps are:
a) How to remove that shattered bushing (I'll keep trying to spin it out) ... and ...
b) Where to get (tomorrow) a new bushing while still being able to drive the 4Runner to get it (probably the dealer).

EDIT:
Wow. With your kind help, I think I've gone as far as I can for tonight (it's past midnight).
66637d1340607423-how-do-you-post-text-interspersed-pictures-diy-what-am-i-doing-wrong-aluminum.jpg


The decision on what to buy is complicated by three factors:
1. Mail order will get me better quality parts ...
2. But, the dealer will probably be quickest ...
2. Yet I need to drive the car to the dealer ...

I should be able to bum a ride - but I won't have total freedom to shop around. Given that, may I ask:

Q: What do you suggest I buy so that I won't have to make a second trip?

For example, must I use 'lithium' grease?
66638d1340607432-how-do-you-post-text-interspersed-pictures-diy-what-am-i-doing-wrong-overview.jpg


1. Lithium grease (is my Mobil1 synthetic grease OK?)
2. New shift lever ball seat (definitely!)
3. New shifter socket (maybe? How would I know?)

Q: Being midnight, where can I find the part number for my 1997 2WD W59 5-speed transmission shift lever ball seat & shifter socket?

EDIT: Googling (it's now 1:30am but I still can't call anyone yet), I find these 'might' be helpful:
- 1999 4Runner conversion (page 9, Marlin Crawler Shifter Bushings & Seat)
- 1992 4Runner shift lever seat replacement
- 1988 4Runner Manual transmission sloppy shifting? Try a new shifter seat!
- 1996 Tacoma W59 transmission - can't remove shift lever cap (can't get it to turn) P/N 33505-35020
- Polyurethane shift lever bushing
- Transmission parts for all Toyota transmissions (Kingomatic, Axiom Automotive Technologies)
 
Last edited:
1. Lithium grease (is my Mobil1 synthetic grease OK?)
2. New shift lever ball seat (definitely!)
3. New shifter socket (maybe? How would I know?)
FWIW, others had a similarly difficult time removing the 'shift lever cap'. For example in this off-road blog:
I had a tough time getting a decent grip on the collar that holds the shift lever, but found that I could grab it with a pair of needle-nose pliers and turn it while pushing down with the other hand. Once the collar turned about a 1/4 turn, the shift lever lifted right out.
4s.jpg~original

Bushing, Shift Lever, 33548-31010, $3.74
Seat, Shift Lever, 33505-35020, $8.89
Here's another who had the same problem on the W59 transmission in a 96 Tacoma:
I can't get the shift lever cap to turn so that I can remove the shift lever. My thumbs are absolutely shredded wheat at this point and I have given up for the day to give them time to heal. Does anybody have any idea why this thing won't move?
Also, if the part number is a universal Toyota part number (covering many vehicles), I 'think' it would be '33505-35020' because that shows up in a lot of the posts, e.g., here is the W59 part number for a 1997 Tacoma and a useful new odd:even diagnostic hint:
There's a rubber seating ring at the base of the shift lever that when it wears causes the trans to pop out of gear. It may start out popping out of just one gear but as the seat wears further it will start popping out of more than one gear - but always gears where the lever has to point in the same direction - for example, 1, 3 or 5 (shift lever towards the dash)
but not 2 and 4 (shift lever towards the seat.)

If you have the 2WD with the W59 transmission (look on the ID tag on the drivers door frame) go down to your Toyota dealer and get part no 33505-35020, it'll cost you about ten bucks. While you're in there you might want to splurge, spend another five bucks and get 33548-31010, a white nylon cap that goes on the end of the shift lever.
That part number even shows up here for the Supra:
Shifter_Parts_MK3.jpg~original

33505-35020 (shifter seat -- green in picture) $10.40
33548-31010 (lower shifter bushing -- blue in picture) $4.40
33584-22020 (shifter gasket -- red in picture) $0.83
It seems to be a common problem, so I'm surprised the factory shop manual doesn't have a decent description.
Here, from photobucket and from this forum is a nice closeup of the destroyed shifter seat (33505-35020):
IMG_1749_half.jpg~original

And, here (from the same source) is a closup of the upper shifter bushing (33548-31010):
IMG_1752_half.jpg~original
As for materials, this is what I found out, so far:
1. Rubber ==> Toyota (lower, larger, softer 33505-35020 $17.65 at San Jose dealer; upper smaller harder 33548-31010 $8.59 at dealer)
2. Delrin ==> Marlin Crawler 559-252-7295 ($12.50 & $7.50 respectively, they say it's nylon, 1 day fedex, 1 week usmail)
3. Urethane ==> AST 866-789-3624 (called and they can get it to me in 2 to 4 days for $11 & $5 respectively).

The prices online are about $10 for the lower shift lever bushing (W0133-1741737) and half that for the upper shift lever bushing (W0133-1644479) but the availability is two days or more:
66644d1340631430-how-do-you-post-text-interspersed-pictures-diy-what-am-i-doing-wrong-final.jpg~original


Apparently the upper (smaller) shifter bushing is relatively universal (33548-31010) and easy to find online (OEM Toyota BUSH, SHIFT LEVER) ... but the lower (larger) shifter bushing can be either part number 33505-35020 or 33505-35030 (OEM Toyota SEAT SUB-ASSY, SHIFT) but for my 2WD 1997 4Runner with the W59 transmission, it's PN 33505-35020 according to a call to the Toyota dealership this morning.

My key question now is whether I can put it together 'without' the bushing and still drive the vehicle to the parts place.
 
Last edited:
Driving it without the seat in place, would result in sloppy movement of the shifter, and it might be difficult to find the gear you're trying to select.

It's up to you as to whether to order the parts of your choice online and have them shipped asap, or get a ride to the dealer for OEM parts.

I would personally go with the parts I referenced in my first post, as they are more durable than the OEM parts:Heavy Duty Shift Lever Ball Seats | Marlin Crawler, Inc.

Your socket doesn't look too bad, so it's up to you if you want to replace it.

Regarding the Mobil 1 grease you have: The shift lever and seat is lubricated by the gear oil in the transmission. So any grease you put on the shifter would just be to ease installation of the shifter. As is specified in the manual. The write-up I referenced in my first reply, the Author coated the shifter with grease. That is unnecessary, and in fact the grease will be dissolved into the gear oil in short order as the transmission gets warm, as you drive the vehicle.

The thing about write-ups that you find, is that they are usually one individuals method for accomplishing a task. There is usually more than one way to accomplish any task. So someone's write-up may or may not be the best way to accomplish a particular task.

Considering how dirty it was in the shift lever tower, I'd consider changing or having the gear oil in the transmission changed.
 
Last edited:
I would personally go with the parts I referenced in my first post, as they are more durable than the OEM parts

I don't disagree one bit. In perfect hindsight, this is what I 'should' have done:
a) I noticed the shifting problem & asked here
b) You gave me a great pointer to upgraded parts
c) I 'should' have ordered the upgraded parts pronto (it would have taken 2 to 4 days)
d) By the time I was about to disassemble, I would have had the upgraded parts in my hands

Lesson learned.

BTW, I called the company you referenced and they said their seals are nylon and that they could fedex them for receipt in two days or US mail which would take a week.

Your socket doesn't look too bad, so it's up to you if you want to replace it.

I agree with you, now having seen pictures of the new upper socket.

But I already pulled it off the shifter (it wasn't as easy to do as it looks) because I had decided to replace it. In doing so, I chewed it up a bit so my advice, again in hindsight, is that you can't easily remove the upper socket with pliers without ruining it.

any grease you put on the shifter would just be to ease installation of the shifter.

That's interesting!

I called Toyota and they also said not to lubricate it ... but ... the weird thing is that the big ball on the shifter has grease on it which must then be from when the clutch was replaced 5 years ago if it wasn't the factory from 15 years ago.

the grease will be dissolved into the gear oil in short order as the transmission gets warm, as you drive the vehicle.

Thanks for the advice. I'll stay away from the grease. But, just for the record, if you look in the pictures prior, you'll see black grease still on the big ball - so - some greases must stay.

I'd consider changing or having the gear oil in the transmission changed.

I agree with you.

The oil is probably 5 years old but I have no idea what condition it's in ... so I should replace it. That's next on my list after I fix this (as I think it gets changed from below).

UPDATE:
I spoke to every Toyota dealership in the Silicon Valley this morning. I have parts on the counter waiting for me at the best price I could find when my friend comes over to pick me up and take me there later on today:

They very helpful parts guys said they 'matched' the web prices I gave them (just for me, they said) ...

  • PN 33505-35020 SEAT SUB-ASSY,SH, $12.61 each
    • OLD# TO33505-35010
  • PN 33548-31010 BUSH, SHIFT LEVER, $5.37 each
    • OLD# TO33548-35010
  • PN 90467-07041-E0 CLIP, $1.32 each
    • OLD# TO90467-07041-45
Thanks for your fantastic help 02SE & Nelson!

Now, having done it, I would say it's an hour job - but - it took me over six hours, mostly in the time it took to figure out how to remove the trim (but I also did a lot of web reading and DIY photo annotations which took a ton of time - but which I hope helps others in the future). I'm a people person who loves to please ... so I hope others like the DIY instructions above.
 
Last edited:
I don't disagree one bit. In perfect hindsight, this is what I 'should' have done:
a) I noticed the shifting problem & asked here
b) You gave me a great pointer to upgraded parts
c) I 'should' have ordered the upgraded parts pronto (it would have taken 2 to 4 days)
d) By the time I was about to disassemble, I would have had the upgraded parts in my hands

Lesson learned.

Well, without taking the shifter out, there was no way to know the condition of the parts.


That's interesting!

I called Toyota and they also said not to lubricate it ... but ... the weird thing is that the big ball on the shifter has grease on it which must then be from when the clutch was replaced 5 years ago if it wasn't the factory from 15 years ago.


Thanks for the advice. I'll stay away from the grease. But, just for the record, if you look in the pictures prior, you'll see black grease still on the big ball - so - some greases must stay.

It's hard to say from the picture, but it could also be, and likely is, bits of the disintegrating seat mixed with gear oil. Giving a look of grease.

There are some very high temp greases available, and it's possible someone put high-temp grease on there at some point, but they are unnecessary in this application.

Keep in mind that if this doesn't fix the shifting issue, the next step would be some work on the transmission. That would be best left to a trained Tech.
 
if this doesn't fix the shifting issue

Putting it back together took all of about five minutes. I tested it and it seems to be working fine now.

Thank you very much for your wonderful, timely, and most of all, courteously helpful advice!

Here, for the next reader's edification, are some final pictures of the old and new parts together.

attachment.php

---
attachment.php

---
attachment.php

---
attachment.php

---
attachment.php

---
attachment.php
 
Last edited:
Thank you very much for your wonderful, timely, and most of all, courteously helpful advice!

No problem. I'm glad it wasn't an internal problem in the transmission, as that quickly gets expensive.

20+ years ago I was an ASE Certified Master Tech. Factory service manuals are produced with the idea that the person using it is an automotive tech. So some of the seemingly more basic stuff is often left out.

Don't worry about being razzed on here by those that think some things should be obvious. At some point in every board members life, they knew nothing about cars. Myself included.

:cheers:
 
At some point in every board members life, they knew nothing about cars

Long term update:

The transmission is shifting perfectly, ever since this repair.

That's proof that your advice was 100% on the mark!

Thanks.
 
TCheck the shifter lever ball seat l

I found this thread, just now, searching for oxygen sensors, and, I must say yet again, that I very much appreciate your advice on this issue, since I was worried about a major repair, and, in the end, it turned out to be a minor one.

Thanks to you!

The 4runner has been shifting beautifully ever since (now it has 150K miles on it).
 
Just for future reference:
I replaced bushing and seat of my 86 4Runner last week.

Seat seemed to be a completely different (but not damaged) part, actually consisting of several layers:

img2014071119twg0ure5fa.jpg


Left: new, Right: Old

I used original toyota parts as they were available immediately. Both for 33 AUD in Melbourne.

In general, shifting is improved (but did not resolve my 3rd gear issues).

Replacing took 30 Minutes with a leatherman as only tool. quick and easy :clap2::clap2:
 
Last edited:
Status
Not open for further replies.

Members online

Forum statistics

Threads
278,317
Messages
3,554,129
Members
248,016
Latest member
Advally Service

Trending content

Back
Top