Ripcord's 2002 Sport Ed. Version 2.0

To fund another toy or to take this rig to the next level?

And don't tell me you're gonna save the money, or put it towards something irrational like bills, debt, a house. That would just be ridiculous.
I need to know as well. We need answers sir!
What gives you any idea I am the kind of person to do adult stuff like that??

Half for this toy and half for the other. I have an '04 A4 Wagon I am going to 2.7T swap in the near future. I can also neither confirm on deny I have bought a bumper for the 4runner.


Hey I'm wanting a Yakima fairing just like that, in the same spot and a 42 inch light bar on the windsheild. Would that combination be to much? Should I only get one or the other? I can't decide, what would you do
As far as what I would do, I've already done just that. In my opinion there should be no lights on top of the drivers eye line. The purpose of offroad lights is to be below the driver and cast shadows from sections of the road that are uneven so that the driver can see them. With a light above the driver there are no shadows cast.

what's the designated pizza vehicle now?

P.S. I'll be in touch here soon... possibly have a new monster on my hands that i'll need help putting some lift under.
PM me now! I can't wait to hear about this thing! I still have your mudflap btw haha.

My new DD, like I mentioned above, is an A4 wagon. It is the 3.0 V6 with a 6-speed manual.
 
Last edited:
I flipping hate the 2.7... It's such a finicky motor, I don't get me wrong it's a race motor, but its like a 2stroke banshee... Runs great like a rapped ape, but other than that is junk... To maintenance happy. Yeah the Audi v8 had the whole timing chain issues, but you will have the motor outta the car and can easily fix that problem before you put it in... And then you could SC that v8 and run circles around any 2.7...
 
True but would it look tacky having both together ?
I think all windshield mounted light bars are tacky, but I guess Alabama has different styles.

No way!

2.7tt is the right choice, or maybe a turbo vr6.

But for sure 2.7tt>v8
I flipping hate the 2.7... It's such a finicky motor, I don't get me wrong it's a race motor, but its like a 2stroke banshee... Runs great like a rapped ape, but other than that is junk... To maintenance happy. Yeah the Audi v8 had the whole timing chain issues, but you will have the motor outta the car and can easily fix that problem before you put it in... And then you could SC that v8 and run circles around any 2.7...
There is no way in hell I can afford a supercharged 4.2 build. And I disagree on your opinion of the 2.7T, a mild stage 3 build is reliable as long as you don't drag race everywhere. Which can be said for any car really. I had no problems with my last S4 and put in tons of miles on it.

And for what its worth, the 2.7 gets like 2x the fuel economy of the 4.2. But that is not really a priority anyway.
 
I think all windshield mounted light bars are tacky, but I guess Alabama has different styles.

I like the idea of mounting lights up high, to eliminate shadows. At the same time I dont like having things mounted randomly on my truck.

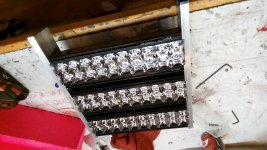
I recently aquired a broken rigid bar, I fixed it then I chopped it up and welded the heatsinks together into a 6x10 housing then machined new ends for it and did a whole bunch of other things to make it all work and be waterproof. it came out nicely and it fits perfectly in between two big hellas in my grill. originally i was just going to stack the three sections of 10 but it was simply massive and too "bro" looking. Connor was very disappointed when i finished the triple stack and decided to go in a different direction.

heres the triple stack, ill post a picture and more details about the 6x10 in my thread at some point.
 

Attachments

  • 20160317_183047.jpg
    20160317_183047.jpg
    143.6 KB · Views: 1,636
I like the idea of mounting lights up high, to eliminate shadows. At the same time I dont like having things mounted randomly on my truck.
No I was saying that you DO want those tiny shadows. They provide definition in the road at night, helping you to see features of the surface you normally wouldn't. I think that any forward facing light mounted above the driver is a bad idea.

I know that you supercharged your last build... Is that something you plan on doing for this one?
Eventually, superchargers arent cheap.
 
No I was saying that you DO want those tiny shadows. They provide definition in the road at night, helping you to see features of the surface you normally wouldn't. I think that any forward facing light mounted above the driver is a bad idea.


Eventually, superchargers arent cheap.

Interesting, so you are saying you can more easily pick a line by using the shadows. So you would never drive with a light coming from above you? With that logic you must not like sunlight, seeing as it always come from above you.

I think there are advantages to having the light mounted higher, for one you eliminate all of the shadows. Secondly your light is more easily concentrated further down the road instead of flooding the foreground and its much easier to setup a proper gradient of light concentration. I wheel at night often and at first I had the same opinion regarding the shadows, but after wheeling with both I prefer having more visibility to see over hills rocks and obastacles. Sometimes I would need someone to spot me where my low mounted lights werent shining. I guess if you are driving down service roads the shadows might be kind of neat, but in any sort of technical offroading you want to see everything. The reality is you will see any sort of dip with the light on it and be able to determine more quickly what you need to.
 
So you would never drive with a light coming from above you? With that logic you must not like sunlight, seeing as it always come from above you.
We are talking about night driving, where the single source of light is in the same direction as the driver's view. Not ambient lighting. No need to be a smart ass.

I think you and I are talking about two different scenarios..
-I am talking about just driving at a decent speed on trails, in this situation the shadows help to create depth perception, which is very useful.
-You are talking about slow speed rock crawling. In that situation, I agree its better to have everything light up.


Here is a post I found from a jeep forum talking about it more:
There's a basic difference between lights that are mounted below, or above, eye level.

Lights that are below eye level, cast longer shadows which you see -- instead of seeing the terrain.

Lights that are above eye level, cast shorter shadows which you do not see -- so you see all the terrain which is within view.

This is true for both short and long distance, and for either spots or floods.
attachment.php


Finally its a matter of preference right? I prefer having depth perception, you prefer having everything light up. Its tough to have both at the same time.
 
I've got a bar and some ditch lights. The ditch lights point down while the bar is tilted for light further down the road. Makes a good combination for crawling and higher speeds.
 
No I was saying that you DO want those tiny shadows. They provide definition in the road at night, helping you to see features of the surface you normally wouldn't. I think that any forward facing light mounted above the driver is a bad idea.


Eventually, superchargers arent cheap.
Neither is an icon suspension ;)
 
Hilux Surf Field Monitor install. Part 1: Sunroof Controls

|April 3, 2016|

The FMU is divided into two, independently powered and independently operating units.. The sunroof/maplight controls and the FMU itself. This will be part 1.

Part 1: Sunroof/ Maplight controls swap
Part 2: Field Monitor Wiring/Install

=====================================

What/Why:
The Hilux surf field monitor is a device, made by Toyota, that has an outdoor temp sensor, compass, altimeter, and a barometer. I just wanted it because it looks cool and I don't have a use for the sunglasses holder. The field units were available only in the Japanese version of the 4runner, the Hilux Surf. Also, there are 2 versions of the field monitor; the sunroof model and the non-sunroof model.

-The sunroof/maplight plugs on the 99+ 4Runners are different than the 96-98 4runners. The Hilux Surf units are directly compatible only for the 96-98 4runner, so for '99-'02 4Runners there is some extra work.

Parts/Cost:
$300: JDM Hilux Surf Field monitor (eBay:JDMNZ)

Tools:
-10mm socket
-Phillips and Flat head screw drivers
-Wire cutter/crimper
-electrical tape
-electrical connectors
-small zip ties
-Heat Gun

Resource:
Hilux Surf Field Monitor installed in a 3rd Gen Write-Up *PICS* - YotaTech Forums
FIELD MONITOR UNIT - update w/ pics - YotaTech Forums

Time:
Swapping the controls takes 30 mins.

Procedure:
This post will cover swapping the maplight/sunroof controls for 99-02 4Runners, the FMU wiring will be on the next post.

Side by Side (ignore the white balance card)
<a data-flickr-embed="true" href="https://www.flickr.com/photos/149794382@N06/34705221723/in/album-72157685365200766/" title="20160131-IMG_1390-Edit"><img src="https://c1.staticflickr.com/5/4266/34705221723_fe4040db58_b.jpg" width="1024" height="683" alt="20160131-IMG_1390-Edit"></a><script async src="//embedr.flickr.com/assets/client-code.js" charset="utf-8"></script>


Now with the FMU removed, so we can focus on just the Sunroof and Maplights.
<a data-flickr-embed="true" href="https://www.flickr.com/photos/149794382@N06/35384100611/in/album-72157685365200766/" title="20160131-IMG_1391-Edit"><img src="https://c1.staticflickr.com/5/4215/35384100611_a5f569dfb8_b.jpg" width="1024" height="683" alt="20160131-IMG_1391-Edit"></a><script async src="//embedr.flickr.com/assets/client-code.js" charset="utf-8"></script>


Notice how the 99-02 sunroof controls changed to 1 switch instead of 2..
<a data-flickr-embed="true" href="https://www.flickr.com/photos/149794382@N06/34673584864/in/album-72157685365200766/" title="20160131-IMG_1392-Edit"><img src="https://c1.staticflickr.com/5/4253/34673584864_b9c4ddd1a6_b.jpg" width="1024" height="683" alt="20160131-IMG_1392-Edit"></a><script async src="//embedr.flickr.com/assets/client-code.js" charset="utf-8"></script>


Now to get started, remove the small screws holding the map light switches in place.
<a data-flickr-embed="true" href="https://www.flickr.com/photos/149794382@N06/34705181313/in/album-72157685365200766/" title="20160131-IMG_1393-Edit"><img src="https://c1.staticflickr.com/5/4262/34705181313_a0a89771a2_b.jpg" width="1024" height="683" alt="20160131-IMG_1393-Edit"></a><script async src="//embedr.flickr.com/assets/client-code.js" charset="utf-8"></script>


Next, remove the screws holding the Sunroof controls on.
<a data-flickr-embed="true" href="https://www.flickr.com/photos/149794382@N06/35384073921/in/album-72157685365200766/" title="20160131-IMG_1394-Edit"><img src="https://c1.staticflickr.com/5/4239/35384073921_110d84b2c6_b.jpg" width="1024" height="683" alt="20160131-IMG_1394-Edit"></a><script async src="//embedr.flickr.com/assets/client-code.js" charset="utf-8"></script>


When swapping the wires over, there are a few areas where we want to leave the existing structure. It is just easier. Cut the wire going to the map light ground and the wires going to each maplight socket.
<a data-flickr-embed="true" href="https://www.flickr.com/photos/149794382@N06/34673557044/in/album-72157685365200766/" title="20160131-IMG_1395-Edit"><img src="https://c1.staticflickr.com/5/4232/34673557044_539af81c77_b.jpg" width="1024" height="683" alt="20160131-IMG_1395-Edit"></a><script async src="//embedr.flickr.com/assets/client-code.js" charset="utf-8"></script>

<a data-flickr-embed="true" href="https://www.flickr.com/photos/149794382@N06/34673547924/in/album-72157685365200766/" title="20160131-IMG_1396-Edit"><img src="https://c1.staticflickr.com/5/4278/34673547924_f0a25f3e81_b.jpg" width="1024" height="683" alt="20160131-IMG_1396-Edit"></a><script async src="//embedr.flickr.com/assets/client-code.js" charset="utf-8"></script>


With the wires cut:
<a data-flickr-embed="true" href="https://www.flickr.com/photos/149794382@N06/34673534904/in/album-72157685365200766/" title="20160131-IMG_1397-Edit"><img src="https://c1.staticflickr.com/5/4266/34673534904_8e8e2274a0_b.jpg" width="1024" height="683" alt="20160131-IMG_1397-Edit"></a><script async src="//embedr.flickr.com/assets/client-code.js" charset="utf-8"></script>


Now do the same thing on the sunglasses console you are removing..
<a data-flickr-embed="true" href="https://www.flickr.com/photos/149794382@N06/34705138293/in/album-72157685365200766/" title="20160131-IMG_1398-Edit"><img src="https://c1.staticflickr.com/5/4205/34705138293_f70227f8c1_b.jpg" width="1024" height="683" alt="20160131-IMG_1398-Edit"></a><script async src="//embedr.flickr.com/assets/client-code.js" charset="utf-8"></script>

<a data-flickr-embed="true" href="https://www.flickr.com/photos/149794382@N06/35383986561/in/album-72157685365200766/" title="20160131-IMG_1400-Edit"><img src="https://c1.staticflickr.com/5/4214/35383986561_d25b791775_b.jpg" width="1024" height="683" alt="20160131-IMG_1400-Edit"></a><script async src="//embedr.flickr.com/assets/client-code.js" charset="utf-8"></script>


Side by side again, with sunroof controls and maplights removed.
<a data-flickr-embed="true" href="https://www.flickr.com/photos/149794382@N06/34705126473/in/album-72157685365200766/" title="20160131-IMG_1399-Edit"><img src="https://c1.staticflickr.com/5/4286/34705126473_439f976cd9_b.jpg" width="1024" height="683" alt="20160131-IMG_1399-Edit"></a><script async src="//embedr.flickr.com/assets/client-code.js" charset="utf-8"></script>


Can you guess what we do now? Connect the 1999-2002 sunroof controls into the FMU Console!
<a data-flickr-embed="true" href="https://www.flickr.com/photos/149794382@N06/35475516386/in/album-72157685365200766/" title="20160131-IMG_1401-Edit"><img src="https://c1.staticflickr.com/5/4281/35475516386_2012f274c5_b.jpg" width="1024" height="683" alt="20160131-IMG_1401-Edit"></a><script async src="//embedr.flickr.com/assets/client-code.js" charset="utf-8"></script>


Part 1 is DONE! :party:
 
Last edited:
Hilux Surf Field Monitor install. Part 2: FMU Wiring

|April 3, 2016|

The FMU is divided into two, independently powered and independently operating units.. The sunroof/maplight controls and the FMU itself. This will be part 2.

Part 1: Sunroof/ Maplight controls swap
Part 2: Field Monitor Wiring/Install

=====================================

Time:
The wiring portion took me 2 hours, but this is the second one I have installed..

Procedure:
The goal for this section is to find a proper home for the wires from the Field Monitor Unit itself.


Here is the diagram for the wires on the white FMU plug:
<a data-flickr-embed="true" href="https://www.flickr.com/photos/149794382@N06/35559992175/in/dateposted-public/" title="108_0904"><img src="https://c1.staticflickr.com/5/4242/35559992175_440bdd5e07_b.jpg" width="1024" height="768" alt="108_0904"></a><script async src="//embedr.flickr.com/assets/client-code.js" charset="utf-8"></script>

The following wiring directions involve following the wire colors on the blue plug.
An important note however is that the colors of the wires change depending on what side of the plug you are on. This is the Console side of the plug:
<a data-flickr-embed="true" href="https://www.flickr.com/photos/149794382@N06/35475473396/in/album-72157685365200766/" title="20160403-IMG_1427"><img src="https://c1.staticflickr.com/5/4236/35475473396_a3600d24d1_b.jpg" width="1024" height="683" alt="20160403-IMG_1427"></a><script async src="//embedr.flickr.com/assets/client-code.js" charset="utf-8"></script>

And this is the Vehicle side of the plug:
<a data-flickr-embed="true" href="https://www.flickr.com/photos/149794382@N06/35347603272/in/album-72157685365200766/" title="20160403-IMG_1428"><img src="https://c1.staticflickr.com/5/4266/35347603272_567bdafb52_b.jpg" width="1024" height="683" alt="20160403-IMG_1428"></a><script async src="//embedr.flickr.com/assets/client-code.js" charset="utf-8"></script>

From [MENTION=5602]Rock Slide[/MENTION]'s write up. (with additions by myself)
Field Monitor:
1. Blue/Yellow wire coming off the female end of the White Plug, taps into the Gray wire on the console side of the Blue plug [Blue/Yellow wire on the vehicle side]. (full-time power)
2. White/Red wire coming off the female end of the White Plug, taps into the Red wire on the Console side of the Blue Plug [Blue/Red wire on the Vehicle side]. (ignition power)
3. White/Black wire coming off the female end of the White Plug (this wire also could also be Gray), taps into the Black/Red on the console side of the Blue Plug [White/Black/Gray on the vehicle side]. (GROUND)
Clock:
4. Green wire coming off the female end of the White Plug, taps into the Green # 3 wire on the back of the clock in the dash.
(I taped into the solid Green wire coming off the back of the dash light dimmer knob)
Temp Sensor:
5. Blue wire coming off the female end of the White Plug, connects to your Air Temp Sensor. (This Sensor needs to be installed behind the front bumper. It contains 2 wires. See next step for second wire connection.)
6. Yellow/Black wire coming off the female end of the White Plug connects to your Air Temp Sensor.
Speed Sensor:
7. Green/Orange wire coming off the female end of the White Plug, taps into the Grey/Blue wire located at the ABS Unit.


Spliced into blue plug according to the above instructions.
<a data-flickr-embed="true" href="https://www.flickr.com/photos/149794382@N06/35128404670/in/album-72157685365200766/" title="20160403-IMG_1430"><img src="https://c1.staticflickr.com/5/4218/35128404670_68ef99b8b8_b.jpg" width="1024" height="683" alt="20160403-IMG_1430"></a><script async src="//embedr.flickr.com/assets/client-code.js" charset="utf-8"></script>


Connect longer wire to the remaining 4 wires (2 for temp sensor, speed sensor, Dimmer).
<a data-flickr-embed="true" href="https://www.flickr.com/photos/149794382@N06/35347594712/in/album-72157685365200766/" title="20160403-IMG_1431"><img src="https://c1.staticflickr.com/5/4265/35347594712_921d485514_b.jpg" width="683" height="1024" alt="20160403-IMG_1431"></a><script async src="//embedr.flickr.com/assets/client-code.js" charset="utf-8"></script>


Use a hangar and make a hook to pull the wires through the headliner. You will need to remove the visor and A-pillar trim for this.
<a data-flickr-embed="true" href="https://www.flickr.com/photos/149794382@N06/35128396730/in/album-72157685365200766/" title="20160403-IMG_1432"><img src="https://c1.staticflickr.com/5/4254/35128396730_f7bff6687d_b.jpg" width="1024" height="683" alt="20160403-IMG_1432"></a><script async src="//embedr.flickr.com/assets/client-code.js" charset="utf-8"></script>

Then make sure the wires stay on the inside of the headliner and run them down the A-Pillar.
<a data-flickr-embed="true" href="https://www.flickr.com/photos/149794382@N06/35514714615/in/album-72157685365200766/" title="20160403-IMG_1433"><img src="https://c1.staticflickr.com/5/4242/35514714615_167c119aee_b.jpg" width="1024" height="683" alt="20160403-IMG_1433"></a><script async src="//embedr.flickr.com/assets/client-code.js" charset="utf-8"></script>

<a data-flickr-embed="true" href="https://www.flickr.com/photos/149794382@N06/35383890391/in/album-72157685365200766/" title="20160403-IMG_1434"><img src="https://c1.staticflickr.com/5/4207/35383890391_acc2084351_b.jpg" width="1024" height="683" alt="20160403-IMG_1434"></a><script async src="//embedr.flickr.com/assets/client-code.js" charset="utf-8"></script>


For the dimmer.. As mentioned above, I cut into the green wire on the back of the dash dimmer knob.
<a data-flickr-embed="true" href="https://www.flickr.com/photos/149794382@N06/35347573052/in/album-72157685365200766/" title="20160403-IMG_1436"><img src="https://c1.staticflickr.com/5/4218/35347573052_afbed1def2_b.jpg" width="1024" height="683" alt="20160403-IMG_1436"></a><script async src="//embedr.flickr.com/assets/client-code.js" charset="utf-8"></script>

<a data-flickr-embed="true" href="https://www.flickr.com/photos/149794382@N06/35514701955/in/album-72157685365200766/" title="20160403-IMG_1437"><img src="https://c1.staticflickr.com/5/4211/35514701955_cfc99c94af_b.jpg" width="1024" height="683" alt="20160403-IMG_1437"></a><script async src="//embedr.flickr.com/assets/client-code.js" charset="utf-8"></script>


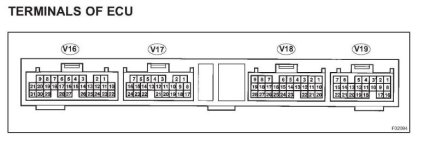
Now for the speed sensor, we need to find the speed sensor wire in the ABS ECU. Here is a diagram of the back of the ABS unit. For 99+ 4runners it is located under the driver's dash, next to the brake pedal. The Blue/Grey speed sensor wire is in the V18 plug, it should be number 16 on that plug.
Just remember that it is the only Blue/Grey wire on the entire ABS unit..
VSC-ECU.jpg

Blue/Grey speed sensor wire located. (The other red wires are for the Andymod, ignore those)
<a data-flickr-embed="true" href="https://www.flickr.com/photos/149794382@N06/34751225413/in/dateposted-public/" title="100_0866"><img src="https://c1.staticflickr.com/5/4286/34751225413_4f0862c85f_b.jpg" width="1024" height="768" alt="100_0866"></a><script async src="//embedr.flickr.com/assets/client-code.js" charset="utf-8"></script>


Ran wires to the temp sensor through the firewall and the engine bay along the drivers side.
<a data-flickr-embed="true" href="https://www.flickr.com/photos/149794382@N06/35514707455/in/album-72157685365200766/" title="20160403-IMG_1435"><img src="https://c1.staticflickr.com/5/4266/35514707455_e145b0df70_b.jpg" width="1024" height="683" alt="20160403-IMG_1435"></a><script async src="//embedr.flickr.com/assets/client-code.js" charset="utf-8"></script>


Final Product! (with some LED modifications listed below)
<a data-flickr-embed="true" href="https://www.flickr.com/photos/149794382@N06/34705027213/in/album-72157685365200766/" title="20160403-IMG_1438"><img src="https://c1.staticflickr.com/5/4206/34705027213_5b1e77e3da_b.jpg" width="1024" height="683" alt="20160403-IMG_1438"></a><script async src="//embedr.flickr.com/assets/client-code.js" charset="utf-8"></script>

 

Attachments

  • VSC-ECU.jpg
    VSC-ECU.jpg
    30.7 KB · Views: 6,171
Last edited:
LED Dash Lights & Dome Lights

|April 3, 2016|

To finish up for now, I swapped all the interior lights to LEDs! I had white on the last 4Runner, and I went with Amber this time.

=====================================

What/Why:
Green sucks, stock bulbs are dim. You don't have to put up with it!

Parts/Cost:
Total cost was like $80.
<a data-flickr-embed="true" href="https://www.flickr.com/photos/149794382@N06/34696855774" title="LED Chart"><img src="https://c1.staticflickr.com/5/4290/34696855774_3e620dd188_b.jpg" width="802" height="313" alt="LED Chart"></a><script async src="//embedr.flickr.com/assets/client-code.js" charset="utf-8"></script>

Tools:
-10mm socket
-Phillips and Flat head screw drivers

Resource:
http://www.toyota-4runner.org/3rd-gen-t4rs/160498-led-dash-lights-faqs.html
http://www.toyota-4runner.org/3rd-gen-t4rs/79771-you-can-change-color-your-clock-2.html

Time:
Expect this to take you at least 3 hours, don't rush it.

Procedure:
I am not really going to cover procedure very much, [MENTION=98153]MStudt[/MENTION] has already done that in his FAQ thread I linked above. Instead just enjoy some pics I guess. I will cover how to change the Clock color though.

Most of the Lights I got:
<a data-flickr-embed="true" href="https://www.flickr.com/photos/149794382@N06/35475503476/in/album-72157685365200766/" title="20160313-IMG_1405"><img src="https://c1.staticflickr.com/5/4289/35475503476_27d68f3896_b.jpg" width="1024" height="683" alt="20160313-IMG_1405"></a><script async src="//embedr.flickr.com/assets/client-code.js" charset="utf-8"></script>


Interior all apart and stuff as usual..
<a data-flickr-embed="true" href="https://www.flickr.com/photos/149794382@N06/35347663872/in/album-72157685365200766/" title="20160312-IMG_1402"><img src="https://c1.staticflickr.com/5/4205/35347663872_b294277150_b.jpg" width="1024" height="683" alt="20160312-IMG_1402"></a><script async src="//embedr.flickr.com/assets/client-code.js" charset="utf-8"></script>

Working on the A/C Unit neo-wedge bulbs.
<a data-flickr-embed="true" href="https://www.flickr.com/photos/149794382@N06/34673463864/in/album-72157685365200766/" title="20160313-IMG_1406"><img src="https://c1.staticflickr.com/5/4213/34673463864_cec3dd0ed2_b.jpg" width="1024" height="683" alt="20160313-IMG_1406"></a><script async src="//embedr.flickr.com/assets/client-code.js" charset="utf-8"></script>

Wax paper helps prevent hot spots (uneven distribution of light)
<a data-flickr-embed="true" href="https://www.flickr.com/photos/149794382@N06/35475496396/in/album-72157685365200766/" title="20160313-IMG_1407"><img src="https://c1.staticflickr.com/5/4265/35475496396_11c564f6b4_b.jpg" width="1024" height="683" alt="20160313-IMG_1407"></a><script async src="//embedr.flickr.com/assets/client-code.js" charset="utf-8"></script>


Sweet corner bulbs
<a data-flickr-embed="true" href="https://www.flickr.com/photos/149794382@N06/34705081633/in/album-72157685365200766/" title="20160315-IMG_1408"><img src="https://c1.staticflickr.com/5/4206/34705081633_b219187b28_b.jpg" width="1024" height="683" alt="20160315-IMG_1408"></a><script async src="//embedr.flickr.com/assets/client-code.js" charset="utf-8"></script>


Backside of the gauge cluster.
<a data-flickr-embed="true" href="https://www.flickr.com/photos/149794382@N06/34705073883/in/album-72157685365200766/" title="20160316-IMG_1411"><img src="https://c1.staticflickr.com/5/4255/34705073883_36c9ddc00e_b.jpg" width="1024" height="683" alt="20160316-IMG_1411"></a><script async src="//embedr.flickr.com/assets/client-code.js" charset="utf-8"></script>


And similar to the last build, I added some Cabin Accent Lighting that will shine down below the field monitor itself. Quite nice.

<a data-flickr-embed="true" href="https://www.flickr.com/photos/149794382@N06/35521438296/in/dateposted-public/" title="108_0910"><img src="https://c1.staticflickr.com/5/4231/35521438296_b1023b9e3e_b.jpg" width="1024" height="768" alt="108_0910"></a><script async src="//embedr.flickr.com/assets/client-code.js" charset="utf-8"></script>

<a data-flickr-embed="true" href="https://www.flickr.com/photos/149794382@N06/34705027213/in/album-72157685365200766/" title="20160403-IMG_1438"><img src="https://c1.staticflickr.com/5/4206/34705027213_5b1e77e3da_b.jpg" width="1024" height="683" alt="20160403-IMG_1438"></a><script async src="//embedr.flickr.com/assets/client-code.js" charset="utf-8"></script>

=====================================


One thing I see missing from a lot of peoples' LED Swaps is the clock color. Its actually really easy to change! Go to any studio lighting supply store (or online) and pickup a swatch sample book. I had to pay $2 for mine. Play around with the colors until you find one that fits!

Credit goes to [MENTION=37079]GottaBeTRD[/MENTION] for pioneering this one back in the good old days..

Clock:
<a data-flickr-embed="true" href="https://www.flickr.com/photos/149794382@N06/34705066413/in/album-72157685365200766/" title="20160320-IMG_1412"><img src="https://c1.staticflickr.com/5/4238/34705066413_bfc8d4671b_b.jpg" width="1024" height="683" alt="20160320-IMG_1412"></a><script async src="//embedr.flickr.com/assets/client-code.js" charset="utf-8"></script>

Without cover:
<a data-flickr-embed="true" href="https://www.flickr.com/photos/149794382@N06/34705061913/in/album-72157685365200766/" title="20160320-IMG_1413"><img src="https://c1.staticflickr.com/5/4236/34705061913_b6b6024355_b.jpg" width="1024" height="683" alt="20160320-IMG_1413"></a><script async src="//embedr.flickr.com/assets/client-code.js" charset="utf-8"></script>

First try, way too red:
<a data-flickr-embed="true" href="https://www.flickr.com/photos/149794382@N06/35347619832/in/album-72157685365200766/" title="20160320-IMG_1414"><img src="https://c1.staticflickr.com/5/4238/35347619832_05b43db875_b.jpg" width="1024" height="683" alt="20160320-IMG_1414"></a><script async src="//embedr.flickr.com/assets/client-code.js" charset="utf-8"></script>

Just right!
<a data-flickr-embed="true" href="https://www.flickr.com/photos/149794382@N06/34705056173/in/album-72157685365200766/" title="20160320-IMG_1415"><img src="https://c1.staticflickr.com/5/4218/34705056173_3710e7662b_b.jpg" width="1024" height="683" alt="20160320-IMG_1415"></a><script async src="//embedr.flickr.com/assets/client-code.js" charset="utf-8"></script>

=====================================


Now before I was done, I needed an Amber colored Radio as well. JVC had just what I wanted! All the features for a great price. Sound is very nice.

<a data-flickr-embed="true" href="https://www.flickr.com/photos/149794382@N06/35383876321/in/album-72157685365200766/" title="20160403-IMG_1441"><img src="https://c1.staticflickr.com/5/4216/35383876321_8cefda3220_b.jpg" width="1024" height="683" alt="20160403-IMG_1441"></a><script async src="//embedr.flickr.com/assets/client-code.js" charset="utf-8"></script>

I HIGHLY recommend getting the OEM Specific harnesses. So easy, you just connect the same colors to the radio's harness!
<a data-flickr-embed="true" href="https://www.flickr.com/photos/149794382@N06/35383871061/in/album-72157685365200766/" title="20160403-IMG_1442"><img src="https://c1.staticflickr.com/5/4238/35383871061_6bcd924964_b.jpg" width="1024" height="683" alt="20160403-IMG_1442"></a><script async src="//embedr.flickr.com/assets/client-code.js" charset="utf-8"></script>


===========================================


All Done!! :artist:

Yes I know I still suck at night pictures.. shut up.
You can really tell how well the Amber Accent lighting under the field monitor lights up the cabin though!

<a data-flickr-embed="true" href="https://www.flickr.com/photos/149794382@N06/35347541632/in/album-72157685365200766/" title="20160403-IMG_1465"><img src="https://c1.staticflickr.com/5/4290/35347541632_0be9417615_b.jpg" width="1024" height="683" alt="20160403-IMG_1465"></a><script async src="//embedr.flickr.com/assets/client-code.js" charset="utf-8"></script>

<a data-flickr-embed="true" href="https://www.flickr.com/photos/149794382@N06/35347539072/in/album-72157685365200766/" title="20160403-IMG_1471"><img src="https://c1.staticflickr.com/5/4216/35347539072_3ee9b46aee_b.jpg" width="1024" height="683" alt="20160403-IMG_1471"></a><script async src="//embedr.flickr.com/assets/client-code.js" charset="utf-8"></script>

<a data-flickr-embed="true" href="https://www.flickr.com/photos/149794382@N06/35128356220/in/album-72157685365200766/" title="20160403-IMG_1455"><img src="https://c1.staticflickr.com/5/4282/35128356220_e694e82ff2_b.jpg" width="1024" height="683" alt="20160403-IMG_1455"></a><script async src="//embedr.flickr.com/assets/client-code.js" charset="utf-8"></script>

<a data-flickr-embed="true" href="https://www.flickr.com/photos/149794382@N06/35514677535/in/album-72157685365200766/" title="20160403-IMG_1458"><img src="https://c1.staticflickr.com/5/4285/35514677535_f2babdbca6_b.jpg" width="1024" height="683" alt="20160403-IMG_1458"></a><script async src="//embedr.flickr.com/assets/client-code.js" charset="utf-8"></script>
 
Last edited:
Looking great dude. Amber is different, haven't seen anyone do that before. Sweet install on the FMU. All comes together really well.
 
Looking great dude. Amber is different, haven't seen anyone do that before. Sweet install on the FMU. All comes together really well.
Thanks man! How is Colorado so far? Im going to be moving there in August. Cannot flipping wait!

==============================

For those of you who are bored with this ricey stuff, I have this sitting in the garage waiting for me.

All Pro Apex bumper!

CBI Tire carrier will be on the way soon along with sliders..

<a data-flickr-embed="true" href="https://www.flickr.com/photos/149794382@N06/35342489372/in/album-72157682519482244/" title="IMG_20160330_175902067_HDR"><img src="https://c1.staticflickr.com/5/4262/35342489372_7ccacb0ca4_b.jpg" width="1024" height="576" alt="IMG_20160330_175902067_HDR"></a><script async src="//embedr.flickr.com/assets/client-code.js" charset="utf-8"></script>
 
Last edited:

Members online

Forum statistics

Threads
278,312
Messages
3,554,084
Members
248,016
Latest member
Advally Service

Trending content

Back
Top
