Ripcord's 2002 Sport Ed. Version 2.0

4-Ripcord

New member
2002 TOYOTA_4RUNNER 4x4 SPORT EDITION
Thundercloud Metallic Grey
3.4L V6 5VZ-lFE


Most recent pictures as of June 25, 2017

<a data-flickr-embed="true" href="https://www.flickr.com/photos/140899154@N02/35861376490/in/dateposted/" title="530A2335"><img src="https://live.staticflickr.com/4301/35861376490_0b9e504f01_b.jpg" width="1024" height="576" alt="530A2335"></a><script async src="//embedr.flickr.com/assets/client-code.js" charset="utf-8"></script>

<a data-flickr-embed="true" href="https://www.flickr.com/photos/140899154@N02/36123819055" title="530A0728"><img src="https://farm5.staticflickr.com/4323/36123819055_224e295d89_b.jpg" width="1024" height="576" alt="530A0728"></a><script async src="//embedr.flickr.com/assets/client-code.js" charset="utf-8"></script>

<a data-flickr-embed="true" href="https://www.flickr.com/photos/149794382@N06/36211448425" title="20170719-IMG_5049"><img src="https://farm5.staticflickr.com/4316/36211448425_1c3a3b0da3_b.jpg" width="1024" height="576" alt="20170719-IMG_5049"></a><script async src="//embedr.flickr.com/assets/client-code.js" charset="utf-8"></script>


========================================================================================================

|March 28, 2015|
-I bought my 4Runner for $7,700 in Memphis, TN. At that time it had just over 130k miles. Completely stock other than a remote start system, fresh Timing belt change.
Dare I say it was a bit cleaner than my last 4Runner.

<a data-flickr-embed="true" href="https://www.flickr.com/photos/149794382@N06/34704747063/in/album-72157685365200726/" title="IMG_20150328_192123170_HDR"><img src="https://c1.staticflickr.com/5/4207/34704747063_45802abb5f_b.jpg" width="1024" height="576" alt="IMG_20150328_192123170_HDR"></a><script async src="//embedr.flickr.com/assets/client-code.js" charset="utf-8"></script>


===============================================================================


UPGRADES & MODIFICATIONS as of August 24, 2017
Links to pictures/Write-ups can be found next to each item.

Suspension:
1" Toytec Body Lift
Front: 3" suspension lift
-KING 2.5 Extended travel coilovers w/600 lbs/in springs (PG. 47/ Post 705)
-ICON 2.5 Extended travel remote reservoir coilovers w/600 lbs/in springs (PG. 12/ Post 166)
-SPC Adjustable upper control arms (PG. 47/ Post 705)
-AllPro upper control arms (PG. 12/ Post 166)
-Energy Suspension steering rack and sway bar bushings
-Energy Suspension control arm bushings (PG. 12/ Post 166)
Rear: 3.25" suspension lift
-KING 2.0 12" travel shocks w/adjustable compression and finned remote reservoir (PG. 47/ Post 705)
-Custom 12" shock towers (PG. 47/ Post 705)
-ICON 2.0 10" travel shocks (PG. 12/ Post 166)
-Custom 10" shock towers (PG. 12/ Post 166)
-Toytec Superflex rear springs (PG. 38/ Post 569)
-OME 890 rear springs (PG. 35/ Post 515)
-OME 861 rear springs (PG. 12/ Post 166)
-3" Extended bump stops (PG. 12/ Post 166)
-Toytec panhard drop bracket

Wheels & Tires:
-FN Wheels 17x8.5 5-Star Bronze (PG. 10/ Post 138)
-315/70-17 Goodyear Duratrac
-Dorman RNB-610-407 Extended wheel studs (PG. 12/ Post 166)
Tire Clearance:
-Sonoran Steel washer bottle relocation kit (PG. 44/ Post 655)
-Pinch weld trimming, proper wheel offset, caster set full forward

Drivetrain
-Hayden Transmission cooler
Front Axle:
-ARB Air Locker (PG. 37/ Post 541)
-4.88:1 gear ratio
-Toytec SS braided extended brake lines
Rear Axle:
-ARB Air Locker (PG. 37/ Post 541)
-4.88:1 gear ratio
-Toytec SS Braided brake lines

Electrical:
-Blue Sea Systems 12 circuit fuse block w/ ignition relay (PG. 1/ Post 5) *version 2* (PG. 30/ Post 444)
-Custom fuse platform (PG. 1/ Post 5) *version 2* (PG. 30/ Post 444)
-CS144 Alternator (PG. 1/ Post 4)
-"Big 3" Mod(PG. 1/ Post 5)
-ARB High output air compressor (PG. 37/ Post 541)
-Optima Yellow Top battery
-EP35 flasher relay

Exterior:
-Sherpa "Matterhorn" Aluminium Full-Length Roof Rack (PG. 47/ Post 700)
-Overland Pros Wraptor 2000 FoxWing awning (PG. 47/ Post 700)
-Redline Tuning Hood struts (PG. 7/ Post 105)
-Ceramic Tint all around (PG. 4/ Post 51)
-Diamond K9000 Motorized CB Antenna Mount (PG. 6/ Post 90) Mounted to new rack:: (PG. 47/ Post 700)
Armor:
-All Pro APEX 1st gen Tacoma front bumper (PG. 22/ Post 317)
-All Pro IFS Skid plate
-4xInnovations rock sliders (PG. 22/ Post 317)
-CBI Hybrid Swingout rear bumper (PG. 22/ Post 317)
__-Custom folding camp table on swingout (PG. 38/ Post 556)
__-Modified CBI Swingout pin (PG. 46/ Post 687)
Exterior Lighting:
-Rigid Dually Fogs w/amber lens covers (PG. 22/ Post 317)
-Black Oak LED 20" single row Combo pattern light bar (PG. 30/ Post 444)

Interior:
-Custom Cargo Box w/drawer (PG. 21/ Post 304)
-JDM Hilux Surf Field Monitor (PG. 18/ Post 256)
-OTRATTW switches (PG. 30/ Post 444)
-GPS Tablet mounted (PG. 19/ Post 280)
-Sound Deadened interior (PG. 1/ Post 3)
-Extra grab handle (PG. 1/ Post 5)
-Scangauge II (PG. 1/ Post 6)
-Weathertech Digital-fit floor lines
Interior Lighting: (PG. 18/ Post 258)
-LED Nighttime Accent Lighting (Amber)
-LED Dome lights (White)
-LED Gauge lighting (Amber)

Stereo/ CB/ HAM:
-JVC KD-R960BTS (PG. 18/ Post 258)
CB: (PG. 7/ Post 91)
-Uniden Pro520XL Radio
-Speco Amplified PA Speaker
-Diamond K9000 Motorized CB Antenna Mount (PG. 6/ Post 90) Mounted to new rack:: (PG. 47/ Post 700)
HAM:
-Baofeng UV-5R V2+ handheld 2M radio


Trip Reports:
-May 28 - June 3, 2016: MOAB Rock Therapy 2016 (PG. 23/ Post 331)
-August 12, 2016: Colorado Toyota Jamboree 2016 (PG. 25/ Post 361)
-September 19, 2016: Breck Peak 10, Bill Moore Lake, CO (PG. 26/ Post 376)
-September 24, 2016: Webster Pass, Radical Hill, CO (PG. 26/ Post 387)
-October 5, 2016: Engineer Pass, CO (PG. 28/ Post 411)
-February 27, 2017: Switzerland trail, CO (PG. 31/ Post 460)
-April 3, 2017: Switzerland trail, CO (PG. 34/ Post 507)
-May 16, 2017: Yankee Hill, CO (PG. 40/ Post 586)
-June 4, 2017: Calico, CA (PG. 42/ Post 618)
-June 17, 2017: Pilot Rock, CA (The flop) (PG. 42/ Post 625)
-July 16-21, 2017: 7 Day overlanding across Colorado to FJ Summit (PG. 47/ Post 701)


========================================


Some of my more notable mods
(see above for links to each item)


Custom fuse box setup:

<a data-flickr-embed="true" href="https://www.flickr.com/photos/149794382@N06/34702439993/in/album-72157682523525914/" title="20170309-IMG_2296"><img src="https://farm5.staticflickr.com/4283/34702439993_0822acbd9e_b.jpg" width="683" height="1024" alt="20170309-IMG_2296"></a><script async src="//embedr.flickr.com/assets/client-code.js" charset="utf-8"></script>


Front and Rear air lockers:

<a data-flickr-embed="true" href="https://www.flickr.com/photos/149794382@N06/35382470841/in/album-72157685365200766/" title="20170510-IMG_2548"><img src="https://farm5.staticflickr.com/4282/35382470841_df640fe8fb_b.jpg" width="1024" height="576" alt="20170510-IMG_2548"></a><script async src="//embedr.flickr.com/assets/client-code.js" charset="utf-8"></script>


Orange LED interior lighting:

<a data-flickr-embed="true" href="https://www.flickr.com/photos/149794382@N06/35472858756/in/album-72157682523525914/" title="20170217-IMG_2146"><img src="https://farm5.staticflickr.com/4257/35472858756_fd1c2e8a0c_b.jpg" width="1024" height="683" alt="20170217-IMG_2146"></a><script async src="//embedr.flickr.com/assets/client-code.js" charset="utf-8"></script>


JDM Hilux surf field monitor:

<a data-flickr-embed="true" href="https://www.flickr.com/photos/149794382@N06/34705027213/in/album-72157685365200766/" title="20160403-IMG_1438"><img src="https://farm5.staticflickr.com/4206/34705027213_5b1e77e3da_b.jpg" width="1024" height="683" alt="20160403-IMG_1438"></a><script async src="//embedr.flickr.com/assets/client-code.js" charset="utf-8"></script>


Rear shock mounts:

<a data-flickr-embed="true" href="https://www.flickr.com/photos/149794382@N06/36634629246" title="IMG_2973"><img src="https://farm5.staticflickr.com/4423/36634629246_cf136713fe_b.jpg" width="1024" height="683" alt="IMG_2973"></a><script async src="//embedr.flickr.com/assets/client-code.js" charset="utf-8"></script>


Custom Cargo box build:

<a data-flickr-embed="true" href="https://www.flickr.com/photos/149794382@N06/35128266680/in/album-72157685365200766/" title="20160516-IMG_1553"><img src="https://farm5.staticflickr.com/4211/35128266680_df1a8739c0_b.jpg" width="1024" height="640" alt="20160516-IMG_1553"></a><script async src="//embedr.flickr.com/assets/client-code.js" charset="utf-8"></script>


Bumper swingout table

<a data-flickr-embed="true" href="https://www.flickr.com/photos/149794382@N06/35123295300/in/album-72157682519482244/" title="20170512-IMG_2576"><img src="https://farm5.staticflickr.com/4254/35123295300_3ede438fd9_b.jpg" width="1024" height="576" alt="20170512-IMG_2576"></a><script async src="//embedr.flickr.com/assets/client-code.js" charset="utf-8"></script>


===============================================


This build came to a tragic end as the truck was the victim of a Hit and Run.
Some of the mods were sold off and the truck was sold as salvage to a new owner.


LINK TO ACCIDENT PICS & STORY POST


I have replaced it with a Tacoma, here is the new build thread link:

Ripcord's Spruce Mica Build


[<a data-flickr-embed="true" href="https://www.flickr.com/photos/149794382@N06/33921877678/" title="20190503-IMG_7409"><img src="https://live.staticflickr.com/65535/33921877678_c49c8e5543_b.jpg" width="1024" height="683" alt="20190503-IMG_7409"></a><script async src="//embedr.flickr.com/assets/client-code.js" charset="utf-8"></script>

<a data-flickr-embed="true" href="https://www.flickr.com/photos/149794382@N06/46694722125/in/dateposted-public/" title="20190413-IMG_7020"><img src="https://live.staticflickr.com/7894/46694722125_68d89b5e25_b.jpg" width="1024" height="683" alt="20190413-IMG_7020"></a><script async src="//embedr.flickr.com/assets/client-code.js" charset="utf-8"></script>

<a data-flickr-embed="true" href="https://www.flickr.com/photos/149794382@N06/47646743932/in/dateposted-public/" title="IMG_20190422_090412_808"><img src="https://live.staticflickr.com/65535/47646743932_925704d1a9_b.jpg" width="696" height="696" alt="IMG_20190422_090412_808"></a><script async src="//embedr.flickr.com/assets/client-code.js" charset="utf-8"></script>


.
 
Last edited:
Register to hide this ad
Many of you will remember my previous (original) 4Runner.

Well after an unfortunate streak of breaking things and having my only vehicle down for many weeks at a time. I decided it was time to sell the 4runner to get a more sensible DD, so I parted out most of the mods and sold it.

Build thread for it here: http://www.toyota-4runner.org/3rd-gen-t4rs/85197-ripcords-2002-4runner-sport-ed.html

<a data-flickr-embed="true" href="https://www.flickr.com/photos/149794382@N06/35379019551/in/album-72157682572920363/" title="12_12_1 (4)"><img src="https://c1.staticflickr.com/5/4213/35379019551_633fa51755_b.jpg" width="1024" height="768" alt="12_12_1 (4)"></a><script async src="//embedr.flickr.com/assets/client-code.js" charset="utf-8"></script>


Shortly after, I realized how stupid I was.

You can read more about my time in between 4runners here: http://www.toyota-4runner.org/3rd-gen-t4rs/192371-ripcords-return.html.


=================================================================================================


Alright, enough with the introductions. My plan for this project is going to be overland/camping/roadtrip focused. It seems to help to think of it in phases, although those lines may be blurred over time.
The main difference is that this time, I will have the budget to do things right.
Stage 1: Platform Improvement, communication
Stage 2: Suspension, wheels & tires, armor
Stage 3: Gears, supercharger
Stage 4: trailer


First step with any new vehicle.. Catch up on maintenance. I mostly focused on engine and drive train items. I will be dealing with suspension related maintenance once I get to modding the suspension.

Parts/Cost: $361.81 Total
$40.00 – Mobil 1 75W-90 Diff fluid (2 bottles)- only enough for the T-case, I will be replacing diffs and didn't want to buy unnecessary fluid.
$97.09 - Denso Radiator 221-0508
$43.76 – TOYOTA Coolant (2 jugs)
$33.96 – TOYOTA ATF (4 bottles, 00718-ATF00)
$22.95 – TOYOTA Air Filter (17801-07020)
$42.11 – TOYOTA Fuel Filter (23300-62030)
$15.97 – TOYOTA PCV Valve & Grommet (12204-62010 & 90480-18001)
$04.40 – TOYOTA IAC Gasket (22215-62180)
$10.57 – TOYOTA TRD “O” TB Gasket (PTR29-60030)
$50.00 – Oil + TOYOTA Filter (90915-YZZD1)

Here are all of the new parts I got:
<a data-flickr-embed="true" href="https://www.flickr.com/photos/149794382@N06/34707809103/in/album-72157683394662800/" title="IMG_0713"><img src="https://c1.staticflickr.com/5/4281/34707809103_dd86598291_b.jpg" width="1024" height="683" alt="IMG_0713"></a><script async src="//embedr.flickr.com/assets/client-code.js" charset="utf-8"></script>

<a data-flickr-embed="true" href="https://www.flickr.com/photos/149794382@N06/35131000960/in/album-72157683394662800/" title="IMG_0719"><img src="https://c1.staticflickr.com/5/4236/35131000960_cd7f4c26b3_b.jpg" width="1024" height="683" alt="IMG_0719"></a><script async src="//embedr.flickr.com/assets/client-code.js" charset="utf-8"></script>

<a data-flickr-embed="true" href="https://www.flickr.com/photos/149794382@N06/35350448642/in/album-72157683394662800/" title="IMG_0736"><img src="https://c1.staticflickr.com/5/4257/35350448642_981df1fd25_b.jpg" width="1024" height="683" alt="IMG_0736"></a><script async src="//embedr.flickr.com/assets/client-code.js" charset="utf-8"></script>

Throttle Body Before:
<a data-flickr-embed="true" href="https://www.flickr.com/photos/149794382@N06/35478135906/in/album-72157683394662800/" title="IMG_0721"><img src="https://c1.staticflickr.com/5/4230/35478135906_4c9d219da7_b.jpg" width="1024" height="683" alt="IMG_0721"></a><script async src="//embedr.flickr.com/assets/client-code.js" charset="utf-8"></script>

TRD "O" TB Gasket:
<a data-flickr-embed="true" href="https://www.flickr.com/photos/149794382@N06/35477713406/in/album-72157683394662800/" title="IMG_0723"><img src="https://c1.staticflickr.com/5/4290/35477713406_98483e02e9_b.jpg" width="1024" height="683" alt="IMG_0723"></a><script async src="//embedr.flickr.com/assets/client-code.js" charset="utf-8"></script>

Dirty MAF:
<a data-flickr-embed="true" href="https://www.flickr.com/photos/149794382@N06/35477708046/in/album-72157683394662800/" title="IMG_0724"><img src="https://c1.staticflickr.com/5/4217/35477708046_2a5f04448f_b.jpg" width="1024" height="683" alt="IMG_0724"></a><script async src="//embedr.flickr.com/assets/client-code.js" charset="utf-8"></script>

Clean:
<a data-flickr-embed="true" href="https://www.flickr.com/photos/149794382@N06/35350468242/in/album-72157683394662800/" title="IMG_0725"><img src="https://c1.staticflickr.com/5/4229/35350468242_afdeda2432_b.jpg" width="1024" height="683" alt="IMG_0725"></a><script async src="//embedr.flickr.com/assets/client-code.js" charset="utf-8"></script>

When replacing the radiator, you will need to drain and disconnect the coolant and transmission fluid lines.

Got rid of the ugly 02' sport skid
ITS SOLD, STOP ASKING
<a data-flickr-embed="true" href="https://www.flickr.com/photos/149794382@N06/35386691601/in/album-72157683394662800/" title="IMG_0740"><img src="https://c1.staticflickr.com/5/4282/35386691601_eb0703f775_b.jpg" width="1024" height="683" alt="IMG_0740"></a><script async src="//embedr.flickr.com/assets/client-code.js" charset="utf-8"></script>

Removed the running boards:
<a data-flickr-embed="true" href="https://www.flickr.com/photos/149794382@N06/35517345405/in/album-72157683394662800/" title="IMG_0741"><img src="https://c1.staticflickr.com/5/4259/35517345405_059fea913d_b.jpg" width="1024" height="683" alt="IMG_0741"></a><script async src="//embedr.flickr.com/assets/client-code.js" charset="utf-8"></script>
 
Last edited:
Sound Deadened Interior

|April 18, 2015|

Following with my Stage 1 plan of building a solid platform, the first actual mod will be Sound Deadening. I followed [MENTION=5602]Rock Slide[/MENTION]'s build for where to buy materials. In his build, he also opted for new carpet padding. I chose to reuse the stock padding as it was still fine.
Rock Slide's 2002 Sport - YotaTech Forums

What/Why:
Sound deadening is exactly what it sounds like it is, applying materials (Similar to Dynomat) to dampen vibration and road noise to produce a quieter cabin. Many newer luxury vehicles have sound deadening already. Another method of sound deadening used in the auto industry is to fill body cavities with foam, I obviously did not do that. Sound deadening can also help to insulate the vehicle from extreme temps, but the windows will do a good job of keeping that improvement to a minimum.

Parts/Cost:
$84.28: (5) Rolls of 4"roofing mat (McMaster-Carr 9640T1)- I actually bought 7 rolls, and only ended up using 4. I say 5 if you plan to do the doors. They also sell 6" rolls, but I found 4" was better for the tight areas.

Tools:
-Utility Knife
-Heat gun (a hair dryer will work, but will be MUCH slower)
-10mm socket
-12mm socket
-14mm socket
-Phillips screwdriver
-Surface cleaning product (something that cleans and doesn't leave a residue such as Lysol wipes)

Time:
6-8 hours. Depending on how thorough you are and how fast you can disassemble/reassemble the interior.

Procedure:
There are 3 main phases on this mod, I chose not to do the doors, because it got late in the day. I will save the materials and do the doors if/when I replace speakers.
-Passenger area
-Cargo area
-Doors

For the passenger area, first step is to remove the seats. 14mm bolts.

Next, remove the trim around the doors and the center console. To remove the center console, there are a number of bolts that require the 10mm socket or a Philips screwdriver. I have marked them on this picture, this is for a 99-02 center console.

<a data-flickr-embed="true" href="https://www.flickr.com/photos/149794382@N06/35474953656/in/album-72157685365200766/" title="IMG_2111"><img src="https://c1.staticflickr.com/5/4236/35474953656_c019059073_b.jpg" width="1024" height="683" alt="IMG_2111"></a><script async src="//embedr.flickr.com/assets/client-code.js" charset="utf-8"></script>

This mod is a great way to clean the interior too! Mine needed it.

<a data-flickr-embed="true" href="https://www.flickr.com/photos/149794382@N06/35474759166/in/album-72157685365200766/" title="IMG_2121"><img src="https://c1.staticflickr.com/5/4282/35474759166_f618033f9e_b.jpg" width="1024" height="683" alt="IMG_2121"></a><script async src="//embedr.flickr.com/assets/client-code.js" charset="utf-8"></script>

Next up is remove the carpet. It is held down with a few clips along the door jambs, nothing more.

<a data-flickr-embed="true" href="https://www.flickr.com/photos/149794382@N06/35383270711/in/album-72157685365200766/" title="IMG_2116"><img src="https://c1.staticflickr.com/5/4213/35383270711_ecd8c5a205_b.jpg" width="1024" height="683" alt="IMG_2116"></a><script async src="//embedr.flickr.com/assets/client-code.js" charset="utf-8"></script>

Once the carpet is removed, BE SURE TO CLEAN THE SURFACE OF THE METAL or the mat will not apply very well. DO NOT use cleaners that leave a residue.

Here are the rolls of sound deadening material
<a data-flickr-embed="true" href="https://www.flickr.com/photos/149794382@N06/34704313993/in/album-72157685365200766/" title="IMG_2124"><img src="https://c1.staticflickr.com/5/4237/34704313993_5c0d5e7c17_b.jpg" width="1024" height="683" alt="IMG_2124"></a><script async src="//embedr.flickr.com/assets/client-code.js" charset="utf-8"></script>

Cut each strip to the desired length, remove the wax paper backing, and heat the material to activate it. It is EXTREMELY sticky once hot, so you won’t be able to re-position after you apply it. Keep that in mind.

<a data-flickr-embed="true" href="https://www.flickr.com/photos/149794382@N06/35474804496/in/album-72157685365200766/" title="IMG_2119"><img src="https://c1.staticflickr.com/5/4229/35474804496_2515a453c1_b.jpg" width="1024" height="683" alt="IMG_2119"></a><script async src="//embedr.flickr.com/assets/client-code.js" charset="utf-8"></script>

Once you have it all covered, put everything back.

<a data-flickr-embed="true" href="https://www.flickr.com/photos/149794382@N06/35474717226/in/album-72157685365200766/" title="IMG_2122"><img src="https://c1.staticflickr.com/5/4205/35474717226_c3c2be3c1e_b.jpg" width="1024" height="683" alt="IMG_2122"></a><script async src="//embedr.flickr.com/assets/client-code.js" charset="utf-8"></script>

--------

The cargo area is similar to the passenger area. Remove the trim then the carpet. There are a few bolts holding the rear trim pieces on that are not apparent right away.
If you happen to break any of the plastic clips that hold this panel on (I did), the PN for replacement clips is 67771-35010.

For example, the upper section of the big side pieces has this bolt that can only be accessed once the cargo light and the piece it bolts to are removed.
<a data-flickr-embed="true" href="https://www.flickr.com/photos/149794382@N06/35383127481/in/album-72157685365200766/" title="IMG_2125"><img src="https://c1.staticflickr.com/5/4257/35383127481_1505e6f7f5_b.jpg" width="1024" height="683" alt="IMG_2125"></a><script async src="//embedr.flickr.com/assets/client-code.js" charset="utf-8"></script>

There is this rubber mat that was under the carpet, I chose to reuse it in addition to the sound deadening.
<a data-flickr-embed="true" href="https://www.flickr.com/photos/149794382@N06/35347288032/in/album-72157685365200766/" title="IMG_2130"><img src="https://c1.staticflickr.com/5/4290/35347288032_068ced5fb5_b.jpg" width="1024" height="683" alt="IMG_2130"></a><script async src="//embedr.flickr.com/assets/client-code.js" charset="utf-8"></script>

<a data-flickr-embed="true" href="https://www.flickr.com/photos/149794382@N06/35475045766/in/album-72157685365200766/" title="IMG_2133"><img src="https://c1.staticflickr.com/5/4212/35475045766_96805964b7_b.jpg" width="1024" height="683" alt="IMG_2133"></a><script async src="//embedr.flickr.com/assets/client-code.js" charset="utf-8"></script>

All covered.

<a data-flickr-embed="true" href="https://www.flickr.com/photos/149794382@N06/35475010386/in/album-72157685365200766/" title="IMG_2135"><img src="https://c1.staticflickr.com/5/4258/35475010386_fbf3297b54_b.jpg" width="1024" height="683" alt="IMG_2135"></a><script async src="//embedr.flickr.com/assets/client-code.js" charset="utf-8"></script>

All done!

<a data-flickr-embed="true" href="https://www.flickr.com/photos/149794382@N06/35383429861/in/album-72157685365200766/" title="IMG_2137"><img src="https://c1.staticflickr.com/5/4282/35383429861_35f6fdfce1_b.jpg" width="1024" height="683" alt="IMG_2137"></a><script async src="//embedr.flickr.com/assets/client-code.js" charset="utf-8"></script>

Overall, I did notice a difference mostly in road noise transmitted to the cabin. I would say this mod was worth the money.
 
Last edited:
Alternator Upgrade

|May 2, 2015|

The next step in Stage 1 is to improve the Stock electrical system. I was always disappointed with the quality of my wiring work on my previous 4Runner, this time that will not be the case. I will be upgrading the stock system to handle higher loads (Big 3, Alternator) and installing an auxiliary fuse block to avoid fuse taps. I will also be building a clean platform to mount the new wiring components to.

The electrical upgrade will consist of 4, completely independent, phases. Meaning you can do any of them at any time.
-Alternator Upgrade
-"Big 3" wiring Mod
-Blue Sea Fuse box
-800W Power inverter

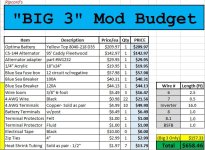
Here is my parts list for the entire electical project
Big 3.JPG

<a data-flickr-embed="true" href="https://www.flickr.com/photos/149794382@N06/34670676354/in/album-72157682523525914/" title="IMG_2139"><img src="https://c1.staticflickr.com/5/4214/34670676354_ec644e9495_b.jpg" width="1024" height="683" alt="IMG_2139"></a><script async src="//embedr.flickr.com/assets/client-code.js" charset="utf-8"></script>


==================================================================================================


This post will cover the alternator upgrade only.

Resource:
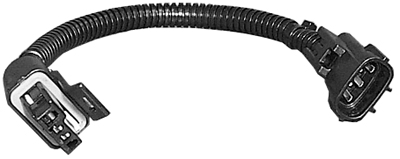
I followed [MENTION=76419]Doc2012[/MENTION]'s CS144 alternator upgrade. Although he chose to make a custom harness, since then an adapter has come to market. Super simple!


What/Why:
The stock alternator is capable of 85W, this will quickly be maxed out when running many accessories. The CS144 Alternator is capable of 140W, which will be more than sufficient. The CS144 code denotes the case style, which was mostly used in 90's chevy V8s. The CS144 will bolt to the stock location with the stock alternator belt.

Parts/Cost:
$142.97: CS-144 Alternator- Summit Racing (be sure to get the ribbed pulley type NOT the V-belt type)
$29.95: Alternator plug adapter (W1232)
$21.03: Power Steering Belt (90080-91126-83)
$19.51: A/C Belt (99364-20870-78)
$21.57: Alternator Belt (90080-91090-83)

Tools:
-12mm socket
-14mm socket

Time:
2 hours. Depending on how quick you can figure out the power steering tensioner.

Procedure:
Basically, we will remove the accessory belts, then the alternator, then replace everything in the reverse order. Remove the skids, you will need to be under the truck.
-The first belt is the Power steering belt, this is the hardest tensioner to reach. You will need to break the top power steering pump bolt loose, then loosen the clamp nut on the tensioner. Both can be reached from above the vehicle. The final step is to loosen the tensioner bolt, you can barely even see it, but know that it is under the Power steering pump.
-The second belt is the A/C belt. The tensioner pulley can be accessed from under the vehicle. Loosen the bolt through the center of the pulley, then the tensioner itself.
-The final belt is the Alternator belt. The tensioner is under the alternator. First break loose the top alternator bolt, then loosen the clamp nut then the tensioner bolt.
-To get the belts out, you will need to put a few fan blades through the belt, then turn the fan so the belt is out. Once the belts are off, the rest is trivial.

Here is most of my materials.
<a data-flickr-embed="true" href="https://www.flickr.com/photos/149794382@N06/34670326744/in/album-72157682523525914/" title="IMG_0768"><img src="https://c1.staticflickr.com/5/4265/34670326744_4064910b4c_b.jpg" width="1024" height="683" alt="IMG_0768"></a><script async src="//embedr.flickr.com/assets/client-code.js" charset="utf-8"></script>

D11873.2.JPG


Alternators side-by-side:
<a data-flickr-embed="true" href="https://www.flickr.com/photos/149794382@N06/34670314774/in/album-72157682523525914/" title="IMG_0770"><img src="https://c1.staticflickr.com/5/4231/34670314774_522c1ec7ba_b.jpg" width="1024" height="683" alt="IMG_0770"></a><script async src="//embedr.flickr.com/assets/client-code.js" charset="utf-8"></script>

<a data-flickr-embed="true" href="https://www.flickr.com/photos/149794382@N06/35344501742/in/album-72157682523525914/" title="IMG_0769"><img src="https://c1.staticflickr.com/5/4216/35344501742_626ae788d7_b.jpg" width="1024" height="683" alt="IMG_0769"></a><script async src="//embedr.flickr.com/assets/client-code.js" charset="utf-8"></script>

New one in with new belts: You will notice that the CS144 has a 5-Rib pulley while the OEM belt is 3-Rib. The belt will be on the pulley like this when looking down on it:
Rear:
---------------------------- open
-x-x-x-x-x-x-x-x-x-x-x-x belt
Front:

<a data-flickr-embed="true" href="https://www.flickr.com/photos/149794382@N06/35344493442/in/album-72157682523525914/" title="IMG_0771"><img src="https://c1.staticflickr.com/5/4286/35344493442_851d9e18d7_b.jpg" width="1024" height="683" alt="IMG_0771"></a><script async src="//embedr.flickr.com/assets/client-code.js" charset="utf-8"></script>
 

Attachments

  • Big 3.JPG
    Big 3.JPG
    99 KB · Views: 42,759
Last edited:
"BIG 3" Mod

|May 2, 2015|

This post will cover the Big 3 upgrade, fuse box install, and Power Inverter.

Resource:
The only BIG 3 thread you need here is [MENTION=44220]BigFishAllDay[/MENTION] 's. A truly excellent write-up!
http://www.toyota-4runner.org/3rd-g...wiring-ugrade-3rd-gen-toyota-4runner-how.html

What/Why:
The purpose of the Big 3 wiring upgrade is to improve the capacity of the OEM electical system, and to also bring some stability to the system. It consists of adding wires from the alternator to the battery, alternator to ground and from the battery to the ground.

Parts/Cost:
$209.97: Optima Yellow top 8040-218 D35
$57.98: Blue Sea 12 circuit fuse box
$40.31: Blue Sea 100A Breaker panel mount
$44.13: Blue Sea 120A Breaker panel mount
$19.95: 1/4" Acrylic 18"x24"
$16.47: 3/8" Wire loom
$21.56: 22ft 4AWG wire ($0.98/ft)
$49.90: 10 pairs
$6.49: Marine battery terminals

Tools:
-10mm socket
-12mm socket
-14mm socket
-Wire cutter/crimper
-Soldering iron
-Rosin core solder
-electrical tape
-small zip ties
-blow torch

Time:
Mostly hours of prep work, actual install is less than an hour.

Procedure:
Big 3: Measure the lengths of wire needed, make wires, install wires.
Fuse box: Measure lengths of wire needed, make wires, make fuse box platform, install. For details, see the linked write-up.

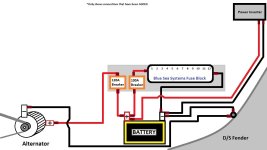
In the end, my wiring will follow this diagram: (NOTE: The power inverter and fuse block are not part of the BIG 3 itself, they are an extra piece I have added)
Wiring Diagram.jpg

I will show how I made the ends of the wire. First cut and stripped about 1/2" off. For the terminals, I cut a few pieces of solder and used a blow torch to melt it in the terminal.
<a data-flickr-embed="true" href="https://www.flickr.com/photos/149794382@N06/35472326856/in/album-72157682523525914/" title="IMG_0709"><img src="https://c1.staticflickr.com/5/4263/35472326856_ee04624bf0_b.jpg" width="1024" height="683" alt="IMG_0709"></a><script async src="//embedr.flickr.com/assets/client-code.js" charset="utf-8"></script>


Then while it was still molten, I stuck the end of the wire in and it was pretty solid.

<a data-flickr-embed="true" href="https://www.flickr.com/photos/149794382@N06/35125348560/in/album-72157682523525914/" title="IMG_0710"><img src="https://c1.staticflickr.com/5/4237/35125348560_c28fa886e4_z.jpg" width="1024" height="683" alt="IMG_0710"></a><script async src="//embedr.flickr.com/assets/client-code.js" charset="utf-8"></script>

Then crimped and taped the end with electrical tape:
<a data-flickr-embed="true" href="https://www.flickr.com/photos/149794382@N06/35472379206/in/album-72157682523525914/" title="IMG_0699"><img src="https://c1.staticflickr.com/5/4286/35472379206_049a737119_z.jpg" width="1024" height="683" alt="IMG_0699"></a><script async src="//embedr.flickr.com/assets/client-code.js" charset="utf-8"></script>

After that, I wrapped the wire in loom and taped them again, used red tape on the positive wires. Also used wire ties to hold it together.

<a data-flickr-embed="true" href="https://www.flickr.com/photos/149794382@N06/34670335144/in/album-72157682523525914/" title="IMG_0753"><img src="https://c1.staticflickr.com/5/4286/34670335144_62d9c95a88_z.jpg" width="1024" height="683" alt="IMG_0753"></a><script async src="//embedr.flickr.com/assets/client-code.js" charset="utf-8"></script>


===============================================================


For the fuse box holder tray, I got my idea from this thread on Tacomaworld:
How To: Secondary Stand Alone Fuse Block Install

The person in this thread used Lexan, which cannot be laser cut, so I used Acrylic instead as I had access to a laser cutter. I designed the tray on Rhino and Adobe Illustrator with the help of my Girlfriend.
Keep in mind, my design completely uses factory fastener locations. I did not need to drill any holes for bolts.

Here is my first iteration of the design.
<a data-flickr-embed="true" href="https://www.flickr.com/photos/149794382@N06/35499146786/in/dateposted-public/" title="Screen Shot 2015-04-20 at 9.35.32 PM"><img src="https://c1.staticflickr.com/5/4231/35499146786_5ef83b75f4_z.jpg" width="1024" height="683" alt="Screen Shot 2015-04-20 at 9.35.32 PM"></a><script async src="//embedr.flickr.com/assets/client-code.js" charset="utf-8"></script>]

<a data-flickr-embed="true" href="https://www.flickr.com/photos/149794382@N06/34701883853/in/album-72157682523525914/" title="IMG_20150506_185847098_HDR"><img src="https://c1.staticflickr.com/5/4206/34701883853_fa1eab294d_z.jpg" width="1024" height="683" alt="IMG_20150506_185847098_HDR"></a><script async src="//embedr.flickr.com/assets/client-code.js" charset="utf-8"></script>

To bend the acrylic, I held it in my press (lightly) and used the heat gun to warm the plastic then just bent it and held it until cooled.

<a data-flickr-embed="true" href="https://www.flickr.com/photos/149794382@N06/35125367810/in/album-72157682523525914/" title="IMG_0706"><img src="https://c1.staticflickr.com/5/4209/35125367810_472a251aa4_z.jpg" width="1024" height="683" alt="IMG_0706"></a><script async src="//embedr.flickr.com/assets/client-code.js" charset="utf-8"></script>

<a data-flickr-embed="true" href="https://www.flickr.com/photos/149794382@N06/35472338596/in/album-72157682523525914/" title="IMG_0707"><img src="https://c1.staticflickr.com/5/4255/35472338596_dcc85abde1_z.jpg" width="1024" height="683" alt="IMG_0707"></a><script async src="//embedr.flickr.com/assets/client-code.js" charset="utf-8"></script>

Here is version one all assembled:
<a data-flickr-embed="true" href="https://www.flickr.com/photos/149794382@N06/35125299420/in/album-72157682523525914/" title="IMG_0746"><img src="https://c1.staticflickr.com/5/4241/35125299420_826428e65b_z.jpg" width="1024" height="683" alt="IMG_0746"></a><script async src="//embedr.flickr.com/assets/client-code.js" charset="utf-8"></script>

I needed to move a few things out of the way for the tray to fit as intended, luckily there was room to move this bundle of stuff down about 1.5"
<a data-flickr-embed="true" href="https://www.flickr.com/photos/149794382@N06/34670385824/in/album-72157682523525914/" title="IMG_0743"><img src="https://c1.staticflickr.com/5/4277/34670385824_6bd46b9ff0_z.jpg" width="1024" height="683" alt="IMG_0743"></a><script async src="//embedr.flickr.com/assets/client-code.js" charset="utf-8"></script>

I made this bracket from a sheet of stainless steel then painted it.

<a data-flickr-embed="true" href="https://www.flickr.com/photos/149794382@N06/35344550112/in/album-72157682523525914/" title="IMG_0744"><img src="https://c1.staticflickr.com/5/4206/35344550112_a0895689b6_z.jpg" width="1024" height="683" alt="IMG_0744"></a><script async src="//embedr.flickr.com/assets/client-code.js" charset="utf-8"></script>

<a data-flickr-embed="true" href="https://www.flickr.com/photos/149794382@N06/35125302350/in/album-72157682523525914/" title="IMG_0745"><img src="https://c1.staticflickr.com/5/4215/35125302350_9f9451df1d_z.jpg" width="1024" height="683" alt="IMG_0745"></a><script async src="//embedr.flickr.com/assets/client-code.js" charset="utf-8"></script>

Version 1 test fit, sorry for shitty focusing:

<a data-flickr-embed="true" href="https://www.flickr.com/photos/149794382@N06/34701998113/in/album-72157682523525914/" title="IMG_0748"><img src="https://c1.staticflickr.com/5/4215/34701998113_8ab43b8176_z.jpg" width="1024" height="683" alt="IMG_0748"></a><script async src="//embedr.flickr.com/assets/client-code.js" charset="utf-8"></script>
 

Attachments

  • Wiring Diagram.jpg
    Wiring Diagram.jpg
    100.3 KB · Views: 47,620
Last edited:
Custom fuse panel

Time for version 2!

<a data-flickr-embed="true" href="https://www.flickr.com/photos/149794382@N06/34670358154/in/album-72157682523525914/" title="IMG_0747"><img src="https://c1.staticflickr.com/5/4260/34670358154_fce4f55e82_b.jpg" width="1024" height="683" alt="IMG_0747"></a><script async src="//embedr.flickr.com/assets/client-code.js" charset="utf-8"></script>

Here it is all assembled.

<a data-flickr-embed="true" href="https://www.flickr.com/photos/149794382@N06/35472205486/in/album-72157682523525914/" title="IMG_0772"><img src="https://c1.staticflickr.com/5/4207/35472205486_d9c738d567_b.jpg" width="1024" height="683" alt="IMG_0772"></a><script async src="//embedr.flickr.com/assets/client-code.js" charset="utf-8"></script>

<a data-flickr-embed="true" href="https://www.flickr.com/photos/149794382@N06/35344472482/in/album-72157682523525914/" title="IMG_0775"><img src="https://c1.staticflickr.com/5/4218/35344472482_35742a43ce_b.jpg" width="1024" height="683" alt="IMG_0775"></a><script async src="//embedr.flickr.com/assets/client-code.js" charset="utf-8"></script>

<a data-flickr-embed="true" href="https://www.flickr.com/photos/149794382@N06/35344463132/in/album-72157682523525914/" title="IMG_0777"><img src="https://c1.staticflickr.com/5/4215/35344463132_86b41701f1_b.jpg" width="1024" height="683" alt="IMG_0777"></a><script async src="//embedr.flickr.com/assets/client-code.js" charset="utf-8"></script>

There was an existing threaded hole here that I used.

<a data-flickr-embed="true" href="https://www.flickr.com/photos/149794382@N06/35511560545/in/album-72157682523525914/" title="IMG_0805"><img src="https://c1.staticflickr.com/5/4234/35511560545_6f342eca89_b.jpg" width="683" height="1024" alt="IMG_0805"></a><script async src="//embedr.flickr.com/assets/client-code.js" charset="utf-8"></script>


==============================================================================================================


UPDATE: Feb 17, 2017


Redid the fuse platform again and added an ignition relay so that the circuit is only active when the truck is on. LINK HERE (Page 30)

<a data-flickr-embed="true" href="https://www.flickr.com/photos/149794382@N06/35512119815/in/album-72157682523525914/" title="20170309-IMG_2300"><img src="https://c1.staticflickr.com/5/4255/35512119815_b1ce426f79_b.jpg" width="1024" height="576" alt="20170309-IMG_2300"></a><script async src="//embedr.flickr.com/assets/client-code.js" charset="utf-8"></script>

<a data-flickr-embed="true" href="https://www.flickr.com/photos/149794382@N06/35512111265/in/album-72157682523525914/" title="20170309-IMG_2301"><img src="https://c1.staticflickr.com/5/4209/35512111265_7b1f88e010_b.jpg" width="1024" height="683" alt="20170309-IMG_2301"></a><script async src="//embedr.flickr.com/assets/client-code.js" charset="utf-8"></script>
 
Last edited:
Looking forward to this build! Already off to a super clean and high detail start! I like the clear plastic bracket for your fuse block, that helps with the illusion of less clutter and more space... Stoked to see where this goes, thanks for the wealth of information already!
 
Looking forward to this build! Already off to a super clean and high detail start! I like the clear plastic bracket for your fuse block, that helps with the illusion of less clutter and more space... Stoked to see where this goes, thanks for the wealth of information already!
Its just a taste of what is to come! Every mod post I do will be formatted like this.

My favorite color 4Runner, and favorite color S4....

Still....the best combo! :)

Looking forward to the build!

7A3rNuA.jpg
That green color was my second choice, love it!

And yeah this car combo is a dream come true!

I love the interior of the S4.
<a data-flickr-embed="true" href="https://www.flickr.com/photos/149794382@N06/35371214662/in/dateposted-public/" title="IMG_1785"><img src="https://c1.staticflickr.com/5/4238/35371214662_505454d799_b.jpg" width="1024" height="683" alt="IMG_1785"></a><script async src="//embedr.flickr.com/assets/client-code.js" charset="utf-8"></script>

<a data-flickr-embed="true" href="https://www.flickr.com/photos/149794382@N06/35538622605/in/dateposted-public/" title="Shift Knob-8"><img src="https://c1.staticflickr.com/5/4284/35538622605_def61c840f_b.jpg" width="1024" height="683" alt="Shift Knob-8"></a><script async src="//embedr.flickr.com/assets/client-code.js" charset="utf-8"></script>
 
Last edited:
So much hnnnngggg so far. My posts look cat shit pulled out of the litter box, rolled in vomit, passed through an elderly ladies' labia, and served on a hamburger bun next to yours. Can't wait to see what happens next. Still going to rock the E rated Duratracs?

Edit: Also, suspension engineer at Honda, eh? Any plans on bringing back double wishbone front ended Civics a la late 90's? I recall reading an article recently where a lead engineer from Honda said they were looking to get back to their roots as a sporty, fun, easy to drive sub-compact. I'd love for that to be more than just lip-service to all the fans out there.

Edit, edit: What radio gear you planning on running? Any thoughts on a Yaesu 75w 144k mobile and Baofeng 8w walkie? You like mag antennas?
 
Last edited:
So much hnnnngggg so far. My posts look cat shit pulled out of the litter box, rolled in vomit, passed through an elderly ladies' labia, and served on a hamburger bun next to yours. Can't wait to see what happens next. Still going to rock the E rated Duratracs?

Edit: Also, suspension engineer at Honda, eh? Any plans on bringing back double wishbone front ended Civics a la late 90's? I recall reading an article recently where a lead engineer from Honda said they were looking to get back to their roots as a sporty, fun, easy to drive sub-compact. I'd love for that to be more than just lip-service to all the fans out there.

Edit, edit: What radio gear you planning on running? Any thoughts on a Yaesu 75w 144k mobile and Baofeng 8w walkie? You like mag antennas?
Well get that diesel swap done and mine won't hold a candle to that!

Duratracs are D rated http://www.tirerack.com/tires/tires...&tireModel=Wrangler+DuraTrac&partnum=17QR7WDT

Edit: thought you said gear ratio the first time I read that..
Regarding the radio, I have not decided which unit to get. I know i want one with a removable face. For Antennas, I saved the HAM setup from my last 4runner. I will be reusing the antenna and antenna mount. See that post here: http://www.toyota-4runner.org/1103703-post588.html
I am still a noob to the HAM scene, so I need to do a lot of research on what setup I should run.

Re: Honda, I can't say a whole lot. Believe me I wish I could, lots of cool stuff in the works for the next few years. The next civic is definitely a lot better than the last few generations have been. BTW strut engineering has come a long way since the 90's, I think you will be surprised.
 
Last edited:
HE IS BACK! :hungry:The write up on the sound deadening procedure was great. I plan on doing something similar. Excited to see what is to come with this new 4Runner. Congrats Ripcord!
 
HE IS BACK! :hungry:The write up on the sound deadening procedure was great. I plan on doing something similar. Excited to see what is to come with this new 4Runner. Congrats Ripcord!

Thanks! It really was an easy task, but holy moly it takes a long time. (The sound deadening and the write-up, haha)


============================================================

I decided I needed a current picture for the obligatory "As she currently sits" pic.

Some of the observant types may notice it is the same roof rack from my last 4Runner, I kept it all this time. I bit of legacy hardware for the new girl.

<a data-flickr-embed="true" href="https://www.flickr.com/photos/149794382@N06/35514498245/in/album-72157685365200726/" title="IMG_0796"><img src="https://c1.staticflickr.com/5/4213/35514498245_3328c1e482_b.jpg" width="1024" height="683" alt="IMG_0796"></a><script async src="//embedr.flickr.com/assets/client-code.js" charset="utf-8"></script>
 
Last edited:
Loving this build and it has hardly started... loved the last one so much, and I'm sure this one will be even better! Awesome work with the detailed posts!
 
I always admired ripcord's build and seeing his rig around Albuquerque!!! Glad to follow one of the awesome builds here.
 
Awesome write-ups so far! You're making us all look bad. Can't wait to see more.
Thanks man. I tried. Congrats on T4ROTM!

Subscribed. Stoked to see what you do with this one.
Me too! Definitely stay tuned.

Awesome posts. Can't wait to see more.
Thanks for the compliments, Brian.

Loving this build and it has hardly started... loved the last one so much, and I'm sure this one will be even better! Awesome work with the detailed posts!
I loved the last one too, and it will influence this one a lot.

I always admired ripcord's build and seeing his rig around Albuquerque!!! Glad to follow one of the awesome builds here.
I miss ABQ so much! It is very nice and green here, but I just like the people back home way more.
 

Members online

Forum statistics

Threads
278,310
Messages
3,554,079
Members
248,016
Latest member
Advally Service

Trending content

Back
Top