Rock Rat's Imperial Jade Mica "Next Adventure" Build

Not sure if these will fit your fuel rails but the 3RZ & 5VZ has the same stock flow rate & fuel pump.
https://www.fiveomotorsport.com/toyota-tacoma-2320979085
Not sure there is much difference between 318 & 325CC's.

Here's a cool flow rate calculator. 318 would probably the min you want.
https://www.fiveomotorsport.com/flow-rate-calculator -

I decided to go ahead and order the 325's from LCE. I'll put my equalized injectors up for sale once I install these. They're only two years old.
 
Installation of LCA Bushings (LCA OFF vehicle)

Installing the LCA Bushings (off vehicle)
This is for installing new bushings in LCA's that have already been prepped. I'm using two LCA's that I purchased from a low-mileage donor vehicle in a Junkyard. I think this is the easiest way for anyone to do this job. This gives you a lot of time to work on them without trying to get your rig put back together.

Here'a link to how I removed the bushings

Once the bushings have been removed, the installation process takes about an hour max with a press.

Before you begin use the proper PPE and familiarize yourself with the MSDS and safety precautions.

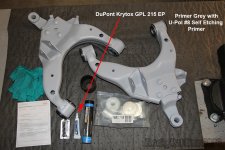
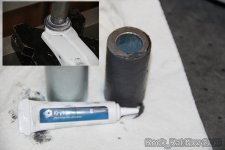
First off I would pre-order some Dupont Krytox GPL 215 EP. You do not want ANY squeaking when the job is finished. The Dupont grease is some of the best out there. My bushings came with a small tube of grease plus I have some marine EP grease as well. I chose to use the DuPont.

Place your bushings in the FREEZER for about 24-48 hours. In my case nine months!! I think they shrunk up pretty small.

You MAY need to place your LCA's in the oven. I didn't need to do that. My bushings pressed in nicely. It might be a different story pressing them in without a press.

I used Whiteline Bushings PN# W53377A. I've heard of a report about these bushings squeaking after 3-5 months. Others have reported that they are fine. Fingers crossed they don't squeak.

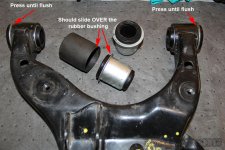
I plastered the DuPont grease all over the sleeve. 100% covered with a liberal amount of grease. NOTE: THIS IS THE PART THAT SLIDES INTO THE RUBBER.

DO NOT GREASE THE BUSHING WITH THE RUBBER INSERT. PRESS THAT IN DRY INTO THE LCA SLEEVE.

For this process I used the following;

Tools
  • Press
  • Ball joint service tool/cup
  • Dupont Krytox GPL 215 EP
  • U-POL #8 Self-Etching Primer (3 coats)
  • Dupli-Color Engine Enamel with Ceramic (3 coats)
  • Nitrile gloves

Steps
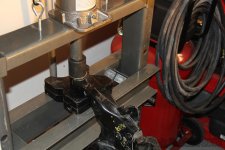
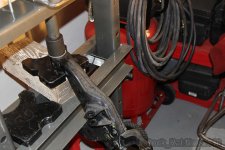
  • Place LCA on the press with bushing ready to be pressed in.
  • Place the ball-joint cup OVER the rubber and press the bushing sleeve until flush. (Ensure metal to metal - Do not press the rubber)
  • Because of the angle of the LCA you will need a 4x4 to get the LCA centered for the opposite bushing.
  • Once pressed in, now take your round inserts and wipe the condensation and ice off
  • Use a liberal amount of grease on the sleeves and insert (by hand or press) them in the rubber bushings.

Bump Stops
  • Install your bump-stops now. For factory bump-stops use the vice as if it were your channel locks. I used blue thread locker.
  • I'm using Wheeler Superbump Bumpstops

Apply 3 coats of U-POL Acid #8 Etch Primer

Apply 3 coats of Dupli-Color Engine Enamel with Ceramic

...or go have them powder coated.

LCA's ready to be installed.
 

Attachments

  • LCA Bushings_1.jpg
    LCA Bushings_1.jpg
    104.6 KB · Views: 1,029
  • LCA Bushings_2.jpg
    LCA Bushings_2.jpg
    114.2 KB · Views: 1,002
  • LCA Bushings_3.jpg
    LCA Bushings_3.jpg
    129.1 KB · Views: 1,191
  • LCA Bushings_4.jpg
    LCA Bushings_4.jpg
    118.8 KB · Views: 1,031
  • LCA Bushings_5.jpg
    LCA Bushings_5.jpg
    67 KB · Views: 1,000
Last edited:
Winter Projects

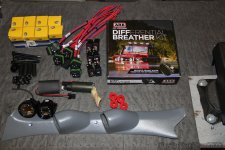
Starting to squirrel away some projects and get ready for winter.

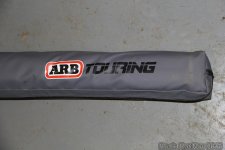
  • ARB Touring Canopy - 2500 x 2500
  • ARB Breather
  • Contura II Switches with Rockers
  • Weatherproof HELLA, 12V SPDT Relays with bracket
  • Weatherproof HELLA, ISO Relay Connectors
  • Denso EVO-8 Fuel Pump just arrived. Thanks [MENTION=50342]JayRolla[/MENTION] :thumb3:
  • Waiting for the 325cc Fuel Injectors from LCE
  • Gauge Pod from LOTEK
  • I already had the wideband gauge. Decided to pick up the boost gauge.

I plan on completing the front end (spindle/knuckles and LCA's) over Thanksgiving.

:smow:
 

Attachments

  • ARB Awning.jpg
    ARB Awning.jpg
    68.8 KB · Views: 952
  • Winter Projects.jpg
    Winter Projects.jpg
    132 KB · Views: 904
Nice LCA bushing write up Mike! I also dig your fancy pants ARB diff breather. That reminds me that I need to still extend mine. Looks like you have some items to keep you busy.

Man I was re-reading your Completion of the WABDR from Stevenson to Canada post last night. That was an epic trip and very well documented. I remember you posting about it and the run in you had with the trail bike kamikaze too. That guy was lucky as hell for pushing his luck.

Keep up the great work!
 
Nice LCA bushing write up Mike! I also dig your fancy pants ARB diff breather. That reminds me that I need to still extend mine. Looks like you have some items to keep you busy.

Man I was re-reading your Completion of the WABDR from Stevenson to Canada post last night. That was an epic trip and very well documented. I remember you posting about it and the run in you had with the trail bike kamikaze too. That guy was lucky as hell for pushing his luck.

Keep up the great work!
Thanks Ryder. The bushing installation is pretty straight forward, especially with a press. Nothing original on the write up as so many before me have done this. I just hope the White Lines don't squeak the way they did with Alex.

The ARB Diff breather is definitely a must if I'm going to be dedicating this to off-road only for the most part. Looking forward to wiring everything up finally and FINALLY installing the SC. All this just takes time and proper preparation as you know.

If you get a chance to run any of the sections of the WABDR I highly recommend you do it. One of my fav's was section 2 with Bethel Ridge and Umtanum. I also loved Section 5 with Ruby Grade. You'll gain a whole lot of respect for your 4runner and the guys on two wheels. Hopefully this is a good resource for anyone that's interested. I have one more post to put in there. It's my "Lessons Learned and Things to Think About" Basically what worked and what didn't or what I would've done differently...

I still have visions of that guy laying down his bike right as I was talking to my wife and boys about what to watch out for on a one-lane road with two-way traffic. I swear the words barely came out of my mouth and BAM! There he was. So many if's in that situation...Helluva experience.

The last I looked you finally installed your new bumper. Looks good. Hopefully you were able to sell the Schrockworks. Any plans before winter sets in?
 
Haha.. Yeah, I got the bumper thing sorted out. I sold the SW bumper and got my AOR all mounted up. As far as winter plans go, I have a few. It has taken me quite a while as I have had a lot of other things that took priority over doing fun stuff with my 4runner. But now, I have my lift sitting a few feet away. SS 1.2 rear lift and front drop diff to go with some King 2.5 extended COs and SPC UCAs up front. That's the big thing. There are a few other things that I would like to add/do, but I might wait and see if there are any sweet black Friday or similar sales that tempt me. I am hoping to have enough free time to knock the lift out, maybe this weekend, we'll see.

I am interested to hear about your SC install and what you think of it. I would love to get a SC or a rear locker some day. Those would be my pie in the sky additions.
 
Lower Control Arm and Spindle Installation

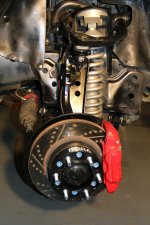
Began working on my front suspension after work this week and finished everything up in time for winter. Here's what I did:

Replaced my Lower Control Arms with whiteline bushings and replaced my spindle/knuckles with TC Gussets. Here's a list of what was replaced:

  • Whiteline bushings
  • Inner Tie Rod Ends
  • Outer Tie rod Ends
  • Gussets
  • Axle bearings
  • Wheelers Bump Stops
  • OEM LBJ's

Good to go for another 10 plus years.

Practically all new suspension system.
Front Suspension_1.jpg

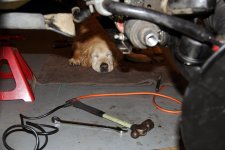
My helper, making sure I do everything correctly.
Front Suspension_2.jpg
 

Attachments

  • Front Suspension_1.jpg
    Front Suspension_1.jpg
    143.4 KB · Views: 1,133
  • Front Suspension_2.jpg
    Front Suspension_2.jpg
    91.4 KB · Views: 1,193
Great work. Did you go with wheelers bump stops over timbren because of the price or did anything else influence that decision?

Thank you. I went with [MENTION=80392]Wheeler[/MENTION]s for the little bag of candy. :dancin:

Seriously, I like the idea of supporting our local small businesses whenever possible.. They're just down the road from me in Oregon and I felt these would meet my needs. As you know cost is not the biggest factor with me.
 

You're welcome! I am in the process of getting a '98 SR5 and your build gives me some great ideas. Love the pics and vids from your adventures too. I was just up at Browns Camp in June. I plan on heading up for the annual Tillamook State Forest Tacoma World meet next year too. I'd love to get together with more of the locals from up there too.
 
Thank you. I went with [MENTION=80392]Wheeler[/MENTION]s for the little bag of candy. :dancin:

Seriously, I like the idea of supporting our local small businesses whenever possible.. They're just down the road from me in Oregon and I felt these would meet my needs. As you know cost is not the biggest factor with me.

Cool I respect that. There are certain things that I value in addition to the product where I don't mind paying higher prices within reason.

I've been meaning to call them to ask them what the difference is other than price (firmness, density, material, quality, etc.) because they also carry the timbren front bumpstops.
 
2.2 Pulley Arrived Today

This arrived in the mail today completing all the things I need to install the SC. However, since there's no secret candle lit ceremony ( [MENTION=56396]Hepar[/MENTION] ), I'm not sure what to do with it all. (sad face)

Aside from the pulley arriving, I installed my gauges and my Lotek pod. Not a bad fit considering it's for a Taco. Needed to make one extra hole because the grab handle on the Taco is little bigger.

While I had the dash tore apart I installed my switch harness I made a few weeks ago. I love the clean look under the head unit. I still have a few switch faceplates/covers to swap out when they arrive. It's pretty difficult to find the Contura II switches in Amber. In retrospect I wish I went with a different model of Contura switches. Oh well, it will all come together. I still like the Amber interior LED lighting. It contrasts well with the IJM Grey color combo.

I originally had the 2.1 pulley shipped because I failed to select the correct one from the drop down menu on the website. I thought it defaulted to the 2.2. This one has been on backorder from URD for about two months. Fed Ex had to drop it off at a pick up location today because they couldn't get to my house. My road is still covered in snow and ice.
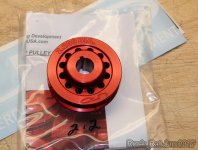
SC Pulley.jpg

Here are the two gauges in the Lotek pod. It's not a bad fit, all things considered. Very unobtrusive which I like and closely matches the grey interior. Don't ask how I got the grab handle off. Since I didn't plan on re-using it...I convinced it to come off!! What a PITA.
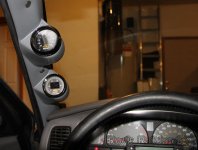
SC Gauges.jpg

Here's what the switch wiring looks like mounted under a single din head unit. I like the way it turned out. I'm working on the wiring for the other side of the firewall.
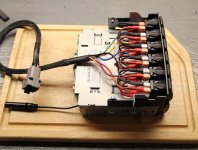
Light Switches Wiring.jpg

So don't believe all the labels on the switches. When the ones I ordered arrive, I'll be swapping them out. I'll keep the winch switches on the other side of the column with the ARB compressor switch.
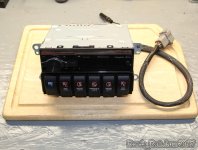
Light Switches Wiring_1.jpg
 

Attachments

  • SC Pulley.jpg
    SC Pulley.jpg
    76.5 KB · Views: 1,313
  • SC Gauges.jpg
    SC Gauges.jpg
    57.7 KB · Views: 1,290
  • Light Switches Wiring.jpg
    Light Switches Wiring.jpg
    88 KB · Views: 1,505
  • Light Switches Wiring_1.jpg
    Light Switches Wiring_1.jpg
    80.3 KB · Views: 1,249
Nice clean work there, for all installs. I really need to ask who doesn't now have a SC in the Pacific NW.

Sorry about UW, I was in hopes for a win after they scored but then speed for Bama's defense got turned on. I am in hopes that the distractions by Bama this week will bring my Tigers a victory.
 
This arrived in the mail today completing all the things I need to install the SC. However, since there's no secret candle lit ceremony ( [MENTION=56396]Hepar[/MENTION] ), I'm not sure what to do with it all. (sad face)

What a scam, right?!
 
Nice clean work there, for all installs. I really need to ask who doesn't now have a SC in the Pacific NW.

Sorry about UW, I was in hopes for a win after they scored but then speed for Bama's defense got turned on. I am in hopes that the distractions by Bama this week will bring my Tigers a victory.

To live in the PNW with a 3rd Gen having an SC is a Rite of Passage (without the candle lit ceremony.)

UW was very disappointing. I expected more from them especially after that first TD with Pettis. Their D held Bama pretty good but we had absolutely nothing on offense. Bama is a great team! I'm looking forward to your game. Hope Clemson takes care of business.


What a scam, right?!
Yea total scam! We'll have to have our own the next time I'm up in Seattle.

[emoji137]
Nice work on the switch wiring man, looks great [emoji1360]
Jealous of everyone having a SC [emoji41]
Thanks for the compliment on the wiring. I try and take my time with everything and do it right. I love electrical stuff so this is right up my alley. Just keep your eyes open on CL and I'm sure one will pop up. That's how I found mine. This was before the prices were jacked up. We'll run into each other soon enough, either at the PDX Overlanders get together on Fridays or Browns Camp, LaDee flats or another run.
 
ARB Awning Brackets with Whitson Rack

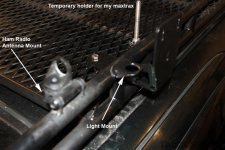
Just finished installed my ARB Awning brackets on my Whitson rack. I had a few things to take into consideration. When I purchased my rack from Dave [MENTION=139225]dfranchuk08[/MENTION] last year it came with these little gems already welded to the rack:

  • Four light brackets; Two for the rear and one on each side.
  • Diamond K series Ham Radio antenna mount on drivers side
  • Mounting brackets for traction devices on the passenger side

I looked at several bracket styles before deciding on the ARB OS850 Awning Brackets. This bracket doesn't take up ANY real estate inside the rack with the exception of the two bolt heads. So I could put a Wolfpack or other piece of cargo up close to the rack.

I looked at the following:

  1. Fourtrek Modular Awning Mounts design but the cost would have been $148 and it's also "shiny" and it doesn't match my build. I would rather keep mine subdued.
  2. I also looked at the Gobi Stealth mounts but price was $120 and as a 3rd Gen guy I just can't bring myself to purchase anything from Gobi (It's a matter of personal conviction)

So I decided on the ARB OS850 Awning Brackets.

Here are the details:
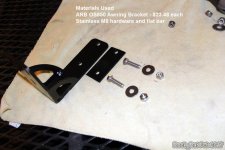
  • Mounting hardware is M8 stainless with washers and nylocs.
  • A matched piece of flat bar underneath for equal weight distribution.
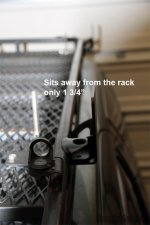
  • Sits away from the rack 1 3/4" and allows plenty of room for to still mount my light and swing my antenna mount up and out.

Eventually I will extend my piece of flat bar to make use of the hole in between the gussets for addition strength. I will need to bend it around the lower frame rail of the rack. This would be the ideal way to mount these brackets.

Enjoy!

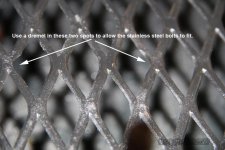
The holes didn't exactly line up to the rack. I used a dremel to open up the space on both sides. It's a very good fit.
ARB Awning Bracket_1.jpg

Pretty simple. M8x30, washer, nyloc's and piece of flatbar to match the bracket. I'm only using two of the holes.
ARB Awning Bracket_2.jpg

Here's a pretty good view of the clearance provided by the bracket as it sits away from the rack. I still have full use of the inside of my rack.
ARB Awning Bracket_3.jpg


Another view from a different perspective. The bracket only sits out 1 3/4" from the rack.
ARB Awning Bracket_4.jpg
 

Attachments

  • ARB Awning Bracket_1.jpg
    ARB Awning Bracket_1.jpg
    96.2 KB · Views: 916
  • ARB Awning Bracket_2.jpg
    ARB Awning Bracket_2.jpg
    93.9 KB · Views: 1,407
  • ARB Awning Bracket_3.jpg
    ARB Awning Bracket_3.jpg
    102.7 KB · Views: 1,024
  • ARB Awning Bracket_4.jpg
    ARB Awning Bracket_4.jpg
    64.5 KB · Views: 1,023

Members online

No members online now.

Forum statistics

Threads
278,317
Messages
3,554,129
Members
248,016
Latest member
Advally Service

Trending content

Back
Top