Sp8Ball’s Mod Thread (Stealing Other Poster’s Ideas Since Mid-2010)

She's a country girl at heart! Maybe she can be persuaded...

Further proof that I'm an idiot.

The wife saw the web page with the Gear Alloy wheels. Then I showed her Jesse's sweet ride (with the badass MotoMetal 951b's that are one of my current top choices).

And then she said, "you're not getting black wheels - they look spray painted and ghetto. You're keeping the wheels you have."

Grrrrrr...

I tried to convince her that these do NOT look like you're missing a hubcap or something, like the black wheels on a beat up 1983 K car in downtown Baltimore.

So much for the "country girl" thing.
 
Further proof that I'm an idiot.

The wife saw the web page with the Gear Alloy wheels. Then I showed her Jesse's sweet ride (with the badass MotoMetal 951b's that are one of my current top choices).

And then she said, "you're not getting black wheels - they look spray painted and ghetto. You're keeping the wheels you have."

Grrrrrr...

I tried to convince her that these do NOT look like you're missing a hubcap or something, like the black wheels on a beat up 1983 K car in downtown Baltimore.

So much for the "country girl" thing.

HAHA! I was showing my girlfriend some pics of some black wheels, and she said "it looks like it's one of those beaters riding on spare tires" I tried to tell her that riding on black rims was cool. At least she doesn't have control of my wallet yet..
 
then she said, "you're not getting black wheels - they look spray painted and ghetto. You're keeping the wheels you have.".


I've been looking for FJ wheels for my off road trialer for weeks. Finally found a set, show them to the wife, she hates them. She says "what else you got", so I show her the back up plan, stock spare wheel steelies. She loves them!

You are never right ;)
 
Oops, just realized I bought different LED's than you sp8ball. I went with the WLED-WHP for the front map lights, and 3022-CWHP4 for the rear lights. I'm gonna leave the rear ones, but I did just order the WLED-WHP5 to compare the differences for the map lights. I'm also gonna try and put these in the bottom of my doors. Thanks again.

Here's a better guide of the what types of LED bulbs you need. http://www.sylvania.com/ConsumerProducts/AutomotiveLighting/LampReplacementGuide/AutoLRG-Results.htm

Map light
168

Dome light
DE3175

Trunk/Cargo area
DE3175
 
I know, I know. You were right, and I'm an idiot.

Hahaha, don't feel bad my wife doesnt like the look of the black wheels also. But in retrospect I got the old "I don't care what you buy/do to the truck, it's yours do what you want to it"
 
I know, I know. You were right, and I'm an idiot.

I've been married to the same girl for 28 years - since I was 20. I have learned a few things since then. Just take it slow and comprimise and you will be just fine. I drive too much to put different rims on. I will have 100K in 3 years...
 
Mtn Rush and 1engineer -

You are both very wise. I will heed your advice, go slowly, and catch her in a good mood when she does the "it's your truck, do whatever" thing...

Exciting day tomorrow - Antman helps me do the Toytec Front Plate Spacers!
 
The Toytec Top Plate Spacers went in today, and I have Antman to thank for walking me through the process and hosting me in his garage. We were able to do it pretty effectively with two people and no spring compressor.

Write-up and pics will be up this weekend. LOTS of pictures.

Also...he went and showed me all the lighting mods has he made. Footwell lighting, cupholder lighting, and Limited-like interior door handle lighting. Lots of cool accent stuff. So, we're going to tackle some of these in the near future and document them on this thread.

Stay tuned.
 
Looking for anyone who did the "roof rack delete" mod, and may have the four plastic chrome-ish end pieces available for sale...PM me!

I can buy the parts from Toyota, but I'm hoping that someone on here may have them cheaper for me to experiment with. (I'm going to do the Plastidip black-out on them, but I need to do it on a "spare" set)

Let me know if you can help!
 
Looking for anyone who did the "roof rack delete" mod, and may have the four plastic chrome-ish end pieces available for sale...PM me!

I can buy the parts from Toyota, but I'm hoping that someone on here may have them cheaper for me to experiment with. (I'm going to do the Plastidip black-out on them, but I need to do it on a "spare" set)

Let me know if you can help!

i'm pretty sure harper7 removed his roof rack, check out his thread. I don't remember what he used to close the holes, but, i seem to recall he used some sort of putty or paste to 'seal' them.
 
i'm pretty sure harper7 removed his roof rack, check out his thread. I don't remember what he used to close the holes, but, i seem to recall he used some sort of putty or paste to 'seal' them.

OH, I'm not going to remove the roof rack. It's staying in place - I just want to paint the ends black. However, I want to hang on to my chrome ones since the wife seems to prefer them. The set I'd buy would get painted black and installed on the T4R as "my way" and if it doesn't fly, I can always switch it back.
 
OH, I'm not going to remove the roof rack. It's staying in place - I just want to paint the ends black. However, I want to hang on to my chrome ones since the wife seems to prefer them. The set I'd buy would get painted black and installed on the T4R as "my way" and if it doesn't fly, I can always switch it back.

oh okay cool hahahah
 
Spaceball,

I followed the hyperlink and ordered the AVS Bugflector II. I received the package but it did not come with any mounting hardware (screws, plastic tabs etc). Was it supposed to come with these parts or do I have to order them sep?

Regards
 
Spaceball,

I followed the hyperlink and ordered the AVS Bugflector II. I received the package but it did not come with any mounting hardware (screws, plastic tabs etc). Was it supposed to come with these parts or do I have to order them sep?

Regards

Mine came with them! If I remember correctly, they were hiding in a little pouch...but they were there!
 
The Toytec Top Plate Spacers went in today, and I have Antman to thank for walking me through the process and hosting me in his garage. We were able to do it pretty effectively with two people and no spring compressor.

Write-up and pics will be up this weekend. LOTS of pictures.

Also...he went and showed me all the lighting mods has he made. Footwell lighting, cupholder lighting, and Limited-like interior door handle lighting. Lots of cool accent stuff. So, we're going to tackle some of these in the near future and document them on this thread.

Stay tuned.
Any update on the lift mod? Looking forward to the How To and pics.
 
Modification: Toytec Top Plate Spacer Lift

Toytec Lifts Front Top Plate Spacer Kit - $60.00
Front Top Plate Spacer Kit - Toytec Lifts: Toyota Lift Kits: FJ Cruiser Lift Kits, Tacoma Lift Kits, Tundra Lift Kits, 4 Runner Lift Kits, Sequoia Lift Kits, Toyota Truck Lift Kits
Added bonus: Toytec Lifts decal!

Hidden Cost: Front End Alignment is required after the lift ($75-$90)

Difficulty Scale (1 to 10):
Six

Sp8ball’s Personal Intimidation Factor (1 to 10): Nine (mitigated to a “four” by Antman having already done it, and offering to help)

Install Time: 2-3 hours

Reason for Doing It: Level the rake of the truck to make the front even with the back

Benefit: Looks better, and it’s cheaper and easier than replacing suspension components (shocks, struts, UCAs, installing coilovers, etc.). And it prepares the truck for new shoes!

Cons: It’s the hardest mod so far!

Other Products Considered: Bilstein 5100s.
_____________________________

Alright…here’s the biggest one so far!

I’d like to start off by saying – again – that I couldn’t have done this mod without the guidance and insight provided by this forum. Not only is it full of great ideas, but great people as well. In this particular case, Antman and I discovered that we live about a mile apart, and he offered to not only help me with this mod, but to host me in his garage (with his large collection of tools and jacks and impact guns) to do it! Mad props to Antman.

[Note: Want to know what Antman looks like? That’s his arms doing all the work in the pictures. In all fairness, I did the driver’s side after this tutorial on the passenger side. With some help.]

The documents posted in this thread (http://www.toyota-4runner.org/5th-gen-t4rs/59485-modifications-write-ups-quick-links.html) (specifically, the TIS FSM sections on the front end suspension) proved invaluable. You have to go through some downloading and a tiny bit of searching to get to it, but it’s well worth taking your time and doing a little bit of upfront research.

OK, this write-up is going to be picture heavy for a number of reasons:

1) A picture is worth a thousand words, and I have 30-some pictures to post. That’s 30,000+ words I don’t have to write. And it has been noted that my posts are “wordy”.

2) There was a lot of discussion on here about needing a spring compressor to do this mod. We’re hoping to show how we did it without one.

We’ll have before-and-after pictures at the end to show the rake both before and after the spacer lift.

So, let’s get started!

Step One: Chock the rear wheels.

Step Two: Jack up the side on which you are going to install the lift. Put a jack stand under the truck and slowly lower the jack. For this series of posts, we are working on the passenger’s side. (we started with the passenger’s side because it was closest to the coffee pot)
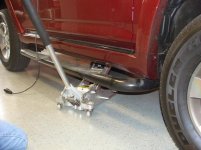
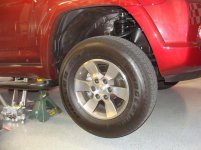
DSC05106.jpg

DSC05107.jpg

Step Three: Give the opposite side of the car a slight lift, and install another, lower jack stand on that side for stability.
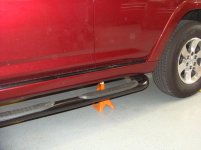
DSC05108.jpg

Step Four: remove the six lugs holding the wheels onto the rotors.
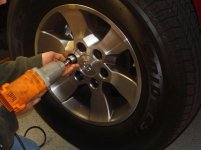
DSC05110.jpg

Step Five: Remove wheel.

DSC05111.jpg

Step six: place the jack under the lower control arm (large metal part of the suspension just behind the rotor) to support it during the next few steps, because you’ll want that slight upward pressure on the spring while you do step 7.

Step seven: Loosen and remove the nut, cushion retainer (a metal washer), and shock absorber cushion (a thick rubber disk).
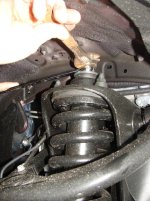
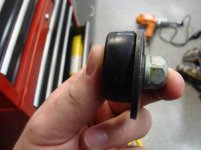
DSC05115.jpg
DSC05116.jpg

[continued on next post...]

 

Attachments

  • DSC05106.jpg
    DSC05106.jpg
    98.4 KB · Views: 23,248
  • DSC05107.jpg
    DSC05107.jpg
    98.8 KB · Views: 23,115
  • DSC05108.jpg
    DSC05108.jpg
    77.2 KB · Views: 23,013
  • DSC05110.jpg
    DSC05110.jpg
    70.5 KB · Views: 22,973
  • DSC05111.jpg
    DSC05111.jpg
    86 KB · Views: 23,043
  • DSC05115.jpg
    DSC05115.jpg
    119.8 KB · Views: 23,021
  • DSC05116.jpg
    DSC05116.jpg
    60.7 KB · Views: 22,972
Last edited:

Members online

Forum statistics

Threads
278,316
Messages
3,554,107
Members
248,016
Latest member
Advally Service

Trending content

Back
Top