The 3rd Gen All Questions Allowed Thread

Status
Not open for further replies.
Is it normal to use over 5oz to balance a new tire or could there be something wrong with the wheel?

Sloppy work, but in todays world of everything being cheap, you don't exactly get tire techs who are paid to give a damn. They just did what the machine told them without thinking about what they were doing or why... because that's how much they were paid to care.

If it rides fine, just leave it alone. I'd hold judgement till getting it on a Front corner though, those usually show issues more than the rears. So check again when you do your first rotation...
 
I recently got new tires. You'd think by now I'd know enough to take more than a glance at new things but I didn't.

While washing the wheels for the first time since I got the new tires I noticed 3 weights on the outside of the left rear wheel with 2 on the inside. All 5 appear to 30 grams each. Both sets are opposite each other on the wheel.

Is it normal to use over 5oz to balance a new tire or could there be something wrong with the wheel?

For what it's worth, here's the overall weight situation:
  • LF 0 outside, 30 inside
  • LR 3 x 30 outside, 2 x 30 inside opposite each other
  • RF 0 outside, 30 & 15 inside
  • RR 30 outside, 0 inside

This was done at America's/Discount and they told me they used Hunter road force machines.

She rides smooth at any speed so I suspect I'm just being a tool but I figured I might as well ask the experts. This is nowhere near as extreme as some posts I've come across but just because it's not as bad doesn't mean it's good, right?

xWT9mu5.jpg


(4Runner was driven between images. Weights are indeed opposite each other)

Je8NzLI.jpg
For the record that should be "3.0" not "30". as in 3 oz weight not 30 oz weight. Big difference between needing 6 oz and 5lbs of weight to balance.

Not really surprised by the amount of weight. Only way to get that down would be to take it somewhere that does road force balancing.
 
Sloppy work... because that's how much they were paid to care.

If it rides fine, just leave it alone. I'd hold judgement till getting it on a Front corner though, those usually show issues more than the rears. So check again when you do your first rotation...

I assumed that's why they put it on the rear. Thanks.

For the record that should be "3.0" not "30". as in 3 oz weight not 30 oz weight. Big difference between needing 6 oz and 5lbs of weight to balance.

Not really surprised by the amount of weight. Only way to get that down would be to take it somewhere that does road force balancing.

I was assuming it was grams since 30 grams ~= 1 ounce. You're telling me there's damn near a full pound of weights (15oz) on that wheel?

They told me they used the Hunter road force machines for balancing when they sold me on the deal.
 
Sloppy work, but in todays world of everything being cheap, you don't exactly get tire techs who are paid to give a damn. They just did what the machine told them without thinking about what they were doing or why... because that's how much they were paid to care.

If it rides fine, just leave it alone. I'd hold judgement till getting it on a Front corner though, those usually show issues more than the rears. So check again when you do your first rotation...

Years ago (1970's) I was a tire tech in high school and college. If a new tire mounted on a wheel had excessive weight needed to balance, we were taught to break the tire back down off of the bead and spin 180º on the wheel and try to balance again. More recently, the industry has been using red and yellow paint dots to indicate heavy and light spots in the tire to assist with mounting/balancing.

I wouldn't be satisfied with all of those weights on one of my wheels.
 
I assumed that's why they put it on the rear. Thanks.


I was assuming it was grams since 30 grams ~= 1 ounce. You're telling me there's damn near a full pound of weights (15oz) on that wheel?

They told me they used the Hunter road force machines for balancing when they sold me on the deal.
The weights look a lot larger than a 1 oz weight. It's not the exact same weights, but should show the size/weight difference: https://www.amazon.com/Harzole-MC-M...la-793217869338&ref=&adgrpid=79954179727&th=1
 
Hello everyone, new to the group been a T4R owner for many many years. I currently have a 3rd gen and the past couple of years things related to the brakes have started to fail. We recently changed the front brakes and calipers. Next will be the cylinders. Shoes are good. 2 years ago I changed the brake booster and ever since then she’s never driven the same. I have to change it again and hope that it works way better than it did. Has anyone ever had to change there’s? Was the drive/braking ever the same as original? Here’s what’s happening and maybe someone can give me some insight. I will try to brake at times and the pedal gets stiff, there is a “whoosh” sound at times when I brake, at times I brake and she continues to slowly move forward(this caused me to get into a fender bender). If anyone has any ideas please let me know. Thanks.
 
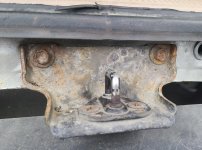
So I really want to remove my trunk latch, clean it up and throw some new bolts in... only problem is I'm almost positive they're going to snap the second i give it a try. One of them is ready to drop down a socket size cause its so corroded. What would you guys do, go for it anyways or just leave it?
Since they're touching the body a torch isn't an option, but I'm wondering if a torque multiplier would possibly help. They work magic on large bolts and I could see how it would work here too, but I can also see it snapping these even easier too because of their size
Just looking for opinions here. This is easily one of the rustiest areas on my car so I'd love to address it
 

Attachments

  • Screenshot_20220628-191131_Gallery.jpg
    Screenshot_20220628-191131_Gallery.jpg
    136.6 KB · Views: 176
So I really want to remove my trunk latch, clean it up and throw some new bolts in... only problem is I'm almost positive they're going to snap the second i give it a try. One of them is ready to drop down a socket size cause its so corroded. What would you guys do, go for it anyways or just leave it?
Since they're touching the body a torch isn't an option, but I'm wondering if a torque multiplier would possibly help. They work magic on large bolts and I could see how it would work here too, but I can also see it snapping these even easier too because of their size
Just looking for opinions here. This is easily one of the rustiest areas on my car so I'd love to address it

Non-critical area like that, just take your time with a penetrant and working the bolts in the normal tighten/loosen cycle (adding some direct blows won't hurt). You don't have to feel them moving for them to actually move. If you don't want to deal with destructive removal, then the key is to go gently. Even if you do have to go destructive in the end, the bolt heads should still be on/attached, it's VERY easy to feel when bolts go elastic right before you rip the heads off.

If you don't care and just want it done yesterday, then use the bolt head to help you center-punch and start drilling. Sometimes after you run a couple sizes of drill down the center, they will free up enough to come loose, but expect that you will be drilling out to the proper tap size, then retapping the threads. Maybe you'll get lucky and the heat/vibration of drilling will drive the threaded portion through once the head is gone.

Know your backup plans. I see them as rethreading (even to just clean out the rust corrosion if the bolts do come free), maybe a rivnut, threading up a size, not sure if that area is accessible on the backside but if so then using a normal nut/bolt combo... nothing else coming to me right now.
 
Just finished my third TB/water pump job. Took about four hours. Would have been finished last week when I started but noticed the Koyorad radiator I put in there in 2008 was leaking. Changed it out for a Taiwan made Denso. Also had to grab a new harmonic balancer and decided to get one from LC Engineering. Very well made.

Overall, not sure this 4runner has ever driven so smooth. Got a whispering ticking valve in the passenger side, will do a valve job sometime in the fall.
 
Just finished my third TB/water pump job. Took about four hours. Would have been finished last week when I started but noticed the Koyorad radiator I put in there in 2008 was leaking. Changed it out for a Taiwan made Denso. Also had to grab a new harmonic balancer and decided to get one from LC Engineering. Very well made.

Overall, not sure this 4runner has ever driven so smooth. Got a whispering ticking valve in the passenger side, will do a valve job sometime in the fall.

Is it safe to say you’re in the 300K mile club, too? Very nice! I’ve done one t-belt/water pump job in the 9.5 years that I’ve owned mine, will be due in the next few years or so for another.
 
Hello everyone, new to the group been a T4R owner for many many years. I currently have a 3rd gen and the past couple of years things related to the brakes have started to fail. We recently changed the front brakes and calipers. Next will be the cylinders. Shoes are good. 2 years ago I changed the brake booster and ever since then she’s never driven the same. I have to change it again and hope that it works way better than it did. Has anyone ever had to change there’s? Was the drive/braking ever the same as original? Here’s what’s happening and maybe someone can give me some insight. I will try to brake at times and the pedal gets stiff, there is a “whoosh” sound at times when I brake, at times I brake and she continues to slowly move forward(this caused me to get into a fender bender). If anyone has any ideas please let me know. Thanks.

What after market brake boosters are a hit and miss. Oem brake booster are super expensive. Get a used Oem off of ebay.
 
Non-critical area like that, just take your time with a penetrant and working the bolts in the normal tighten/loosen cycle (adding some direct blows won't hurt). You don't have to feel them moving for them to actually move. If you don't want to deal with destructive removal, then the key is to go gently. Even if you do have to go destructive in the end, the bolt heads should still be on/attached, it's VERY easy to feel when bolts go elastic right before you rip the heads off.

If you don't care and just want it done yesterday, then use the bolt head to help you center-punch and start drilling. Sometimes after you run a couple sizes of drill down the center, they will free up enough to come loose, but expect that you will be drilling out to the proper tap size, then retapping the threads. Maybe you'll get lucky and the heat/vibration of drilling will drive the threaded portion through once the head is gone.

Know your backup plans. I see them as rethreading (even to just clean out the rust corrosion if the bolts do come free), maybe a rivnut, threading up a size, not sure if that area is accessible on the backside but if so then using a normal nut/bolt combo... nothing else coming to me right now.

Glad to see we think alike, I had the same idea about using a rivnut worst case scenario. It should be fine to use as those bolts go right into the body and there's no way to get to them from behind - at least I don't think there is - so really what's one hole versus another? :boink:
 
Glad to see we think alike, I had the same idea about using a rivnut worst case scenario. It should be fine to use as those bolts go right into the body and there's no way to get to them from behind - at least I don't think there is - so really what's one hole versus another? :boink:
Why not just paint it with rust converter until it falls off or wiggles loose?

Sent from my Pixel 4 XL using Tapatalk
 
Glad to see we think alike, I had the same idea about using a rivnut worst case scenario. It should be fine to use as those bolts go right into the body and there's no way to get to them from behind - at least I don't think there is - so really what's one hole versus another? :boink:

what [MENTION=315156]Brian.[/MENTION] said but add a heat cycle or two, the rust penetrate plus heat should do the trick. If u drop the spare tire there's I hole on the back side that should let u reach the the area and be able to spray penetrate with the nozzle ext from the back side (have to reconfirm the hole) as memory serves.
 
Why not just paint it with rust converter until it falls off or wiggles loose?

Sent from my Pixel 4 XL using Tapatalk

Because I'm not that lazy and would prefer to address it properly at some point. Rust spreads and putting a band-aid over the top half of it doesn't make it stop completely, you know what I mean?
Ironically if it was on the frame I would probably do exactly that, because a boxed frame is dead easy to repair. But a body on the other hand...
 
Last edited:
So I really want to remove my trunk latch, clean it up and throw some new bolts in... only problem is I'm almost positive they're going to snap the second i give it a try. One of them is ready to drop down a socket size cause its so corroded. What would you guys do, go for it anyways or just leave it?
Since they're touching the body a torch isn't an option, but I'm wondering if a torque multiplier would possibly help. They work magic on large bolts and I could see how it would work here too, but I can also see it snapping these even easier too because of their size
Just looking for opinions here. This is easily one of the rustiest areas on my car so I'd love to address it

If you really want to spend the money, buy one of those $500 induction heaters and heat the bolt cherry red and then attempt to turn it. Will almost guarantee it will come out but this solution is way too expensive.

What I would do is what was said already - penetrant oil and back and fourth motion with the wrench. If the head breaks off, drill the bolt to a solid hole and if you can get some space in the back, throw a nut behind the new bolt and tighten the latch.
 
Rear engine coolant leak? Freeze plug?

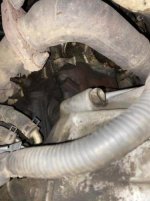
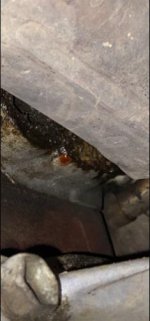
Hello all, I am hoping for some help on my issue with my 2001 4Runner with the 3.4/5VZFE. She currently has 310K miles and runs like a top other than some strange noises, haha. However, that is not my current issue. I have noticed some coolant drips on the top of my transmission bell housing; red/orange in color. I did some looking around and it appears to be coming from above the head-gasket/top end area. I've noticed little to no coolant loss and have had no issues of overheating (yet). Sorry for not the best picture quality but you should be able to see the red coolant drip and some of the orange-ish "build-up". Due to little to no coolant loss, how big of an issue is this? As a broke highschool senior, I unfortunately do not have the funds for the equipment to pull the engine and replace the plugs. Any advice would be greatly appreciated.
 

Attachments

  • Screen Shot 2022-07-02 at 11.20.48 PM.jpg
    Screen Shot 2022-07-02 at 11.20.48 PM.jpg
    27.7 KB · Views: 122
  • Screen Shot 2022-07-02 at 11.32.34 PM.jpg
    Screen Shot 2022-07-02 at 11.32.34 PM.jpg
    17.3 KB · Views: 130
Computer brain

I recently wrecked my 4 runner and twisted the frame but no harm to motor. So I bought another complete 4 runner that needs a motor. The keys can not be found. The one wreaked is a 1999 limited and the one I bought is a 1997. My question is will the brain from the 1999 work on the 1997. The keys on the 97 can't be found so I am just wanting to use the 99 keys on the 97 by using the brain snd steering column. And making a new key Is too exspensive.
 
I recently wrecked my 4 runner and twisted the frame but no harm to motor. So I bought another complete 4 runner that needs a motor. The keys can not be found. The one wreaked is a 1999 limited and the one I bought is a 1997. My question is will the brain from the 1999 work on the 1997. The keys on the 97 can't be found so I am just wanting to use the 99 keys on the 97 by using the brain snd steering column. And making a new key Is too exspensive.

My dealer cuts keys from code for free, not sure why/how you'd consider this "too expensive". Gut feeling is that getting an Immobilizer system installed on a vehicle without the proper wiring would be WAY more expensive than sorting out the key code (tons of time, not zero money). If you're taking on a motor swap, you should be Mor than capable of pulling the passenger side lock cylinder to retrieve the key code... it's Normally a letter with 4 numbers. Buying the key from the dealer and getting it cut ought to be under $10 (it was $7 the last time I got one for a non-immobilizer vehicle, which was about 3 months ago).
 
I recently wrecked my 4 runner and twisted the frame but no harm to motor. So I bought another complete 4 runner that needs a motor. The keys can not be found. The one wreaked is a 1999 limited and the one I bought is a 1997. My question is will the brain from the 1999 work on the 1997. The keys on the 97 can't be found so I am just wanting to use the 99 keys on the 97 by using the brain snd steering column. And making a new key Is too exspensive.
Short answer is no it won’t work. Unless you want to change out the engine wiring harness and instrument panel/body harness the pin outs will be different between the 99 ecm and the 97 wiring. If your 97 isn’t a limited then you should not have an immobilizer system on the 97 ignition meaning you can get a key cut from the vin for the 97 at the dealership and use that for the 97. (This is assuming the ignition cylinder is original.)

Recently I ordered an ignition cylinder and keys from Toyota and took that and the key code to my local locksmith. $55 later I had a new lock cylinder that was keyed to match my vin code so I didn’t have to change the door lock codes or carry a second key.
 
Status
Not open for further replies.

Members online

No members online now.

Forum statistics

Threads
278,310
Messages
3,554,080
Members
248,016
Latest member
Advally Service

Trending content

Back
Top