The Idiot Thread

For the air box, knock that restrictor out. Cutting it is OK but doesn't remove the whole restriction. It literally just pops out of the air box.

I did this the other night. Thought about trimming up the flange that sticks into the fender well to make it more open. Perhaps it would promote more free flow of air? Perhaps just chopping off the half dome at the end? Looks like that may be what you did?
Thoughts?
 
Nice, I love the Kenwood install in mine. Did you get the 520 dashcam too? Ive used several random dash cams but using kenwoods has been the best so far. Being able to review videos on the large screen at any time and change settings is so nice.

I skipped on the integrated dashcam because I already have one. I can say I looked at the integrated radar detector before deciding I was already spending enough money.

I did this the other night. Thought about trimming up the flange that sticks into the fender well to make it more open. Perhaps it would promote more free flow of air? Perhaps just chopping off the half dome at the end? Looks like that may be what you did?
Thoughts?

No, I only removed the through the fender wall scoop for the purposes of cutting. It was reinstalled with the air box mod completed. While it may slightly limit some air flow, I would very much doubt you'd see a performance difference with or without it. I do think without it you may have more large debris caught in your air filter though as it does shield the intake from anything that might be coming in from the front grill.
 
Yea I've had several different dash cams and it was always a pain to take the sd card out and go put it in a computer to looka t videos. With the Kenwood you can view them instantly on the headunit. Plus you can easily change settings without having to fumble thru little buttons on the camera.
 
19Jul2018 64,778 mi

Kenwood DNX-995S
iDataLink Maestro RR
New Maestro Radio Solution Thread - Very Helpful!


This upgrade was so fun, I had to do it twice! Actually I attempted a modded install, then went back and used the proper kit. I liked the latter more, but the former worked just fine too.

Parts List including Crutchfield Suggested Install Kit (14+)
Kenwood DNX-995S CD/DVD/NAV/Wireless Android Auto
Metra 40-LX11 Antenna Adapter
Metra AX-TOYUSB OEM USB Port Adapter
Scosche TA2106B Dash Kit (It's Silver, NOT Black)
iDataLink ADS-MRR Interface Module
iDataLink HRN-RR-TO2 OEM Integration Adpater

Additional Parts
iDataLink ACC-SAT-TO2 - Allows use of OEM GPS antenna with aftermarket head unit
Kenwood CA-C3AV A/V Cable - Allows retention of OEM Aux Input Port
Metra 99-8227S Dash Kit - Not recommended


Curious to know why you chose the DNX995s?

Picking up my first 4Runner on Sunday and thinking this might be my first mod. I’m having a hard time deciding between some of the excelons. Was looking at the DNX995s and the DDX9905s, which has no NAV. Other than NAV, didn’t see major differences in functions, but would love to hear what drove your decision.

I may wait it out for the next gen in hopes of wireless CarPlay in one of the higher end kenwood units. The current alpine ilx seem to be lacking in other areas.

Great looking build, by the way. So much to aspire to in all of the build threads.


Sent from my iPhone using Tapatalk
 
I did this the other night. Thought about trimming up the flange that sticks into the fender well to make it more open. Perhaps it would promote more free flow of air? Perhaps just chopping off the half dome at the end? Looks like that may be what you did?
Thoughts?

I didn't cut anything at all. Just knocked the restrictor out and put it all back together. I may get the TRD intake inlet port which is said to promote better air flow but who knows.
 
Yea I've had several different dash cams and it was always a pain to take the sd card out and go put it in a computer to looka t videos. With the Kenwood you can view them instantly on the headunit. Plus you can easily change settings without having to fumble thru little buttons on the camera.

Agreed, getting those tiny microSD cards in and out of the cam can be a real PITA. But I prefer to edit and upload from a computer with a real screen, and something that's got enough processor to render and reformat if I want to. Besides my dashcam is more for off-roading and fun stuff, so I rarely have to pull the cards (one each front & rear).


Curious to know why you chose the DNX995s?

Picking up my first 4Runner on Sunday and thinking this might be my first mod. I’m having a hard time deciding between some of the excelons. Was looking at the DNX995s and the DDX9905s, which has no NAV. Other than NAV, didn’t see major differences in functions, but would love to hear what drove your decision.

I may wait it out for the next gen in hopes of wireless CarPlay in one of the higher end kenwood units. The current alpine ilx seem to be lacking in other areas.

Great looking build, by the way. So much to aspire to in all of the build threads.

Thanks for nice words about the build, it's been occasionally frustrating but still very enjoyable. A friend of the performance shop owner walked into the shop while the owner and I were fixing my catch can issue. Seeing the hood up and the massive supercharger sitting on top he commented, "Well that's one hell of a sleeper! The wrong person it going to be really disappointed when they lose to that!" Apparently nobody in the street/drag racing community around here would even consider the "off-road-ish soccer mom SUV" a worthy challenge, let alone the chance they could lose! The people at the dyno crew sure gave me some funny looks when it was doing runs too. A 4Runner in amongst their 'Vettes, Camaros, 'Stangs, and assorted import tuners.


There's no difference between the DDX-9905s and the DNX-995s aside from the Garmin Nav, I asked the same question. I wanted nav because I travel a couple times a year to the Appalachians of Tennessee where cell phone signal is a myth. While I'm learning my way around down there, I still don't trust Waze/Google Maps to update directions appropriate if I make a wrong turn without cell signal. If it weren't for that I wouldn't have spent the extra money on it.
While I've long been a fan of Alpine systems, their current offerings just didn't hold up. None of their Double-DIN options include Wireless Android Auto. The only one that did was their new mechless Halo ILX307, which looks like an iPad mounted to the dashboard. I despise the seemingly worldwide Apple iAddiction, and frequently jest the only way to fix Apple problems comes in 12 or 20 gauge high velocity lead solutions.
Another drawback to the ILX307 was the screen resolution. Even though my 8" Android Tablet has a 1080p resolution, the ILX307 10" display is no better than WVGA 800x480. At least the Kenwoods are both 720p, though in a 6" form factor. While I don't typically watch my screen much as I drive, there's no reason it shouldn't be higher resolution. I mean come on, the new generation phones are touting 2k resolutions with goals of 4k before the end of next year. While the ILX307 at least had HDMI inputs, since I'm more apt to play digital files from a USB drive this was less important than I wanted to make it.
Kenwood sold me on the dual USB on the rear both putting out 1.5A for charging and usage. While it's certainly no 2.1A or 2.5A, it's better than most cheap 12v chargers. With the screen off connected to AA, the phone should use less battery than previously as well. A word of warning that when talking to Kenwood Tech Support, they did mention the LG phones have been having issues with running Android Auto connected to head units.
Sorry "Pee-in-your-ear" (Pioneer) was never really an option.


As for the Kenwood install itself, I had been having difficulty with the Gauges function of the head unit, they weren't displaying anything except an error message about "OBD2 Disconnected" at the top of the screen. It took calling Kenwood, iDataLink (closed on weekends), and Crutchfield before we finally stumbled into the setting that allows the Maestro to auto-disconnect from the OBD2 if it detects another reader present. Well I'm pretty sure the URD UCON-EMS "black box" that's installed near the ECU for the supercharger was being read as another OBD2 reader. Once we got back into the initial Kenwood setup and forced the OBD2 setting to always on, the gauges came up right away. I was disappointed while there's an option for a tranny temp gauge through the Maestro and Kenwood, apparently Toyota doesn't have the ability to read it through the ECU. But with more than enough gauges to select from I've got a much better real time idea of what's going on with the 4Runner now that the gauges are working.
EDIT Tranny temp is one of the gauges available, but it can only be selected in one gauge position.
 
Last edited:
I didn't cut anything at all. Just knocked the restrictor out and put it all back together. I may get the TRD intake inlet port which is said to promote better air flow but who knows.

The TRD intake is what prompted the idea to cut the inlet. I cut most of it off last night (left a bit to stick into the fender well) and installed a K&N filter. Definitely louder today around 3500 rpm. Waiting to see if MPG is helped any on the next roadtrip.

If you install the trd inlet Id love to hear the results.
 
Agreed, getting those tiny microSD cards in and out of the cam can be a real PITA. But I prefer to edit and upload from a computer with a real screen, and something that's got enough processor to render and reformat if I want to. Besides my dashcam is more for off-roading and fun stuff, so I rarely have to pull the cards (one each front & rear).


Well my point was just being able to view the videos quick and easy in the car without doing anything. or just turn the screen to live video view to act kind like a front view camera. Thats why I went with kenwoods integrated dash cam. Plus I can easily edit the settings on the camera from the large screen so i dont have to fumble with tiny buttons on the camera itself.

Obviously If I ever need to edit the videos etc Im still gonna pull the sd card out and put it in my computer.
 
05Jul2018 74,350 mi
URD/Whipple 2.3L Twin Screw Supercharger Kit
URD Spec-U Long Tube Headers

Just back from the dyno run after the URD/Whipple SC install.

OEM Flywheel Spec: 270 hp, 278 ft-lbs
Measured Drivetrain Loss: 19.7% HP, 21.2% TQ
OEM Calculated RWP: 217 hp, 219 ft-lbs
Dyno Run RWP: 324 hp, 341 ft-lbs
Calculated Flywheel: 410 hp, 433 ft-lbs

OEM 0-60 7.7s
As modified 26Jul18 0-60 6.63s, 0-99 17.3s

303665d1530846895-idiot-thread-dyno-sm.jpg


View attachment 304946

Any dyno videos?
 
4Sep18 76,281mi

So my one regret in all of these mods has been the URD Mk3 Stainless Cat-back exhaust. It's been a royal PITA. I've had several issues with it leaking from different places. It also renders the rear window unusable while in motion. The fumes flow in through the window and into the cabin strong enough to be of concern even with just me in the truck and all the windows down. If I had to do again, I wouldn't even look at it twice, just go with some other company. Somehow I had completely forgotten that I wanted a side exit when I was doing my research and purchasing. Ironically that desire would probably have lead me down the Magnaflow or Gibson road instead.

I fixed the leaks around the muffler by changing out the clamps to a different style, TorcTite 3" Stainless Lap Joint Clamp. In fairness, I probably caused the one between the muffler & mid-pipe by cutting the mid-pipe a little too short (1/4-3/8") This worked well to quiet it down some. I was happier, though still not satisfied.

The exhaust seemed louder than it should have, I just figured that it was the more aggressive sounding profile of the supercharger in combination with headers, bigger y-pipe, and cat-back. I was talking with a shop about adding a resonance tube to try to fix it, but couldn't narrow the loudness to an rpm range as much as to any throttle setting under load. Then last week it got even louder.
So now I have another exhaust leak somewhere. Except now I'm working 6 day weeks, and don't have time to mow the lawn let alone tinker with the truck. I took it back to the shop where I had the supercharger installed (Moorespeed Performance in Columbus OH).

URD had a different truck shear one of the bolts on the belt tensioner. They sent out some upgraded bolts that were to replace the original. While the shop had the truck doing that, I had them check for exhaust leaks, of course they found one. I've probably had it since I installed the exhaust and has only been getting worse since. Thankfully this isn't one I thought I already fixed as it's at the junction of the after the pipe goes over the axle and before the resonator. Shop said that the pipes weren't sized correctly, and band clamp was loose. I did check that band clamp and re-tighten it when I was swapping out the other clamps. The shop resized the pipes, and cranked the band clamp down. I was also informed that even a small leak at that junction would be directing exhaust and noise upwards towards the cabin, so it would seem even louder than just leaking near the muffler.

In addition to fixing the leak, I also had them fix my rear window problem with a side exit. They cut the pipe just after the resonator, ditched the tip, and put on a 90 degree bend. Since I don't exactly go for flashy and don't see a need/want for a tip, they just just used a square cut, and some high-temp rattle-can satin black. I debated about this, but figure it's best for two reasons: regular pipe would be easier to bend back than some tip should it ever get crushed, and the rattle can should help protect the pipe from the extra salt spray exposure that comes from being behind the tire. The rattle-can could have come out better, but there's only so much you can do when it's 95% humidity and 90 degrees inside the shop.
I think I'm finally happy with the Mk3 exhaust as modified, hoping this will be the last issue. For now it's not far off of the stock quiet when idling or coasting, and only aggressive when under acceleration and load. It's finally at an acceptable level for a daily driver!
EDIT 6Sep18: Didn't even get a round trip to work before it got loud again. Pretty sure I'm just going to have the shop weld that joint.
EDIT 11Sep18: Left truck at the shop with the understanding they were going to find, and weld up whatever exhaust leak I had. They tightened everything up instead, although mentioned that nothing was loose. Test drove the vehicle <500ft and turned right back around. Leak is near impossible to hear at idle, but obvious under moderate acceleration or load. Had to repeatedly rev the engine while the shop owner rolled around under the truck feeling and listening at every joint/connection. Turns out the leak was from the driver's side header to y-pipe. Since this connection was tight, we checked the gasket and found it had been misaligned when tightened, hence asymmetrically crushed and causing the leak. Of course he didn't have any gaskets around (performance shop not a Toyota dealer), so I'll be dropping it back tomorrow for resolution.
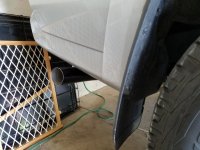
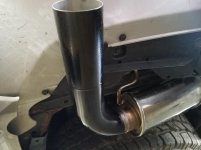
side exit.jpg
tailpipe.jpg

I'm still working with the techs on the UCON-EMS crew to resolve the reoccurring P0420 (occasionally P0430) codes and CEL that are the result of deleting the cats between the O2 sensors with the long tube headers. I have a backup solution provided by the performance shop, but it's more money I'd have to spend on fixing something that I was specifically told wouldn't be an issue!

I finally get a break from work early next month and get to load up some guns, my dog, and head down to the mountains of Tennessee again. There's sure to be some fire roads, and maybe a trail or two. Hopefully not as challenging (or damaging) as back in May! Look for more info on the supercharger results and difference after that trip. I'm sure I'll be going uphill better this time around. I might even be dragging an empty boat trailer back with me if the welding shop is done with it.

 

Attachments

  • side exit.jpg
    side exit.jpg
    133.9 KB · Views: 1,388
  • tailpipe.jpg
    tailpipe.jpg
    104.6 KB · Views: 1,364
Last edited:
12Sep18 76,443mi
Secondary Air Pump Filter Mod
I had a difficult time sourcing the UniFilter #UP-107 they used, and ended up having to order directly from Uni-Filter. Though currently available via Amazon, they had actually cancelled my order because they were out and unsure of restock. SummitRacing also seems to carry them regularly.
Hardest part was finding a Torx-25 head. Apparently all but one of my Torx sets have T20 and then T27 with no T25. Just as I was going to give up, my computer repair kit had one I've never used.
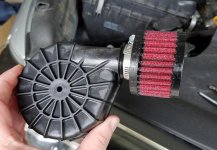
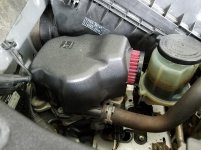
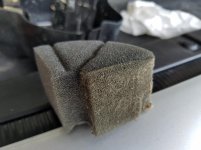
It really is one of the simplest mods to do, pop off the plastic cover, unscrew the single screw, and remove upper half of pump. Then remove factory foam filter and use a standard screwdriver to gently lift up on the tabs for the nozzle from pump upper half. Install filter, tighten band clamp, replace and tighten. Since I was concerned about the air flow given how tightly the plastic cover fit around the new filter, I removed the foam on the underside of it. I still wasn't happy, so used a cut-off wheel on the Dremel and removed a little of the cover. The pump is certainly a little louder now, but for all that it runs who cares!?

20180912_160120.jpg
20180912_161133.jpg

My filter wasn't in bad shape, but why leave it until it becomes a very expensive problem!?
20180912_160133.jpg
 

Attachments

  • 20180912_160120.jpg
    20180912_160120.jpg
    110.9 KB · Views: 1,304
  • 20180912_160133.jpg
    20180912_160133.jpg
    77.3 KB · Views: 1,303
  • 20180912_161133.jpg
    20180912_161133.jpg
    123.5 KB · Views: 2,629
Last edited:
12Sep18 76,443mi
Secondary Air Pump Filter Mod
I had a difficult time sourcing the UniFilter #UP-107 they used, and ended up having to order directly from Uni-Filter. Though currently available via Amazon, they had actually cancelled my order because they were out and unsure of restock. SummitRacing also seems to carry them regularly.
Hardest part was finding a Torx-25 head. Apparently all but one of my Torx sets have T20 and then T27 with no T25. Just as I was going to give up, my computer repair kit had one I've never used.
It really is one of the simplest mods to do, pop off the plastic cover, unscrew the single screw, and remove upper half of pump. Then remove factory foam filter and use a standard screwdriver to gently lift up on the tabs for the nozzle from pump upper half. Install filter, tighten band clamp, replace and tighten. Since I was concerned about the air flow given how tightly the plastic cover fit around the new filter, I removed the foam on the underside of it. I still wasn't happy, so used a cut-off wheel on the Dremel and removed a little of the cover. The pump is certainly a little louder now, but for all that it runs who cares!?

Thanks for posting this, I just ordered a filter to redo mine
 
19Nov 2018 78,774mi
Whack-a-Mole URD Exhaust Edition Round 4
It took two more trips in the past couple weeks to the performance/custom shop, where the owner really is tired of hearing me say the words "exhaust leak." So we've stopped trying to use the easy fixes and started attacking with more drastic permanent solutions.

Challenge A Y-Pipe Fitment/Tension
For some reason it fit the OEM manifolds mostly fine, but not the URD headers. It was taking a lot of prying, swearing, and pushing to get the y-pipe to attach to both headers every time it was disconnected. The thought was also that because of the tension it was bouncing out of alignment and toasting the gaskets driving the wonderful conditions on Ohio's beautifully pothole decorated roadways. Fixing this involved cutting the URD y-pipe where it passes beneath the transmission, then welding it back with a slightly oversized sleeve. This alleviated the compression, no more swearing to install. The shop also wanted to ensure the gaskets had no further issue and added a large amount of liquid gasket to the header/y-pipe connections. The mid-pipe donut gasket was also charcoaled and so replaced.

Challenge B Muffler Support
The hangers which support the muffler aren't actually attached to the muffler. I can certainly see the benefit for the front hanger locations, but the rear really needs the support. The connection with that short section of axle pipe wasn't enough to take the weight and eventually kept bouncing loose. While it wasn't enough to bounce the pipe far enough out to drop the muffler, it was enough to allow a fair amount of sound to bounce off the road and back up to the bottom of the truck. As previously seen I'd tried different clamps (which worked for a while), repositioning, and adjusting. I was going to have the shop just move the rear hanger to the back of the muffler. After fiddling with clamp again myself, decided better to just have them weld it all together. So the muffler is now welded to both the mid-pipe and axle pipes.

The drive down to TN for the holiday was much more enjoyable without so much drone this time around. I fully expect this to be the final fix, but with my luck I doubt it!
 
23Nov2018
Got my 4Runner out onto a 1/2 mi banked track. Grandma was in the passenger seat so I was resigned to sight-seeing (glacial) speed, but I still got to drive on Bristol Motor Speedway!

canvas.jpg
 

Attachments

  • canvas.jpg
    canvas.jpg
    60.8 KB · Views: 605
Last edited:
23Nov2018
Got my 4Runner out onto a 1/2 mi banked track. Grandma was in the passenger seat so I was resigned to sight-seeing (glacial) speed, but I still got to drive on Bristol Motor Speedway!


That's pretty cool, they do something similar here in Charlotte at CMS (same ownership, so it makes sense). Really puts the banking into perspective, even in the "tame" (straightaway and transition) sections. Would be fun to turn a lap.
 

Members online

Forum statistics

Threads
278,308
Messages
3,554,058
Members
248,016
Latest member
Advally Service

Trending content

Back
Top