The Idiot Thread

27Nov2018 79,601mi
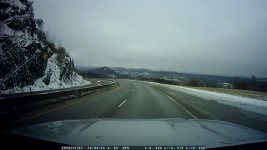
I returned home from TN today, the usual route avoiding the interstates. The snow cleared just enough to have a gorgeous view coming down the mountain into Kentucky on US-23.
view.jpg


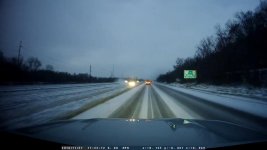
Later I narrowly escaped getting totaled and likely a major hospital visit when someone in the oncoming lane lost control and tried coming across the median at me. I knew I could move right, but would start sliding if I did it quickly. So I yanked the 4WD lever, let off the throttle, and made the move over. The 4WD didn't engage right away because I had been doing almost 70mph, but when it kicked in it did help stop the fishtailing.

oncoming.jpg


After that it took a bit to calm back down, but the rest of the drive was uneventful. I go to the shop tomorrow to assess the damage from when I rear-ended the minivan before I headed south. It will take me a while to splice together all the dashcam footage from the Bristol Speedway in Lights, there's quite a bit of it!
 

Attachments

  • oncoming.jpg
    oncoming.jpg
    53.4 KB · Views: 1,120
  • view.jpg
    view.jpg
    72.4 KB · Views: 1,124
Last edited:
27Nov2018 79,601mi
I returned home from TN today, the usual route avoiding the interstates. The snow cleared just enough to have a gorgeous view coming down the mountain into Kentucky on US-23.


Later I narrowly escaped getting totaled and likely a major hospital visit when someone in the oncoming lane lost control and tried coming across the median at me. I knew I could move right, but would start sliding if I did it quickly. So I yanked the 4WD lever, let off the throttle, and made the move over. The 4WD didn't engage right away because I had been doing almost 70mph, but when it kicked in it did help stop the fishtailing.


After that it took a bit to calm back down, but the rest of the drive was uneventful. I go to the shop tomorrow to assess the damage from when I rear-ended the minivan before I headed south. It will take me a while to splice together all the dashcam footage from the Bristol Speedway in Lights, there's quite a bit of it!

WOW! I'm glad you were able to miss that one! ...and I subscribed to your channel. :thumb:
 
27Nov2018 79,601mi
I returned home from TN today, the usual route avoiding the interstates. The snow cleared just enough to have a gorgeous view coming down the mountain into Kentucky on US-23.


Later I narrowly escaped getting totaled and likely a major hospital visit when someone in the oncoming lane lost control and tried coming across the median at me. I knew I could move right, but would start sliding if I did it quickly. So I yanked the 4WD lever, let off the throttle, and made the move over. The 4WD didn't engage right away because I had been doing almost 70mph, but when it kicked in it did help stop the fishtailing.


After that it took a bit to calm back down, but the rest of the drive was uneventful. I go to the shop tomorrow to assess the damage from when I rear-ended the minivan before I headed south. It will take me a while to splice together all the dashcam footage from the Bristol Speedway in Lights, there's quite a bit of it!


Wow! That could’ve been soooo much worse.


Sent from my iPhone using Tapatalk
 
01Jan19 80,662mi
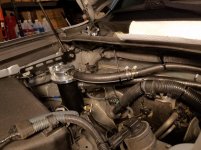
Over the past several months something has been wrong with the catch can I had installed. It wasn't catching anything to drain, and I'm pretty sure that the gases were popping up the spring loaded drain stick (causing an odd noise) and venting into the engine compartment. This was evidenced by a shredded o-ring on the stick and all sorts of oily mess on the top and exterior of the can where it then ran down to the top of the fender. Being that it was oozing down from there only about 4 inches from the headers, it would have been a good way to toast the truck.
:flamethrwoer2:

Around Thanksgiving I decided to go with a more simple setup with 42DD's Ultimate Catch Can, which is probably the route I should have gone in the first place. I've been burned out working 6 days a week, today I finally managed to run errands for plumbing and mounting hardware. The local O'Reilly's actually had the some 3/4" fuel line, once I emphasized 3/4" instead of 3/8". They failed to mention that it was high pressure fuel/hydraulic line rated for 3500psi! Well that certainly won't vacuum crush, but it was pricey, isn't very flexible, and takes a cut-off wheel to cut! While waiting for them to cut it, several times I considered just using 3/4" heater hose, but decided that would probably collapse under the vacuum. I was able to re-use most of the 1/2" lines from the McNally kit with some adapters. But I had to uninstall them and reinstall them in order to get the lengths appropriate with the 3/4" sections, and to cut off the McNally quick-detach connectors (which were a pain to get on the hose to start with). So now it goes from the 3/8" at each OEM side to 1/2" line then 3/4" line to the can.

20190101_191118.jpg

EDIT: 25Mar2019 Install plus about 1800 miles
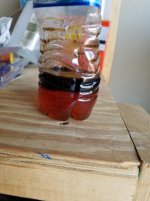
Drained the 42DD today, got plenty out of it.

20190325_190413.jpg
 

Attachments

  • 20190101_191118.jpg
    20190101_191118.jpg
    115.8 KB · Views: 1,888
  • 20190325_190413.jpg
    20190325_190413.jpg
    73.6 KB · Views: 1,525
Last edited:
23Feb2019 81,54x mi

Last year I used the TacomaWorld forum to get in on a RagoFab group buy for ditch light brackets and a set of Baja Design Squadron Pro's. I've been so busy working and chasing other problems I'd not had a chance to do anything more than put the box on my workbench. I've also been delaying because instead of having a spiderweb at the battery terminals with inline fuses in random places, I wanted to put it together in an Aux Fuse Block. It's easier to do things right the first time, hence I've held off on the ditch light install until I've got the Aux Fuse Block wired in.


Aux Fuse Block
Parts on hand, but need to source large gauge wire. I'm considering mounting the FB and paying the local car stereo guys to run the wire.
After install will relocate/extend wiring for HID & 20" OnX6 to fuse block
BattPos > 100A CB > Aux FB
BattNeg > Aux FB


Ditch Lights

Issues to overcome:
1) Baja Design harness isn't long enough to connect both lights on ditch brackets, will create own because
2) I want the lights switched individually, L and R. The original plan was 2 switches: 1 On-Off, 1 Left-Both-Right. I decided it would just be simpler to have 2 On-Off toggles instead.
3) I'm no electrician, so I might get this wiring incorrect. Hoping someone will tell me if any of it is wrong before I Pop/Sizzle something I shouldn't have.

Light Wiring - Not yet started
Aux FB- > Lights
Aux FB+ > Switch > Light
I decided to simplify and skip the previously listed relay for IgnOn circuit


Switches
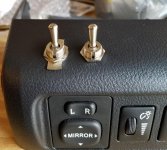
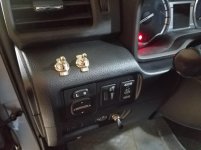
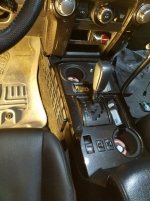
I knew exactly where I wanted the switches, and it wasn't down on the front of the dash.
I'd already been having issues with the On-Off switch for the 20" OnX6 being bumped on by my knee getting into or out of the truck. I've occasionally driven several miles on the road in traffic with it on. Last week when it was cold, this happened again. Except instead of getting bumped on, the plastic toggle of the switch snapped off at the base. I was able to grab another one from BajaDesigns for a couple bucks, which I installed today as well. It fits about the same as before, but I'm thinking I need add a guard/cover to the switch. (Because who doesn't like a big red cover on a switch?!)

Removing the dash piece I was going to be working with was easy. Once you pop the lower dash off, the left middle piece below the vent pops free in the same manner. Then just disconnect the wire harnesses, and pop the existing switches out. I was worried about the switch casings hitting a piece that sticks out beneath the vent and gives this piece support, so mounted them about as far to the front of the dash as I could. Turns out I couldn't get them any closer, the front of the casing is all but pressing against the mount for the mirror control.
As of now they aren't connected to anything, and I haven't decided if I want bare switches or to keep the small on/off plate. Because I'm working too much this one is going to be done little by little.

20190223_160652 - Copy.jpg
20190223_162254 - Copy.jpg

EDIT:
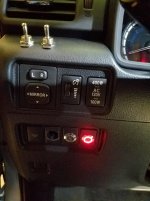
Well the replacement light bar switch lasted all of 3 days before getting bumped and snapped again because it was cold. I didn't even have a chance to obtain a cover or guard for the switch. Seeing as the switch guard would probably end up broken or bent just as quickly because it sticks out further, I needed a different type of switch. A latching push-button style was ordered. I installed it, emboldened by the 2 blanks I got from [MENTION=147513]gibburnz[/MENTION]. Getting the hole correctly sized and mounting snug, while still retaining the clips to hold to the dashboard required a couple failed attempts. I got the 3rd one right. But I only had 2 spare blanks, so there's a blank with a hole in it in my dash. I'll fix it later with the DRL mod I'm planning. Moronically I failed to order the combination connector/harness for the back of the switch, so had to wait a couple days for an Amazon box. Finally wired up tonight and liking it, though wish the switch felt a little heavier duty. (Red halo only comes on with light bar) /13Mar2019
20190313_211635.jpg
 

Attachments

  • 20190223_160652 - Copy.jpg
    20190223_160652 - Copy.jpg
    125.8 KB · Views: 1,481
  • 20190223_162254 - Copy.jpg
    20190223_162254 - Copy.jpg
    110 KB · Views: 1,462
  • 20190313_211635.jpg
    20190313_211635.jpg
    99.9 KB · Views: 1,150
Last edited:
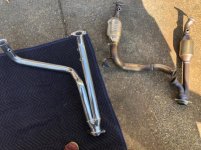
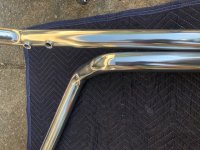
How close is the engine pipe to the transmission pan? Seems there would be a lot of extra heat soak into the transmission which is of course not a good thing. Also, did you notice any real difference in performance or economy?

I wondered about this too so just to be safe I went and had my Y pipe thermal coated before installing. extra expense but makes me feel better lol
 

Attachments

  • new pipe side by side.jpg
    new pipe side by side.jpg
    63.1 KB · Views: 1,332
  • new pipeclose.jpg
    new pipeclose.jpg
    130.5 KB · Views: 1,373
I decided I wanted to hide as much of the upgrade as possible. Out of curiosity I removed the rubber seal and plastic trim piece from the fender on both sides and found plenty of unused space to hide everything. To remove theses you need to slide them towards the windshield and gently pull a little to get the corners from under the lip of the fender. The retainer closest to the windshield in the wiper tray is the toughest, but still easy enough.

I am having such a hard time moving this plastic trim piece and weather seal. any idea? it won't budge towards the windshield.
 
I am having such a hard time moving this plastic trim piece and weather seal. any idea? it won't budge towards the windshield.

Removal
1) Remove radiator cover, the big plastic piece on top of the radiator
2) The very front of the fender trim tucks under the fender, push down on it and slide it towards the center of the vehicle. You just need to get it out from under the fender.
3) Then there's a recessed part of the plastic trim piece closest to the windshield, slide that towards the windshield first then up.
4) Slide the remainder of the hood seal piece towards the windshield

Reinstallation
1) Start with the recessed piece closest to the windshield, slide it on the post
2) The remainder of the long plastic trim, slide onto the 3 posts. It's ok for it to flex a little. It's also fine if you need to gently push aside the rubber hood seal to see and line them up. I found it's best to start closest the windshield and work forward. It may take a little sliding back and forth with pressure in the right areas to keep it down on the posts. Usually I will just barely start the rear post, and push down on the others to get them past the top of the post and started. Then pull the whole piece forward.
3) Don't forget to tuck the front end back under the fender
4) Reinstall Radiator Cover
 
Last edited:
Removal
1) Remove radiator cover, the big plastic piece on top of the radiator
2) The very front of the hood seal tucks under the fender, push down on it and slide it towards the center of the vehicle. You just need to get it out from under the fender.
3) Then there's a recessed part of the plastic trim piece closest to the windshield, slide that towards the windshield first then up.
4) Slide the remainder of the hood seal piece towards the windshield

Reinstallation
1) Start with the recessed piece closest to the windshield, slide it on the post
2) The remainder of the long plastic trim, slide onto the 3 posts. It's ok for it to flex a little. It's also fine if you need to gently push aside the rubber hood seal to see and line them up. I found it's best to start closest the windshield and work forward. It may take a little sliding back and forth with pressure in the right areas to keep it down on the posts. Usually I will just barely start the rear post, and push down on the others to get them past the top of the post and started. Then pull the whole piece forward.
3) Don't forget to tuck the front end back under the fender
4) Reinstall Radiator Cover

awesome stuff, i will give it a shot tomorrow. i am the idiot :doh:
 
01Jan19 80,662mi
Over the past several months something has been wrong with the catch can I had installed. It wasn't catching anything to drain, and I'm pretty sure that the gases were popping up the spring loaded drain stick (causing an odd noise) and venting into the engine compartment. This was evidenced by a shredded o-ring on the stick and all sorts of oily mess on the top and exterior of the can where it then ran down to the top of the fender. Being that it was oozing down from there only about 4 inches from the headers, it would have been a good way to toast the truck.
:flamethrwoer2:

Around Thanksgiving I decided to go with a more simple setup with 42DD's Ultimate Catch Can, which is probably the route I should have gone in the first place. I've been burned out working 6 days a week, today I finally managed to run errands for plumbing and mounting hardware. The local O'Reilly's actually had the some 3/4" fuel line, once I emphasized 3/4" instead of 3/8". They failed to mention that it was high pressure fuel/hydraulic line rated for 3500psi! Well that certainly won't vacuum crush, but it was pricey, isn't very flexible, and takes a cut-off wheel to cut! While waiting for them to cut it, several times I considered just using 3/4" heater hose, but decided that would probably collapse under the vacuum. I was able to re-use most of the 1/2" lines from the McNally kit with some adapters. But I had to uninstall them and reinstall them in order to get the lengths appropriate with the 3/4" sections, and to cut off the McNally quick-detach connectors (which were a pain to get on the hose to start with). So now it goes from the 3/8" at each OEM side to 1/2" line then 3/4" line to the can.

View attachment 322695

Just askin, Why did you not go with the 1/2 in Ultimate Catch Can? :hippie:
 
DRL Switch Mod

27Mar2019 82,521 mi
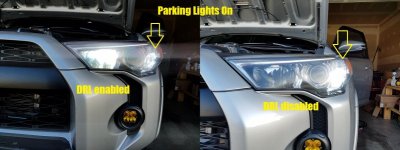
I kind of like my DRL in the daytime, so I wanted to keep them. However, when I want to run parking lights and fog lights only during white-out or heavy fog conditions. After reading the DRL Disable Thread, [MENTION=4160]KDCane[/MENTION] posted some diagrams that got me thinking. Since I still want the ability to run DRL's, bending the pin in the relay wouldn't cut it. I needed a switch somewhere in the circuit.

:director: WARNING: This mod involves cutting and splicing into your factory harness. If you are not comfortable doing so or competent in electronics and wiring, then get someone who is. I take no responsibility for any action you or your associates take with your vehicle even using this information as a guide.
I encourage you to read this through several times before deciding to continue with this mod. I mean, you're literally reading a thread written by a "Friggin Idiot"

According the the diagrams the easiest place would be from the driver's side junction box, connector 2C, wire 37 (light green). Unfortunately it took me about 90 minutes to locate said connector, and easy is a very relative term. As in it's easier to access than say the wiring that's under the fuse box next to the battery. If [MENTION=65614]Antman[/MENTION] gave up on the hood fuse box, then it must be really bad!

Step 1: Disconnect the battery negative terminal.
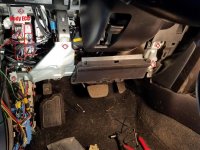
To get at this connector you need to remove quite a bit of the lower driver's dash. Start with the step plate at the bottom of the driver's door, it pries up easily with a body panel removal tool. Unscrew the cap left of the foot rest & pop off the lower left kick plate. Pop the middle center console loose (the part with the HVAC controls). You don't need to remove it just get it loose on the driver's side. Open the cover for the lower dash bolt nearest the center console, remove the bolt and the one on the other side (10mm). Then pop off the lower dash on both sides, disconnect any switches as well as the hood release.
The hood release is a little tricky: pull the cable sheath towards the front of the truck then to the side to free it from the holder. Slide the piston out of the latch and you should be able to remove the entire lower dash. Set aside the lower dash. There are some wires in my pictures which you may not have. They are for my remote start, dashcam, light bar, UCON-EMS, Maestro-RR/Kenwood, and other electronic accessories.

20190327_181923 - Labelled.jpg

Remove the 4- 10mm bolts holding the airbag bracket in place (red diamonds). I didn't waste time figuring out how to disconnect the airbag, and just let it dangle.

20190327_181947.jpg

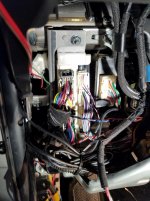
Now saddle up and disconnect all of the harnesses on the front of the Body ECU. The ones with the black retainers have a tab at the top you need to depress then pull the end of the retainer out so that it rotates freeing that connector. Then remove the 3- 10mm bolts holding the Body ECU in place (top, left side - red diamonds, bottom - orange diamond can only see from under the dash behind the interior fuse block).
Pop the bracket off the ECU at the top plastic pin. Now you should be able to drop the Body ECU down and access the harnesses on the rear.

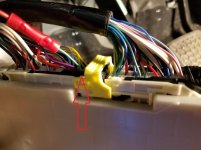
20190327_171918.jpg


You're after the bigger of the two connectors under the yellow locking latch. In order to unlock that latch you need to remove the smaller connector, slide the latch, and then disconnect the larger connector. Near the yellow latch is the small light green wire you've spent the last hour trying to get to!

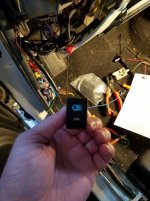
Cut it & wire in your switch. The switch harness from AOB of course isn't long enough to reach back behind the Body ECU from the front of the dash, so I had to wire in some extensions. While I usually prefer the twist and solder method with heat shrink covering, but there's no room for that so crimp connectors are about the only option.

switch.jpg

Reassembly in reverse order. Don't forget to reconnect the battery to test it before you completely reassemble the dash.

Expected Result! The button works as a toggle to enable/disable the DRL in all lighting modes (DRL & Parking)

Unexpected results: The AOB switch has 2 LEDs, one behind the "DRL" & one behind the light logo. When the vehicle is off the light logo stays lit constantly. When vehicle is ON or running, the logo is lit only when the DRL's are off. I figure this is easily reversible by swapping the leads. Don't know if this would fix the always on issue. The "DRL" on the switch never lights, but I didn't connect the blue illumination wire since just getting a working switch was hard enough.

When starting the truck the TPMS light flashes, then stays lit. I figure when the battery was disconnected, then I disconnected everything from the Body ECU it lost the addresses of the TPMS sensors and they need paired/synced back to the truck.
EDIT 18Jun2019: I was poking around in the 5th Gen TPMS Disable Thread and seeing some pictures jogged my memory. Apparently in my rush to finish getting everything back together, I had failed to reconnect the harness to the TPMS module. DOH! Reconnected it tonight and started it up, no TPMS light.

works.jpg


This is not for the feint of heart. If you can live without DRL completely, just bend the pin in the relay. Bending the pin would take less than 5 minutes. Splicing into the harness and reassembling everything took me the better part of 3 hours.

 

Attachments

  • 20190327_181923 - Labelled.jpg
    20190327_181923 - Labelled.jpg
    137.3 KB · Views: 1,243
  • 20190327_171918.jpg
    20190327_171918.jpg
    79.5 KB · Views: 1,247
  • switch.jpg
    switch.jpg
    69.6 KB · Views: 1,199
  • TIS - Toyota 2014 4Runner Repair Manual - Lighting System Diag.pdf
    TIS - Toyota 2014 4Runner Repair Manual - Lighting System Diag.pdf
    185.6 KB · Views: 180
  • 20190327_181947.jpg
    20190327_181947.jpg
    135 KB · Views: 1,214
  • works.jpg
    works.jpg
    76.9 KB · Views: 1,747
Last edited:
Victory 4x4 Center Console Molle Panels

27Mar2019 82,521mi
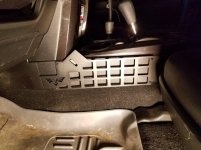
Installed the [MENTION=320865]Victory 4x4[/MENTION] Center Console Molle Panels.
Pretty much as advertised, and expected. Stripped one of the screws going into the plastic. I'd much rather take more time with this and bolt them in place with a washer on the backside of the plastic. Current install will have to do for a while as I've got a road trip coming next week.

20190327_195808.jpg
20190327_195817.jpg
 

Attachments

  • 20190327_195808.jpg
    20190327_195808.jpg
    105 KB · Views: 1,627
  • 20190327_195817.jpg
    20190327_195817.jpg
    118.1 KB · Views: 1,114
Last edited:
27Mar2019 82,521 mi
I kind of like my DRL in the daytime, so I wanted to keep them. However, when I want to run parking lights and fog lights only during white-out or heavy fog conditions. After reading the DRL Disable Thread, [MENTION=4160]KDCane[/MENTION] posted some diagrams that got me thinking. Since I still want the ability to run DRL's, bending the pin in the relay wouldn't cut it. I needed a switch somewhere in the circuit.

:director: WARNING: This mod involves cutting and splicing into your factory main harness. If you are not comfortable doing so or competent in electronics and wiring, then get someone who is. I take no responsibility for any action you or your associates take with your vehicle even using this information as a guide.
I encourage you to read this through several times before deciding to continue with this mod. I mean, you're literally reading a thread written by a "Friggin Idiot"

According the the diagrams the easiest place would be from the driver's side junction box, connector 2C, wire 37 (light green). Unfortunately it took me about 90 minutes to locate said connector, and easy is a very relative term. As in it's easier to access than say the wiring that's under the fuse box next to the battery. If [MENTION=65614]Antman[/MENTION] gave up on the hood fuse box, then it must be really bad!

Step 1: Disconnect the battery negative terminal.
To get at this connector you need to remove quite a bit of the lower driver's dash. Start with the step plate at the bottom of the driver's door, it pries up easily with a body panel removal tool. Unscrew the cap left of the foot rest & pop off the lower left kick plate. Pop the middle center console loose (the part with the HVAC controls). You don't need to remove it just get it loose on the driver's side. Open the cover for the lower dash bolt nearest the center console, remove the bolt and the one on the other side (10mm). Then pop off the lower dash on both sides, disconnect any switches as well as the hood release.
The hood release is a little tricky: pull the cable sheath towards the front of the truck then to the side to free it from the holder. Slide the piston out of the latch and you should be able to remove the entire lower dash. Set aside the lower dash. There are some wires in my pictures which you may not have. They are for my remote start, dashcam, light bar, UCON-EMS, Maestro-RR/Kenwood, and other electronic accessories.

View attachment 329950

Remove the 4- 10mm bolts holding the airbag bracket in place (red diamonds). I didn't waste time figuring out how to disconnect it, and just let it dangle.

View attachment 329956

Now saddle up and disconnect all of the harnesses on the front of the Body ECU. The ones with the black retainers have a tab at the top you need to depress then pull the end of the retainer out so that it rotates freeing that connector. Then remove the 3- 10mm bolts holding the Body ECU in place (top, left side - red diamonds, bottom - orange diamond can only see from under the dash behind the interior fuse block).
Pop the bracket off the ECU at the top plastic pin. Now you should be able to drop the Body ECU down and access the harnesses on the rear.

View attachment 329953


You're after the bigger of the two connectors under the yellow locking latch. In order to unlock that latch you need to remove the smaller connector, slide the latch, and then disconnect the larger connector. Near the yellow latch is the small light green wire you've spent the last hour trying to get to!

Cut it & wire in your switch. The switch harness from AOB of course isn't long enough to reach back behind the Body ECU from the front of the dash, so I had to wire in some extensions. While I usually prefer the twist and solder method with heat shrink covering, but there's no room for that so crimp connectors are about the only option.

View attachment 329954

Reassembly in reverse order. Don't forget to reconnect the battery to test it before you completely reassemble the dash.

Expected Result! The button works as a toggle to enable/disable the DRL in all lighting modes (DRL & Parking)

Unexpected results: The AOB switch has 2 LEDs, one behind the "DRL" & one behind the light logo. When the vehicle is off the light logo stays lit constantly. When vehicle is ON or running, the logo is lit only when the DRL's are off. I figure this is easily reversible by swapping the leads. Don't know if this would fix the always on issue. The "DRL" on the switch never lights, but I didn't connect the blue illumination wire since just getting a working switch was hard enough.
When starting the truck the TPMS light flashes, then stays lit. I figure when the battery was disconnected, then I disconnected everything from the Body ECU it lost the addresses of the TPMS sensors and they need paired/synced back to the truck.

View attachment 329957


This is not for the feint of heart. If you can live without DRL completely, just bend the pin in the relay. Bending the pin would take less than 5 minutes. Splicing into the harness and reassembling everything took me the better part of 3 hours.

Very ballsey. I like it!
 
27Mar2019 82,521mi
Installed the [MENTION=320865]Victory 4x4[/MENTION]
Pretty much as advertised, and expected. Stripped one of the screws going into the plastic. I'd much rather take more time with this and bolt them in place with a washer on the backside of the plastic. Current install will have to do for a while as I've got a road trip coming next week.

Same. I installed mine yesterday and also feel like they need support from behind. When I have time to remove the center console I'll be adding longer bolts with washers and nyloc nuts.
 
20Apr2019 84,671mi
ArcLight LEDs
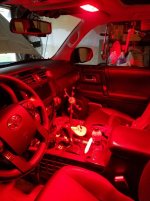
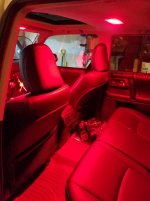
I'd been on the fence about this one for the last year or so. We had a local meet and one of my buddies from up north let me sit in his with the conversion done. I was sold, and ordered them as soon as I got home from the meet.
I decided to pop them in this afternoon. Well this wasn't as simple as I thought. I elected not to do the liftgate because the few times I open it at night, I don't need the red light. The dome light was pretty simple and followed along easily with the instructions.
Somehow the instructions for the map lights were goofed, and I ended up with 2 sets of instructions for the dome light. I spent about 20 minutes trying to figure out how to properly remove the center console before coming inside and emailing ArcLightLEDs about the error, and researching how to remove the overhead console. I found some info with pictures in this thread. About the time I got the console removed, I got an email with the instructions attached from ArcLight and was able to properly complete the installation. Somehow I managed to get the correct polarity on everything on the first try, which never happens for me. Having flown I'm a big fan of red lighting at night, and will likely appreciate it in a few hours when I have to drive to work before dawn on Easter Sunday.

20190420_200122.jpg
20190420_200154.jpg
 

Attachments

  • 20190420_200122.jpg
    20190420_200122.jpg
    82.9 KB · Views: 1,786
  • 20190420_200154.jpg
    20190420_200154.jpg
    68.5 KB · Views: 1,792
Last edited:

The notches don't line up with the stock vs the TRD, but I was able to get it on no problem, then just threw on a hose clamp to keep it in place

mvimg_20180517_161006_c6e08bd514e622a94b422f7838e395fb41b0538f.jpg


TRD Airbox Inlet "Accelerator"
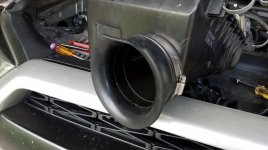
After I had removed my inlet scoop, I couldn't leave enough alone and installed this yesterday. Since it was never designed for the non-TRD air box, some small modifications are required, and a #64 hose clamp (Lowe's ~$2).
I had to remove the 3 small tabs at the top of the inlet opening with a dremel to get a tight fit, otherwise the TRD inlet accelerator doesn't go flush against the air box.

20190515_155043.jpg

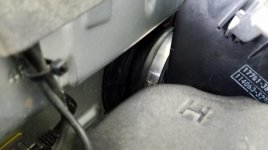
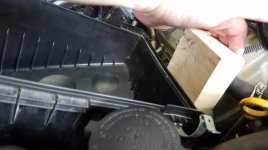
It needs to be flush against the box else the box won't bolt back into place. Even with it flush against the box, I still had some difficulty aligning the box with the original location. It required pulling it hard against the inner fender compressing the TRD inlet accelerator. Since I didn't have any helping hands, I cheated a little with a piece of wood against the head.

Before smashing against the fender to bolt in place
20190515_160334.jpg
20190515_160352.jpg


For the air box, knock that restrictor out. Cutting it is OK but doesn't remove the whole restriction. It literally just pops out of the air box.


While I had the air box out, I also knocked out the restrictor tube which I had partially cut before. Between the two the intake is absolutely louder, more of a low rumble. I'm still adjusting to it and will decide later if I want to keep the noise, or may revert back.
 

Attachments

  • 20190515_155043.jpg
    20190515_155043.jpg
    69 KB · Views: 1,681
  • 20190515_160334.jpg
    20190515_160334.jpg
    46.9 KB · Views: 1,711
  • 20190515_160352.jpg
    20190515_160352.jpg
    55.7 KB · Views: 1,677
26Jun2019 86,xxxmi

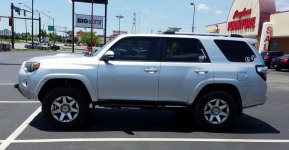
It's only been about 33kmi since installation, but Rancho's QuickLift couldn't stand up to the additional weight on the front end (SSO bumper & URD Supercharger). It has become very bouncy over bumps/potholes, nose dives heavily under braking, and body rolls more heavily around turns. I looked heavily at Kings, Bilstein 6112/5160's, and the ICON came up as an option. I was going to go the 6112/5160 route, but it would be 2+ weeks for availability. The ICON could be installed Monday, before my trip to TN, & are serviceable/rebuildable. I really only want to lift the front enough to be level with the rear, so I didn't want something that would do 3".

First installation wasn't completed before vacation owing to Ohio winters. The LCA cam bolts were rusted solid, and of course replacements weren't available in short order. Got the truck back and went on vacation. Came back and reassessed some of the information I'd received about doing the long travel strut with an UCA so that I'd not lose downtravel. Decided to go with it, and the SPC UCA's seemed what I was looking for, and 4WP had them in stock. So the install became mostly a Stage 2 kit, with the exception of the rear springs.
After some other woes attempting to get the install done, none of which was the fault of 4WP, I got the truck back yesterday. Damn the ride is smooth! It's a little less stable than before, so I think I want them to throw some caster back in (currently .1 - .2). And I believe there's too much preload as there appears some reverse rake. I'm sure some of it will drop out as the springs break in, but I'll have them address it on the follow-up appointment in a couple weeks.
Sorry about bad pics, was in a rush to get to work.
20190626_134845.jpg
20190626_134906.jpg
 

Attachments

  • 20190626_134906.jpg
    20190626_134906.jpg
    77.5 KB · Views: 1,406
  • 20190626_134845.jpg
    20190626_134845.jpg
    73.8 KB · Views: 1,428
Last edited:

Members online

Forum statistics

Threads
278,307
Messages
3,554,049
Members
248,016
Latest member
Advally Service

Trending content

Back
Top